

Transcripted Summary
Hi everyone and welcome. In this chapter we will talk about setting up Espresso.
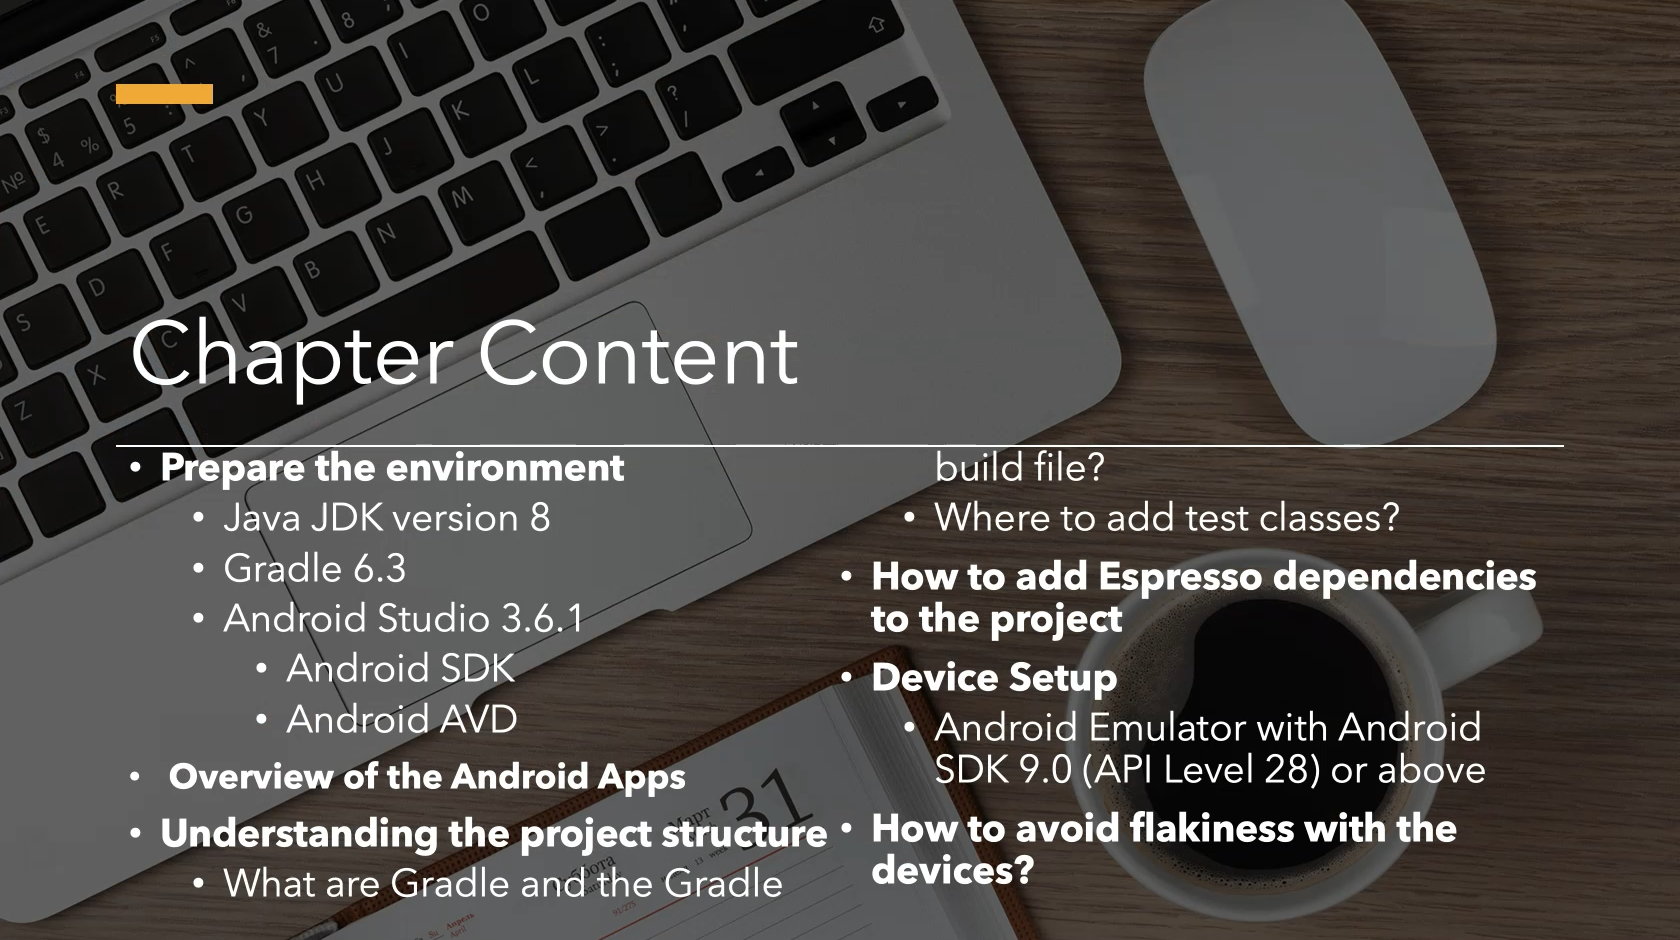
Let’s discuss the preparation of our environment by installing Java JDK, Gradle and Android Studio (including Android SDK and the Android AVD).
Then we will examine the project structure of an Android application and understand the function of Gradle as well as the purpose of the Gradle build file.
After that, we will learn about where to add our test classes, how to set up Android Emulator with Android SDK and how we can avoid flakiness with devices.
In this chapter, we will prepare development environments for Windows OS and macOS but the latter will be used as our default environment in subsequent chapters.
# Installing Java JDK
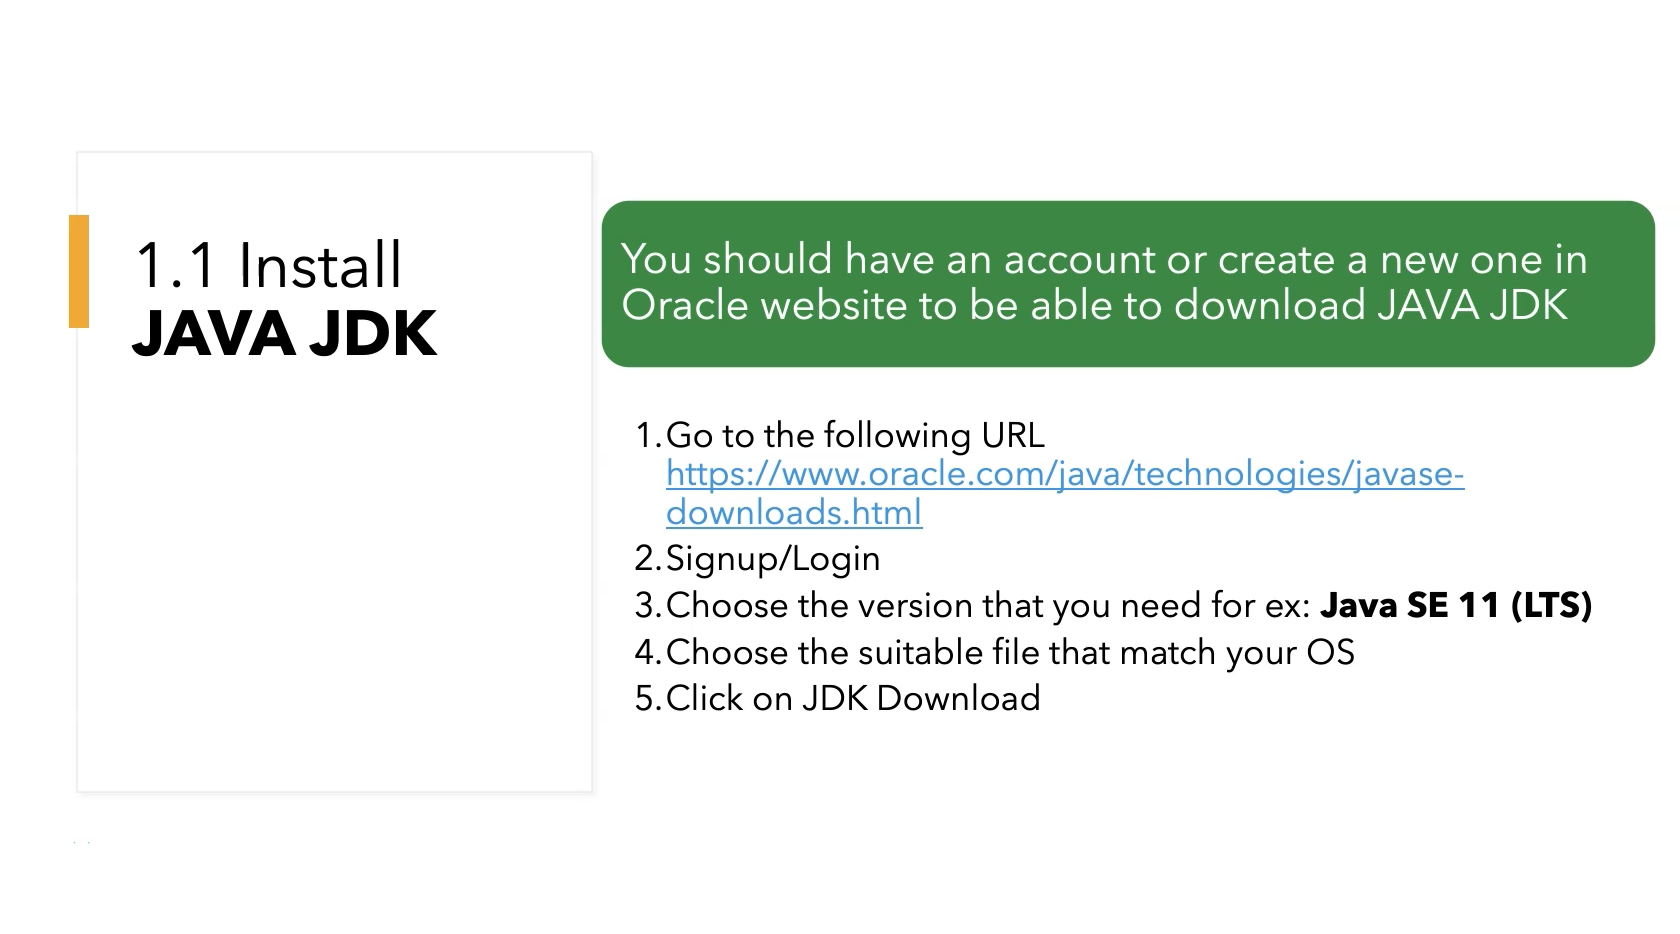
We will start by installing the Java JDK. If you do not already have an account you must create a new one from Oracle’s website to download Java JDK.
Visit the download link for Java SE 11 (LTS), choose the appropriate download for your operating system and complete the installation.
# Gradle
Gradle is a build tool with a focus on build automation and support for multi-language development.
Gradle offers a flexible model that can support the entire development lifecycle, from compiling and packaging code to publishing websites.
Gradle supports build automation across multiple languages and platforms including Java, Scala, Android, C/C++ and Groovy.
Gradle runs on most operating systems and only requires a Java JDK version of 8 or higher.
# Android Studio
Android Studio provides a complete Integrated Development Environment (IDE) including an advanced code editor and a set of app templates.
In this course there is no need to install additional IDEs like IntelliJ or Eclipse. Android Studio will be our main IDE for developing and writing test automation scripts using Espresso. It contains tools for development, debugging, testing and is optimized for responsiveness.
With Android Studio you can test your apps with a large range of preconfigured emulators or with your own mobile device, build production applications, and publish applications to the Google Play Store.
# Preparing the Environment (macOS)
Let’s prepare our macOS environment by installing Java, Gradle and Android Studio.
Installing Java (macOS)
Navigate to the Java JDK download page with your favorite browser.
Choose the version that you need to install. In our case we will install Java SE 11 (LTS), or Long-Term Support.
Choose the appropriate file for your operating system (macOS in this case). The file can be downloaded as a "DMG" file or as a macOS compressed archive but we will choose the latter option for this example.
Accept the agreement to download the file. Remember that you must be logged into your account or create a new account in order to download the file.
After the download is finished, extract the archive file contents.
Open a terminal and view the "JavaVirtualMachines" directory by executing the following command:
open /Library/Java/JavaVirtualMachinesCopy the contents of the extracted archive to the open "JavaVirtualMachines" folder.
Now let’s pause here to export the
$JAVA_HOMEvariable in our profile. The exact syntax used in the next command will depend on your machine. It could be~/.bash_profileor~/.profile. The profile in this example is~/.zshrcbecause I am using the iTerm terminal. Open the profile for editing with "vi":
vi ~/.zshrcIn the profile we need to add the following line:
export JAVA_HOME=/Library/Java/JavaVirtualMachines/jdk-11.0.7.jdk/Contents/Home
Already have Java installed?
If a previous version of Java is installed, this line may already exist. In that case only the jdk version needs to be updated.
Save the changes. To apply the new settings, run the following command:
source ~/.zshrcFinally, run one or both of the following commands to verify that the Java version is correct:
java -version
javac -version
Installing Gradle (macOS)
Navigate to the Gradle installation page with your favorite browser. Notice that Gradle requires a Java JDK or Java JRE version of 8 or higher to be installed.
For macOS users, we can install Gradle by using the package manager "Homebrew". Execute the following console command:
brew install gradleAfter the installation is finished we can confirm the installation by opening the console and running the following command to display version information:
gradle -v
Installing Android Studio (macOS)
Navigate to the Android Studio developer’s site with your favorite browser.
Find the download link for the latest version of Android Studio for your operating system. Then follow instructions to download and install Android Studio by accepting the end user agreement.
After the file download is finished, double click on the "DMG" file and drag and drop the Android Studio icon into the Applications folder.

Accept the default configurations for all steps and ensure that all components are selected for installation. After that, we will wait until the installation is finished before using Android Studio. After installation is complete the Setup Wizard will download and install some additional components including the Android APK. Be patient, this may take some time depending on your internet speed.
- When these downloads are completed, Android Studio will restart. You are ready now to create your first project!
# Preparing the Environment (Windows)
Now we will prepare the environment for Windows OS users by installing Java, Gradle and Android Studio.
Installing Java (Windows)
Navigate to the Java JDK download page with your favorite browser.
Choose the version that you need to install. In our case we will install Java SE 11 (LTS), or Long-Term Support.
Choose the appropriate file for your operating system (Windows in this case). The file can be downloaded as an installer or a compressed archive but we will choose the latter option for this example.
Accept the licensing agreement to download the file. Remember that you must be logged into your account or create a new account in order to download the file.
Create a new directory for the installation. In this example, a new directory "JDK" is created at "C:\JDK". Navigate to the directory where the Java JDK was downloaded and extract the archive contents into our newly created "JDK" directory. The directory path "C:\JDK\jdk-11.X.X" should now exist.
Now the
$JAVA_HOMEand$PATHenvironment variables need to be manually configured to reference our new "JDK" directory. In Windows Search, search for the entry "Edit the system environment variables" and click on it to bring up a system dialog.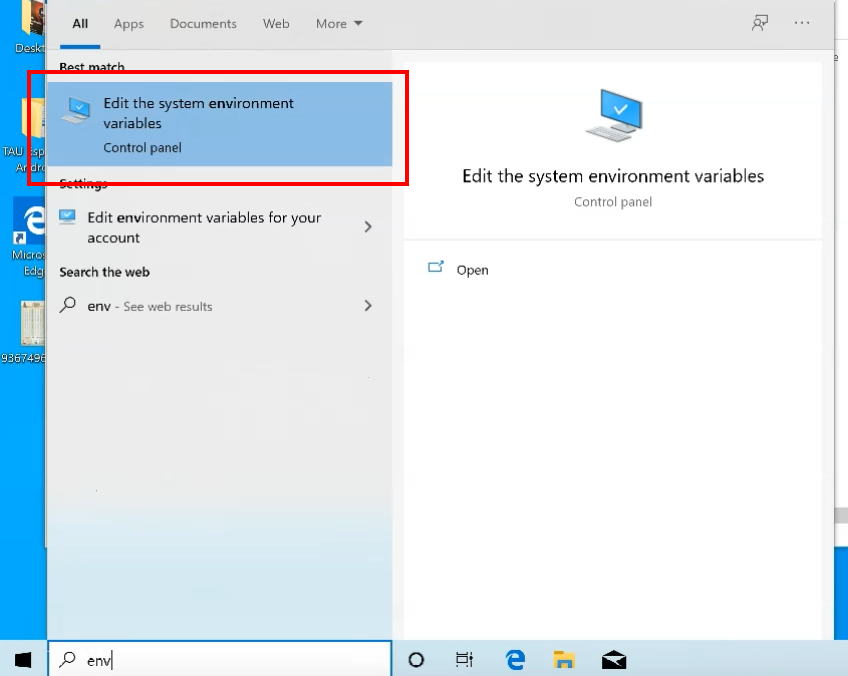
Click on the "Environment Variables" button, then click on the "New…" button to add a new system variable.
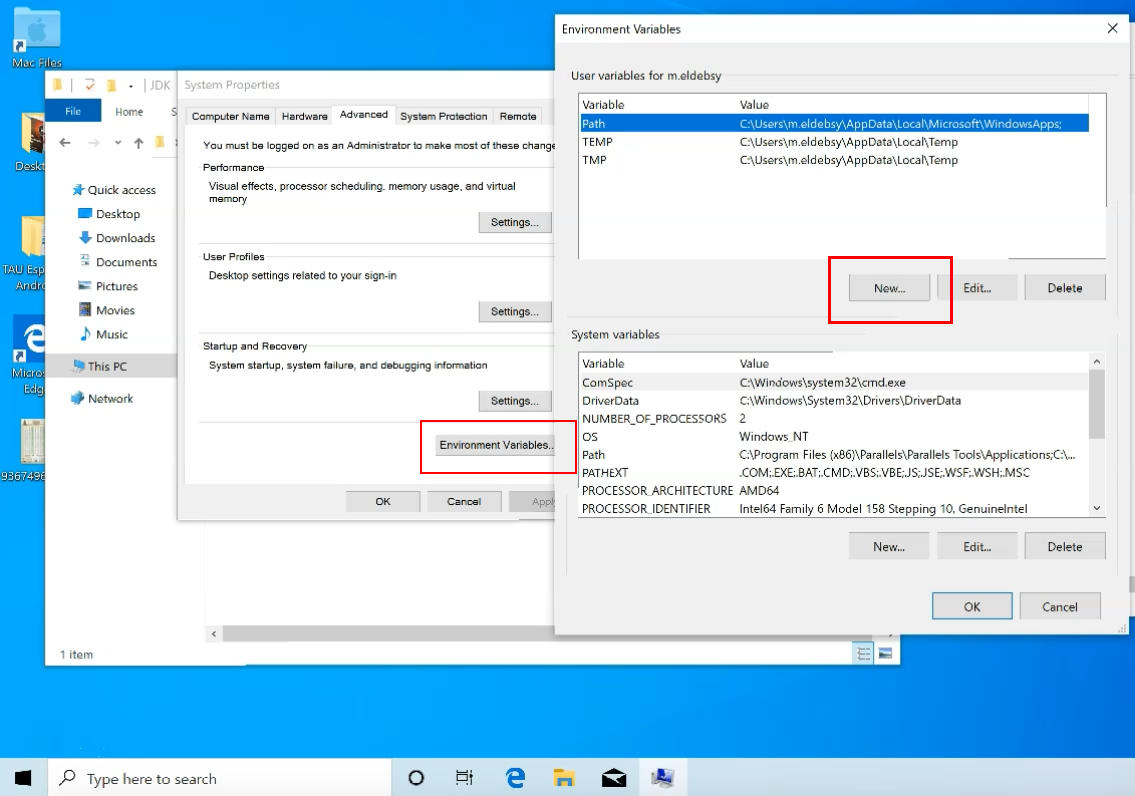
Call the new variable
JAVA_HOMEand set the value to the newly created JDK directory path. Click "OK" to save the changes.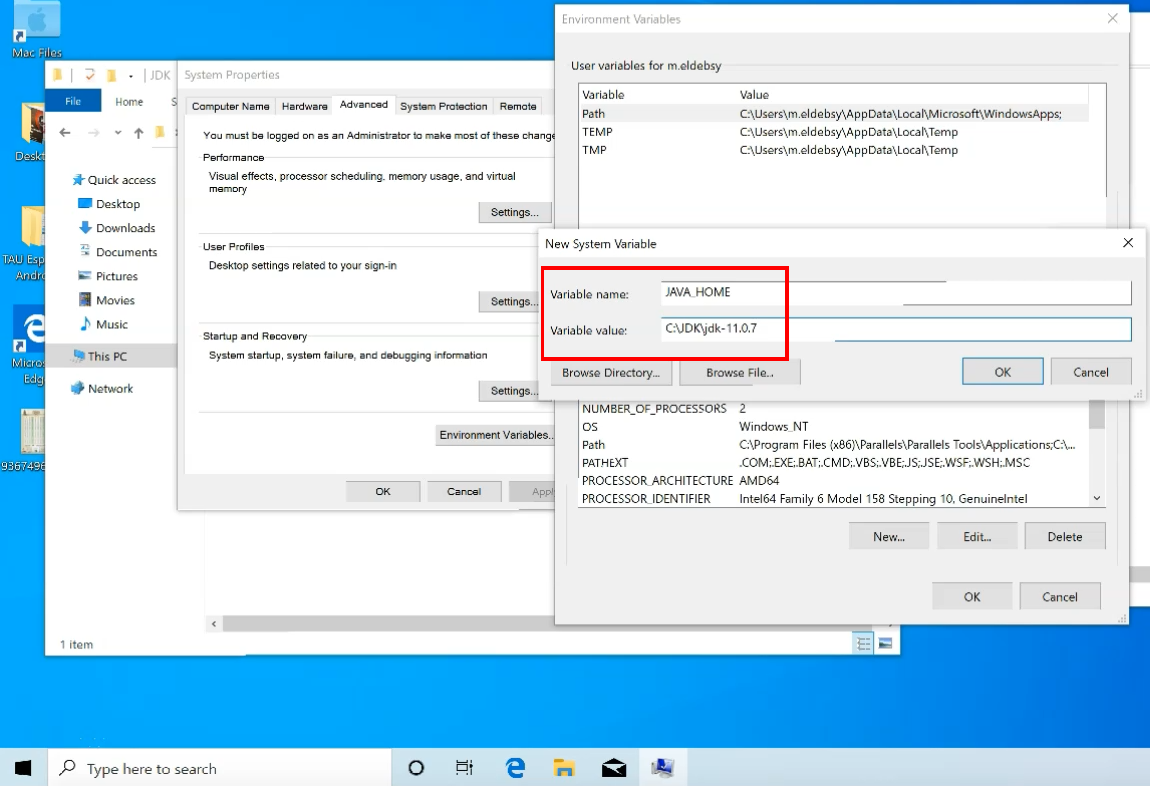
The
$JAVA_HOMEenvironment variable value must also be added to the$PATHvariable. Edit the value of$PATHby double-clicking on the "Path" system variable.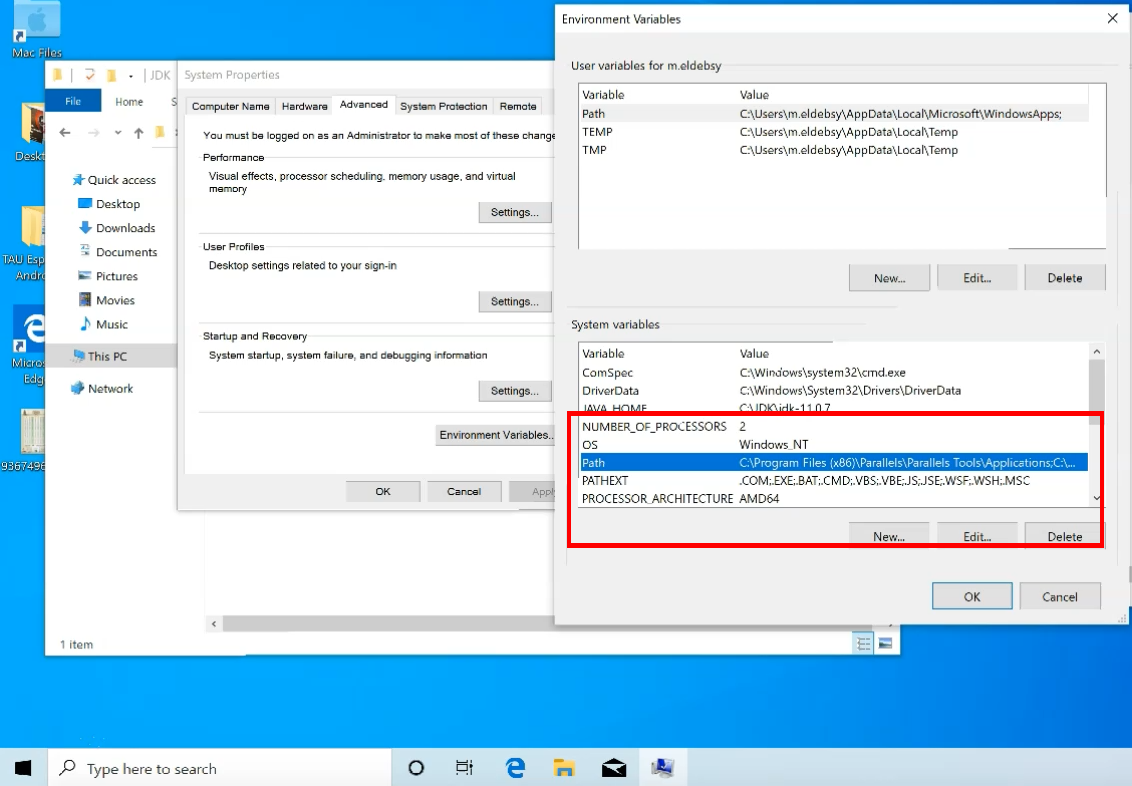
Click "New" and add our Java environment variable, taking care to append "\bin" to the value.
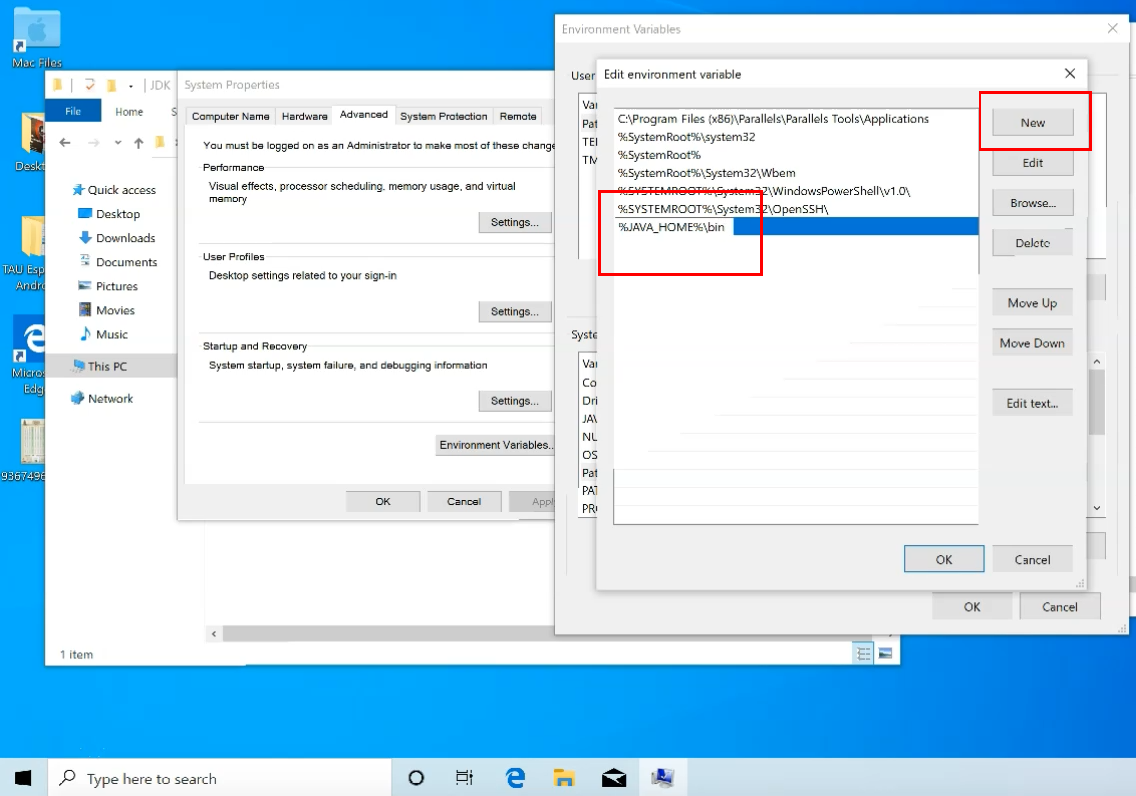
Click "OK", then click "OK" again to save the changes.
Finally, confirm the changes by opening a console prompt and executing one or both of the following commands to view the Java version.
java -version
javac -version
Installing Gradle (Windows)
Navigate to the Gradle installation page with your favorite browser. Notice that Gradle requires a Java JDK or Java JRE version of 8 or higher to be installed.
Download the latest Gradle distribution. Distributions come in two flavors, binary-only (bin) or complete (all) with docs and the sources. For this example we will choose the binary-only files.
Create a new directory for the installation. In this example, a new directory "Gradle" is created at "C:\Gradle". Navigate to the directory where the Gradle binary was downloaded and extract its contents into the new "Gradle" folder. The directory path "C:\Gradle\gradle-X.X/bin" should now exist. Note that "X.X" should be replaced with the specific gradle version.
Now we need to manually configure the Windows
$GRADLE_HOMEand$PATHenvironment variables to reference Gradle’s home directory.In Windows Search, search for the entry "Edit the system environment variables" and click on it to bring up a system dialog.
Click on the "Environment Variables" button, then click on the "New…" button to add a new system variable.
Call the new variable
GRADLE_HOMEand set the variable value to the newly created Gradle directory path. Click "OK" to save the changes.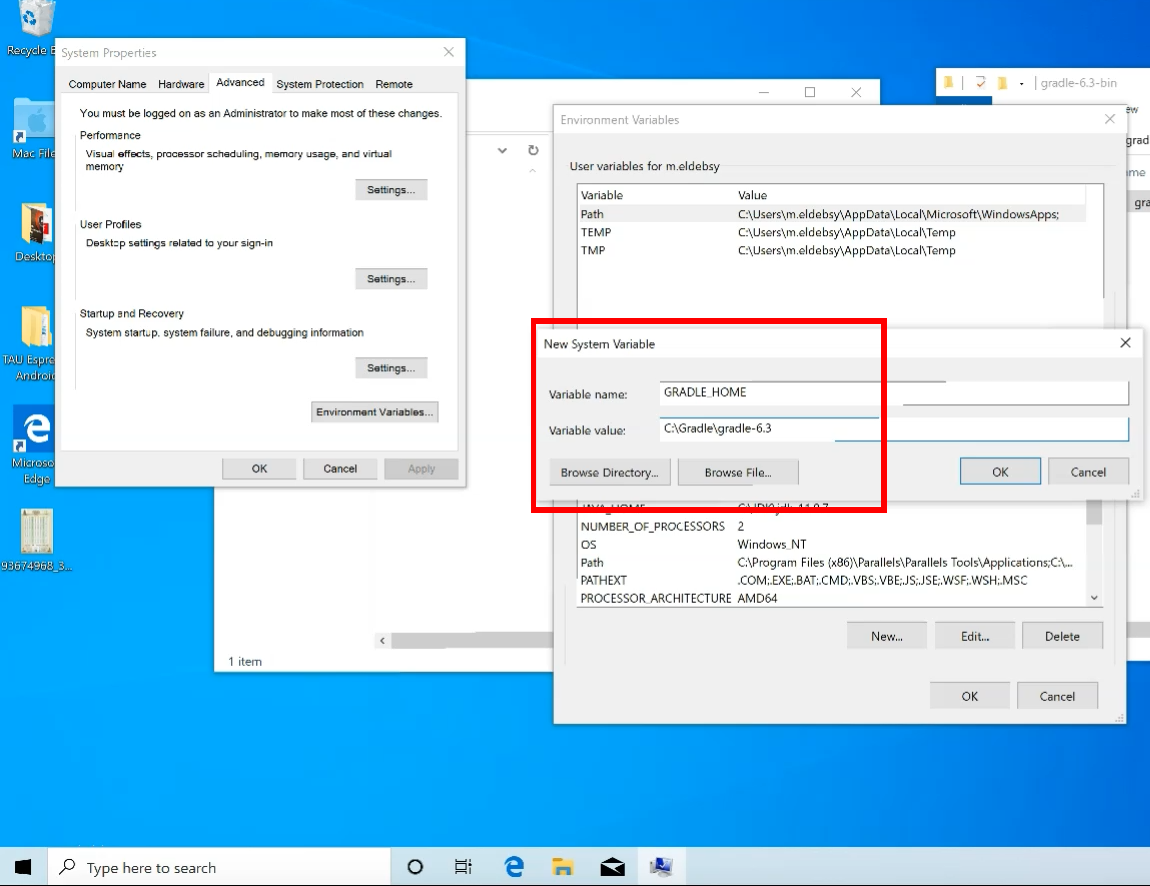
The
$GRADLE_HOMEenvironment variable value must also be added to the$PATHvariable. Edit the value of$PATHby double-clicking on the "Path" system variable.Click "New" and add our Gradle environment variable, taking care to append "\bin" to the value.
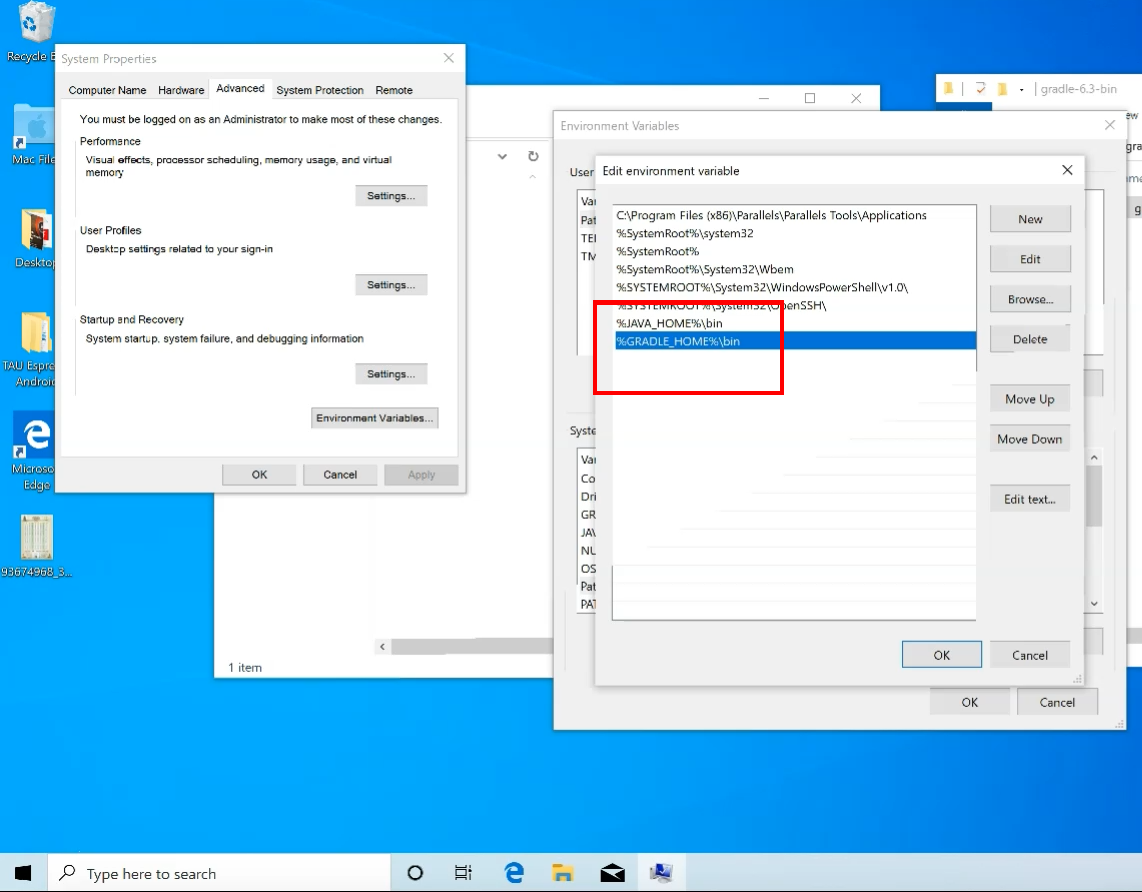
Click "OK", then click "OK" again to save the changes.
Finally, confirm the changes by opening a console prompt and executing the following command to verify the Gradle version.
gradle -v
Installing Android Studio (Windows)
Navigate to the Android Studio developer’s site with your favorite browser.
Find the download link for the latest version of Android Studio for your operating system. Then follow instructions to download and install Android Studio by accepting the end user agreement.
After the file download is finished, double click on the executable file to install Android Studio. Accept the default configurations for all steps and ensure that all components are selected for installation.
After that, we will wait until the installation is finished before using Android Studio. After installation is complete the Setup Wizard will download and install some additional components including the Android SDK. Be patient, this may take some time depending on your internet speed.
When these downloads are completed, Android Studio will restart. You are ready now to create your first project!
# Virtual vs. Physical Devices
What is the difference between virtual and physical devices?
Emulators or virtual devices are usually virtualized mobile devices.
A good emulator precisely simulates the operating system of a physical device being emulated and is a good option for mobile testing.
Emulators do have some limitations emulating hardware components such as Bluetooth, GPS, and cameras.
Testing on physical devices is a good idea when test results need to be as accurate as possible. In certain cases there simply is no substitute for testing using the actual device on which your software will run.
# Emulator Setup
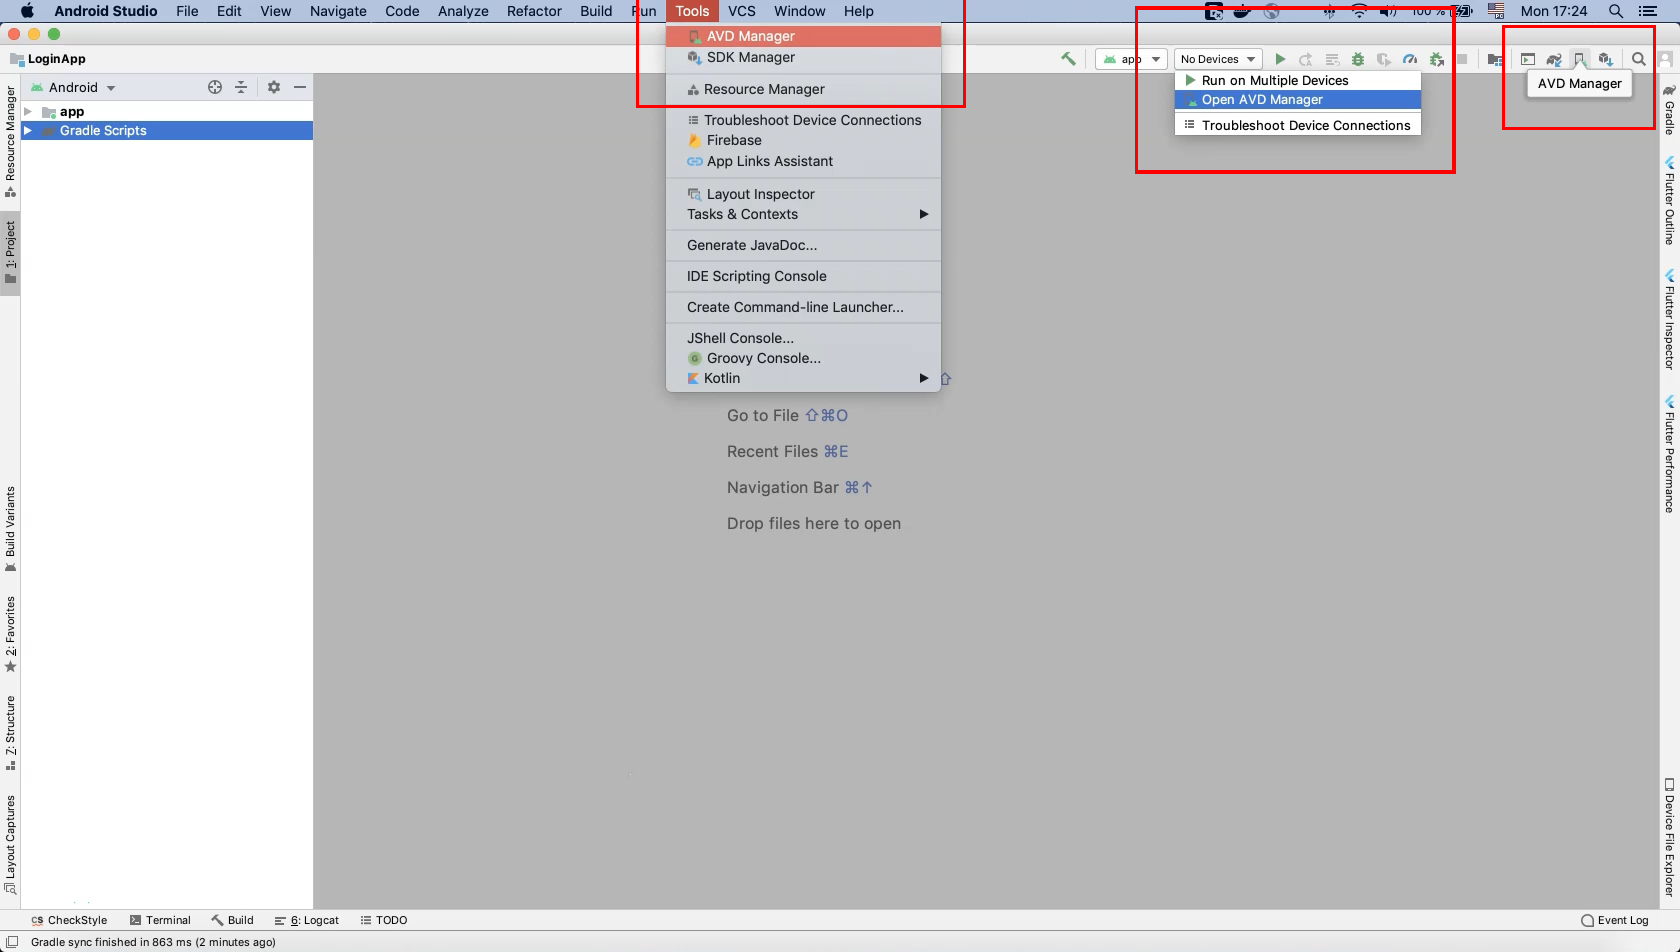
Within Android Studio, setting up an Android emulator can be done from three places.
- From the "Tools" menu we can select the "AVD Manager".
- From the target devices dropdown we can select "Open AVD Manager"
- There is also a dedicated "AVD Manager Icon that can be clicked.
If you open AVD Manager for the first time and don't have any previous devices installed, you can click on "+Create Virtual Device."
Select the hardware first, then select the operating systems to be installed on the device. For example, here I will select "Pixel XL" and after that I will select the system image for Android 9.0 (Pie).
Click "Next". The next screen allows you to edit the "AVD name" which will be useful for keeping track of which versions are installed on a given virtual device. Amongst other things, the startup orientation can also be configured as landscape or portrait.
Finally, click on "Finish" to finalize the creation of this Android Virtual Device (AVD). From this next screen, you can launch your emulator or edit various settings and options.
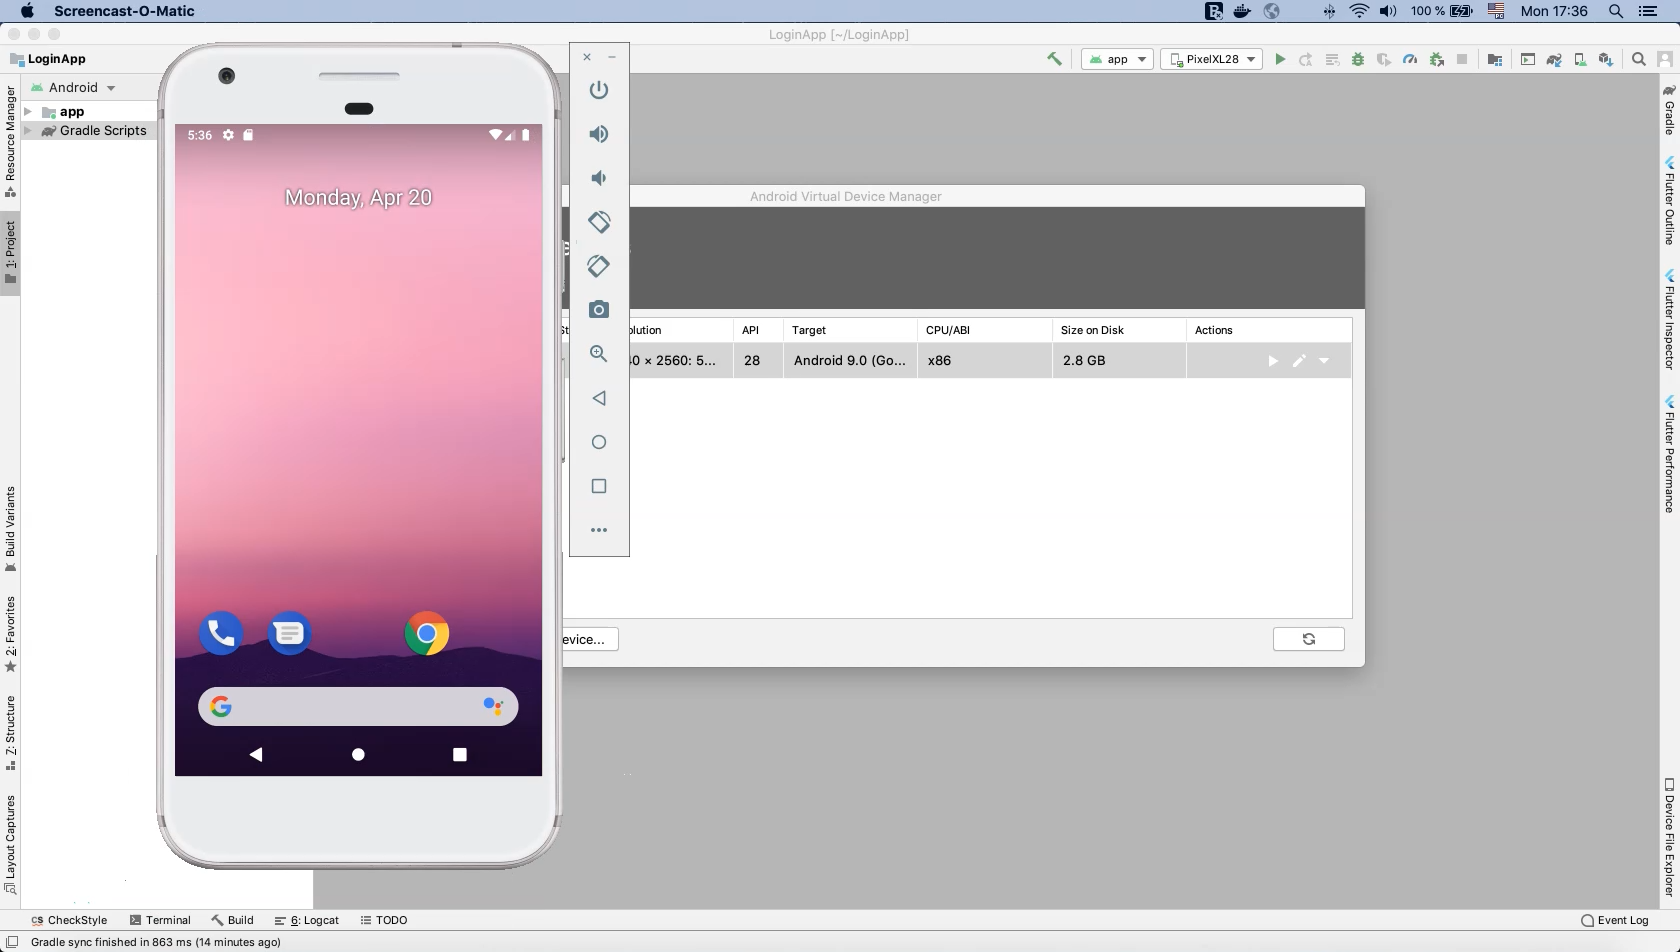
After confirming that the emulator loads successfully, the device is now ready to be used to run our test automation scripts.
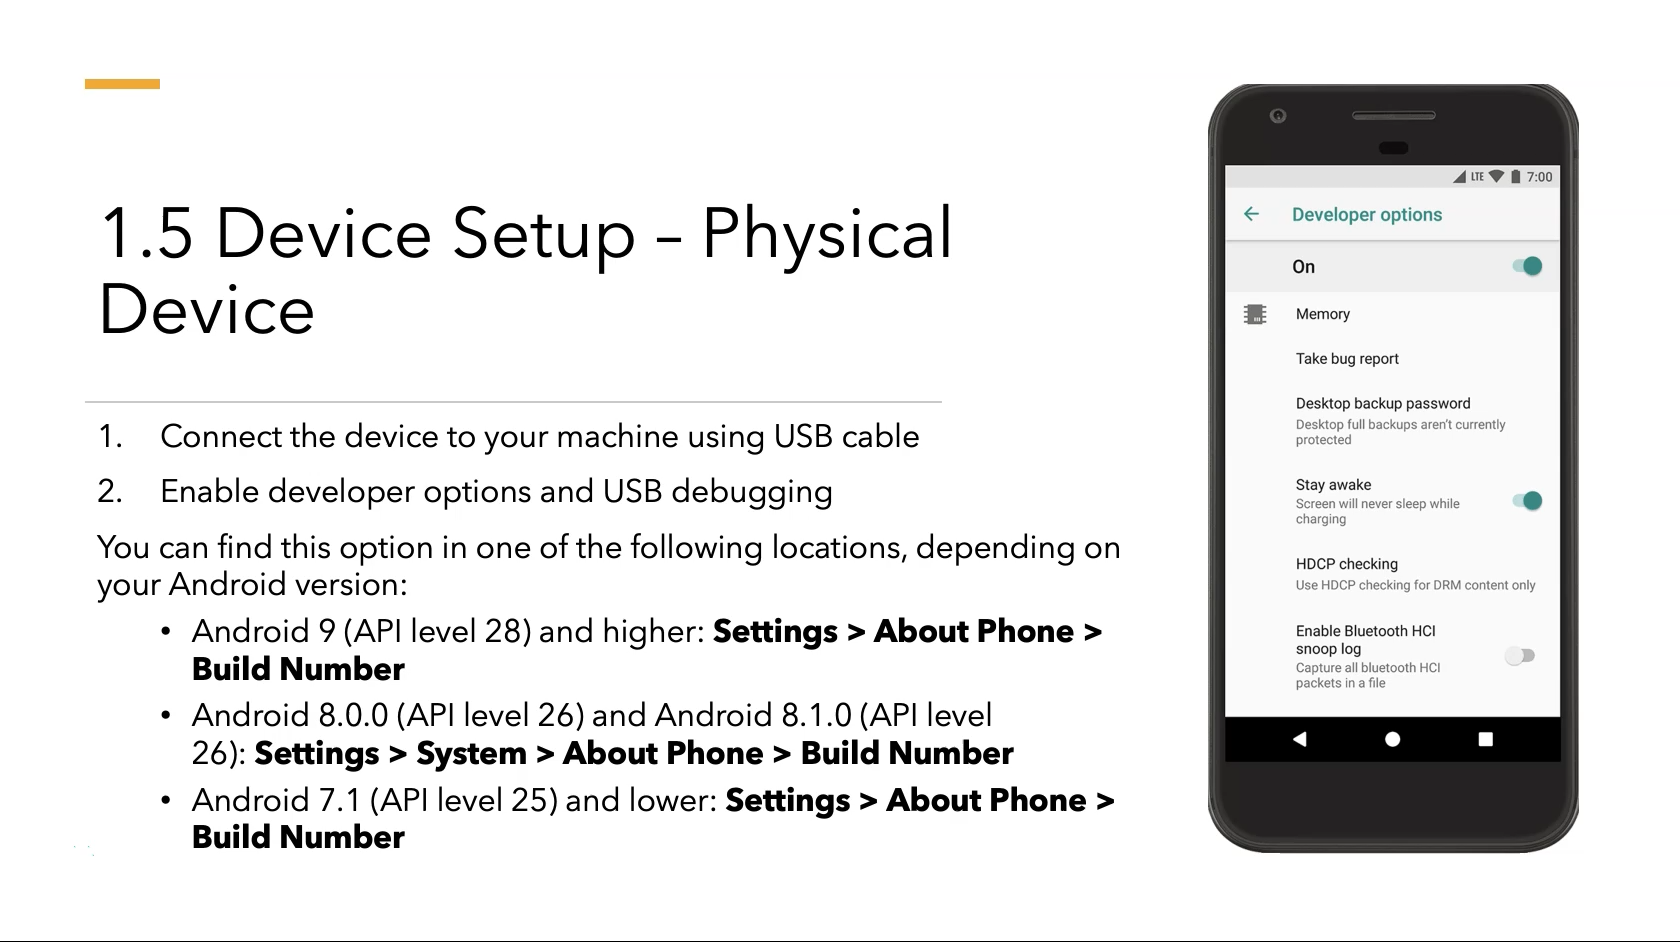
# Physical Device Setup
To set up a physical device, first connect the device to your machine using a USB cable.
Enable developer options and USB debugging. The location of this option will depend on your Android version.
# Android App Overview
In this course we will use several example Android applications for testing purposes. Different applications are built to demonstrate specific features including Drawers, RecyclerViews, Data Adapters, Idling Resources and Intents.
# How to Avoid Flakiness
Disable Animations
Disable system animations on virtual and physical devices during testing to minimize resource utilization and increase responsiveness. Relevant settings are found in the developer options and include disabling window animation scale, transition animation scale, and animation duration scale.
Resources
Quiz
The quiz for this chapter can be found in section 2.2
