

Transcripted Summary
# Espresso Step Definition
In this demo we will now write our espresso step definition file after finishing our feature file.
Right-click on the "com.sniper.bdd" folder under "java" and select "New > Package".
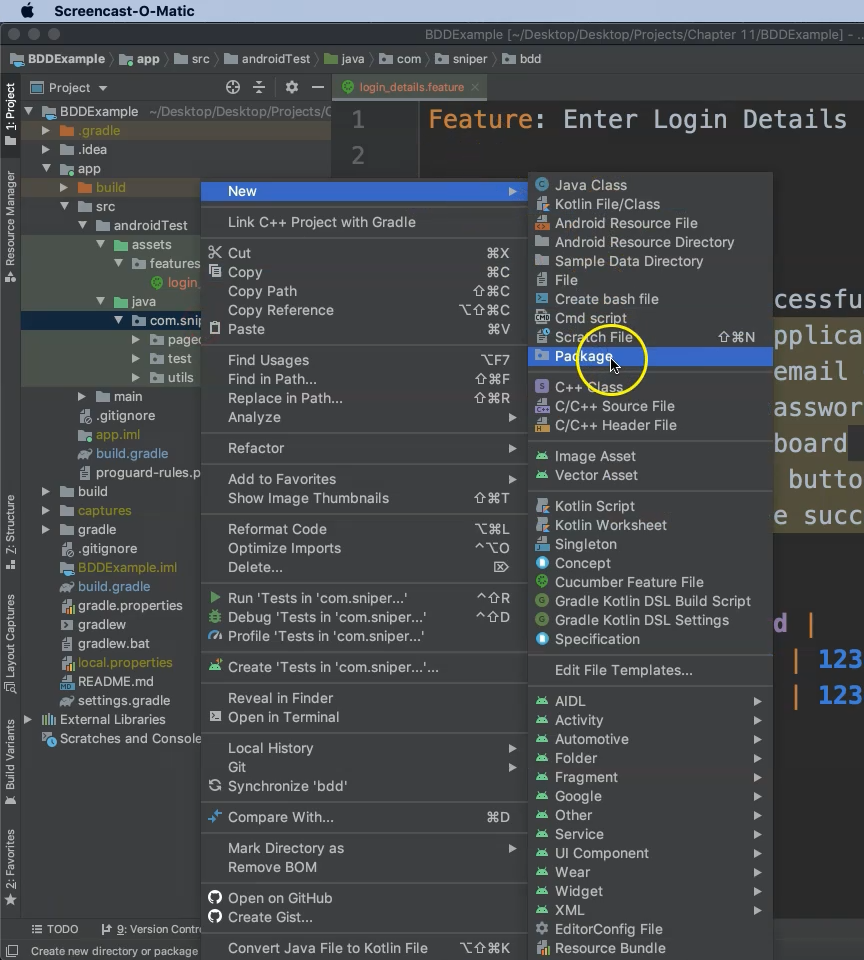
Name this new package "com.sniper.bdd.cucumber" and click "OK".
Now right-click on the new "cucumber" folder and select "New > Package" to create a new package for our step definition files.
Call this package "com.sniper.bdd.cucumber.steps." and click "OK".
Looking at our existing feature file ("login_details.feature") we can automatically generate stubs for the step definition file.
Click anywhere on the scenario code to highlight it, then use keyboard shortcut Option + Enter to display the following context menu.
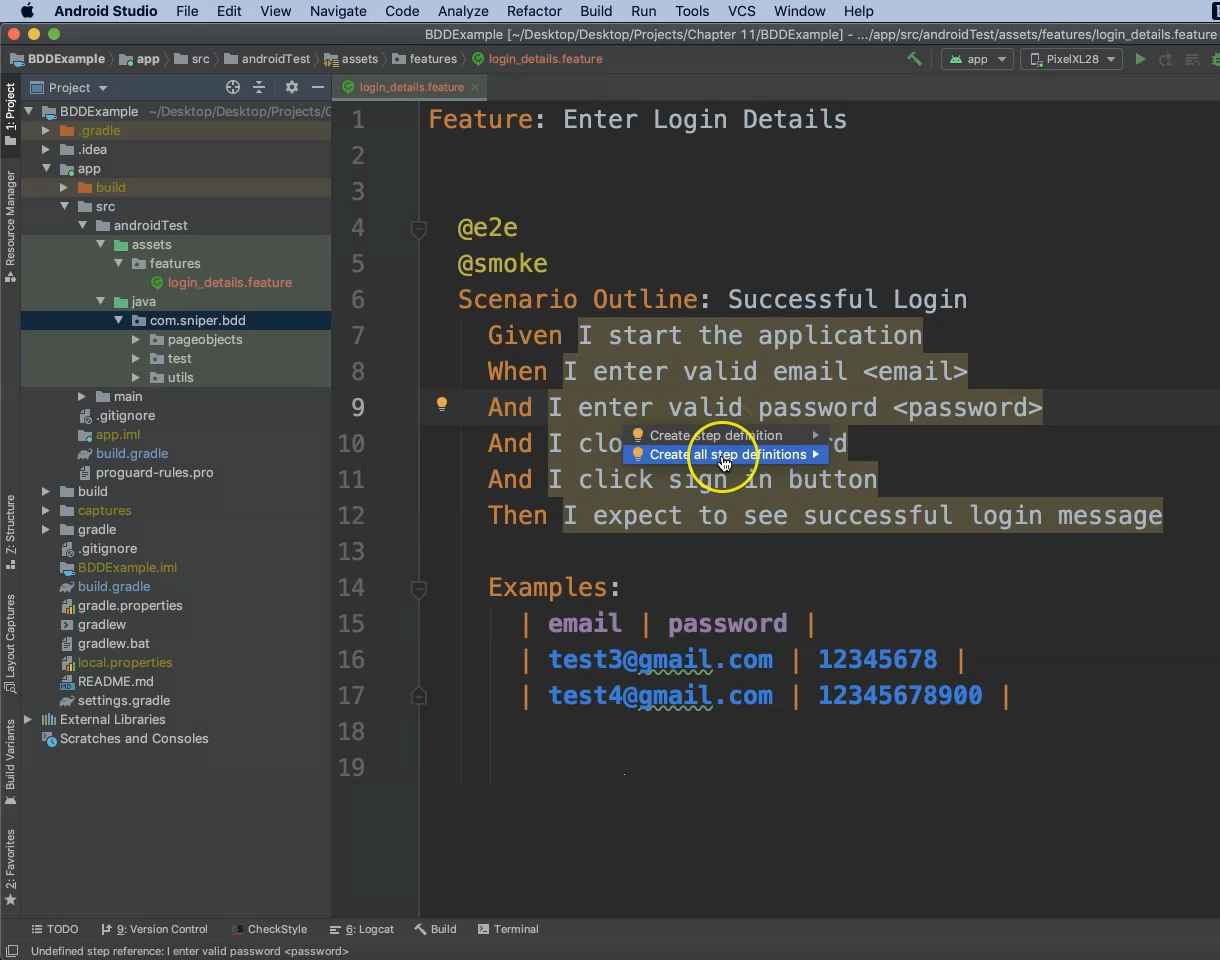
The first menu option will create only one step definition while the second option will create all of the step definitions for our feature file.
Select "Create all step definitions".
In the next menu set the file name as "LoginSteps", leave the file type as "Java" and set the file location to "androidTest > java > com > sniper > bdd > cucumber > steps". Now click "OK".
This generates our basic step definition class file and we can now write our code.
class LoginSteps {
    @Given("I start the application")
    public void iStartTheApplication() {
    }

    @When("I enter valid email <email>")
    public void iEnterValidEmailEmail() {
    }

    @And("I enter valid password <password>")
    public void iEnterValidPasswordPassword() {
    }

    @And("I close the keyboard")
    public void iCloseTheKeyboard() {
    }

    @And("I click sign in button")
    public void iClickSignInButton() {
    }

    @Then("I expect to see successful login message")
    public void iExpectToSeeSuccessfulLoginMessage() {
    }
}
We will begin by instantiating a new login object from our page object classes and initializing the activity test rule.
Don’t forget to import methods as needed (LoginScreen, LoginActivity, ActivityTestRule).
class LoginSteps {
    private LoginScreen loginObject = new LoginScreen();

    ActivityTestRule<LoginActivity> mActivityRule = new ActivityTestRule<>(LoginActivity.class,
        false, false);
    .
    .
    .
}
launchActivity
Note that the third argument of ActivityTestRule (boolean launchActivity) is false. We will not launch the activity from this test rule because we will launch it at the start of the application function.
Let’s add the code to start our application:
    @Given("I start the application")
    public void iStartTheApplication() {
        mActivityRule.launchActivity(new Intent());
    }
Now add the code to enter a valid email.
In our case we already have a function in the page object for entering email that we can use (loginObject.enterEmail()).
We need to pass the email string as a variable.
    @When("I enter valid email <email>")
    public void iEnterValidEmailEmail(String email) {
        loginObject.enterEmail(email);
    }
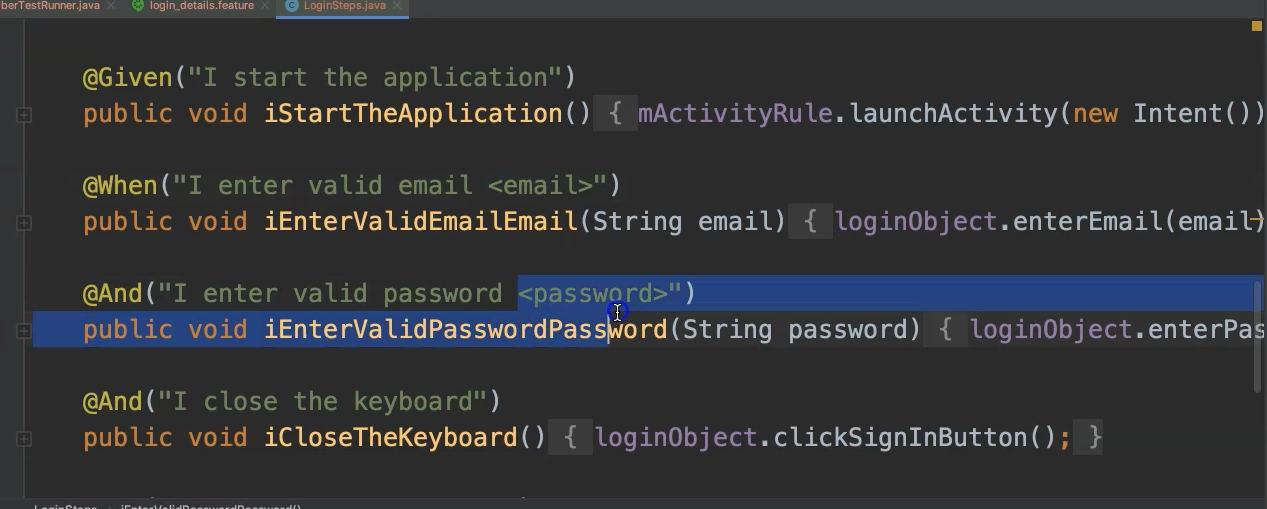
Similarly, we can reuse page object code to enter the password. We need to pass the password as a string.
    @When("I enter valid password <password>")
    public void iEnterValidPasswordPassword(String password) {
        loginObject.enterPassword(password);
    }
These data parameters will be pulled in from the Example table defined in the previous chapter.
To close the keyboard we also have an available page object method for use (loginObject.closeKeyboard()).
    @And("I close the keyboard")
    public void iCloseTheKeyboard() {
        loginObject.closeKeyboard();
    }
Clicking the "SIGN IN OR REGISTER" button comes next. We can use method (loginObject.clickSignInButton()) for this.
    @And("I click sign in button")
    public void iClickSignInButton() {
        loginObject.clickSignInButton();
    }
Finally, to verify login success use the method (loginObject.isSuccessfulLogin()). This method checks that the text is displayed on successful login.
    @Then("I expect to see successful login message")
    public void iExpectToSeeSuccessfulLoginMessage() {
        loginObject.isSuccessfulLogin();
    }
We still need one thing to complete our step definition.
Imagine a typical test scenario where the activity is initialized on application start, the username and password are entered, the "SIGN IN OR REGISTER" button is clicked and finally the verification text is displayed on successful login.
But if we wish to run this scenario with different sets of data this presents a problem because multiple test runs for different scenarios will initialize multiple activity instances.
We need to finalize each activity instance using an activity finisher.
Under the "utils" package of this project we find the "ActivityFinisher" class.
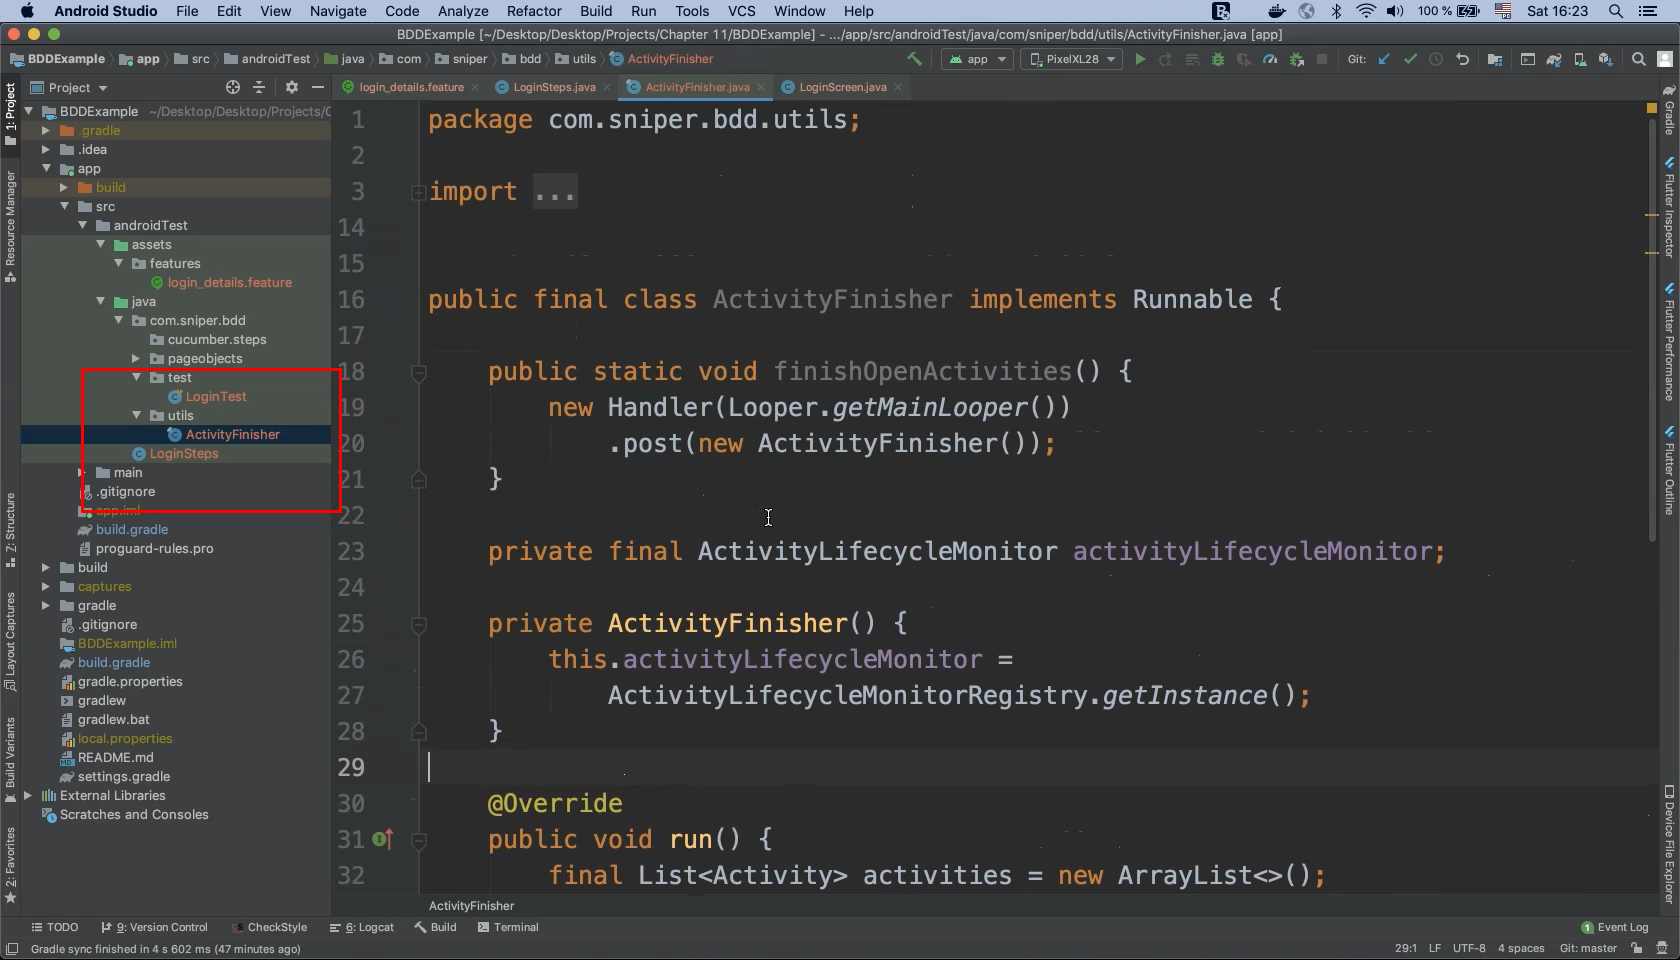
This class contains the logic to clean up an open activity.
We need to use it in conjunction with the @After annotation (not from JUnit but from cucumber.api.java.After) and the tearDown() method for our step definition.
class LoginSteps {
    private LoginScreen loginObject = new LoginScreen();

    ActivityTestRule<LoginActivity> mActivityRule = new ActivityTestRule<>(LoginActivity.class,
        false, false);

    @After
    public void tearDown() {
        ActivityFinisher.finishOpenActivities();
    }
    .
    .
    .
}
We also need to create a new class for Cucumber options which is essentially a properties file containing test settings for features, step definitions, and annotations.
Right-click on "test" and select "New > Java Class".
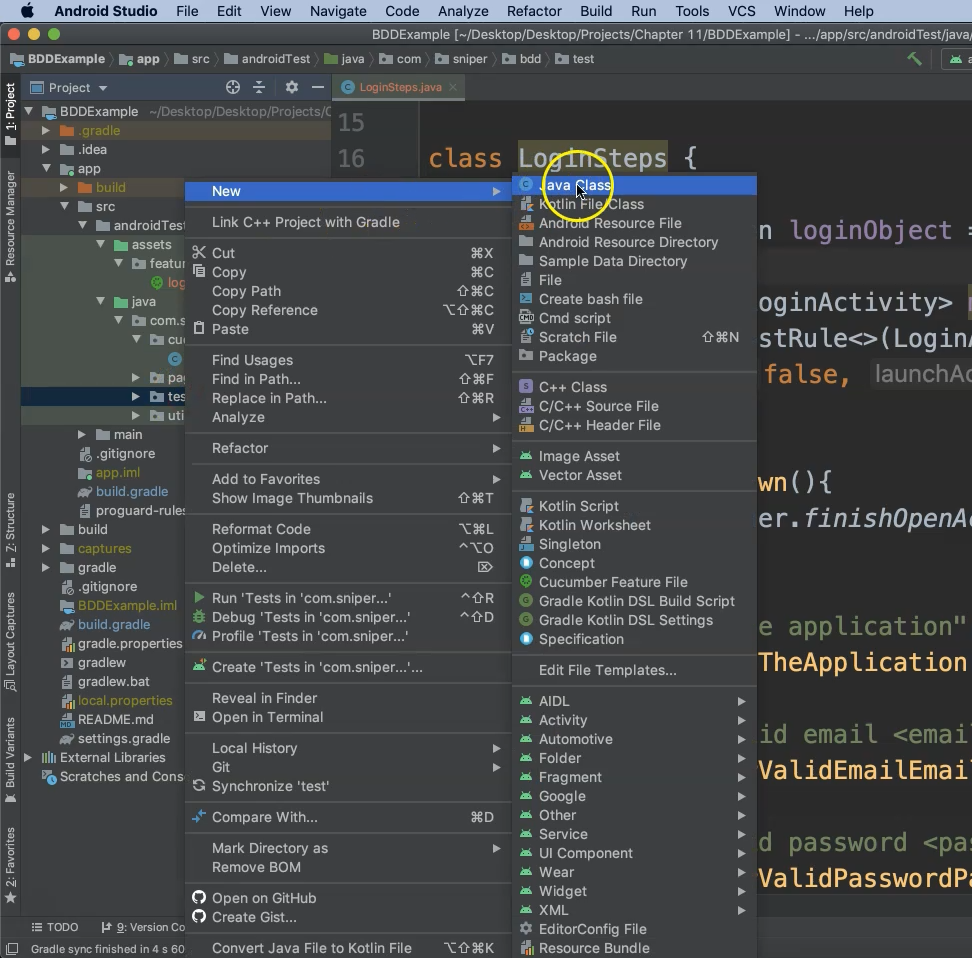
Name this new class "CucumberTestCase" and click "OK". In this class we will use specific annotations enabling Cucumber options to reference our feature files and step definitions.
First we will add the @CucumberOptions() annotation.
Into this we can pass any arguments related to BDD, features ("features") , step definitions ("glue"), tags ("tags"), or plugins.
package com.sniper.bdd.test;
import cucumber.api.CucumberOptions;

@CucumberOptions(features = {"features"},
    glue = {"com.sniper.bdd.cucumber.steps"},
    tags = {"@e2e", "@smoke"})

public class CucumberTestCase {

}
Step definition references generally require the full package name, e.g. "com.sniper.bdd.cucumber.steps".
Adding tags here also enables us to execute tests from the command line using different annotations.
Now we need to create a custom test runner to execute our step definition with our feature file.
This custom runner will override the default test runner already used in "build.gradle". So we will not use the following runner anymore:
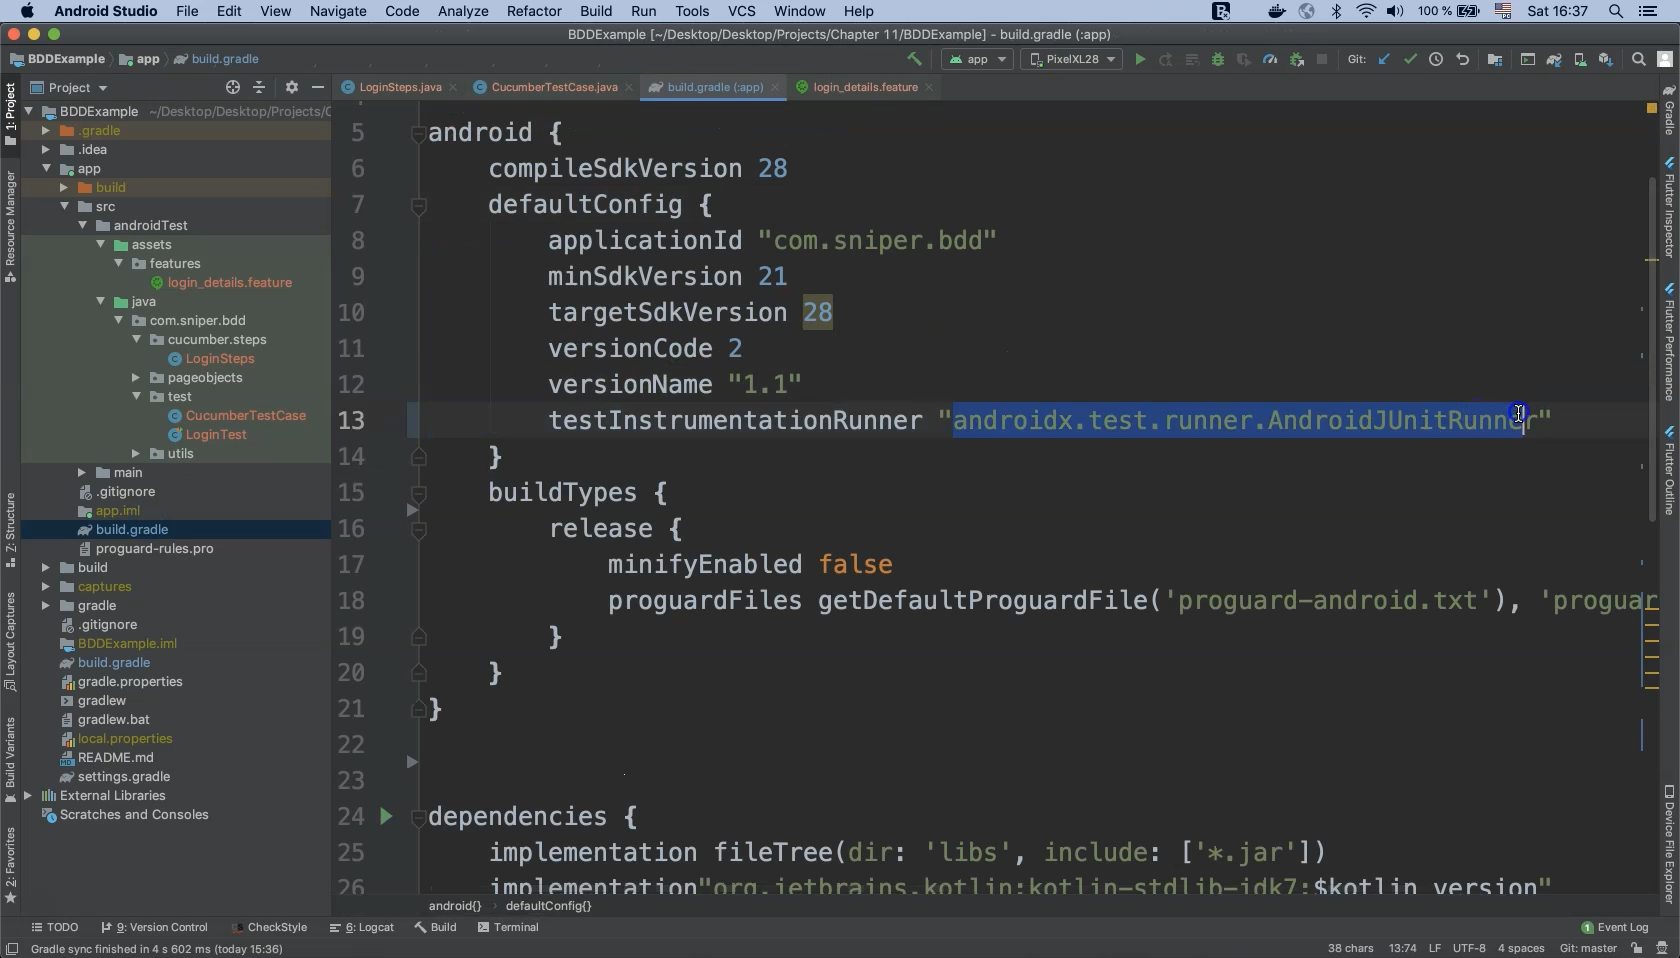
Right-click on "cucumber.steps" and select "New > Package".
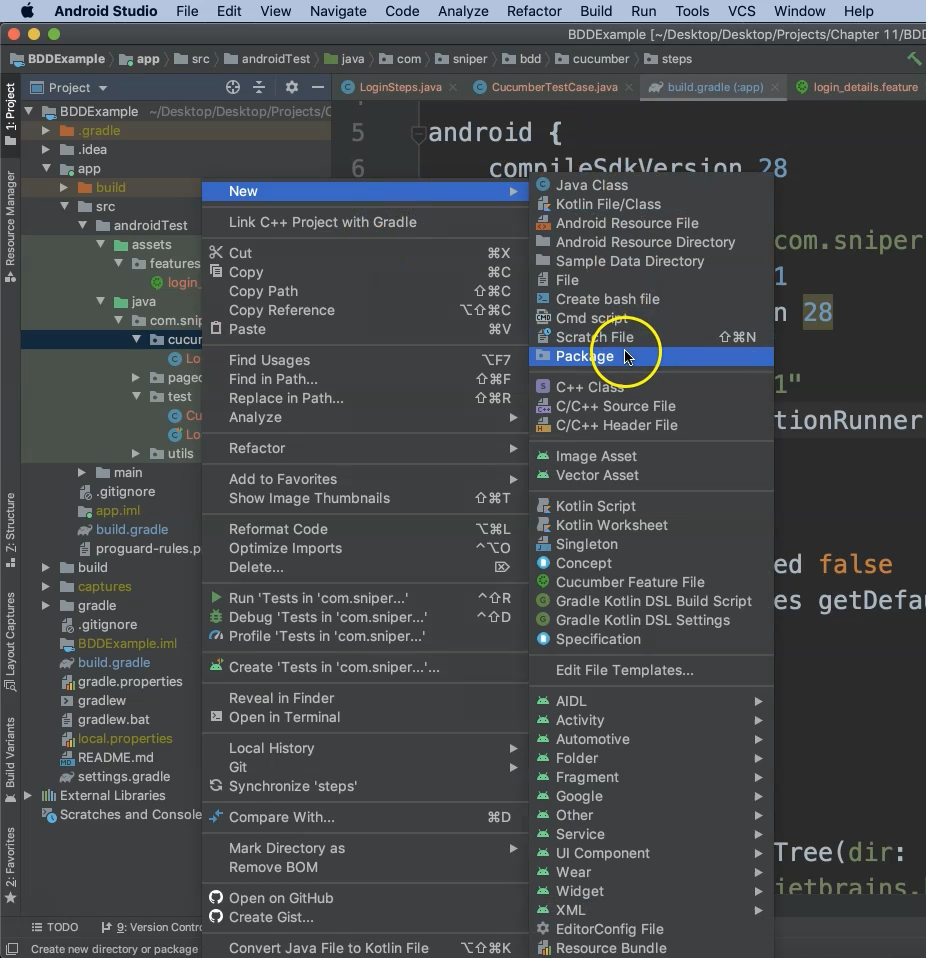
Name this new package "com.sniper.bdd.cucumber.runner". Now right-click on the "runner" package and select "New > Java Class".
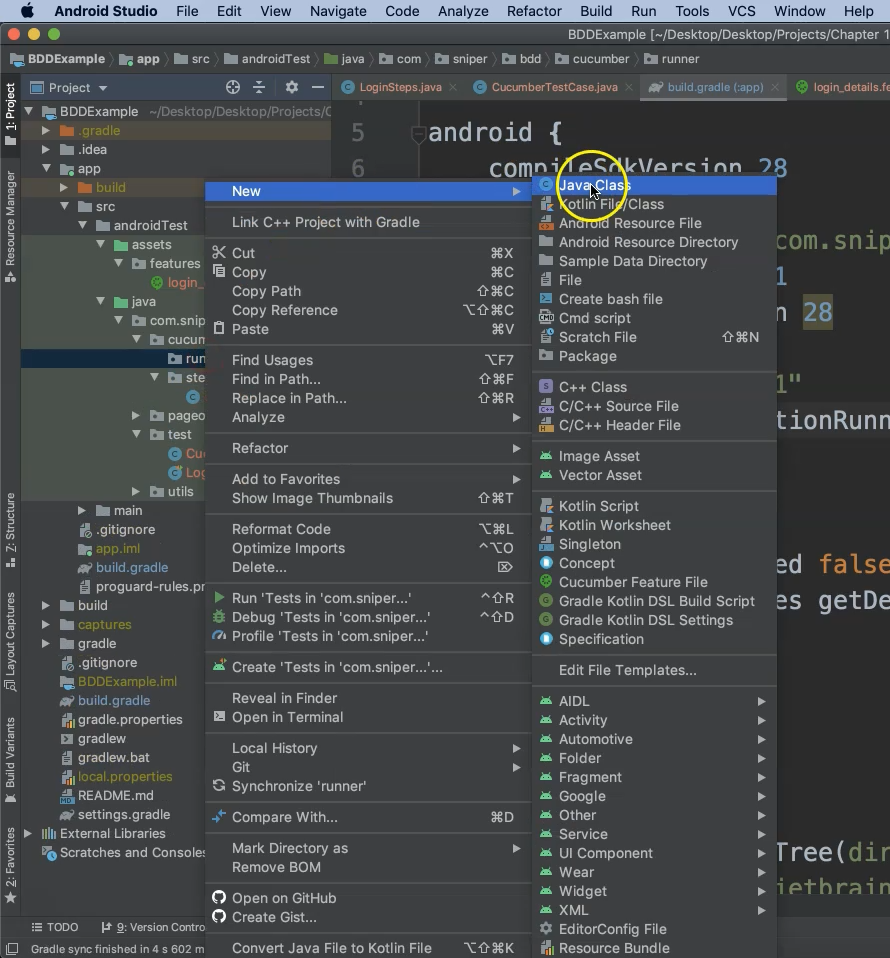
Name this class "CucumberTestRunner" and click "OK". This is our custom runner which extends "CucumberAndroidJUnitRunner"and will replace the default runner in "build.gradle".
This class will extend "CucumberAndroidJUnitRunner".
package com.sniper.bdd.cucumber.runner;

import cucumber.api.android.CucumberAndroidJUnitRunner;

public class CucumberTestRunner extends CucumberAndroidJUnitRunner {
}
We need to define two parameters, one for Cucumber tags and one for the scenario name so that we may pass these parameters from the command line when we begin running our test cases.
    private static final String CUCUMBER_TAGS_KEY = "tags";
    private static final String CUCUMBER_SCENARIO_KEY = "name";
Then we need to override CucumberAndroidJUnitRunner’s onCreate()method so that we can pass our arguments to it.
Add two string definitions, one for tags and one for the scenario. The values of these two variables will come from "build.gradle".
    @Override
    public void onCreate(Bundle bundle) {
        String tags = BuildConfig.TEST_TAGS;
        String scenario = BuildConfig.TEST_SCENARIO;
        super.onCreate(bundle);
    }
So when we begin building our application, the "build.gradle" file will pass its environment variables to our runner which will initialize them. Then we can use these tags in our test cases.
In our "build.gradle" file we need to make three changes.
First, we need to change the test runner from the default runner to our custom runner.
        testInstrumentationRunner ‘com.sniper.bdd.cucumber.runner.CucumberTestRunner’
        // testInstrumentationRunner "androidx.test.runner.AndroidJUnitRunner"
Click "Sync Now" to apply this change.

Second, we need to add the following two definitions to the "build.gradle" file.
def getTestTags() {
    project.getProperties().get(‘tags’) ?: ‘’
}

def getTestScenario() {
    project.getProperties().get(‘scenario’) ?: ‘’
}
Third, under "buildTypes" we need to add a debug entry in order to pass variables from CucumberTestRunner.
buildTypes {
    debug {
        buildConfigField ‘String’, ‘TEST_TAGS’. ‘"‘ + getTestTags() + ‘"‘
        buildConfigField ‘String’, ‘TEST_SCENARIO’, ‘"‘ + getTestScenario() + ‘"‘
    .
    .
    .
}
Click "Sync Now" to apply these changes to "build.gradle".
So we have our three changes.
Test instrumentation runner now uses our custom runner.
We added a "debug" build type which we will use often.
Finally, we added two "get" property definitions, one for retrieving test tags from the project properties as an environment variable and one to get the scenario.
These annotations and tags will be used with test runs executed from the command line.
Before we run our test we will briefly discuss Gradle and the Gradle Wrapper to understand how to build and run our application from the Gradle command line.
After that, we will run our tests from the command line using our tags and scenario annotations.
# What is Gradle CLI?
A command-line interface is one of the primary methods of interacting with Gradle.
Executing Gradle on the command line must conform to the following structure.
Options are allowed before and after task names.
gradle [taskName…] [--option-name…]
# What is Gradle Wrapper?
The recommended way to execute any Gradle build is with the help of Gradle Wrapper (just "Wrapper" for short).
The Wrapper is a script that invokes a declared version of Gradle and downloads it beforehand if necessary.
We can get up and running with a Gradle project quickly without having to follow manual installation processes which save time.
# Run Test using Custom Runner and Cucumber Tags
In this demo we will learn how to run our test cases using the custom runner we created for our Cucumber tests.
To run our system from the command line using Gradle Wrapper ("gradlew") execute the following statement:
./gradlew connectedDebugAndroidTest -Pcucumber -Ptags="@e2e"
So "connectedDebugAndroidTest" is a Gradle task that builds both the application under test and the test APK, installs them both on the device and executes the test.
Then we include parameters -Pcucumber as well as -Ptags which specifies the test type.
When we try to build our application there appears to be a build issue.
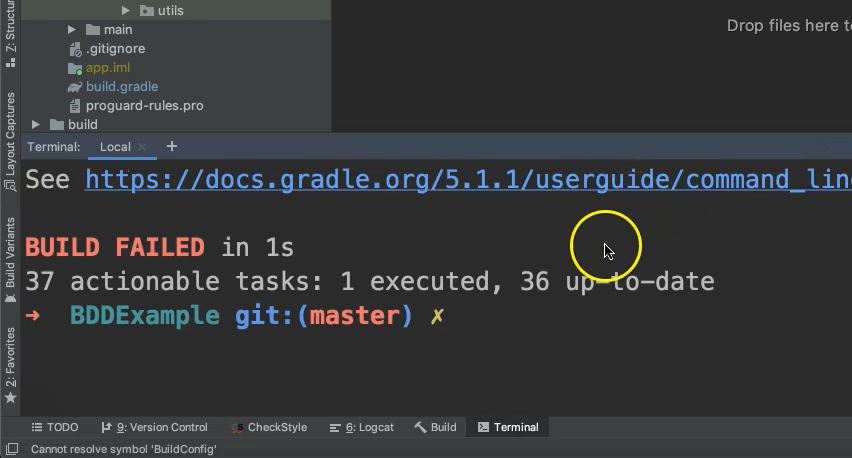
Let’s scroll up and review the terminal output.
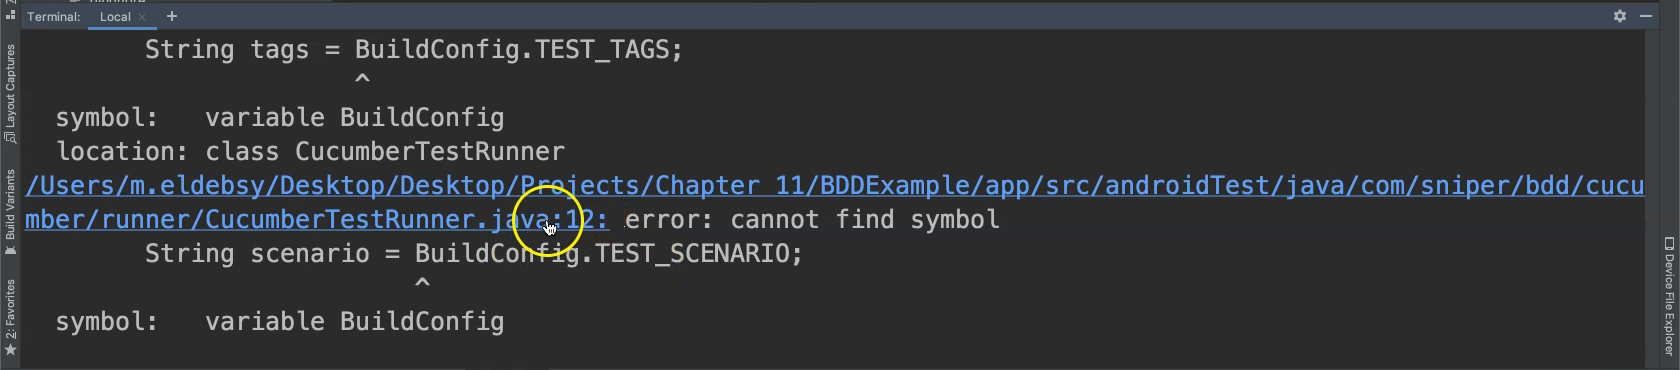
It looks like there is a problem with "BuildConfig.TEST_SCENARIO".
Click on the link to view "CucumberTestRunner.java".
The problem is that we forgot to import the "BuildConfig" class so let’s do that now.
After resolving our build issue we can try executing our command-line statement again.
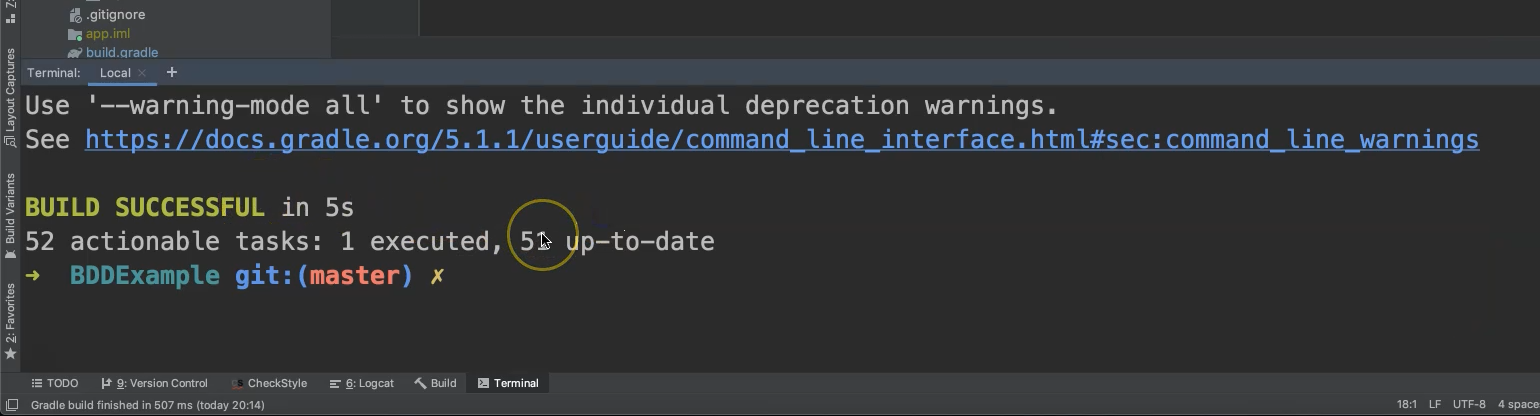
Now the build is successful but something is still wrong with the test execution.
The application opens but the test credentials are missing, i.e. we didn't enter the username and password.
Let’s scroll up and inspect the terminal output again.
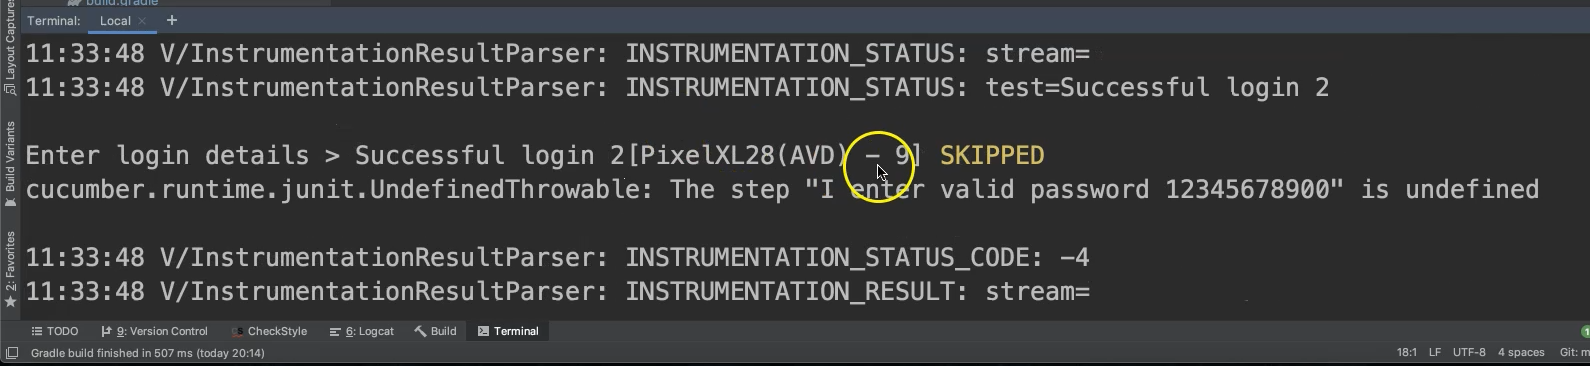
So here it says "SKIPPED" because something is throwing an undefined exception.
If we open our feature file we will see that Android Studio has flagged two lines as undefined.
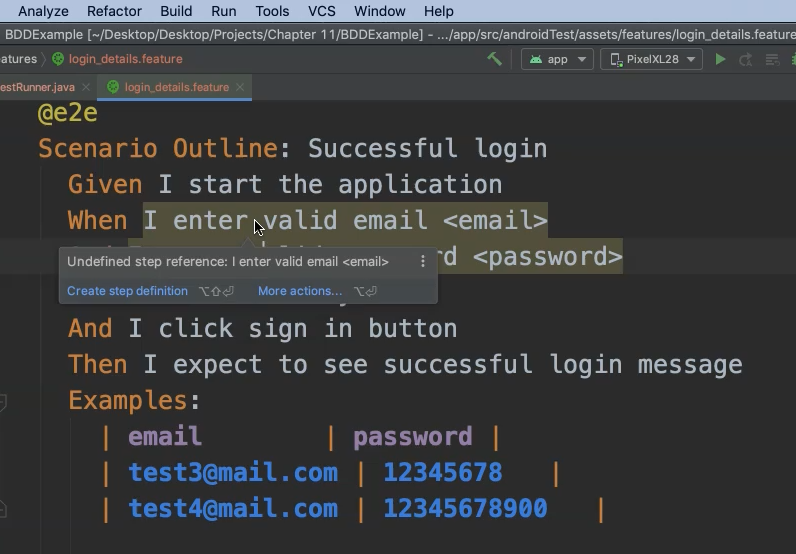
Let’s inspect the step definition file to see what the problem is.
It looks like we need to pass a regular expression for the username and password methods in order to use the Examples table data from the feature file.
    @When("I enter valid email (\\S+)$"))
    public void iEnterValidEmailEmail(String email) {
        loginObject.enterEmail(email);
    }

    @When("I enter valid password (\\S+)$"))
    public void iEnterValidPasswordPassword(String password) {
        loginObject.enterPassword(password);
    }
These two expressions will be replaced with data from the feature file while we are running the test cases.
Now let’s execute our command-line statement again and see what happens.
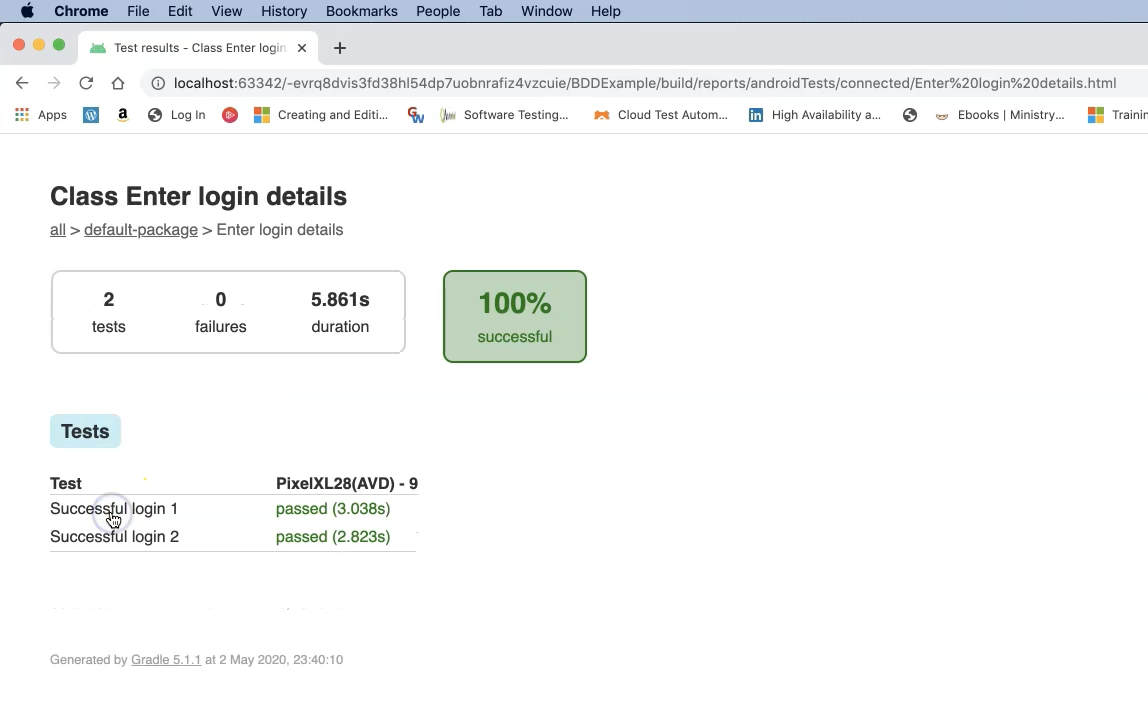
Observe that the test executes twice, one for each data set defined in the Examples table.
Now our test cases are running successfully and we have no outstanding problems with our feature file or step definitions.
Because we are running from the command line, we cannot check the test report from this path.
Under "build > reports > androidTests > connected" we will find "index.html".
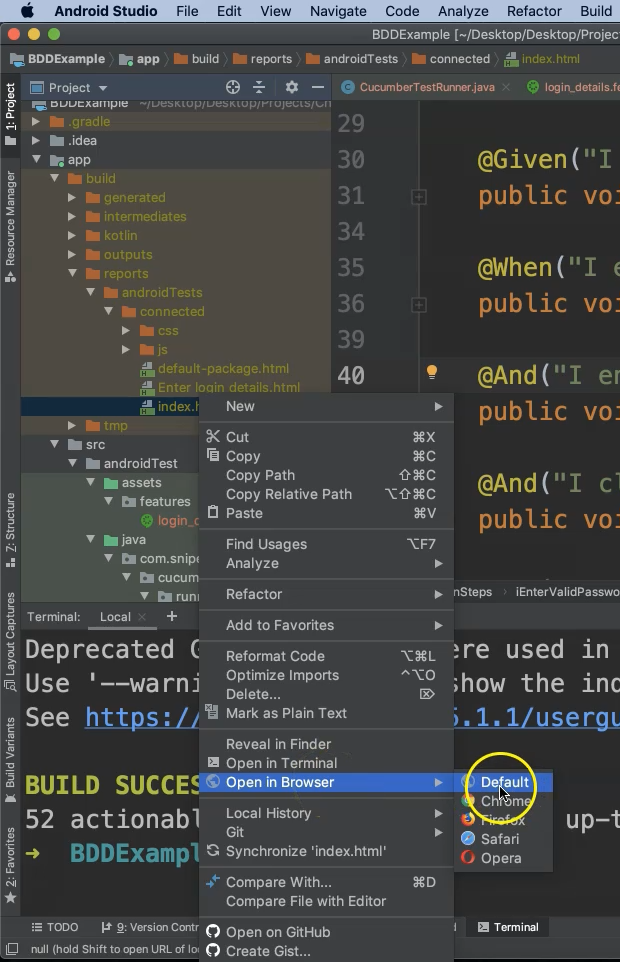
Right-click on "index.html" and select "Open in Browser" to view the test report from Gradle.
This is our default package:
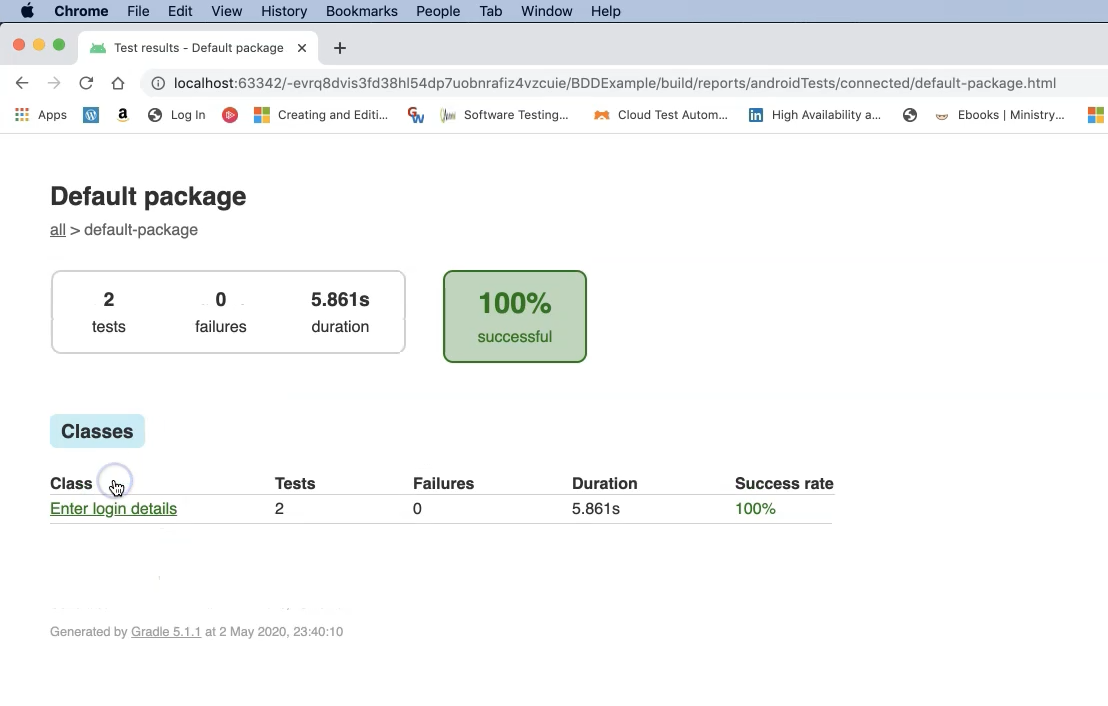
This is our testing class and here we have the test cases.
# CucumberTestRunner
package com.sniper.bdd.cucumber.runner;

import android.os.Bundle;
import com.sniper.bdd.BuildConfig;

import cucumber.api.android.CucumberAndroidJUnitRunner;

@SuppressWarnings("unused")
public class CucumberTestRunner extends CucumberAndroidJUnitRunner {

    private static final String CUCUMBER_TAGS_KEY = "tags";
    private static final String CUCUMBER_SCENARIO_KEY = "name";

    @Override
    public void onCreate(final Bundle bundle) {
        String tags = BuildConfig.TEST_TAGS;
        String scenario = BuildConfig.TEST_SCENARIO;
        super.onCreate(bundle);
    }
}
# LoginSteps
package com.sniper.bdd.cucumber.steps;

import android.content.Intent;

import com.sniper.bdd.LoginActivity;

import androidx.test.rule.ActivityTestRule;
import cucumber.api.java.After;
import cucumber.api.java.en.And;
import cucumber.api.java.en.Given;
import cucumber.api.java.en.Then;
import cucumber.api.java.en.When;

import com.sniper.bdd.pageobjects.LoginScreen;
import com.sniper.bdd.utils.ActivityFinisher;

public class LoginSteps {

    private LoginScreen loginObject = new LoginScreen();

    ActivityTestRule<LoginActivity> mActivityRule = new ActivityTestRule<>(LoginActivity.class,
        false, false);

    @After
    public void tearDown() {
        ActivityFinisher.finishOpenActivities();
    }

    @Given("I start the application")
    public void iStartTheApplication() {
        mActivityRule.launchActivity(new Intent());
    }

    @When("I enter valid email (\\S+)$")
    public void iEnterValidEmailEmail(String email) {
        loginObject.enterEmail(email);
    }

    @And("I enter valid password (\\S+)$")
    public void iEnterValidPasswordPassword(String password) {
        loginObject.enterPassword(password);
    }

    @And("I close the keyboard")
    public void iCloseTheKeyboard() {
        loginObject.clickSignInButton();
    }

    @And("I click sign in button")
    public void iClickSignInButton() {
        loginObject.clickSignInButton();
    }

    @Then("I expect to see successful login message")
    public void iExpectToSeeSuccessfulLoginMessage() {
        loginObject.isSuccessfulLogin();
    }
}
# CucumberTestCase
package com.sniper.bdd.test;

import cucumber.api.CucumberOptions;

@CucumberOptions(features = {"features"},
    glue = {"com.sniper.bdd.cucumber.steps"},
    tags = {"@e2e", "@smoke"})
@SuppressWarnings("unused")
public class CucumberTestCase {

}
