

Transcripted Summary
In this chapter, we will discuss interacting with elements using Espresso.

What we will cover during this chapter? We will discuss the Espresso components ViewMatchers and ViewAssertions, testing Espresso lists with AdapterView and RecyclerView, testing Toast messages with custom matchers, testing Intents, and finally testing Drawers.
# Espresso Components
What are the components of Espresso? In the example Espresso project from the previous chapter you may have noticed that we use the following syntax:
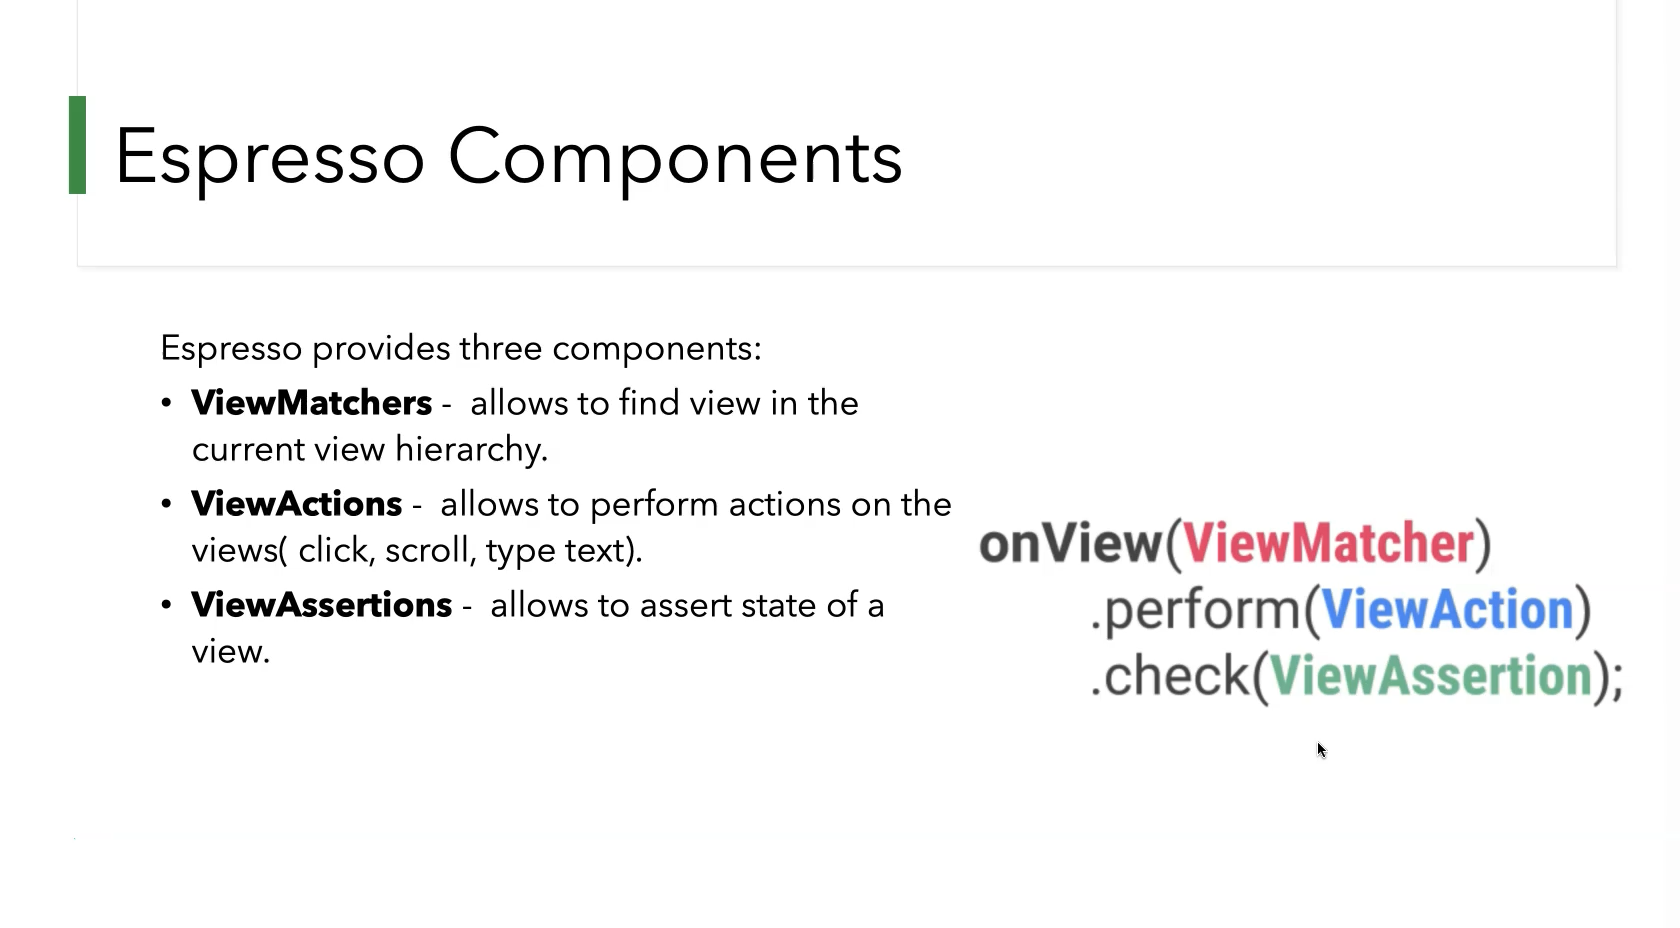
Espresso provides three components: ViewMatchers, ViewActions, and ViewAssertions.
Method onView() is passed a ViewMatcher object such as an element ID. Method perform() is passed a ViewAction object.
Finally, the assertion method check() is passed a ViewAssertion object.
# ViewMatchers
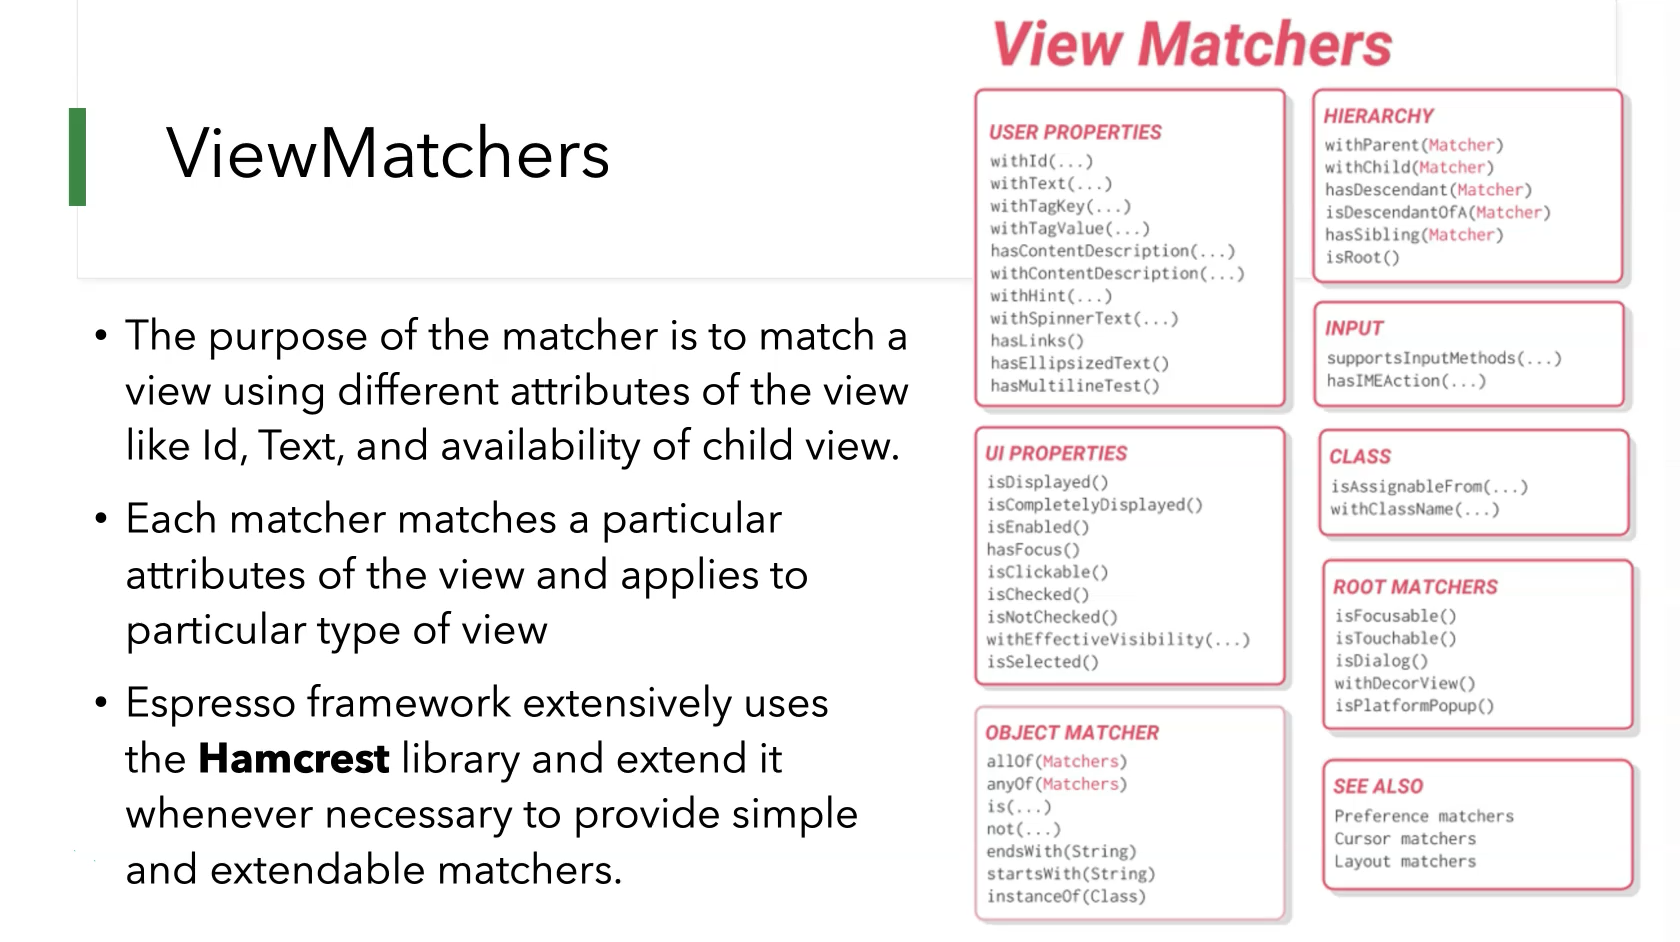
The purpose of a matcher is to match a view using different attributes of a view such as ID, text, or availability of a child view.
Each matcher matches a particular attribute of the view and applies to a particular type of view.
The Espresso framework makes extensive use of the Hamcrest library and extends it whenever necessary to provide simple and extendable matchers.
ViewAssertions
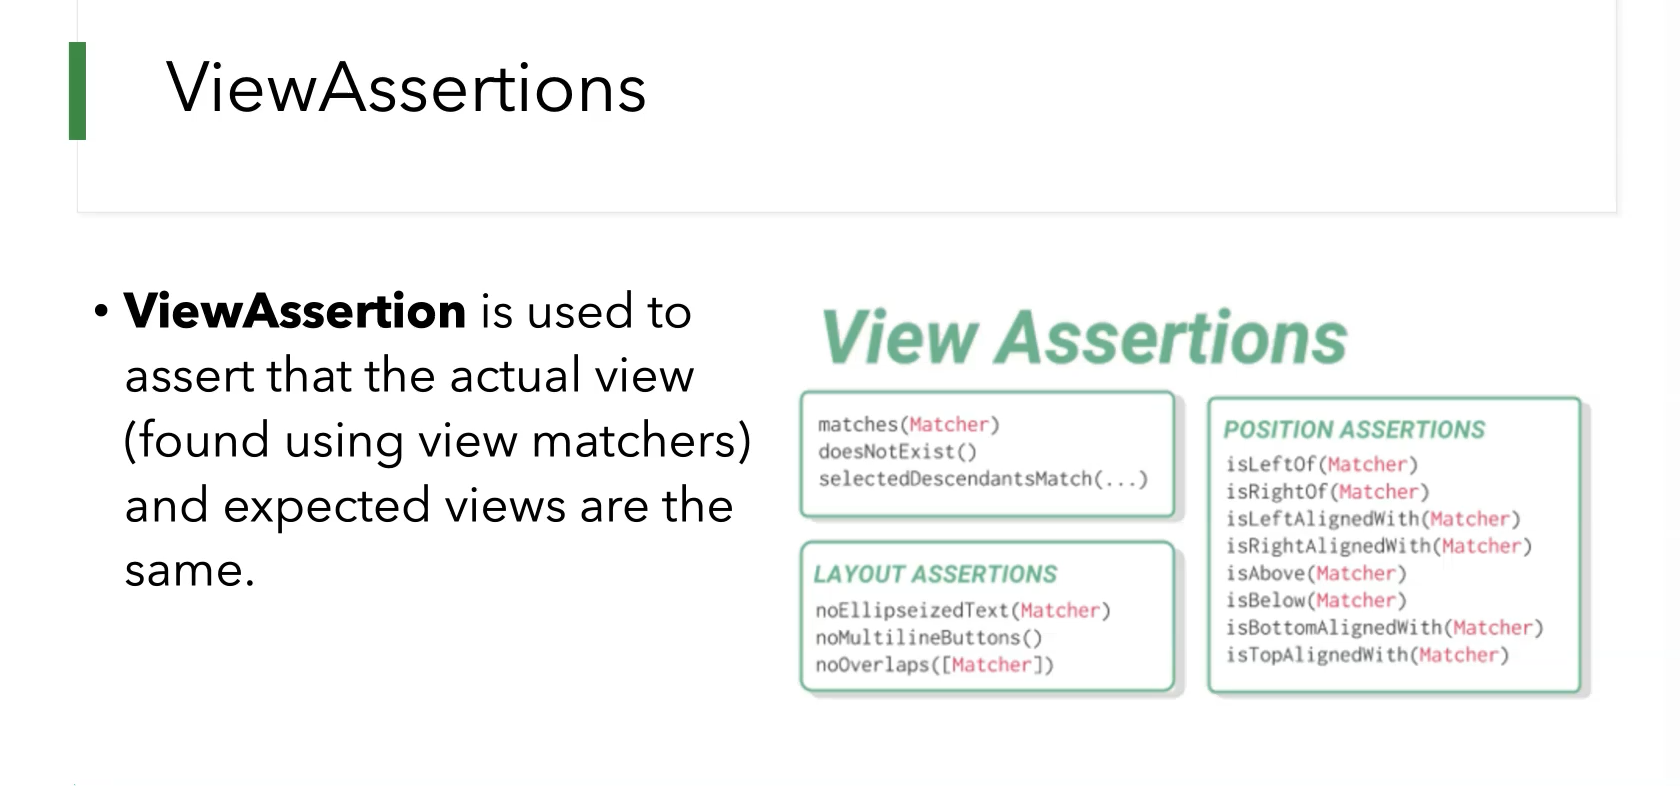
ViewAssertions are used to assert that the View found using ViewMatchers matches the expected View.
Creating a Custom View Matcher
A custom matcher is a very powerful concept used to extend the framework as well as to customize the framework to our taste.
Espresso provides two classes to write new matchers, TypeSafeMatchers and BoundedMatcher.
Testing Espresso Lists
Espresso offers two types of list mechanisms to scroll or interact with a particular item, AdapterView and RecyclerView.
# AdapterView
AdapterView is a ViewGroup that displays items loaded into an adapter.
The most common type of adapter comes from an array-based data source.
The method onData() provides a matcher against the data backing the view you would like to match.
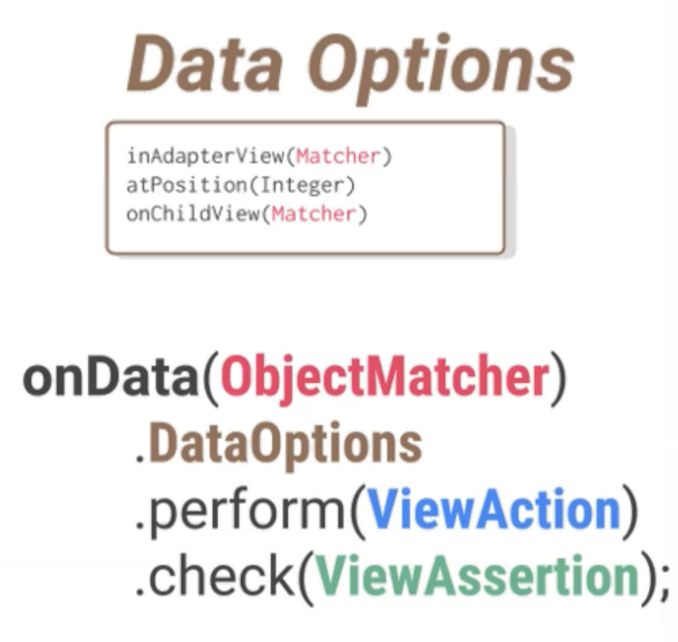
Espresso will do all the work of finding the row in the Adapter object and making the item visible in the viewport.
How Does AdapterView Work?
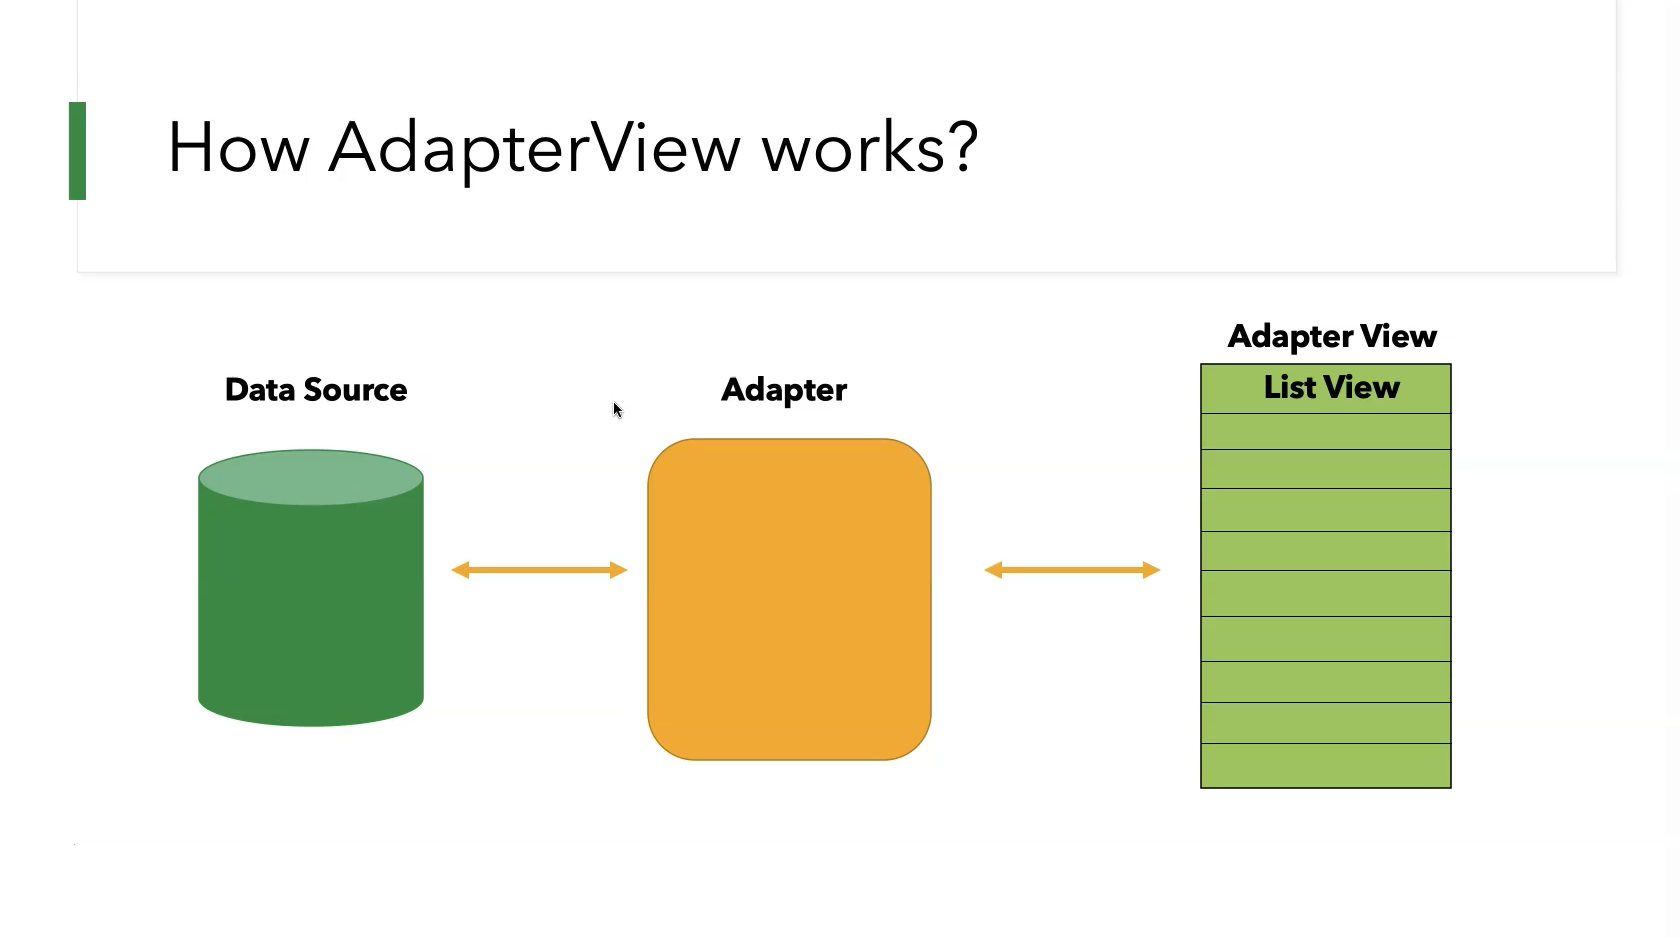
AdapterView renders the user interface dynamically depending on the amount of data available in the underlying data source. AdapterView renders only the minimum data necessary to draw the visible area of the screen. This is done to conserve memory and to maintain UI responsiveness even if the underlying amount of data is large.
Testing AdapterView (Demo)
In the following demo we will learn how to test AdapterView with Espresso.
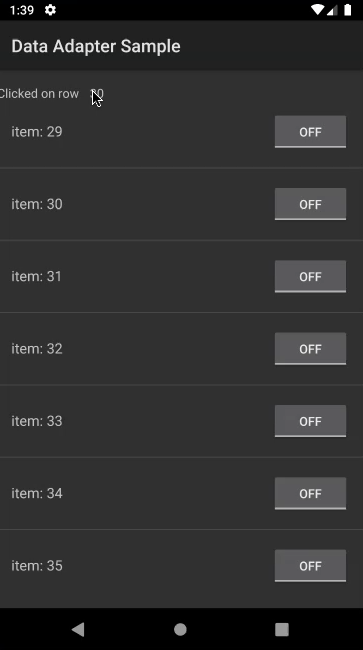
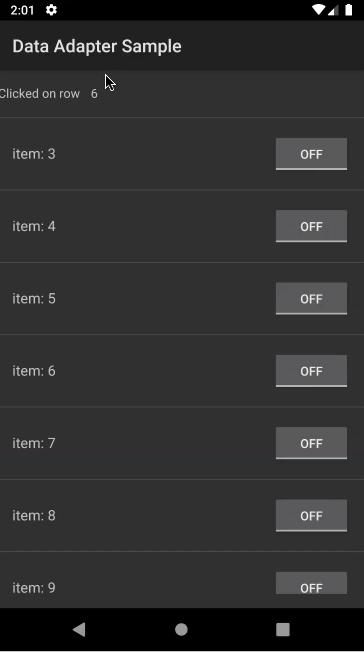
To begin, open the "DataAdapterSample" sample application.
In this application we will find a long list of items with toggle buttons and we can scroll through this list and select any item.
Our test assertions will include verifying a selected list item’s value as well as selecting the last item in the list.
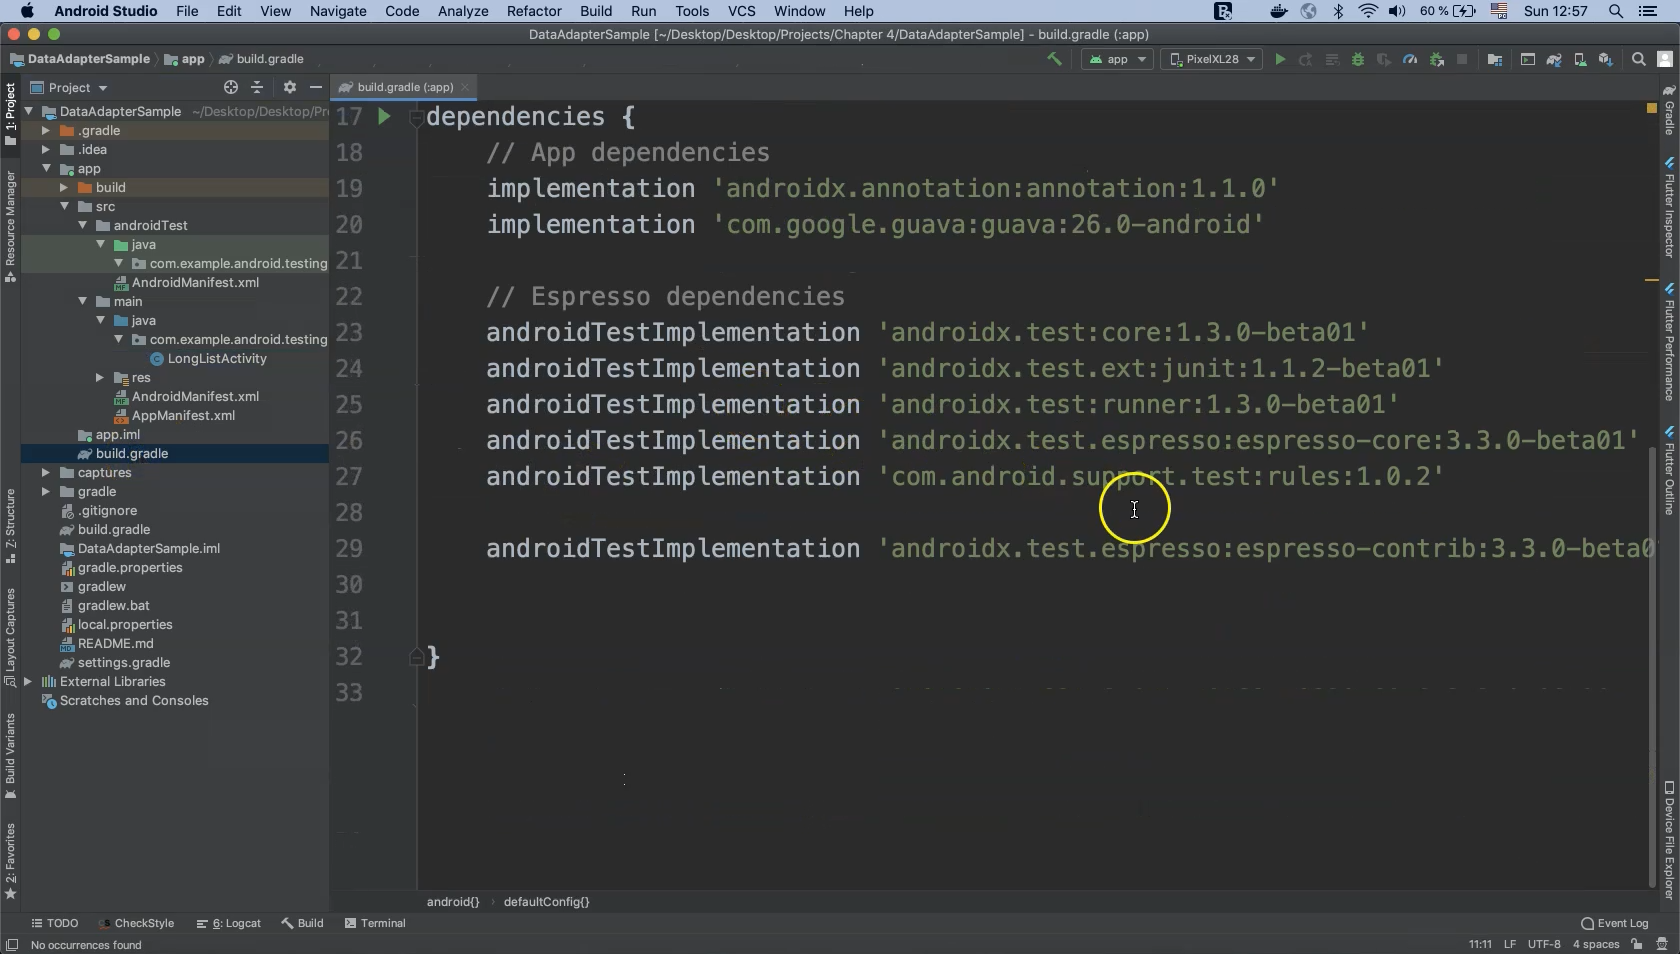
Before we begin, check to see that the Espresso dependencies have already been added to the "build.gradle (:app)" file.
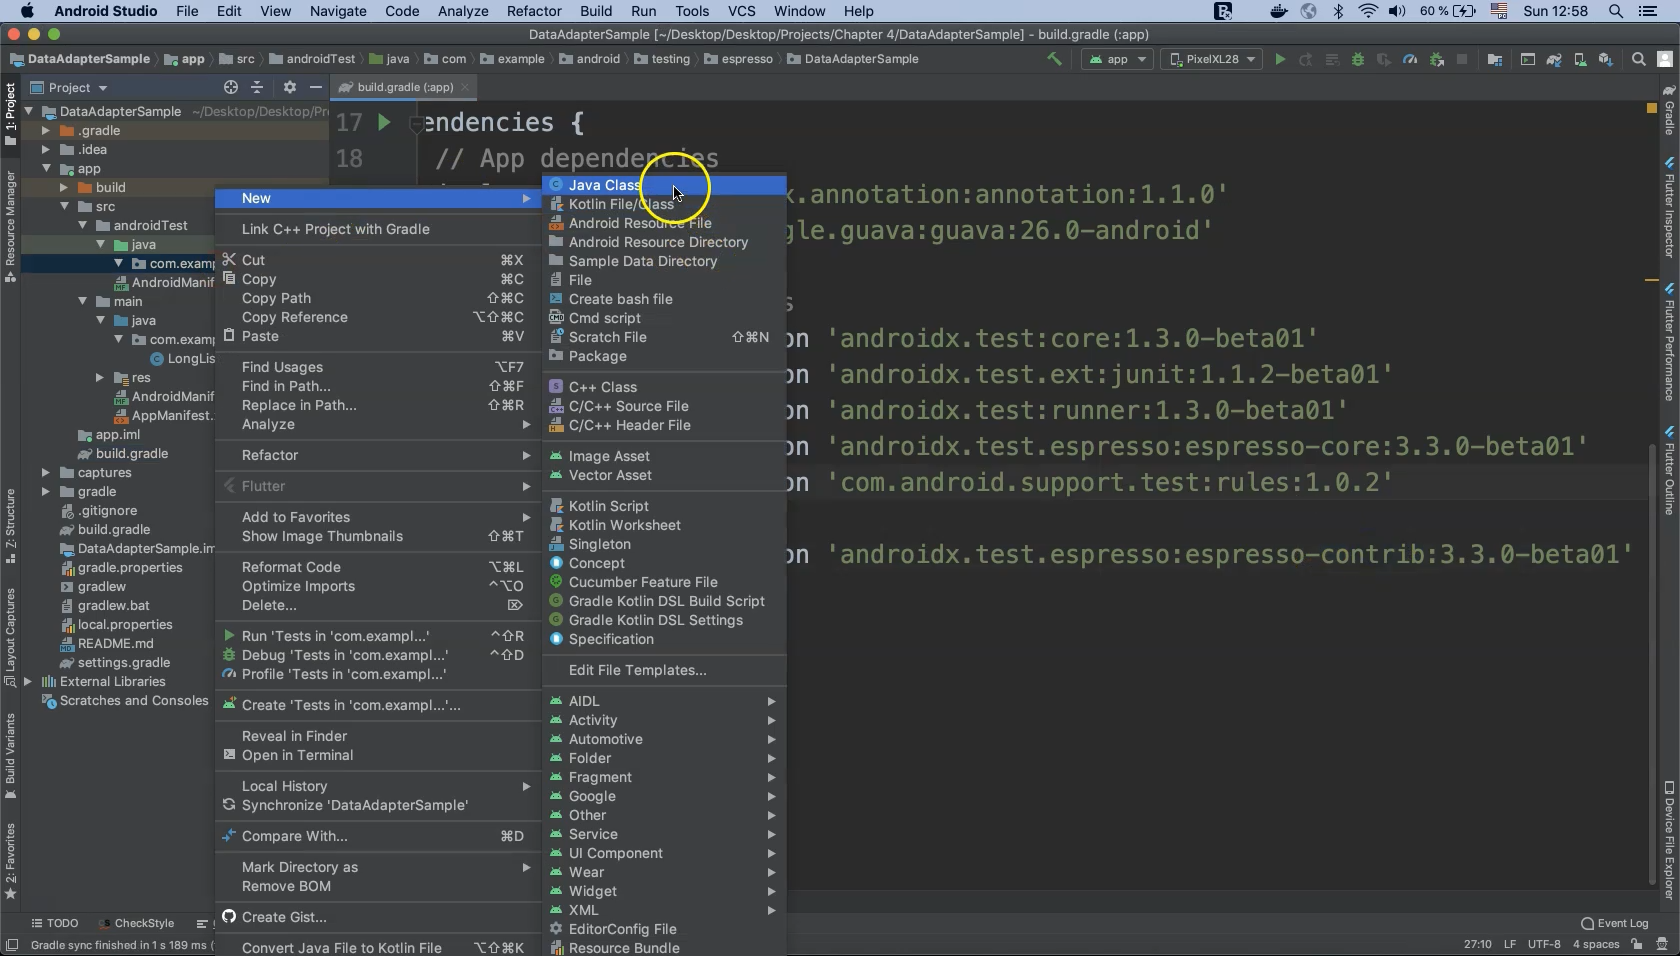
After that, we will go to the Android test folder. Right click and select "New > Java Class".
Call this new class "LongListActivityTest" and click "OK".
First, let’s add the annotation @RunWith(AndroidJUnit4.class) to configure our test with that instrumentation.
@RunWith(AndroidJUnit4.class)
public class LongListActivityTest {
}
Because we will assert against different elements of the LongList, let’s define three string variables to hold those values:
- itemText - The item text and number.
- selectedItemText - The selected item number.
- lastItemID - The value of the last list item.
@RunWith(AndroidJUnit4.class)
public class LongListActivityTest {

    private static final String itemText = "item: 30";
    private static final String selectedItemText = "30";
    private static final String lastItemID = "item: 99";
}
Now we need to create our active data store. Create a new rule using the @Rule annotation from JUnit and ActivityScenarioRule.
@Rule
public ActivityScenarioRule<LongListActivity> rule =
    new ActivityScenarioRule<>(LongListActivity.class);
}
ActivityTestRule is deprecated
ActivityScenarioRule is an upgraded version of ActivityTestRule.
ActivityTestRule is marked as deprecated and will be removed from the library in the future.
Note
Clicking on a method in Android Studio will jump to the method implementation which may contain additional description and usage examples.
The first test to implement for our demo is a test to see whether or not the last item in the list is visible on screen (recall that this is list element 99). Implement this using the @Test annotation from JUnit.
@Test
public void lastItemNotDisplayed() {
    onView(withText(lastItemID)).check(doesNotExist());
}
Remember to continue adding method import statements as necessary.
Let’s run our test now and check the result. The test should pass because the last list item element (99) should not be visible on app initialization.
The second test to implement for our demo is almost the same as our first except that it is a positive test to verify that the last list element is visible.
This can be done by programmatically scrolling to the bottom of the list and then performing our assertion.
If you open the "LongListActivity" class you will find a string variable named "ROW_TEXT".
This variable is what our next test will assert against, i.e. whether or not "ROW_TEXT" is equal to "99".
This can be done by using onData() to search inside the list and scroll to "lastElement".
@Test
public void scrollToLastItemTest() {
    onData(hasEntry(equalTo(LongListActivity.ROW_TEXT), is(lastItemID)))
        .check(matches(isCompletelyDisplayed()));
}
That should be it! Let's run our test and see what happens. Everything looks good but let’s run it one more time to be sure.
The third test to implement for our demo involves clicking a list entry and verifying that the "Clicked on row" label updates itself to match the clicked list entry’s enumeration.
For example, clicking on list "item: 30" should update the label to display "Clicked on row 30".
All of these actions can be automated by your test code.
As before, use the @Test annotation from JUnit.
@Test
public void ClickOnRowTest() {
    onData(hasEntry(equalTo(LongListActivity.ROW_TEXT), is(itemText)))
    .onChildView(withId(R.id.rowContentTextView))
    .perform(click());
}
Let’s now run our test and check the test result. The test appears to be passing.
The fourth and final test to implement for our demo is to pick a list item and click its toggle button.
This will update the button from its default state of "OFF" to "ON" and then an assertion can be performed against that value.
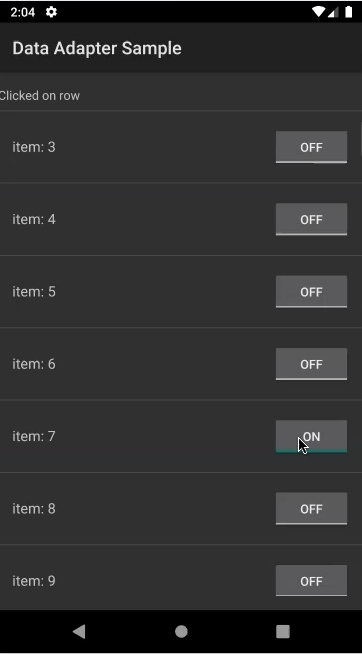
@Test
public void ClickToggleButtonTest() {
    onData(hasEntry(equalTo(LongListActivity.ROW_TEXT), is(itemText)))
        .onChildView(withId(R.id.rowToggleButton))
        .perform(click())
    .check(matches(isChecked()));
}
As before, we run our test and everything looks good.
# Code
package com.example.android.testing.espresso.DataAdapterSample;

import org.junit.Rule;
import org.junit.Test;
import org.junit.runner.RunWith;

import androidx.test.espresso.matcher.ViewMatchers;
import androidx.test.ext.junit.rules.ActivityScenarioRule;
import androidx.test.ext.junit.runners.AndroidJUnit4;

import static androidx.test.espresso.Espresso.onData;
import static androidx.test.espresso.Espresso.onView;
import static androidx.test.espresso.action.ViewActions.click;
import static androidx.test.espresso.assertion.ViewAssertions.doesNotExist;
import static androidx.test.espresso.assertion.ViewAssertions.matches;
import static androidx.test.espresso.matcher.ViewMatchers.isChecked;
import static androidx.test.espresso.matcher.ViewMatchers.isCompletelyDisplayed;
import static androidx.test.espresso.matcher.ViewMatchers.withId;
import static androidx.test.espresso.matcher.ViewMatchers.withText;
import static org.hamcrest.Matchers.equalTo;
import static org.hamcrest.Matchers.hasEntry;
import static org.hamcrest.Matchers.is;

@RunWith(AndroidJUnit4.class)
public class LongListActivityTest {

    private static final String itemText = "item: 30";
    private static final String selectedItemText = "30";
    private static final String lastItemID = "item: 99";

    @Rule
    public ActivityScenarioRule<LongListActivity> rule =
        new ActivityScenarioRule<>(LongListActivity.class);

    @Test
    public void lastItemNotDisplayed() {
        onView(withText(lastItemID))
            .check(doesNotExist());
    }

    @Test
    public void scrollToLastItemTest() {
        onData
            (hasEntry(equalTo(LongListActivity.ROW_TEXT), is(lastItemID)))
            .check(matches(isCompletelyDisplayed()));
    }

    @Test
    public void ClickOnRowTest() {
        onData
            (hasEntry(equalTo(LongListActivity.ROW_TEXT), is(itemText)))
            .onChildView(withId(R.id.rowContentTextView))
            .perform(click());

        onView(ViewMatchers.withId(R.id.selection_row_value))
            .check(matches(withText(selectedItemText)));
    }

    @Test
    public void ClickToggleButtonTest() {
        onData
            (hasEntry(equalTo(LongListActivity.ROW_TEXT), is(itemText)))
            .onChildView(withId(R.id.rowToggleButton))
            .perform(click())
        .check(matches(isChecked()));
    }
}
Resources
Quiz
The quiz for this chapter can be found in section 4.4
