

Transcripted Summary
So far in this course, we have clicked the links provided to navigate through the application. However, WebDriver provides other navigation methods as well.
Let's have a look.
WebDriver provides an interface called Navigation, and in this interface, there are multiple methods.
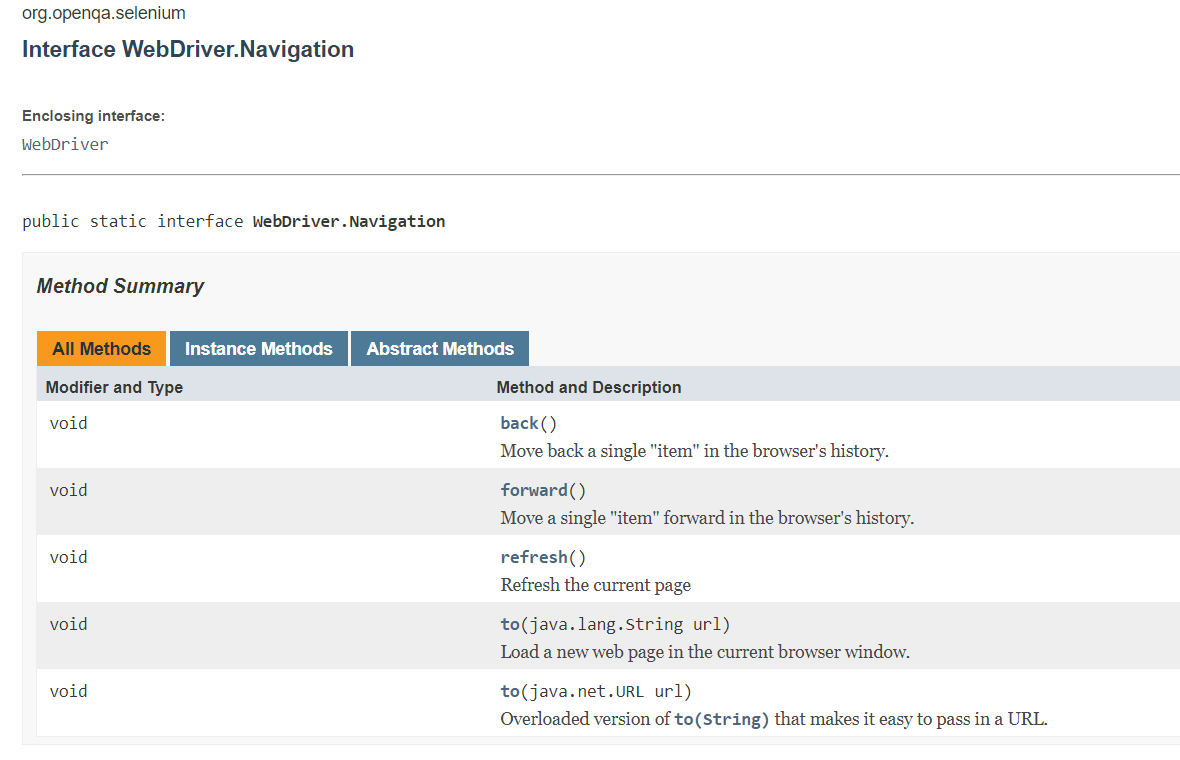
backwhich will navigate to the last page visited in the browser's historyforwardwhich will move forward in the browser's history by one pagerefreshwill reload the current pagetoone that takes a String and one that takes a URL. both go directly to the URL specified. Thetomethod is very similar to thegetmethod that we've been using. However,driver.getwaits for the page to load. Thistomethod does not
I want to create a class that will allow us to utilize those navigation methods.
This will go in the framework since it is indeed interacting with the browser. However, we shouldn't put it in the “pages” package because this is meant for the page objects that model actual pages in our application.
This is more of a utility method.
So, I'm going to create another package, and our framework section, and we'll call this one “utils”.
Let’s create a class in here, which we'll call WindowManager.
Now of course, in order for any class to interact with the browser at all, it needs the driver.
Let's go ahead and create an object for that.
package utils;

import org.openqa.selenium.WebDriver;

public class WindowManager {

    private WebDriver driver;

    public WindowManager(WebDriver driver){
        this.driver = driver;
    }
}
Now let's create a method that will go back one item in the browser's history.
The way you get to the navigation is to say driver.navigate(). And then we see those methods that we saw in the JavaDoc.
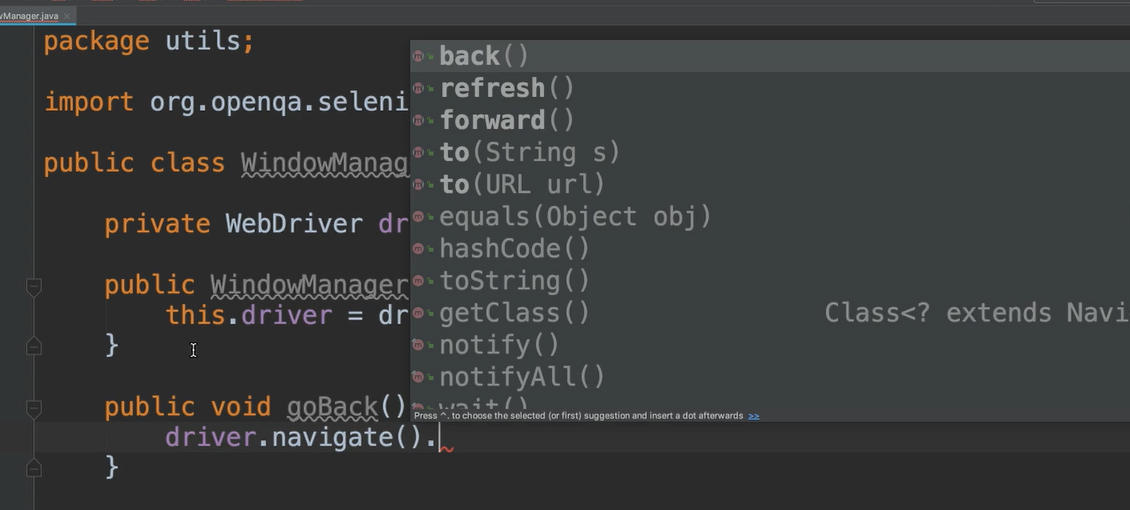
So we can call the back method.
public void goBack(){
    driver.navigate().back();
}
Now if I wanted to create one for go forward and refresh, I'll need to call this again.
So, I'm going to create an object just for that navigation to make things simpler.
private WebDriver.Navigation navigate;
And then in our constructor, after we have our driver, we can say:
navigate = driver.navigate();
Now we can just say navigate.back:
public void goBack(){
    navigate.back();
}
I'm going to go ahead and make “util” methods for going forward, refreshing and navigating to a page.
# WindowManager.java
package utils;

import org.openqa.selenium.WebDriver;

public class WindowManager {

    private WebDriver driver;
    private WebDriver.Navigation navigate;

    public WindowManager(WebDriver driver){

        this.driver = driver;
        navigate = driver.navigate();
    }

    public void goBack(){
        navigate.back();
    }

    public void goForward(){
        navigate.forward();
    }

    public void refreshPage(){
        navigate.refresh();
    }

    public void goTo(String url){
        navigate.to(url);
    }
}
In our page object classes, if we were to move to a new page with our action, then our method will return an appropriate page object. However, when we look at the methods here, all of them return void, so there is no page object to return here.
So, while this is a utility method, it will be up to our tests to keep track of where they are.
Now let's write a quick little method that will exercise these.
We’ll go to the test area, create a new package called “navigation” and a new class called NavigationTests.
package navigation;

import base.BaseTests;
import org.testng.annotations.Test;

public class NavigationTests extends BaseTests {

}
And we already have framework that goes through a couple of pages.
We can do homePage.clickDynamicLoading, which will give us Dynamic Loading page. And then we could say clickExample1, which gives us the DynamicLoadingExample1Page.
@Test
public void testNavigator(){
    homePage.clickDynamicLoading().clickExample1();
}
So now we've gone through a couple of pages. Once we've done this we can say go backwards.
Now the WindowManager takes a driver, and we don't have access to the driver, but our BaseTests does.
Let's go to BaseTests and we're going to create a method in here that will give us a handle to the WindowManager.
public WindowManager getWindowManager(){
    return new WindowManager(driver);
}
Okay, now in our test we can say:
public class NavigationTests extends BaseTests {

    @Test
    public void testNavigator(){
        homePage.clickDynamicLoading().clickExample1();
        getWindowManager().goBack();
    }
}
So, after we go back, let's just maybe refresh the page and then let's go forward.
getWindowManager().refreshPage();
getWindowManager().goForward();
And then finally let's go to a totally different application. So, we can say go to google.com.
getWindowManager().goTo("https://google.com");
# NavigationTests.java
package navigation;

import base.BaseTests;
import org.testng.annotations.Test;

public class NavigationTests extends BaseTests {

    @Test
    public void testNavigator(){
        homePage.clickDynamicLoading().clickExample1();
        getWindowManager().goBack();
        getWindowManager().refreshPage();
        getWindowManager().goForward();
        getWindowManager().goTo("https://google.com");

    }
}
Okay, we'll put some breakpoints here and let's go ahead and run this.
We see that we're on the Example 1 page — this is two clicks in.
Now we're going to go back and that takes us to the Dynamic Loading page. We've come back to this page.
Now let's refresh this page, and we should still be there. Yes.
Okay, now let’s go forward one and we see we’re back on the Example 1 page.
Now let's go to Google and we see that it moved us to Google.com.
These methods are really helpful if you need to traverse through your history or do any refreshing. Or go to a specific place in your application without navigating through menu items in links and not waiting for the page to load.
Let's look at some more window management.
On our application we're going to click on the link that says Multiple Windows.

On this page there's another link that says, “Click Here”.
When we click here, we notice that there’s a new tab that says, “New Window”. So now we have two tabs here.
Let's look at how we use WebDriver to interact with these different windows.
In our HomePage class, I've created a new method to click the multiple windows, which gives us this new MultipleWindowsPage class.
public MultipleWindowsPage clickMultipleWindows(){
    clickLink("Multiple Windows");
    return new MultipleWindowsPage(driver);
}
And I created a new class for MultipleWindowsPage:
# MultipleWindowsPage.java
package pages;

import org.openqa.selenium.By;
import org.openqa.selenium.WebDriver;

public class MultipleWindowsPage {

    private WebDriver driver;
    private By clickHereLink = By.linkText("Click Here");

    public MultipleWindowsPage(WebDriver driver){
        this.driver = driver;
    }

    public void clickHere(){
        driver.findElement(clickHereLink).click();
    }
}
We see here I have the WebDriver.
Then I also have a By for that clickHereLink.
As well as a method that says clickHere.
And this method will do the driver.findElement and click on that link.
Now we have two tabs open.
Let's go back to our WindowManager class and let's add something here to manage those multiple tabs.
I'm going to make a method called switchToTab and our test can pass us the name of the tab that they want to switch to.
For example, our first tab is called “The Internet”. Our second tab is called “New Window”.
WebDriver has a method called getWindowHandles.
getWindowHandles will return us handles to all of the open windows or tabs.
So, we'll make a call to this and that returns a Set of Strings.
Let's just go ahead and save this into a variable called windows.
public void switchToTab(String tabTitle){
    var windows = driver.getWindowHandles();
}
And I'm going to put some print statements here so that we see what's going on when we run our tests.
Let's first print out how many tabs there are and we can do windows.size() for this.
System.out.println("Number of tabs: " + windows.size());
Now let's go ahead and print out the window handles.
System.out.println("Window handles:");
windows.forEach(System.out::println);
As you'll see when this prints out, the window handles are unique identifiers for those windows and they're created when the window runs. So it's not something that we would know in advance.
Next I want to switch to the tab that the test has asked us to.
So, we're going to loop through all of the window handles.
Let's first print out that we're switching to the window.
And now we're going to switch just like we did with the frames. We called driver.switchTo(), we did this with the frames and also the alerts. You do the same thing for windows/tabs.
This time we say driver.switchTo().window() and the window() method for windows or tabs. So, we can call window() and then we provide it the handle that we want to switch to.
for(String window : windows){
    System.out.println("Switching to window: " + window);
    driver.switchTo().window(window);
}
When we first call this method, we're going to be on the original window. So, let's say Window 1.
And so even though we say switch to Window 1, since we're already on Window 1, nothing will really occur.
But then on the second iteration of this loop, it will go to the next window in the Set and then that would be the second window.
So, let's go ahead and do another print statement just to tell us where we are and more importantly the title of the window where we are.
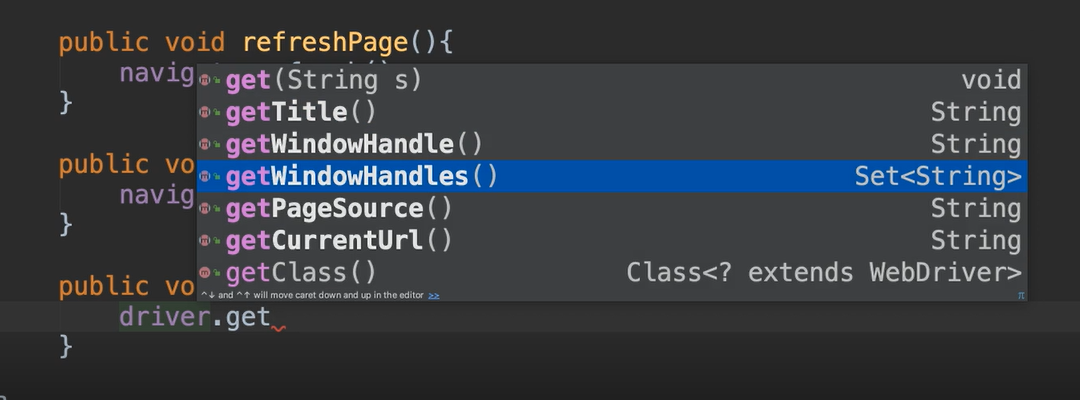
And remember we could do a driver.getTitle(), which will give us the title of the window.
System.out.println("Current window title: " + driver.getTitle());
This is more meaningful to us because like I said, the handle is a unique identifier that we don't know. However, we do know the title.
Now let's say that we have 5 windows up and our tests asked us to switch to the tab that happened to be number 3. Right now, we have no logic here that's telling us which tab to go to.
We're just switching through them and because all we have is those handles, those unique identifiers that we have no clue of what they are when we're running our program, we have to just loop through. Then once we find the one that we want, we can get out of here.
So, we can add a condition here.
The condition says if the tab title that they have asked us for equals the title of the current window, then let's break out of this loop altogether.
if(tabTitle.equals(driver.getTitle())){
    break;
}
So, if we happen to get to the third tab of the 5 open tabs, and that third tab is the one that the test is looking to switch to, then we've switched to that one. And then we're going to stop the loop.
public void switchToTab(String tabTitle){
    var windows = driver.getWindowHandles();

    System.out.println("Number of tabs: " + windows.size());

    System.out.println("Window handles:");
    windows.forEach(System.out::println);

    for(String window : windows){
        System.out.println("Switching to window: " + window);
        driver.switchTo().window(window);

        System.out.println("Current window title: " + driver.getTitle());

        if(tabTitle.equals(driver.getTitle())){
            break;
        }
    }
}
Let's go ahead and add some code to our NavigationTest so that we can see this in action.
We're going to add a new test method here.
We can get our window manager and we can say switch to a certain tab. Let's go ahead and make sure we have the title for our new tab.
So, this is called "New Window" — that's what we'll want to pass in.
@Test
public void testSwitchTab(){
    homePage.clickMultipleWindows().clickHere();
    getWindowManager().switchToTab("New Window");
}
And we have all of those print statements to let us know what's going on.
But let's also just put a little break point right here.
Okay, let's run our test.
On the console we see the output.
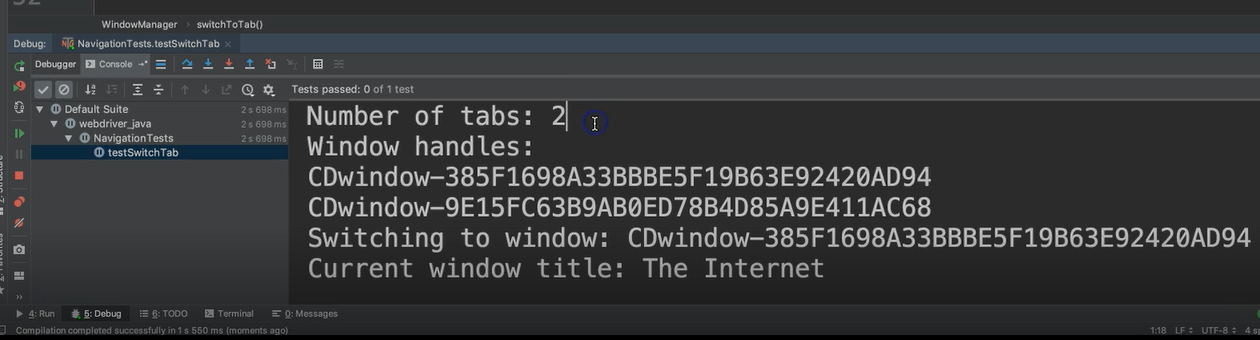
It says that there are two tabs.
Here are the window handles. Again, like I told you, these are unique identifiers. We wouldn't know what these are. These are generated when the window opens and they're not persistent. So, if we were to run this again, these would be two new window handles.
It says that we are switching to this one, which is the first one and that one is called “The Internet”.
Let's look at our app and we see that we have the two windows open. And yes, the current one is indeed “The Internet”.
Let’s keep going.
So, it says if this title, which is “The Internet” equals “New Window” (which the test passed in), then come out.
We know that it's not, so we’re going to keep going.
Now we see some more information.
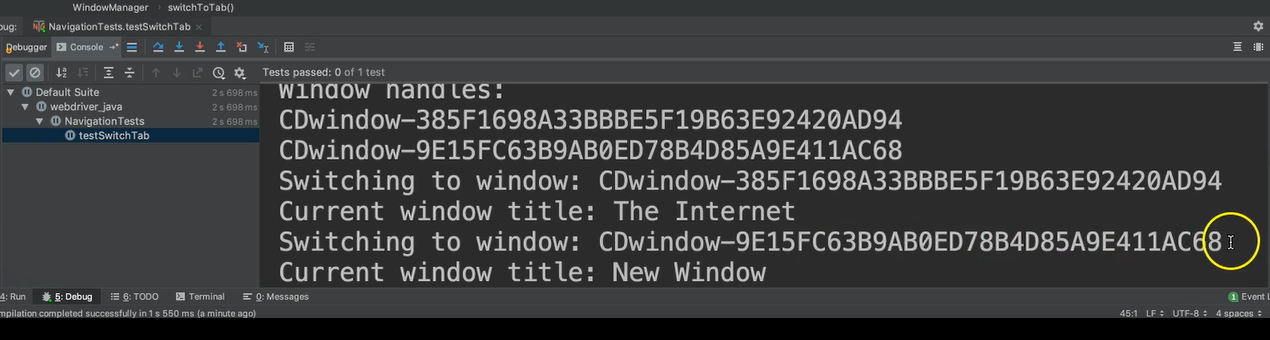
It says, now we're switching to “68” which is this second window. And the title of that window is called “New Window”.
Let's see if it did indeed switch. Yes. Now the focus is on the “New Window”tab and so this will break outside of the loop.
It just so happens that was the last element anyway, but like I said, if there were 5 of these and that was number 3, then it would have done a break right there.
So, there you have it. You have a window manager utility that will allow you to do different types of navigation throughout the app and also do some switching.
Of course, you don't need all of these print statements in your app, but these are just here to help you see what was actually going on.
Optional Independent Exercise
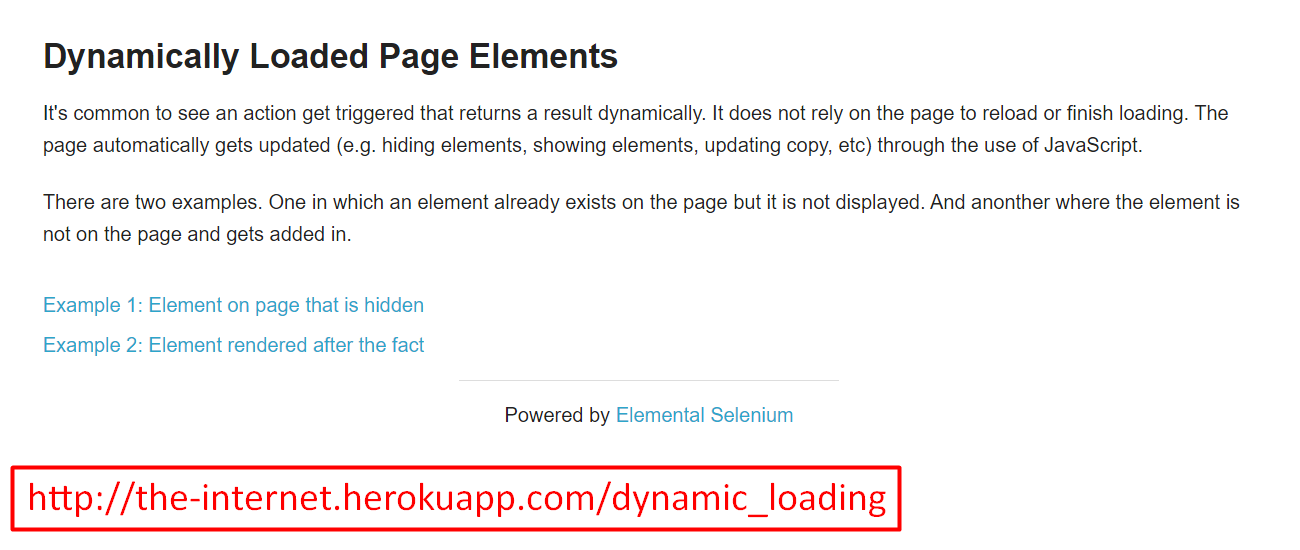
For your optional exercise for this chapter, click on the Dynamic Loading link and you will have two links here.
Take either one, maybe let's go with the Example 2, and simulate a right click.
For example, if I were to hold down my command key and click on this link, then it would open this in a new tab. You may know other shortcuts as well. So, if you need to use the Keys or the Action classes to help you out, then do so.
After opening this link in a new tab, switch over to it and verify that the “Start” button is there.
Good luck!
Solution
Programming can be done many different ways, but here’s my solution: DynamicLoadingPage, WindowManager, WindowTests.
