

Transcripted Summary
Selenium WebDriver also provides functionality to take screenshots of the browser.
Let's go to our project and add the code to take a screenshot when a test completes.
In our BaseTests class, let's go ahead and create another method in here.
We can use the annotation @AfterMethod and this will run after each test runs.
Inside of here is where we can take our photo, so we'll call this method takeScreenshot.
@AfterMethod
public void takeScreenshot(){

}
The first thing that we need to do is to cast our driver to a different Selenium class called TakesScreenshot which is in the Selenium package.
var camera = (TakesScreenshot)driver;
Now we have an object to take a screenshot.
We can save the screenshot as a file using the “java.io” package.
We'll call this screenshot and set it equal to camera.getScreenshotAs().
getScreenshotAs takes an OutputType, so we’ll choose FILE.
File screenshot = camera.getScreenshotAs(OutputType.FILE);
This will save that screenshot as a file.
This is all the code you need to take this screenshot, but let's go ahead and print out the path where that screenshot is stored.
@AfterMethod
public void takeScreenshot(){

    var camera = (TakesScreenshot)driver;
    File screenshot = camera.getScreenshotAs(OutputType.FILE);
    System.out.println(“Screenshot taken: ” + screenshot.getAbsolutePath());
}
Okay, so let's go ahead and run any of our tests and it should take a screenshot right after it.
I'm going to run this testBackspace() method.
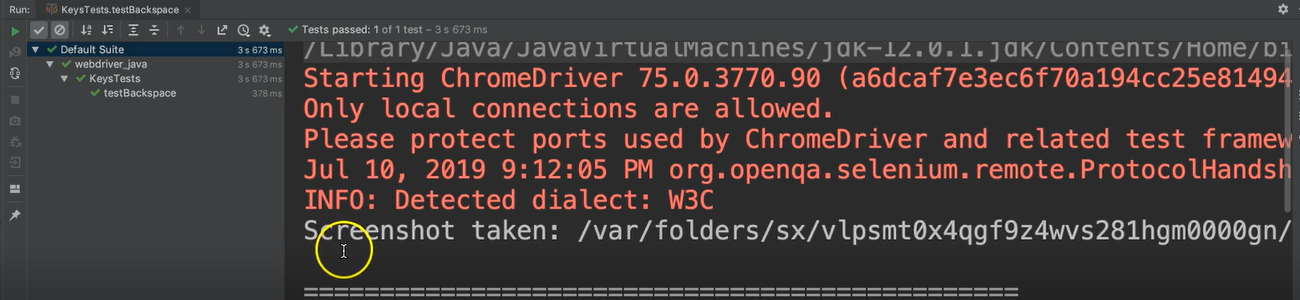
And we see that it printed out that the screenshot was taken, and it's under this ugly looking folder.
So, we can write one more line of code to put the screenshot in our project.
Going back to our BaseTests class and the takeScreenshot method, let's go ahead and move the file.
I'm going to say Files …
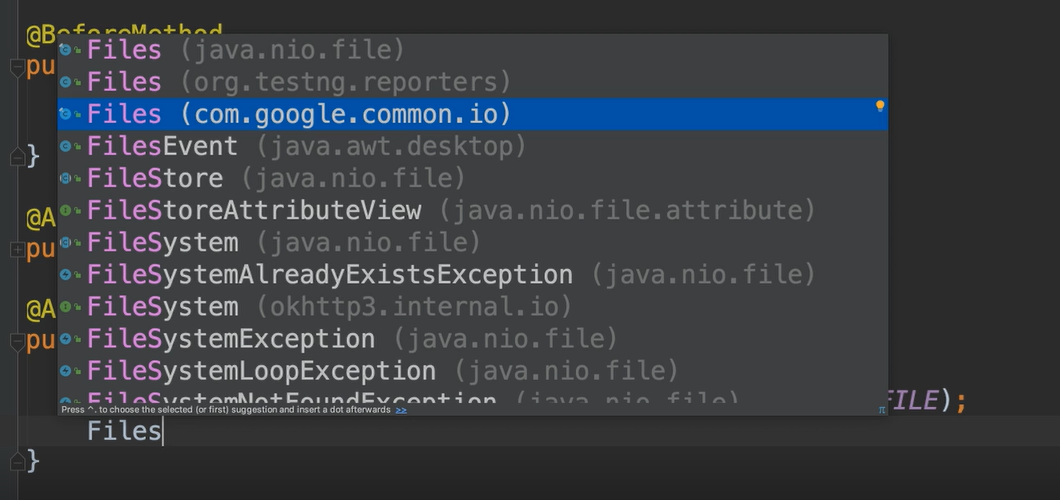
And we're going to import this one — the com.google.com.io one.
We can say .move and that takes the file as it is now (so we'll say the screenshot), and then what it is that you want to move it to.
So, we'll make a new File for this one and we're going to pass in the location that we want to move it to as a String.
We want to move it inside of this “resources” directory within our project. .
I'm going to create another directory under here called "screenshots", and this is where I would like to move that image to.
Let's say “resources/screenshots/” and let's give it a name. For right now let's just say “test.png”.
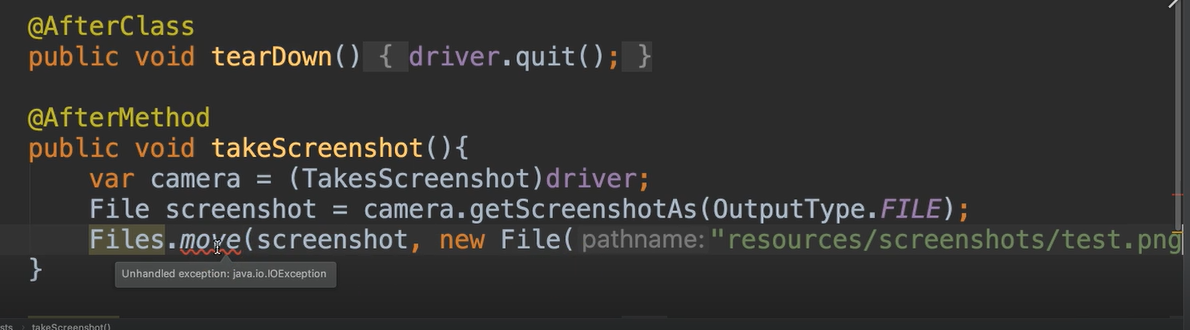
Now notice here this is not compiling because it says that this throws an IOException.
So, let's go ahead and wrap this in a try catch.
@AfterMethod
public void takeScreenshot(){

    var camera = (TakesScreenshot)driver;
    File screenshot = camera.getScreenshotAs(OutputType.FILE);

    try{
        Files.move(screenshot, new File("resources/screenshots/test.png"));
    }catch(IOException e){
        e.printStackTrace();
    }
}
Now let's run our test again.
Let's look in our screenshots and we see that we have a new “test.png”.

If we click on this, we see that it took a screenshot of the page.
Now this is great, except this test passed.
The way that we have it now, it would take a screenshot after every test, even if it passed.
What if we only wanted to take a screenshot on failing tests?
We could do that as well.
Let's go back to the BaseTests class and let's rename our @AfterMethod from takeScreenshot to recordFailure, so that we know this only will run on failures.
And we will add a parameter for this method and that parameter is going to be a type ITestResult.FAILURE which is from the TestNG library. And this is the result of a test.
We'll call this result and then we can add a condition in here. So, we can say, “if the test failed, then we want to do all of this”.
Let's go ahead and add this condition.
Let's say if ITestResult.FAILURE is equal to the results status that was passed in (meaning the test has failed), then we want to run all of this.
@AfterMethod
public void recordFailure(ITestResult result){

    if(ITestResult.FAILURE == result.getStatus())
    {
        var camera = (TakesScreenshot)driver;
        Files.move(screenshot, new File("resources/screenshots/test.png"));

        try{
            Files.move(screenshot, new File("resources/screenshots/test.png"));
        }catch(IOException e){
            e.printStackTrace();
        }
    }
}
For successful tests, it will still call this method however this condition will fail and nothing will happen. So, this will only run if the test is not successful.
Let's delete this image file from our last run and we're going to run the test again.
If the test passes, then we will not have a screenshot.
All right let's double check and it's still empty.
Perfect.
Now let's make that test fail.
So, I was expecting it to say, "You entered: BACK_SPACE". Let's just add and exclamation point here and that should fail the test.
Now in our BaseTests, instead of having “test.png”, let's have the name of the actual test case that has failed.
We can say:
Files.move(screenshot, new File("resources/screenshots/" + result.getName() + ".png"));
result.getName() will get the name of the test that failed. And then we need to add an extension as well (.png).
Now let's run this again.
And yep the test has failed this time and let's look.
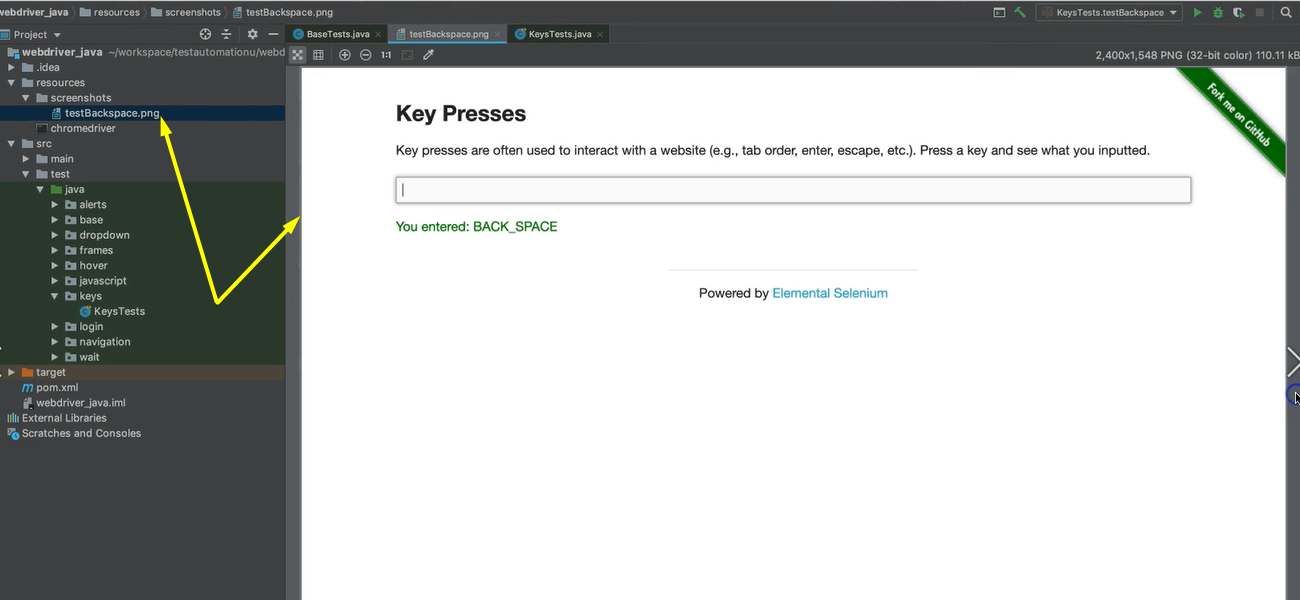
We have a new screenshot “testBackspace.png” and we click it and there is our screenshot.
So, this is how you can add screenshots to your failing tests.
There's no optional exercise for this chapter. I just want you to implement this taking screenshots in your project.
Once you've done that, you're okay. This is something that you only need to do once within your project.
You don't have to do it over and over again. So as long as you've done it this one time, then you're good to go.
