

Transcripted Summary
In the last chapter we learned how to interact with different types of web elements.
We learned how to send text to them, how to click on them, how to get text from them. And we saw that there were various other methods as well.
However, there's several more advanced types of interactions that we have not yet to cover. Let's look at several of those in this chapter.
# Let's look at hovering for example.
On our test application, let's go ahead and click on this Hovers link, and we see here we have 3 pictures.
If I hover over them, there's a name and a link that appears and each one is different.
However, as we saw on the WebElement object, these are the only methods that are available.
There is no method here to hover.
However, there is an additional class in the Selenium WebDriver package that will allow us to work with this.
Let's go ahead and create a new test. This test will:
Click on the Hovers page link from the home page
Come to this first image and hover over it
Ensure that the name “user1” appears as well as the view profile link
Okay, so the very first step is to click this Hovers link from the Home page.
Let's add that.
We know that we already have our HomePage class. So, we go there, and we are going to add a new method to click on the Hovers link.
We’ll make this public. And we know we want to return the HoversPage because we're going to change pages. And we’ll name the method clickHovers.
public HoversPage clickHovers(){

}
We can make a call to clickLink and just pass the “Hovers” text.
public HoversPage clickHovers(){
    clickLink("Hovers");
}
And then we return an instance of HoversPage.
public HoversPage clickHovers(){
    clickLink("Hovers");
    return new HoversPage(driver);
}
Now of course we haven't created the HoversPage class, so let's do that now.
This goes in our framework under “pages”. Let's say, New > Java Class >“HoversPage”.
We'll add our WebDriver and add our constructor. And of course, we need to import our WebDriver, let's do that.
package pages;

import org.openqa.selenium.WebDriver;

public class HoversPage {

    private WebDriver driver;

    public HoversPage(WebDriver driver){
        this.driver = driver;
    }
}
Now we're on the Hovers page.
Let's go back to our application and see what we need to do.
Our test has clicked “Hovers” and we're on the Hovers page. We want to hover over this first image.
Now again, I told you that WebElement doesn't have a method to do a hover. However, there is a class available called Actions.
The Actions class contains lot of advanced actions that you can use for this sort of thing.
Let's go ahead and create an Actions object in our HoversPage class.
We'll make a method that says to hoverOverFigure and since there are three figures in this class, we can allow them to pass in an index to indicate which one of these figures would you like us to hover over.
public void hoverOverFigure(int index){

}
Let's go ahead and create the Actions object, you see it is under the selenium.interactions package. And again, this class contains advanced interactions for your web elements.
Well name this object actions and we'll go ahead and import that class. Actions takes a WebDriver object, so we pass in the driver that we have.
public void hoverOverFigure(int index){
    Actions actions = new Actions(driver);
}
Now that we have the Actions, we see that there are multiple methods here.
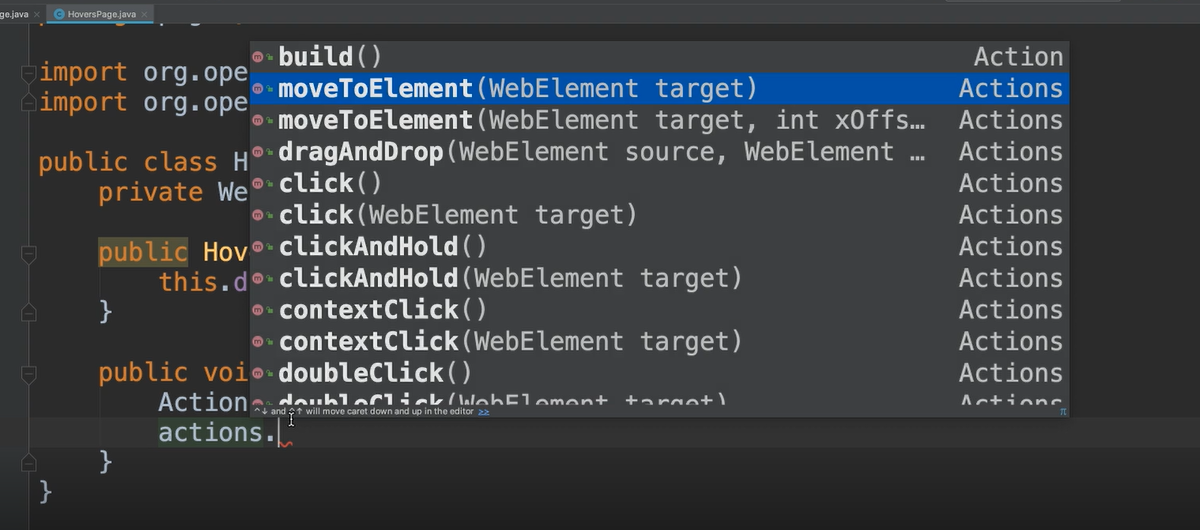
There is moveToElement, and that's what we're going to use in order to hover over an element. This is going to move the mouse to that element.
We see an overloaded
moveToElementmethod that takes X and Y coordinatesWe see
dragAndDropThen there's the
clickones as well asclickAndHoldThere's
contextClickfor if we wanted to do a right clickThere's
doubleClick,keyDown,keyUp,pause,release,tick,sendKeysand so on
Again, we want to do the hover, so we're going to use this moveToElement which takes a WebElement.
So, we have to go ahead and find the WebElement for that image.
Let's go back to our application and figure out the locator for that web element.
I'm going to inspect on this, and we see here there's an image [ <img> ] and it has an alt attribute as “User Avatar”.
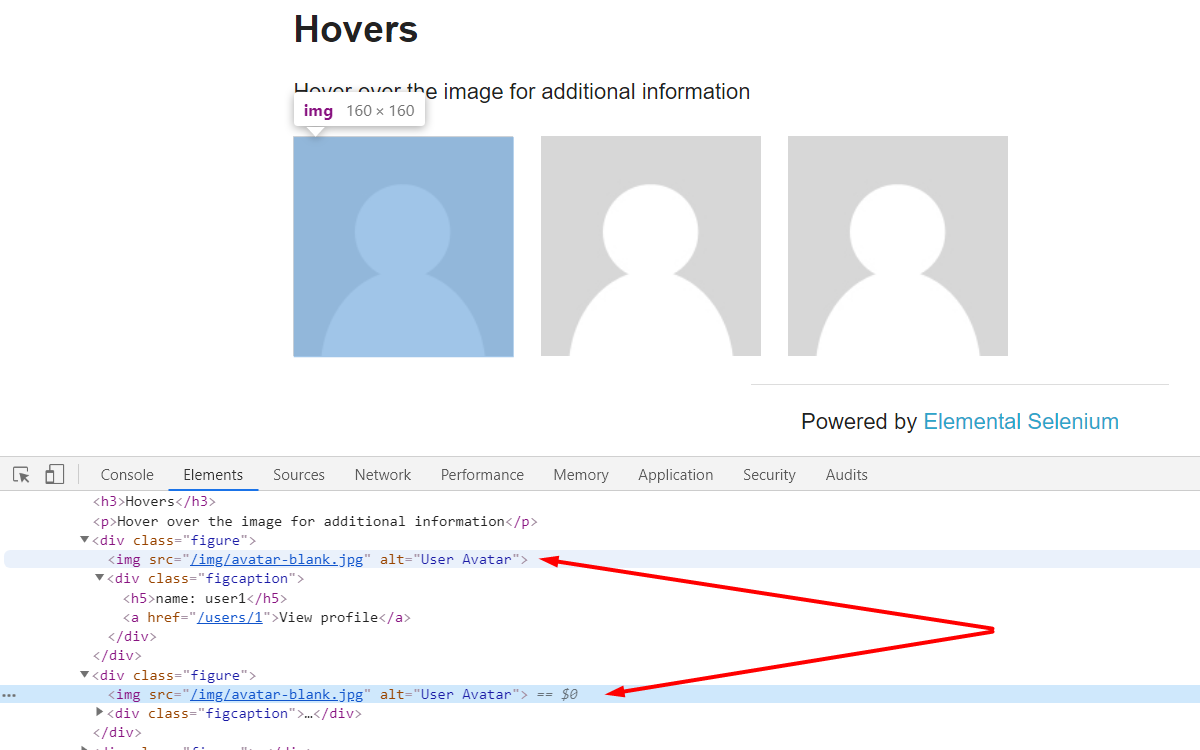
Let's look at the next one. It has the same thing.
So, there are basically these three things. There's no unique identifier for it, so let's just choose a generic locator which will get all of these elements.
We've already told our test to give us the index of the one that they want. We can use findElements, get the list, and then get exactly the one that they want.
Okay, so let's figure out a locator for this.
There's these image ones, but then there's also a div right above it, and this one actually has a class. If we find a div that has a class of “figure” and then get the image right under that, that should do it.
Let's go and get this div that has the class of figure, because not only does it have the image, but it also has this “figcaption”, which contains that name and also the link that we're going to have to verify on. So, this is a good locator.
Okay, let's go back to our class and add that field.
We're going to do a By and we'll call this one figureBox. And we'll say By.className and give it that “figure”.
private By figureBox = By.className("figure");
Before our Actions declaration, let's go ahead and create the WebElement for the figure that we want.
public void hoverOverFigure(int index){
    WebElement figure = driver.findElements(figureBox)
    Actions actions = new Actions(driver);
}
NOTE
Of course, we don't want to use findElement [singular]. Again, findElement is only going to return the first element that it finds that matches the locator, so this would always just choose the first image. Even if our test said that it was looking for the second or third one, findElement would only return the first one. That's why we need to use the findElements so that we can be sure to get the right one.
We say findElements and we give it the figureBox — this will give us a list.
We know right now there’s three of them, so this will give us three WebElement objects. And we have asked our test to give us the index of the one that we want here.
Indexes with lists start with 0, so we would need to either go ahead with that same convention, but the test would need to know to pass in 0. However, whoever writes sour test might think "Okay, I need to pass in the first one," and they’ll pass in a 1.
In this case there could be a little confusion.
We're going to add a JavaDoc, just so that our tests are clear what we want to pass in.
And we'll go ahead and take care of the math of that within this method itself.
We have a List here, now we're going to say get and this takes an index.
So, whatever they've passed in, let's say they pass in 1, we know that they mean the first one. But List indices start at 0, so we can say index – 1.
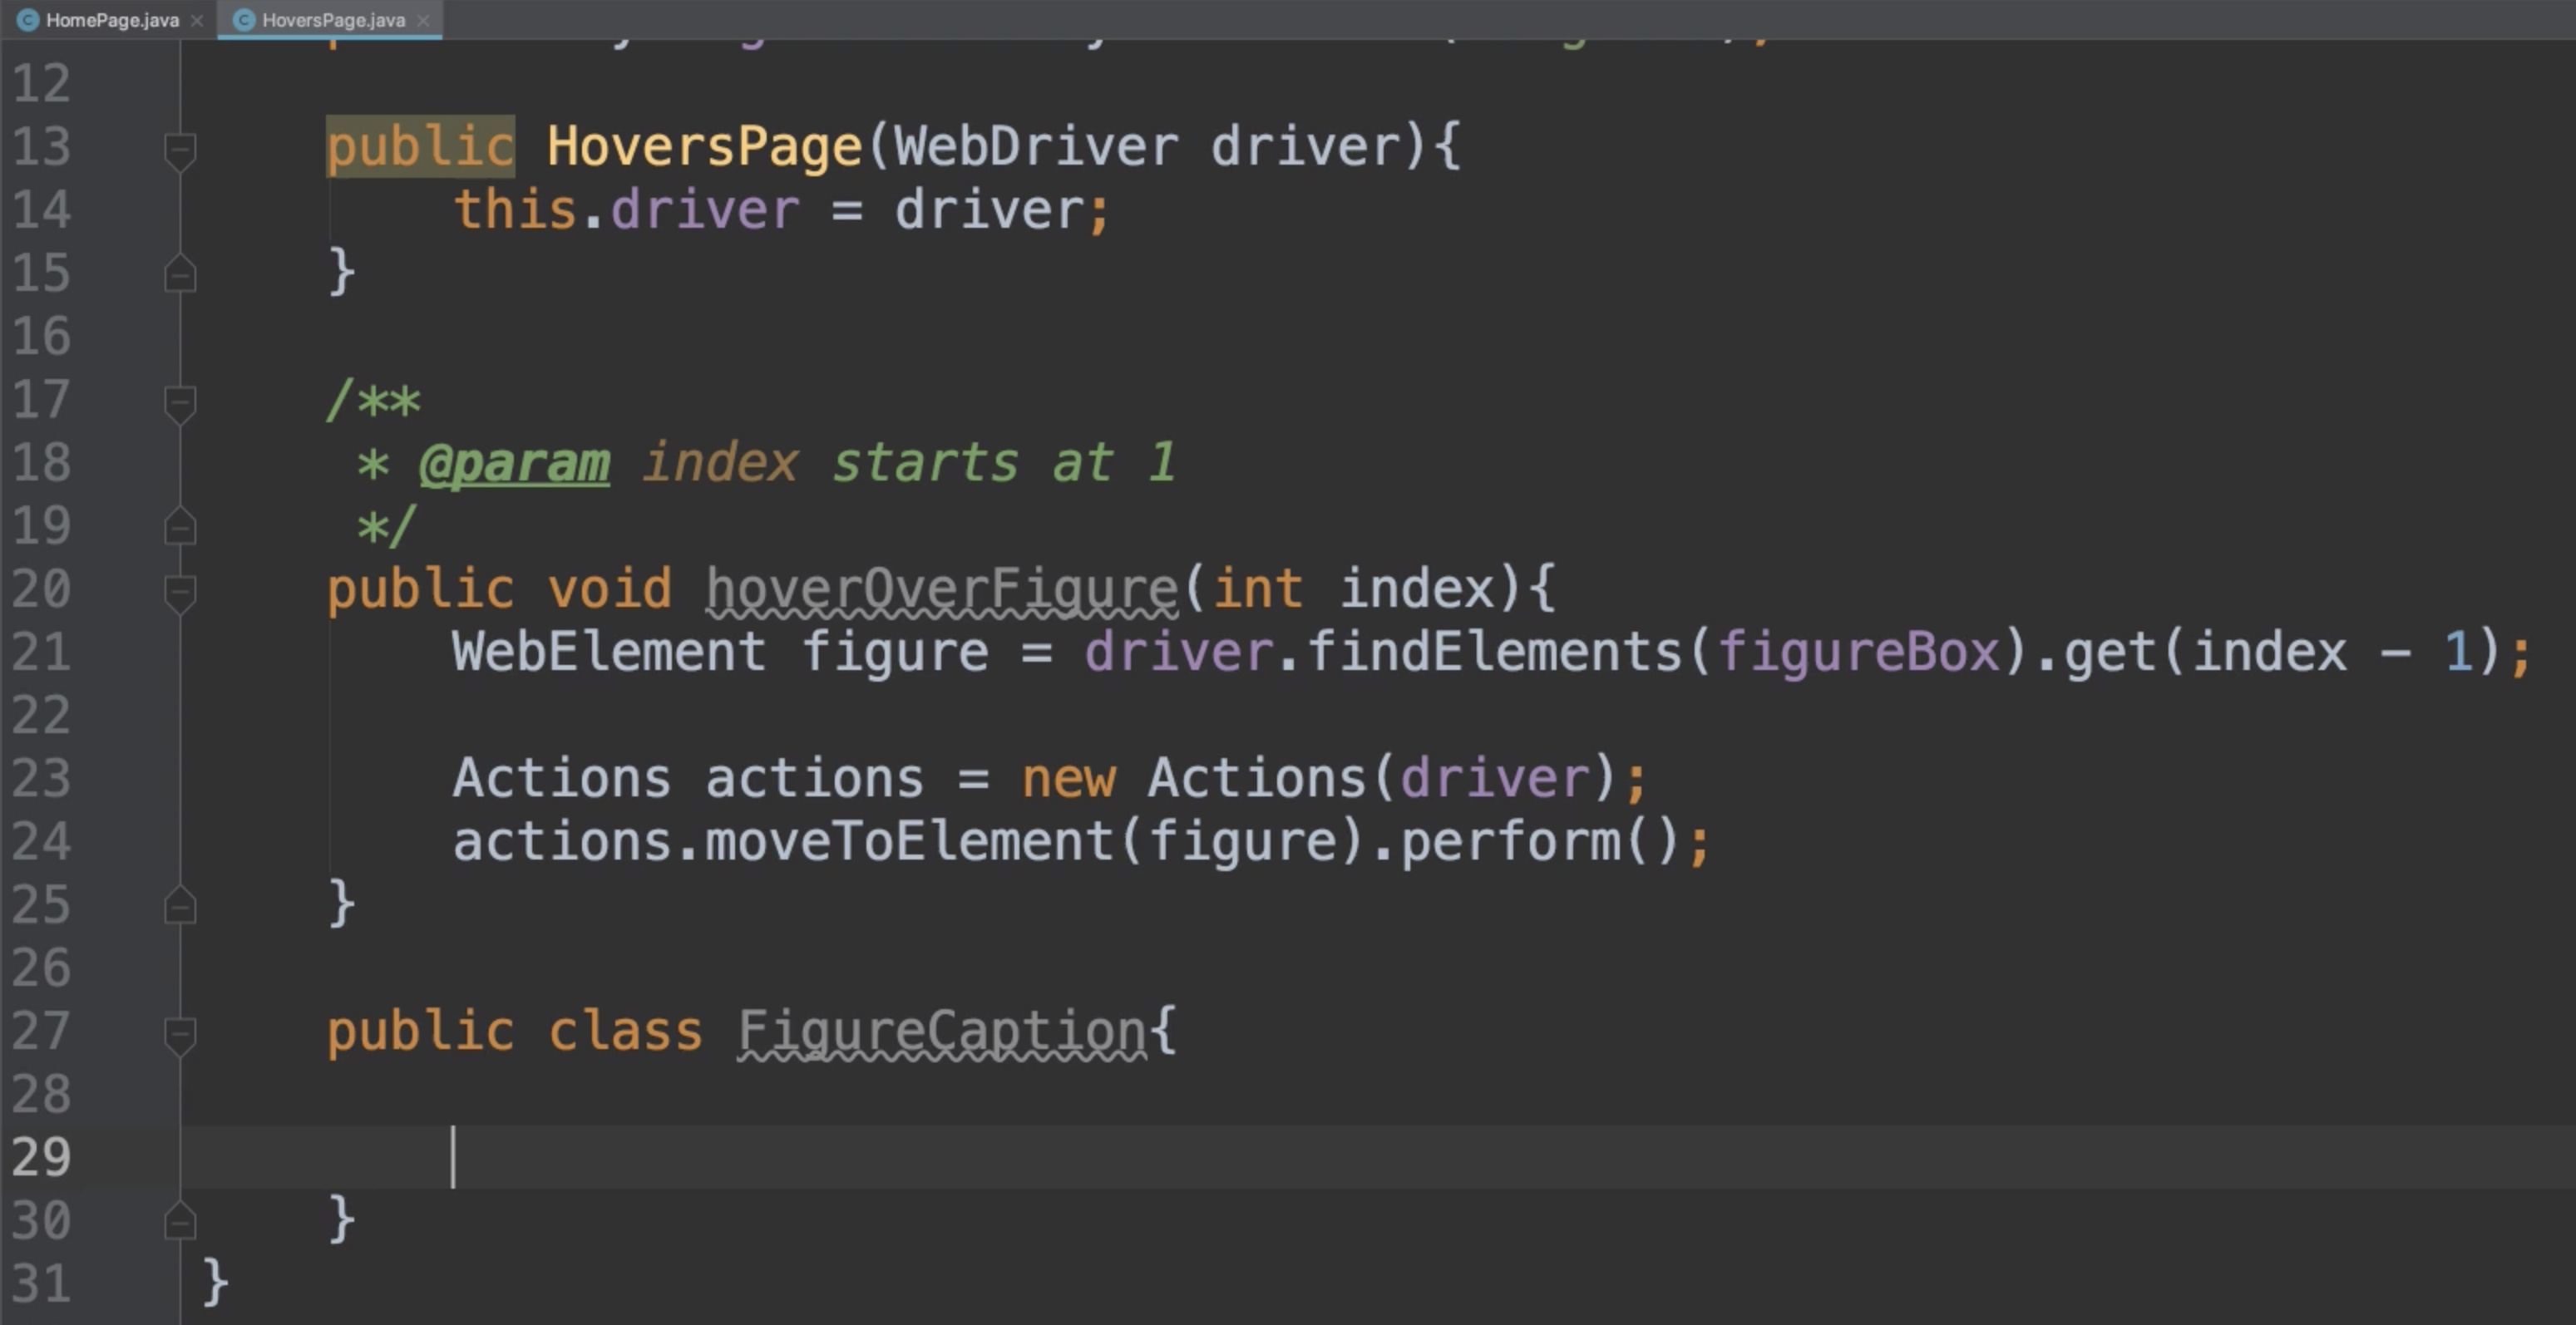
/**
* @param index starts at 1
*/
public void hoverOverFigure(int index){
    WebElement figure = driver.findElements(figureBox).get(index - 1);
        Actions actions = new Actions(driver);
}
If they have passed in the number 1, meaning they want the first one, we say 1 - 1, which would equal 0 because the List index is starting at 0.
Okay, so we have our WebElement.
Now let's go to the moveToElement and we can pass in this “figure”.
/**
* @param index starts at 1
*/
public void hoverOverFigure(int index){
    WebElement figure = driver.findElements(figureBox).get(index - 1);
    Actions actions = new Actions(driver);
    actions.moveToElement(figure)
}
This should move our mouse to that figure, which will cause the hover action to occur.
This alone is not going to do the action because the Actions class uses what's called the builder pattern.
What the builder pattern allows you to do is chain multiple method calls, and then execute them all at once.
So, for this actions, I might want it to do a moveToElement. Then I could do a dot [.] and put any other method calls I wanted to.
Once I've chained together all of the ones that I want, then I can simply call this perform and then it will execute.
Actions actions = new Actions(driver);
actions.moveToElement(figure).perform();
Okay, so now that we've done the action, we're going to want to get that caption that appears.
Let's go back to our app.
When we hover here, we get this username and this “View profile” link, so this is a bit tricky.

If we were hovering over this and only one thing appeared like this text, then we could just return that one String. However, there's 2 things that are appearing here.
Now, if we look at this, this is under a figcaption div, so we could return this entire div. However, this is going to be a WebElement and remember we don't want to return WebElement objects to our test methods.
So, we need to perhaps create something else to model this, some type of class to model the figcaption. And under that class we can then have access to this title and this link. That way our tests can verify this.
Alright let's go back to our framework and figure out how we're going to do this.
In the framework we could create another page for the figure caption. However, figure caption is not a page, so that doesn't make sense to put that there.
It's still a part of this HoversPage. We could create like a model or a component, so that would be like another package under the framework. And that might be a good practice if that figure caption appears in more than one page.
Since it's only appearing here in the HoversPage so far, what I'm going to do is create an inner class inside of this HoversPage for the figure caption.
NOTE
This is just one approach. Again, you could do other approaches if you like. For right now, this one seems to make the most sense, especially since this HoversPage doesn't have many actions. The only real thing that you can do on this page is to hover over a figure. This class is really small as it is, so it wouldn't really hurt to add this inner class here and then keep all of this in one place.
Inside of the HoversPage itself, we're going to create another class, and we'll call this one FigureCaption.
Then, in this inner class will need a constructor that accepts this web element, “figcaption”.
Let's add that, and we'll go ahead and make a field for this as well, and then we can assign it.
public class FigureCaption{

       private WebElement caption;

        public FigureCaption(WebElement caption){
            this.caption = caption;
        }
}
Okay, so when we hover over the figure, let's go ahead and grab this “caption” element, and we'll return a FigureCaption back to our tests.
Let's do that. We already have our div, which is the figure. Remember I told you in previous chapters that if you have a WebElement, you can find children or descendant elements by just doing a findElement from that element?
So instead of doing driver.findElement, which will take it from the top of the DOM, we're going to do figure.findElement, which will find it just from within this element itself.
Let's go back and look at the DOM.
Again, this is the original element, so we're going to say from here, find the “figcaption”. Because remember, “figcaption” appears more than one time, so we don't want to get this from the root of the DOM. We want to say from this WebElement “figure”, drill down and find its caption.
Now notice its caption appears in the DOM, even if it doesn't appear here. Within our test, we're definitely going to want to make sure that this is displayed.
Let's go ahead and get this.
And back to the code, we want to find this element, so let's go ahead and add that element here.
And we'll call this one boxCaption. This was also By.className, so we pass our class name.
public class HoversPage {

    private WebDriver driver;
    private By figureBox = By.className("figure");
    private By boxCaption = By.className("figcaption");
Then we can say find the caption.
public void hoverOverFigure(int index){
    WebElement figure = driver.findElements(figureBox).get(index - 1);
    Actions actions = new Actions(driver);
    actions.moveToElement(figure).perform();
    return new FigureCaption(figure.findElement(boxCaption));
}
And we change the return type here from void to FigureCaption.
public FigureCaption hoverOverFigure(int index){
We've hovered over this; we've returned the caption.
Now inside of this inner class, we know that there are two fields that we care about — the header and the link.
So, let's go ahead and create some By objects within this FigureCaption class.
For this header, there's no unique identifier here, but we see that there is a tag name.
Since we already have this parent element, we can just drill down and say, give me the <h5> element under here.
private By header = By.tagName("h5");
And for the link, it's the same thing. There are no good identifiers here, really.
There's this href attribute, but let's go ahead and just use the tag name since that's the only one under the “figcaption”.
private By link = By.tagName("a");
Okay, so let's create some methods.
What do we want to know?
Well, in our test we're going to want to know if the caption is displayed, of course.
Let's go ahead and create a method for that.
This will have a boolean return type, so it'll say: “yes it's displayed” or “no it's not”.
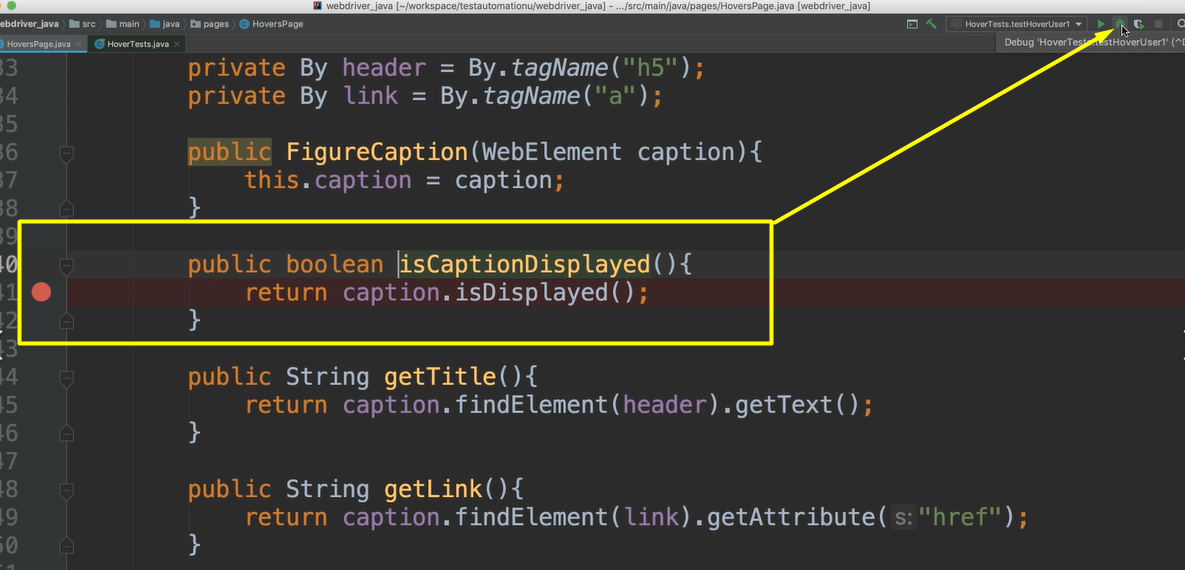
Let's call this isCaptionDisplayed.
public boolean isCaptionDisplayed(){
    return caption.isDisplayed();
}
caption is a WebElement and isDisplayed() is another interaction method available on WebElement that we're now exercising.
Ok, this will be used for one of our checks.
We're also going to want to know what's the title and verify that it’s right.
So, we're going to find the header that's under that caption object, and then from there we'll say, let's go ahead and get the text of that.
public String getTitle(){
    return caption.findElement(header).getText();
}
Then likewise, we're going to want to get the link as well.
We could get the link itself, and we could also do get the link text — let's go ahead and add both of these here.
We'll make the first method getLink.
This time we pass in the link, and let's look at this element again to see how we get the link.
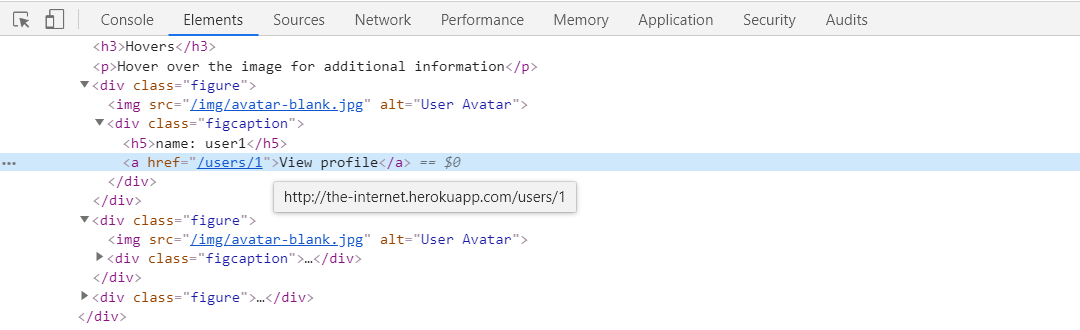
We see here there's this href that has the link and href is an attribute on this element. So, we can use that getAttribute method. We can say .getAttribute. And we give it the attribute of “href”, so then this will return us this link.
public String getLink(){
    return caption.findElement(link).getAttribute("href");
}
Actually, it won't just be the “/users/1” you see when I hover over this, that it is the whole link right here, so that's what will be returned to us. Let's just note that for now.
We'll create another method to get the link text.
public String getLinkText(){
    return caption.findElement(link).getText();
}
All right, so that is the inner class.
You see this entire class is still not too long. Right?
# HoverPage.java
package pages;

import org.openqa.selenium.By;
import org.openqa.selenium.WebDriver;
import org.openqa.selenium.WebElement;
import org.openqa.selenium.interactions.Actions;

public class HoversPage {

    private WebDriver driver;
    private By figureBox = By.className("figure");
    private By boxCaption = By.className("figcaption");

    public HoversPage(WebDriver driver){
        this.driver = driver;
    }

    /**
     * @param index starts at 1
     */

    public FigureCaption hoverOverFigure(int index){
        WebElement figure = driver.findElements(figureBox).get(index - 1);

        Actions actions = new Actions(driver);
        actions.moveToElement(figure).perform();

        return new FigureCaption(figure.findElement(boxCaption));
    }

    public class FigureCaption{

        private WebElement caption;
        private By header = By.tagName("h5");
        private By link = By.tagName("a");

        public FigureCaption(WebElement caption){
            this.caption = caption;
        }

        public boolean isCaptionDisplayed(){
            return caption.isDisplayed();
        }

        public String getTitle(){
            return caption.findElement(header).getText();
        }

        public String getLink(){
            return caption.findElement(link).getAttribute("href");
        }

        public String getLinkText(){
            return caption.findElement(link).getText();
        }
    }
}
# Let's go ahead and create our tests now.
I'm going to go to the “test” package and let's create a new package under here that we will call “hover”. And we'll create a new class inside of here called HoverTests.
This will extend our BaseTests. And we'll create a new test inside of here, and we'll call this one testHoverUser1.
We have our HomePage, we want to clickHovers(). This will give us a HoversPage object.
Then from here we can do hoversPage.hoverOverFigure(). And we said that this is user 1, so we could go ahead and pass in 1.
Okay, this will then return us the FigureCaption, that inner class that we created. We'll just call this caption..
package hover;

import base.BaseTests;
import org.testng.annotations.Test;

public class HoverTests extends BaseTests {

    @Test
    public void testHoverUser1(){

        var hoversPage = homePage.clickHovers();
        var caption = hoversPage.hoverOverFigure(1);
Now we can do our assertions.
We want to assert that of course the caption is displayed.
We can do assertTrue, and we can say caption.isCaptionDisplayed(), and then give it a message.
assertTrue(caption.isCaptionDisplayed(), "Caption not displayed");
Once we make sure that caption is actually displayed, then we can continue on with some additional assertions.
Now we want to make sure the title of the caption is correct, so let's do that.
And I'm going to change this import to import all of the assertion methods.
import static org.testng.Assert.*;
For assertEquals we're going to say caption.getTitle().
And we're going to compare that with the title in our app, so let's go ahead and copy/paste that, so we make sure we have the right title.
assertEquals(caption.getTitle(), "name: user1", "Caption title incorrect");
After we made sure that the title is right, let's go ahead and make sure that the link text is right.
This again, we'll do assertEquals and we'll say caption.getLinkText().
And we'll compare that with the link text in our app, so let's grab that. This says, “View profile”, so we'll copy this there.
assertEquals(caption.getLinkText(), "View profile", "Caption link text incorrect");
And then let's add one final assertion to make sure that the link is okay.
Remember that link is going to be the entire absolute link.
I don't want to hard code that entire link in, because let's say that this URL changed. For example, it can vary from http or https, or the subdomain could change based on if the test is run on prod, test, or dev environments.
Using this relative path is all I really want, this “/users/1”.
I'm going to just get the entire link and then I'm just going to make sure that that entire link ends with this text, so let's do that instead.
assertTrue(caption.getLink().endsWith("/users/1"), "Link incorrect");
All right, so there is our test.
# HoverTests.java
package hover;

import base.BaseTests;
import org.testng.annotations.Test;
import pages.HoversPage;
import static org.testng.Assert.*;

public class HoverTests extends BaseTests {

    @Test
    public void testHoverUser1(){

        var hoversPage = homePage.clickHovers();
        var caption = hoversPage.hoverOverFigure(1);

        assertTrue(caption.isCaptionDisplayed(), "Caption not displayed");
        assertEquals(caption.getTitle(), "name: user1", "Caption title incorrect");
        assertEquals(caption.getLinkText(), "View profile", "Caption link text incorrect");
        assertTrue(caption.getLink().endsWith("/users/1"), "Link incorrect");
    }
}
Let's go ahead and run it.
All right, and we see that that did pass.
It's a good practice to also test your test and make sure that it fails when it needs to fail.
In our case, what has me hung up a little bit is this caption piece.
Since that caption already exists in the DOM, I'm not sure if this isCaptionDisplayed will always just return true.
It shouldn't, but I'm not 100% sure of that.
What I want to do is I want to actually go here to our Hovers page and let's not hover over that image when we call this method.
And then let's make sure that it will actually fail and say that this is not displayed if I move the mouse.
I'm going to put this in debug mode. I put a breakpoint right here, and I'm going to run it in debug mode so that I can move the mouse off of this when this is called.
All right let's run it.
Okay, we're at the breakpoint, let's open our app.
We see that it's hovered. I'm just going to move the mouse right now so that it's no longer hovering this.
Alright now let's continue with our test.
And great, we see that the test failed.
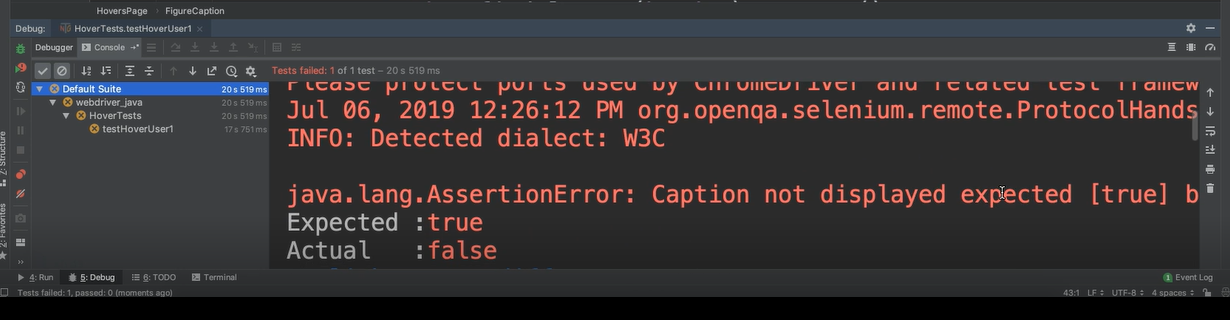
Let's make sure it says why. Yes, “Caption not displayed”. Okay, great, so now we know that that's working how we want it to.
Perfect!
That was advanced interactions using the Actions class.
There's no optional exercise for this chapter, at least not right now. I'm going to couple the Actions exercise with the chapter on popups, so you'll have an optional exercise in that chapter that will cover this as well as the alerts.
