

Transcripted Summary
During this lecture we will be discussing keyboard and mouse inputs. Let's get started.
WebdriverIO contains two actions that we can use for keyboard and mouse inputs — the first one that we're going to look at is the moveTo.
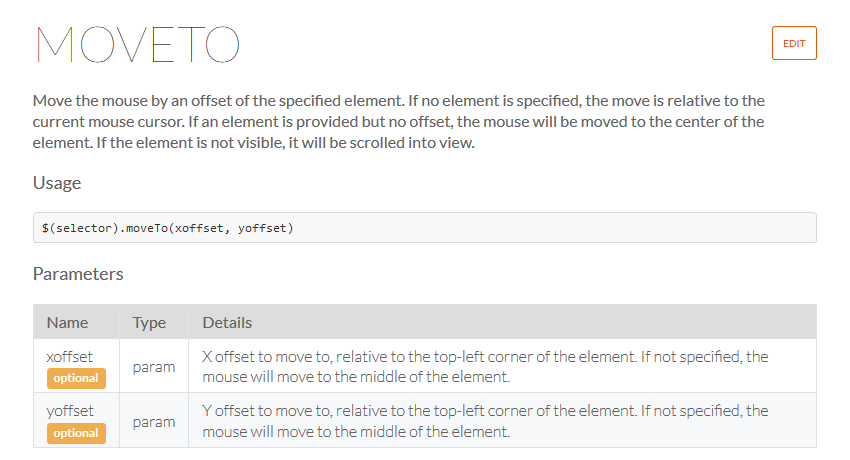
The moveTo will move your mouse by an offset to the specified element — $(selector).moveTo(xoffset, yoffset)
So, you have your selector, you use the command moveTo and then you specify the X and Y offset.
The X offset is relative to the top-left corner of the element. If you don't specify any, then the mouse moves to the middle of the element.
The Y offset is also relative to the top-left corner of the element. If not specified, the mouse will move to the middle of the element.
We can use the moveTo as a hover.
If we go back to our base page, there is a Hovers example.
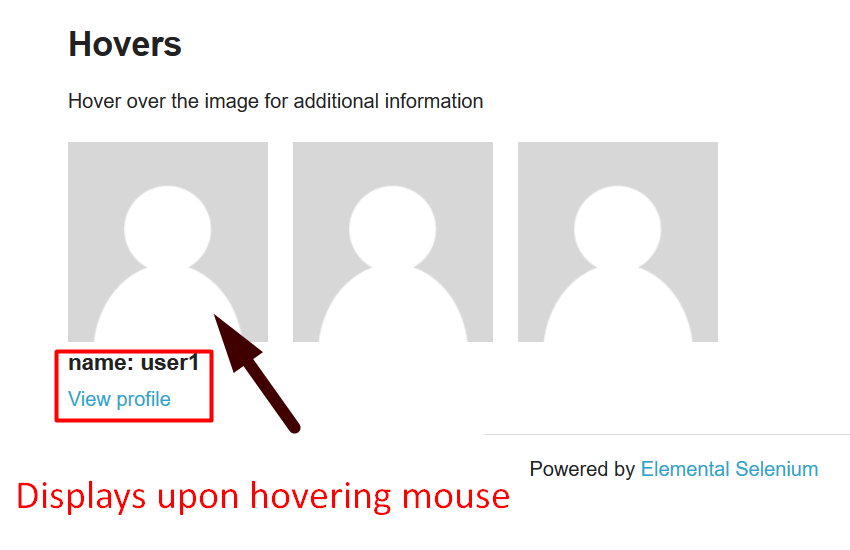
And when we hover over these images, it brings up the name and a “View profile” link. So, each has a different name.
What we are going to do in our test, we are going to use the moveTo to hover over these images and verify that the name shows up.
The first thing that we're going to do, is we're going to create our elements.
If we Inspect this, we realize that they are in a class “figure” with an img tag.
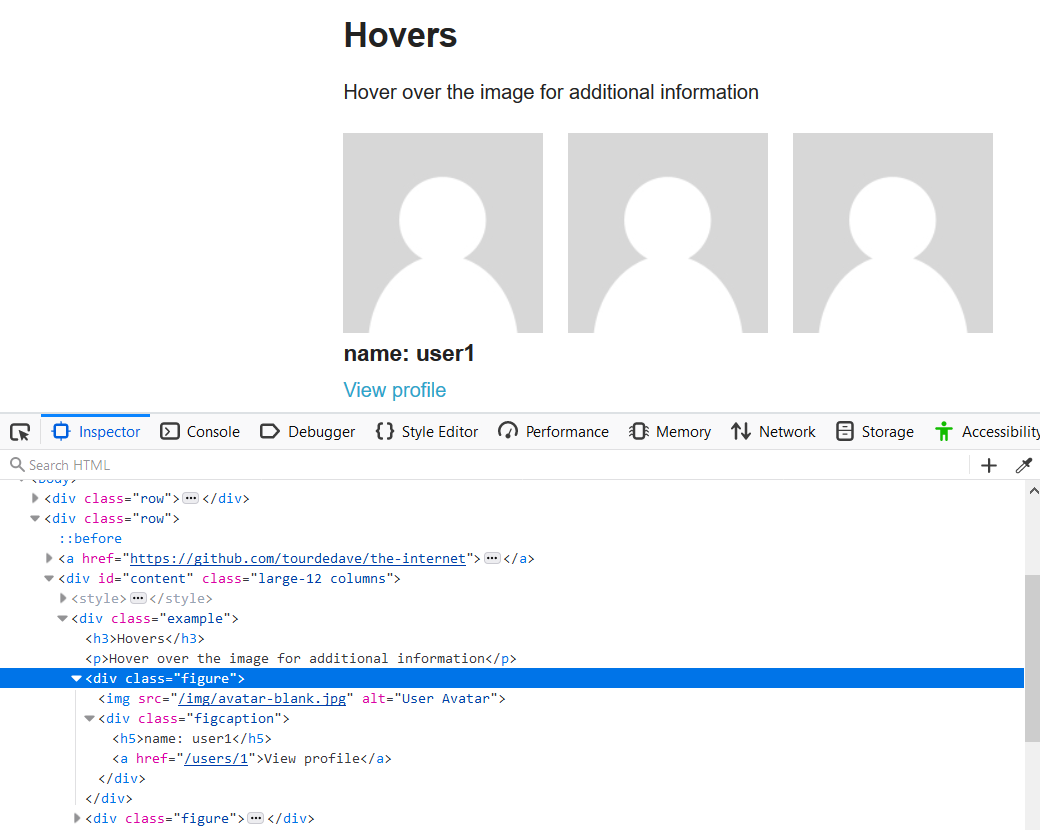
The parent of all of these 3 is this class “example”. Therefore, we can use the “example” and then nth-child for “figure”.
So, if in your browser you do a Command F [ctrl F], it allows you to find your element here.
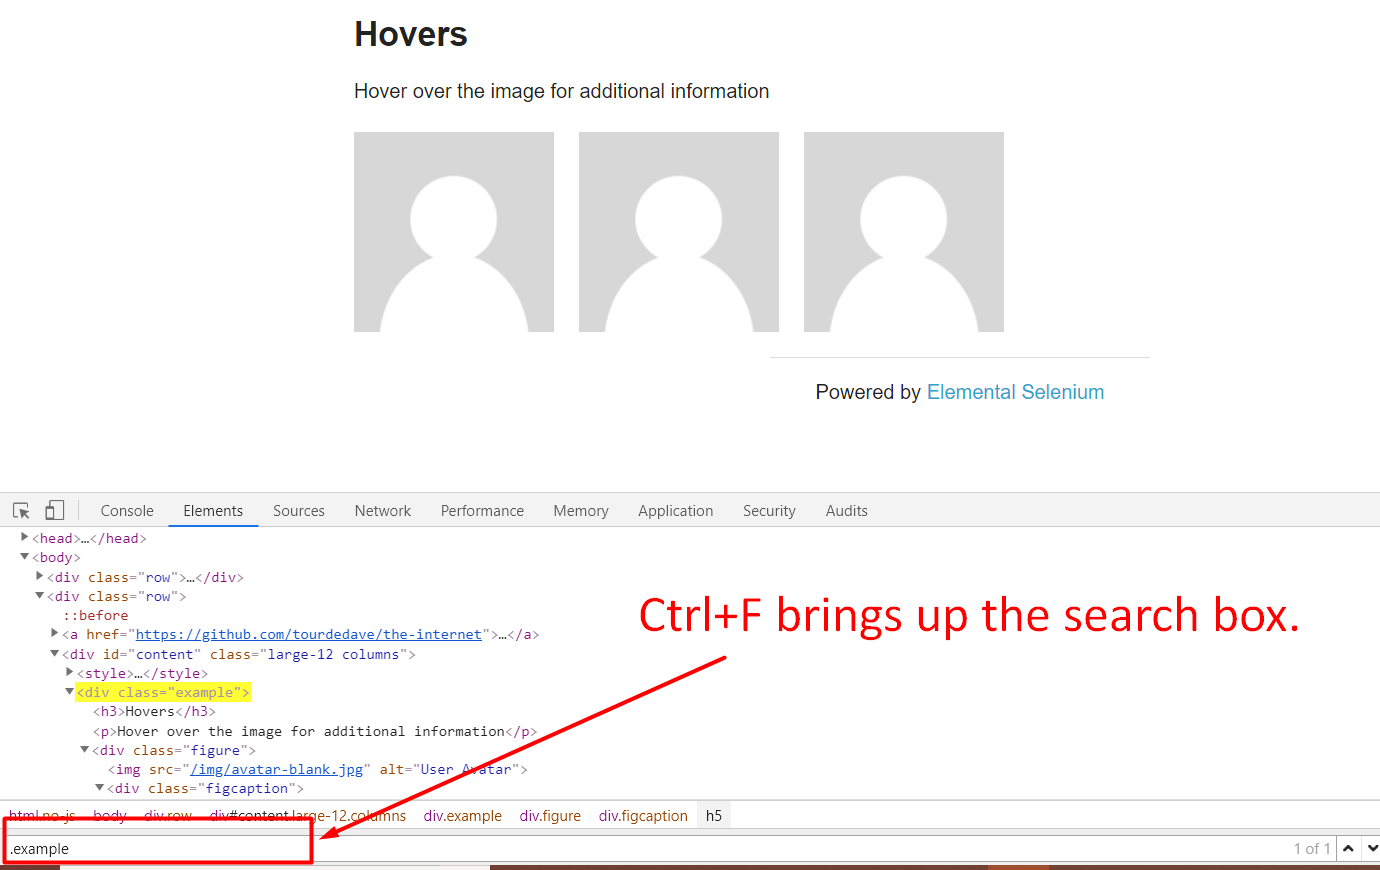
We can say “.example” and you realize that it highlights that.
And then we want “.figure”, which is the class name for these 3 images. However, we want the first, second or third one, we don't want all 3.
We can use nth-child to specify the index [which gives us this selector so far] — .example .figure:nth-child()
We realize that this [the Hovers heading] would be index 1, this [subheading] would be index 2, and index 3, 4 and 5 would be what we are looking for [the images].
If we say index 1, it will not give us anything because index 1 of “example”, would be “Hovers”, which does not have the class “figure”. So, we would have to say, index 3 in order to get our first image. Then we can attach the img tag.
Let's add this to our Page Object.
We can say
figures(index) { return $(`.example .figure:nth-child(${index}) img`) }
After we have found or hovered over the index, we need to verify that this shows up, and that it contains the information that we want.
If we Inspect this, we realize that it is in a class “figcaption” and it has an h5 tag.

What we can do is modify this element’s selector [in our find elements search box] and say .example .figure:nth-child(3) .figcaption h5 and this gives us the selector we need.
So, what we're going to do is when we hover over the image, we are going to verify that this element shows up.
We are going to set up this element in our Page Object
figureDetails(index) { return $(`.example .figure:nth-child(${index}) .figcaption h5`) }
Okay, let's just now create our function.
Our function is going to be called hoverOnFigure which will accept an index; and we are just adding some comments here.
/**
* Hovers over the specified image
* @param {Number} index the specific index of the image
*/
hoverOnFigure(index) {
    this.figures(index).waitForDisplayed()
    this.figures(index).moveTo(1, 1)
}
In this, we're first going to wait for figures to be displayed.
Then we are going to use the moveTo command to hover on the image. So, we're going to say .moveTo(1,1) and we're going to give it X and Y offset of 1.
Next we are going to create a function to get the text and to also wait until this is displayed.
What we're going to do is say:
/**
* Returns the text of the figure details
* @param {Number} index the index of the element
*/
getFigureDetailsText(index) {
    this.figureDetails(index).waitForDisplayed()
    return this.figureDetails(index).getText()
}
And we're going to return the getText so that we can use it in our test.
Let's create a new test file and we're going to call this “webdriverioApiActions.test.js”.
# webdriverioApiActions.test.js
internetPage = require('../pages/internet.page')

describe('WebdriverIO API Actions', function () {
    it('should hover on figure', () => {
        browser.url(`${browser.options.baseUrl}/hovers`)
        internetPage.hoverOnFigure(3)
        assert.equal("name: user1", internetPage.getFigureDetailsText(3))
    })
})
We are going to hover on the figure with an index of 1.
What we had here was "name: user1" and that should equal to internetPage.getFigureDetailsText with an index of 1.
So, what we need to add to our test is a browser.url. And we're going to say browser.options.baseUrl, and we are going to say /hovers, which is the addition to our baseUrl.
Remember, the option for the baseUrl is — ${browser.options.baseUrl} — and then you backslash and append whatever URL you want, which in this case is “hovers”.
One thing to note, remember we said that the index of 1 would be “Hovers” [heading], 2 would be that [subheading], so we need to use 3 here for our indexes, not the default 1.
Let us now run this test and we want to only run webdriverioApiActions.
So, we're going to say
npm test -- --spec ./test/webdriverioApiActions.test.js
Okay, so it passed.
To get a closer look at it, let us put a browser.pause for 2000 milliseconds, so that we can verify with our eyes that it indeed hovered and the results showed up.
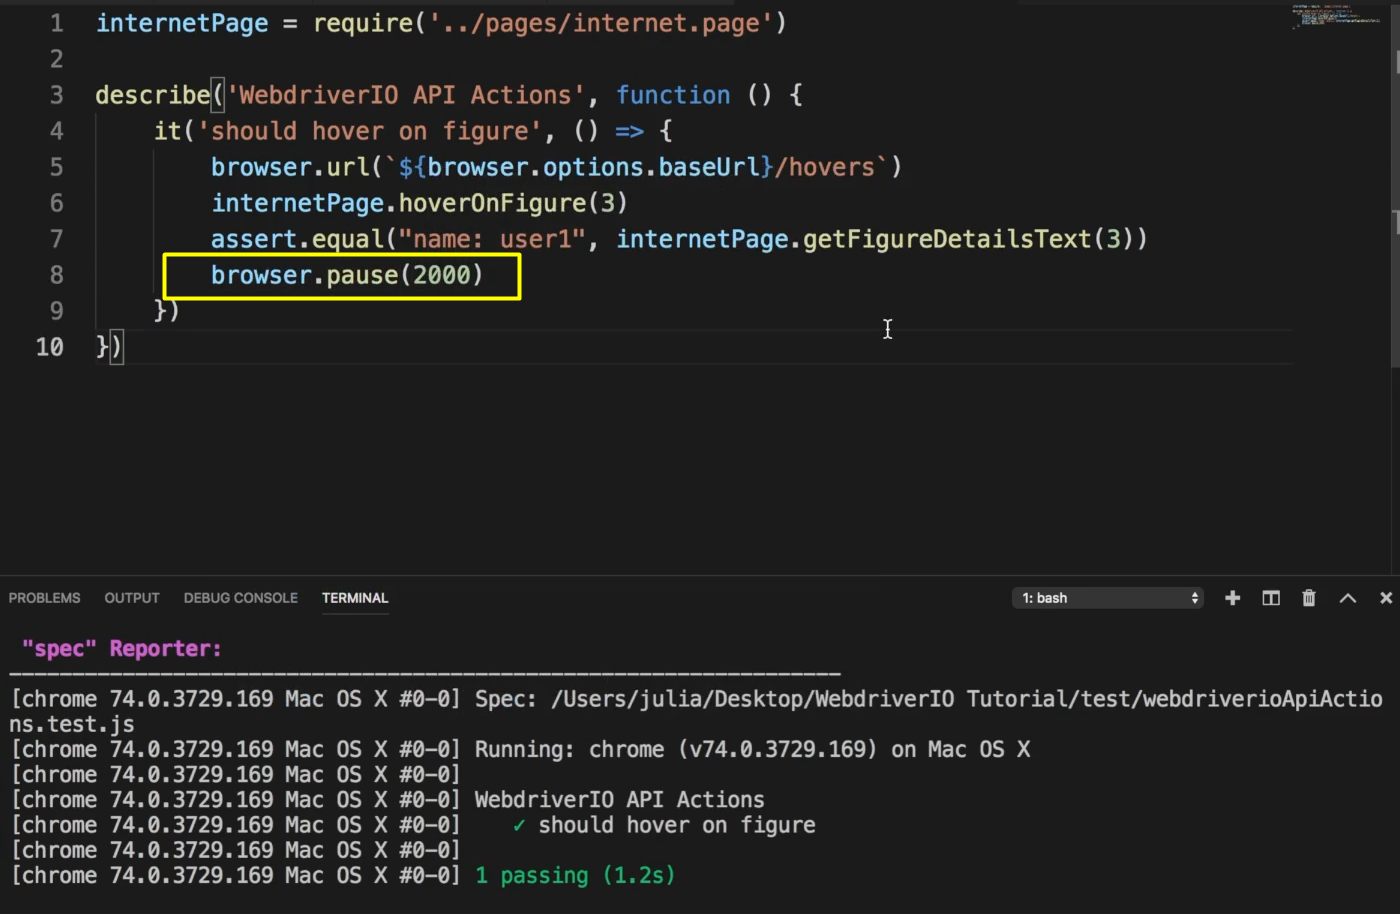
Let's run our test again and we saw that it showed up.
We can do the same thing for the other figures.
We can just modify this to say it should hover in figure 1 and we can just copy and paste it and modify it for figures 2 and 2.
# webdriverioApiActions.test.js
internetPage = require('../pages/internet.page')

describe('WebdriverIO API Actions', function () {
    it('should hover on figure 1', () => {
        browser.url(`${browser.options.baseUrl}/hovers`)
        internetPage.hoverOnFigure(3)
        assert.equal("name: user1", internetPage.getFigureDetailsText(3))
    })

    it('should hover on figure 2', () => {
        browser.url(`${browser.options.baseUrl}/hovers`)
        internetPage.hoverOnFigure(4)
        assert.equal("name: user2", internetPage.getFigureDetailsText(4))
    })

    it('should hover on figure 3', () => {
        browser.url(`${browser.options.baseUrl}/hovers`)
        internetPage.hoverOnFigure(5)
        assert.equal("name: user3", internetPage.getFigureDetailsText(5))
    })
 })
Okay, so let's run our test again.
So, we saw that it hovered. However, we failed to change our assert [when we copy/pasted], and so our assert should be username "name: user2" and "name: user3" [for the other 2 tests].
If we run it this time it should pass. Okay, so it hovered on all the figures.
This is how you can use hover in WebDriver.
Another WebDriver API action that we will discuss in this lecture is keys.
If we go to the WebDriver API documentation and click on keys — browser.keys(value) — and you enter the value that you want.
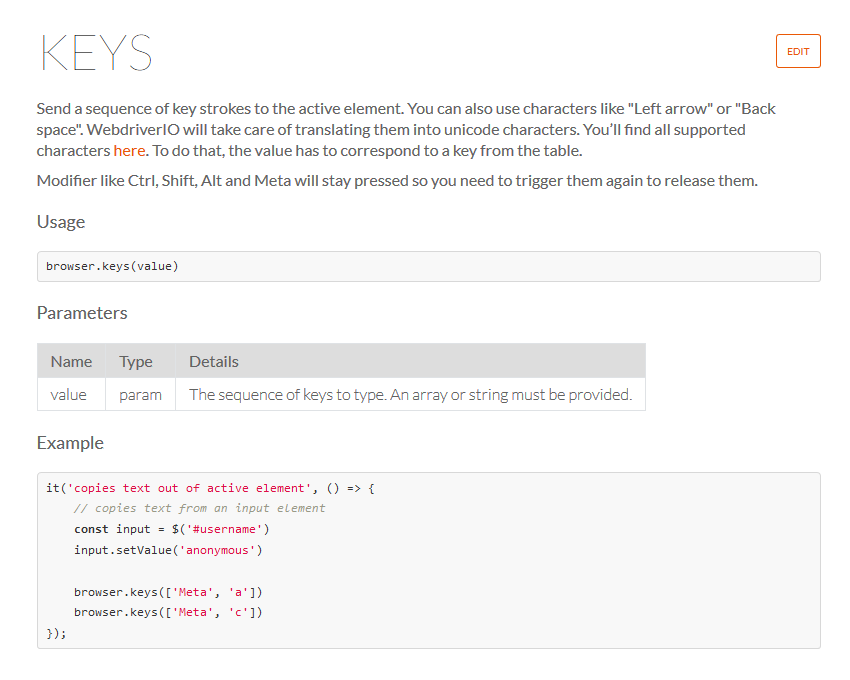
What we're going to do in this case, is enter any keyboard input that we want so we can send enter, we can send delete, we can send shift...
If we go to our internet page, it has Key Presses.
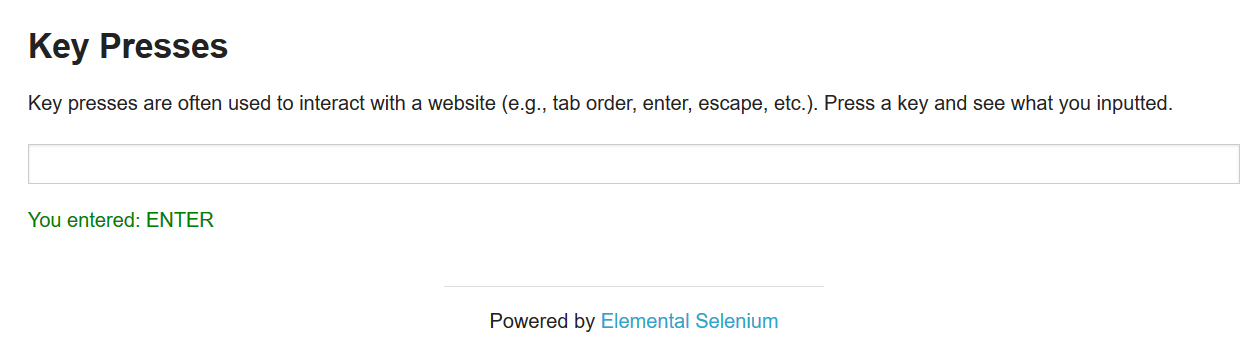
What it does, it tells you what key you entered, so we can use that to verify that the key that we sent was actually entered. What we're going to do is use the keys to send delete or enter to it and then verify that this showed up.
WebDriver Supported Charters
A thing to note is that the WebDriver documentation provides you with a list of supported characters. If you click here, it takes you to this, and if we “command F”, and search for “keyboard actions” it takes you to it. What WebDriver does, and it's very great, you don't have to send in the raw key, you can send in the normalized key value, and a WebDriver will convert it to the raw key for you.
You can send in Clear, Backspace, Help, and WebDriver will convert it to these.
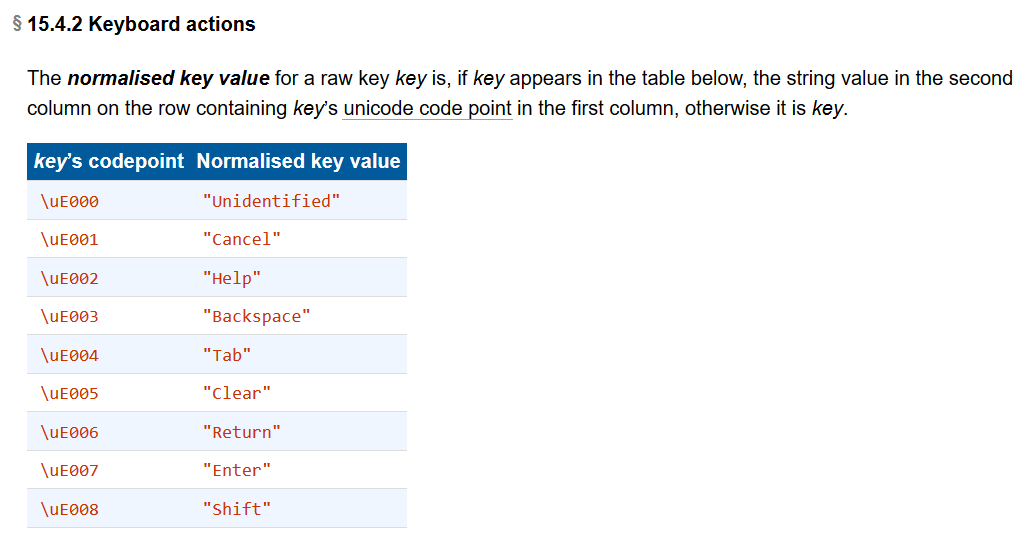
And it says that in this documentation. You can use _Left Arrow _or Backspace and WebDriver will take care of translating them into Unicode characters.
What we're going to do here is enter some value, and then we are going to verify that value that we sent was accepted and it showed up.
In our Page Object, we're going to create an element called “keyPress”.
What we're going to do is Inspect.
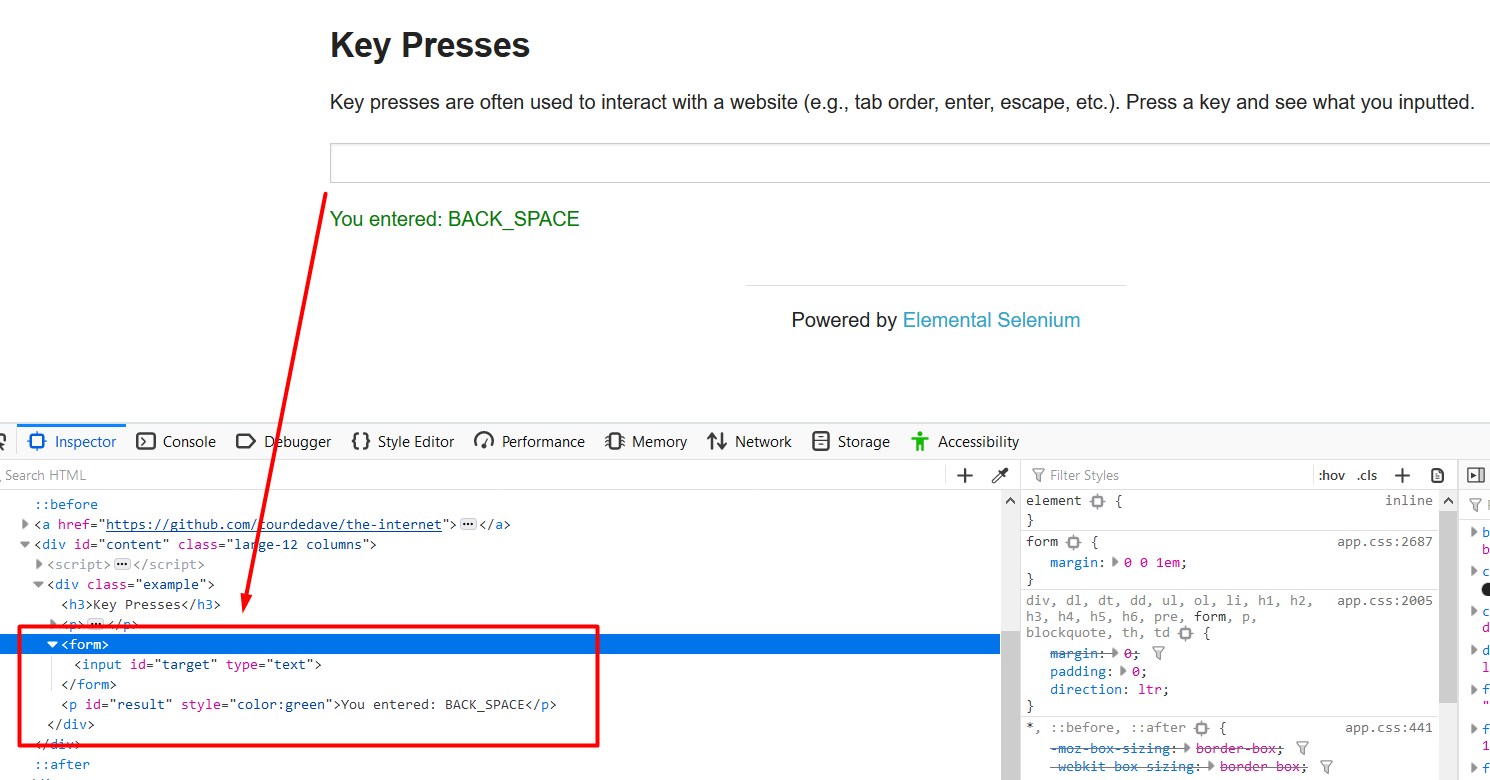
We see that it has a form with an input of “target”, which is in a class “example”. So, if we say [in the find element search box] “.example #target” it provides us with the input field.
For this [the display result of what was entered], if we say “.example #result” it provides us with a results.
So, we're going to create those two key elements.
The first one being the target
get target() { return $('.example #target') }Then the result
get result() { return $('.example #result') }
Okay, now we're going to have our functions.
The first one is clickTarget.
/**
* Clicks the target input field
*/
clickTarget() {
    this.target.waitForDisplayed()
    this.target.click()
}
And we're going to create a function called sendKeysToTarget.
/**
* Send keybord keys to Target
* @param {String} text The keyboard text to enter
*/
sendKeysToTarget(text) {
    this.target.waitForDisplayed()
    this.target.keys(text)
}
What this is going to do is send whatever keyboard keys you want to this field. We're going to say “text”, because we are going to send it from our test. Okay.
And then we're going to have one called getResultText.
/**
* return the text of the return element
*/
getResultText() {
    this.result.waitForDisplayed()
    return this.result.getText()
}
What this is going to do is after we send the key, it is going to return the text to verify that what we actually sent was received and is showing. We're going to return that.
Okay, so in our test we're now going to say:
it('should send keyboard value Enter', () => {
    browser.url(`${browser.options.baseUrl}/key_presses`)
    internetPage.clickTarget()
    internetPage.sendKeysToTarget("Enter")
    assert.equal("You entered: ENTER", internetPage.getResultText())
})
And in this case working to be sending Enter.
For this specific application, what we realize is that if we Enter on the keyboard, press Enter, it disappears.
So, what we're going to enter instead is the Delete, as that does not disappear immediately. So we are going to send in Backspace. Okay.
it('should send keyboard value BackSpace', () => {
    browser.url(`${browser.options.baseUrl}/key_presses`)
    internetPage.clickTarget()
    internetPage.sendKeysToTarget("Backspace")
    assert.equal("You entered: BACK_SPACE", internetPage.getResultText())
})
And in this case, it should equal to "You entered: BACK_SPACE".
Okay, let's run our test. So, our test passed. We sent in the Backspace (or delete) and it gave us the result of "You entered: BACK_SPACE".
We can do a browser.pause here so that we can see it.
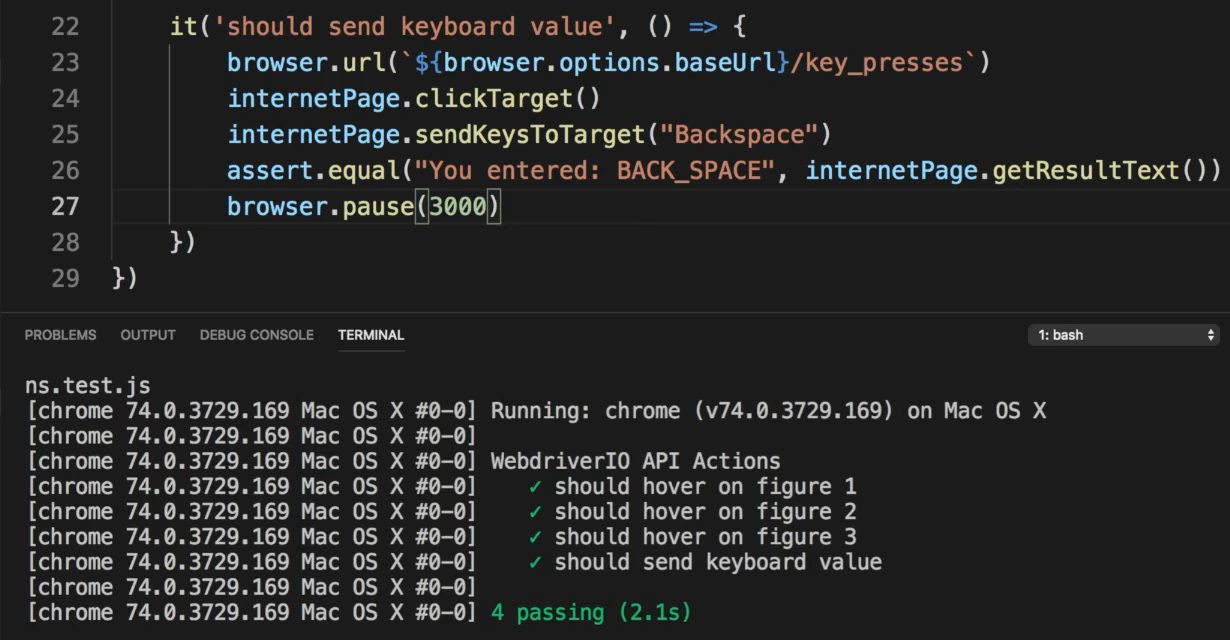
Let's run our test again. We see here "You entered: BACK_SPACE". Okay.
So, let's try a couple more.
If we look here, we have Tab and Return, so let's try Tab and Return.
Let's modify our tests and we're just going to copy and modify it.
it('should send keyboard value Tab', () => {
    browser.url(`${browser.options.baseUrl}/key_presses`)
    internetPage.clickTarget()
    internetPage.sendKeysToTarget("Tab")
    assert.equal("You entered: TAB", internetPage.getResultText())

})

it('should send keyboard value Shift', () => {
    browser.url(`${browser.options.baseUrl}/key_presses`)
    internetPage.clickTarget()
    internetPage.sendKeysToTarget("Shift")
    assert.equal("You entered: SHIFT", internetPage.getResultText())
})
Here we're going to send in "Tab", which we're expecting to see “TAB”, but let's verify what it says here. Okay. And if we say "Shift", it says we entered “SHIFT”.
Let's run those two tests and they should work.
Okay, great. All of those work. And we can remove our browser.pause.
If we notice here [in the API documentation], we can also enter other things like numbers, F1, F2, Alt, PageUp, PageDown. Any arrow key that you want, we can use WebDriver API action to send these to the browser.
So those are two WebDriver API actions:
keys— which is used for keyboard enteringmoveTo— which you can use for mouse movements
Resources
Quiz
The quiz for this chapter can be found in section 3.5
