

Transcripted Summary
# Installing XCode
The next tool that we want to install is Xcode to be able to use the iOS simulators with Appium.
From the App Store menu, you just can click on the "Develop" category in the applications and here you can find that Xcode is already installed with the latest version Xcode 12.4.
If you want a previous version or a specific version with Xcode, you should have a developer account.
This is also required to be able to use Appium with a real device.
I will search for an "apple developer account" which will direct me to the Apple Developer website.
Here, under "Account", I can log in if I already have an account or if I don't, I can create a free Apple account to be able to download the certificate or the signing profile with Apple and to be able to use it with a real device.
I will log in, and I can go to "Downloads" and I can have the Xcode 12.5 beta version or I can check the release notes, or I can check the previous version of Xcode.
So I've already opened an application - the to-do list application - which will be used as an example for an iOS application and from here, I can click on "Devices".

This is a simulator, so you can choose which simulator you want to run your application with.
Also, you can "Download Simulators" or "Add Additional Simulators", and you will be able to click on the one you don't have - for example, "iOS 14.3 Simulator" - enter your password, and then the download will start.
After it's finished, I can use it, but we can select any version that is already installed.
For example, I can select iPhone 12 version 14.4 - iPhone 12 is the hardware and the OS version is 14.4, and then I can click on "Play" or "Run" this application.
Now the application is building my application on the device and then the device, or the simulator, will start and then install the application on the device.
Now the build has succeeded and the simulator will initialize and I need to wait until the application is displayed on the screen.

After our application is installed on the iOS device, now it's displayed and this is a to-do list and I can create or edit it in my notes here.
This is the iOS or I can just close the application and here I can work with the iOS simulator as I want.
One more thing about Xcode, if you run Xcode for the first time, you should enable the Developer Mode.
If it's not enabled or the notification is not displayed for you, you can just run from the command line:
DevToolsSecurity -enable
It will enable Developer Mode if it's not enabled for Xcode.
Now we installed Xcode, and like Android Studio we already have the command line for Xcode and we can use it with Appium. So we have Android Studio, we have Android SDK, and we have Xcode and all the tools that are required.
Now let's continue and check the remaining tools or commands that we want to run for the required dependencies for Appium.
# Installing Homebrew
The next tool that we want to install is Homebrew, which is a command line.
We usually use it to download anything with macOS.
I will search for Homebrew and we can click on the first link to and follow the directions to Install homebrew, so we'll open the command line and then we run:
/bin/bash -c "$(curl -fsSL https://raw.githubusercontent.com/Homebrew/install/HEAD/install.sh)"
This will install Homebrew on our operating system and after that, we can use Homebrew for installing the rest of the tools that are required for Appium.
After we installed Homebrew, we run:
brew -v
This will give us the version, and we can also run just:
brew
This will give us the commands or the parameters that we can use with brew.
For example, brew install, brew update, brew upgrade, brew uninstall, or brew list.
# Installing Carthage
The next tool is Carthage.
Carthage is a dependency management tool for iOS applications - like Maven or Gradle in Java or in Android applications.
Why do we need to use Carthage?
Because if you wanted to run our tests on iOS real devices or physical devices, we should build the WebDriver agent from Appium with this tool, and then to be able to install the application or the WebDriver agent application on the device, and then we can run our tests on the device.
From the browser, I will search Carthage, which is a simple, decentralized dependency for iOS applications.
I will jump to installing Carthage and using Homebrew and I just need to copy this command line and run:
brew install carthage
After I install Carthage, I can then go to the next step.
So Carthage is required to be able to run Appium or the WebDriver agents on our iOS or real device.
Here you can find all the information about Carthage.
Carthage is the simplest way to add frameworks to your Cocoa applications and you can manage your project dependencies, like Maven or Gradle in Java applications.
After we install Carthage, we can start working with this.
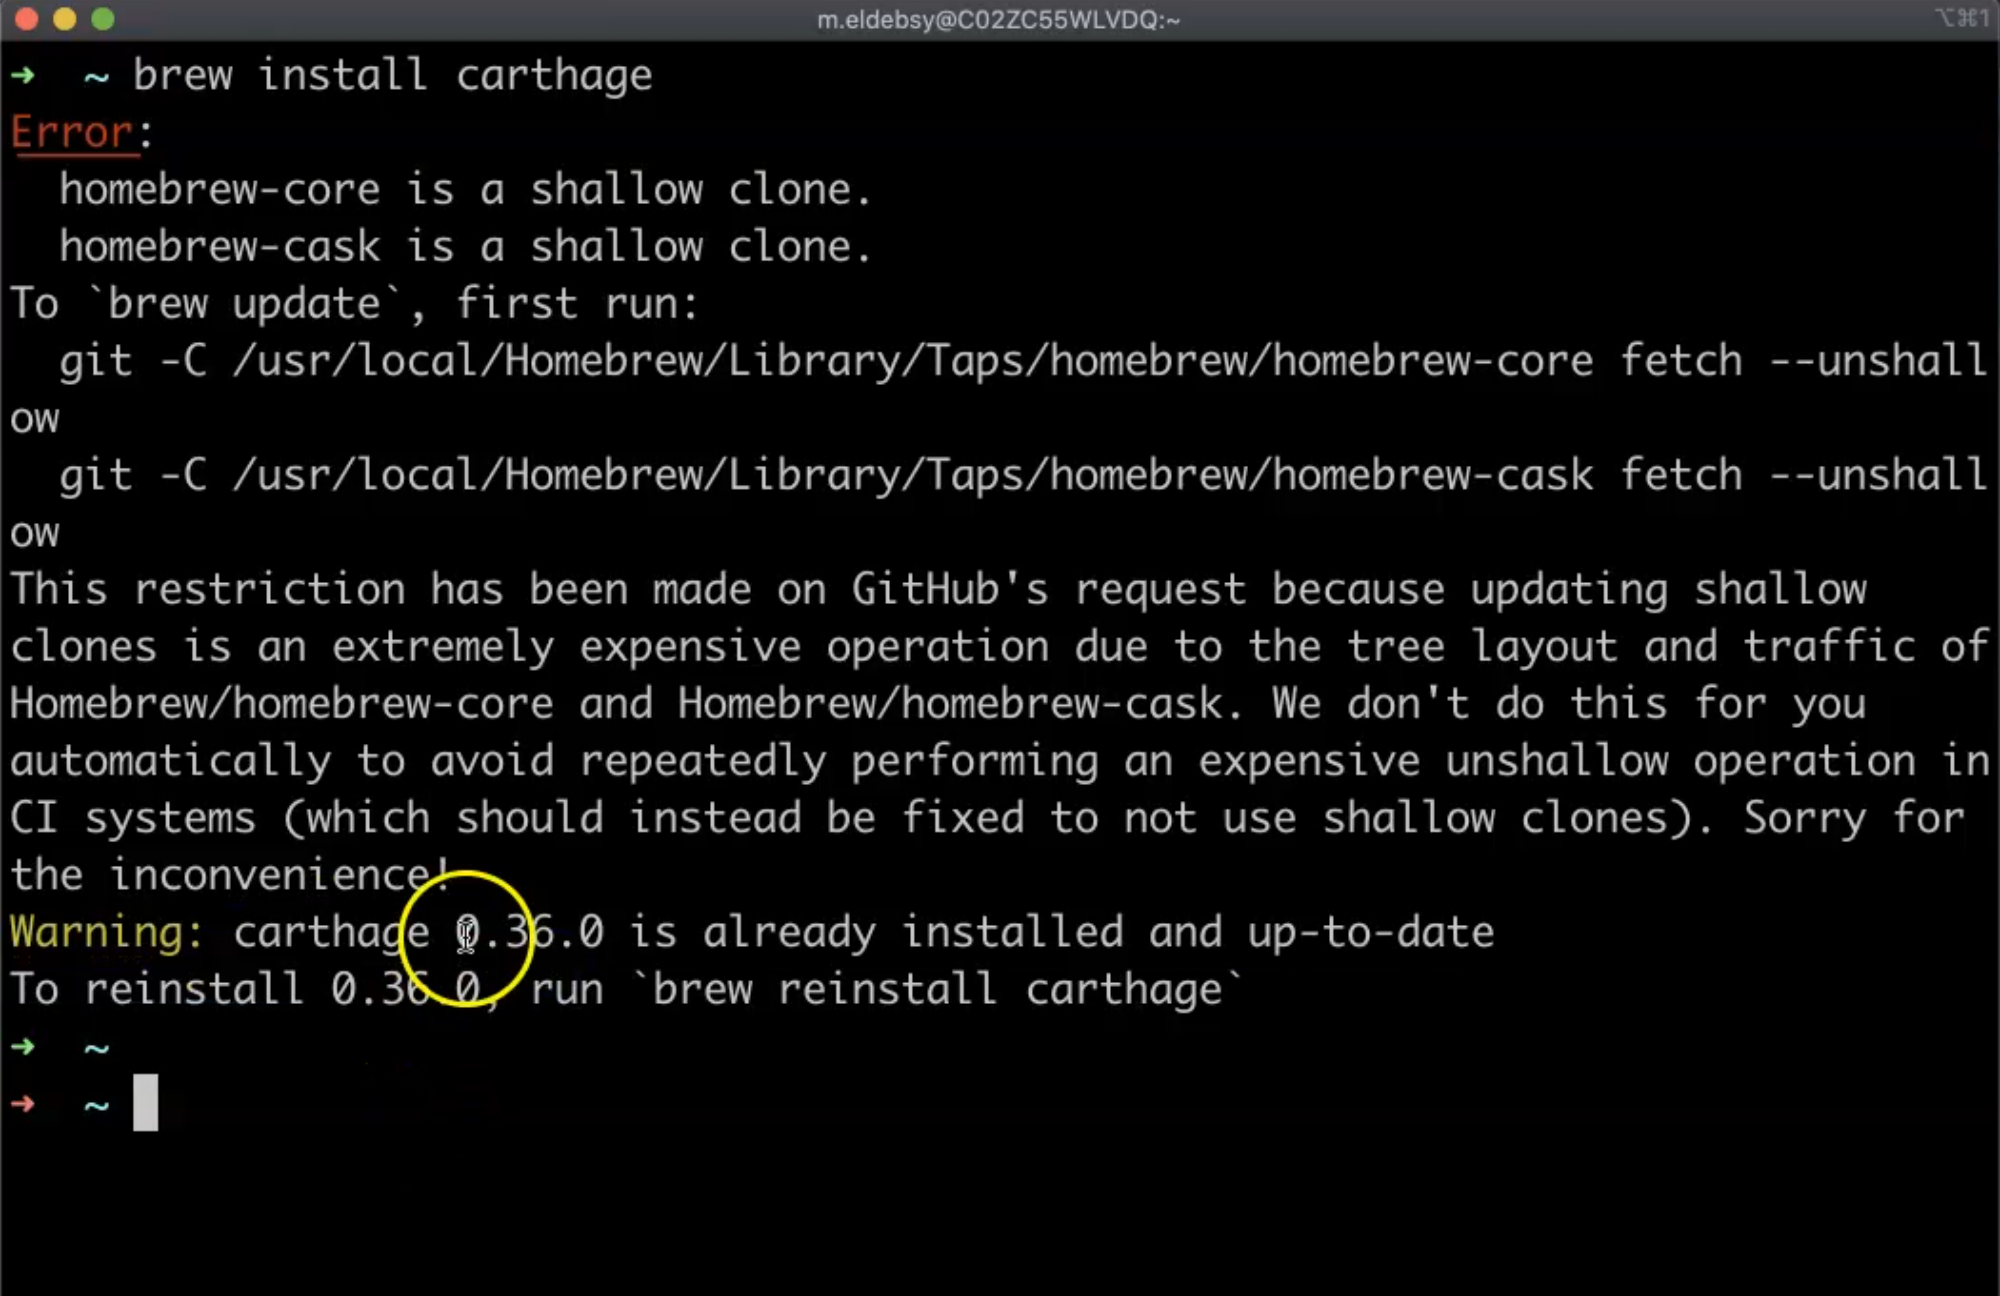
Because I have it already installed, this is a warning that I have already installed it, but in your case, if you don't have Carthage, continue with installing.
# Installing Appium Desktop
Now that we have finished installing all the required or the necessary dependencies for Appium, now it's time to install Appium itself and Appium desktop.
From the browser, we can search "appium install" and then we can go to the official site for Getting started with Appium.
For installing Appium we can use npm, so we can run this on the command line:
npm install -g appium
-g is global on our machine.
You can also install via desktop application, so here we can download the Appium Desktop, which is the next step that we will use.
There is also a driver-specific setup.
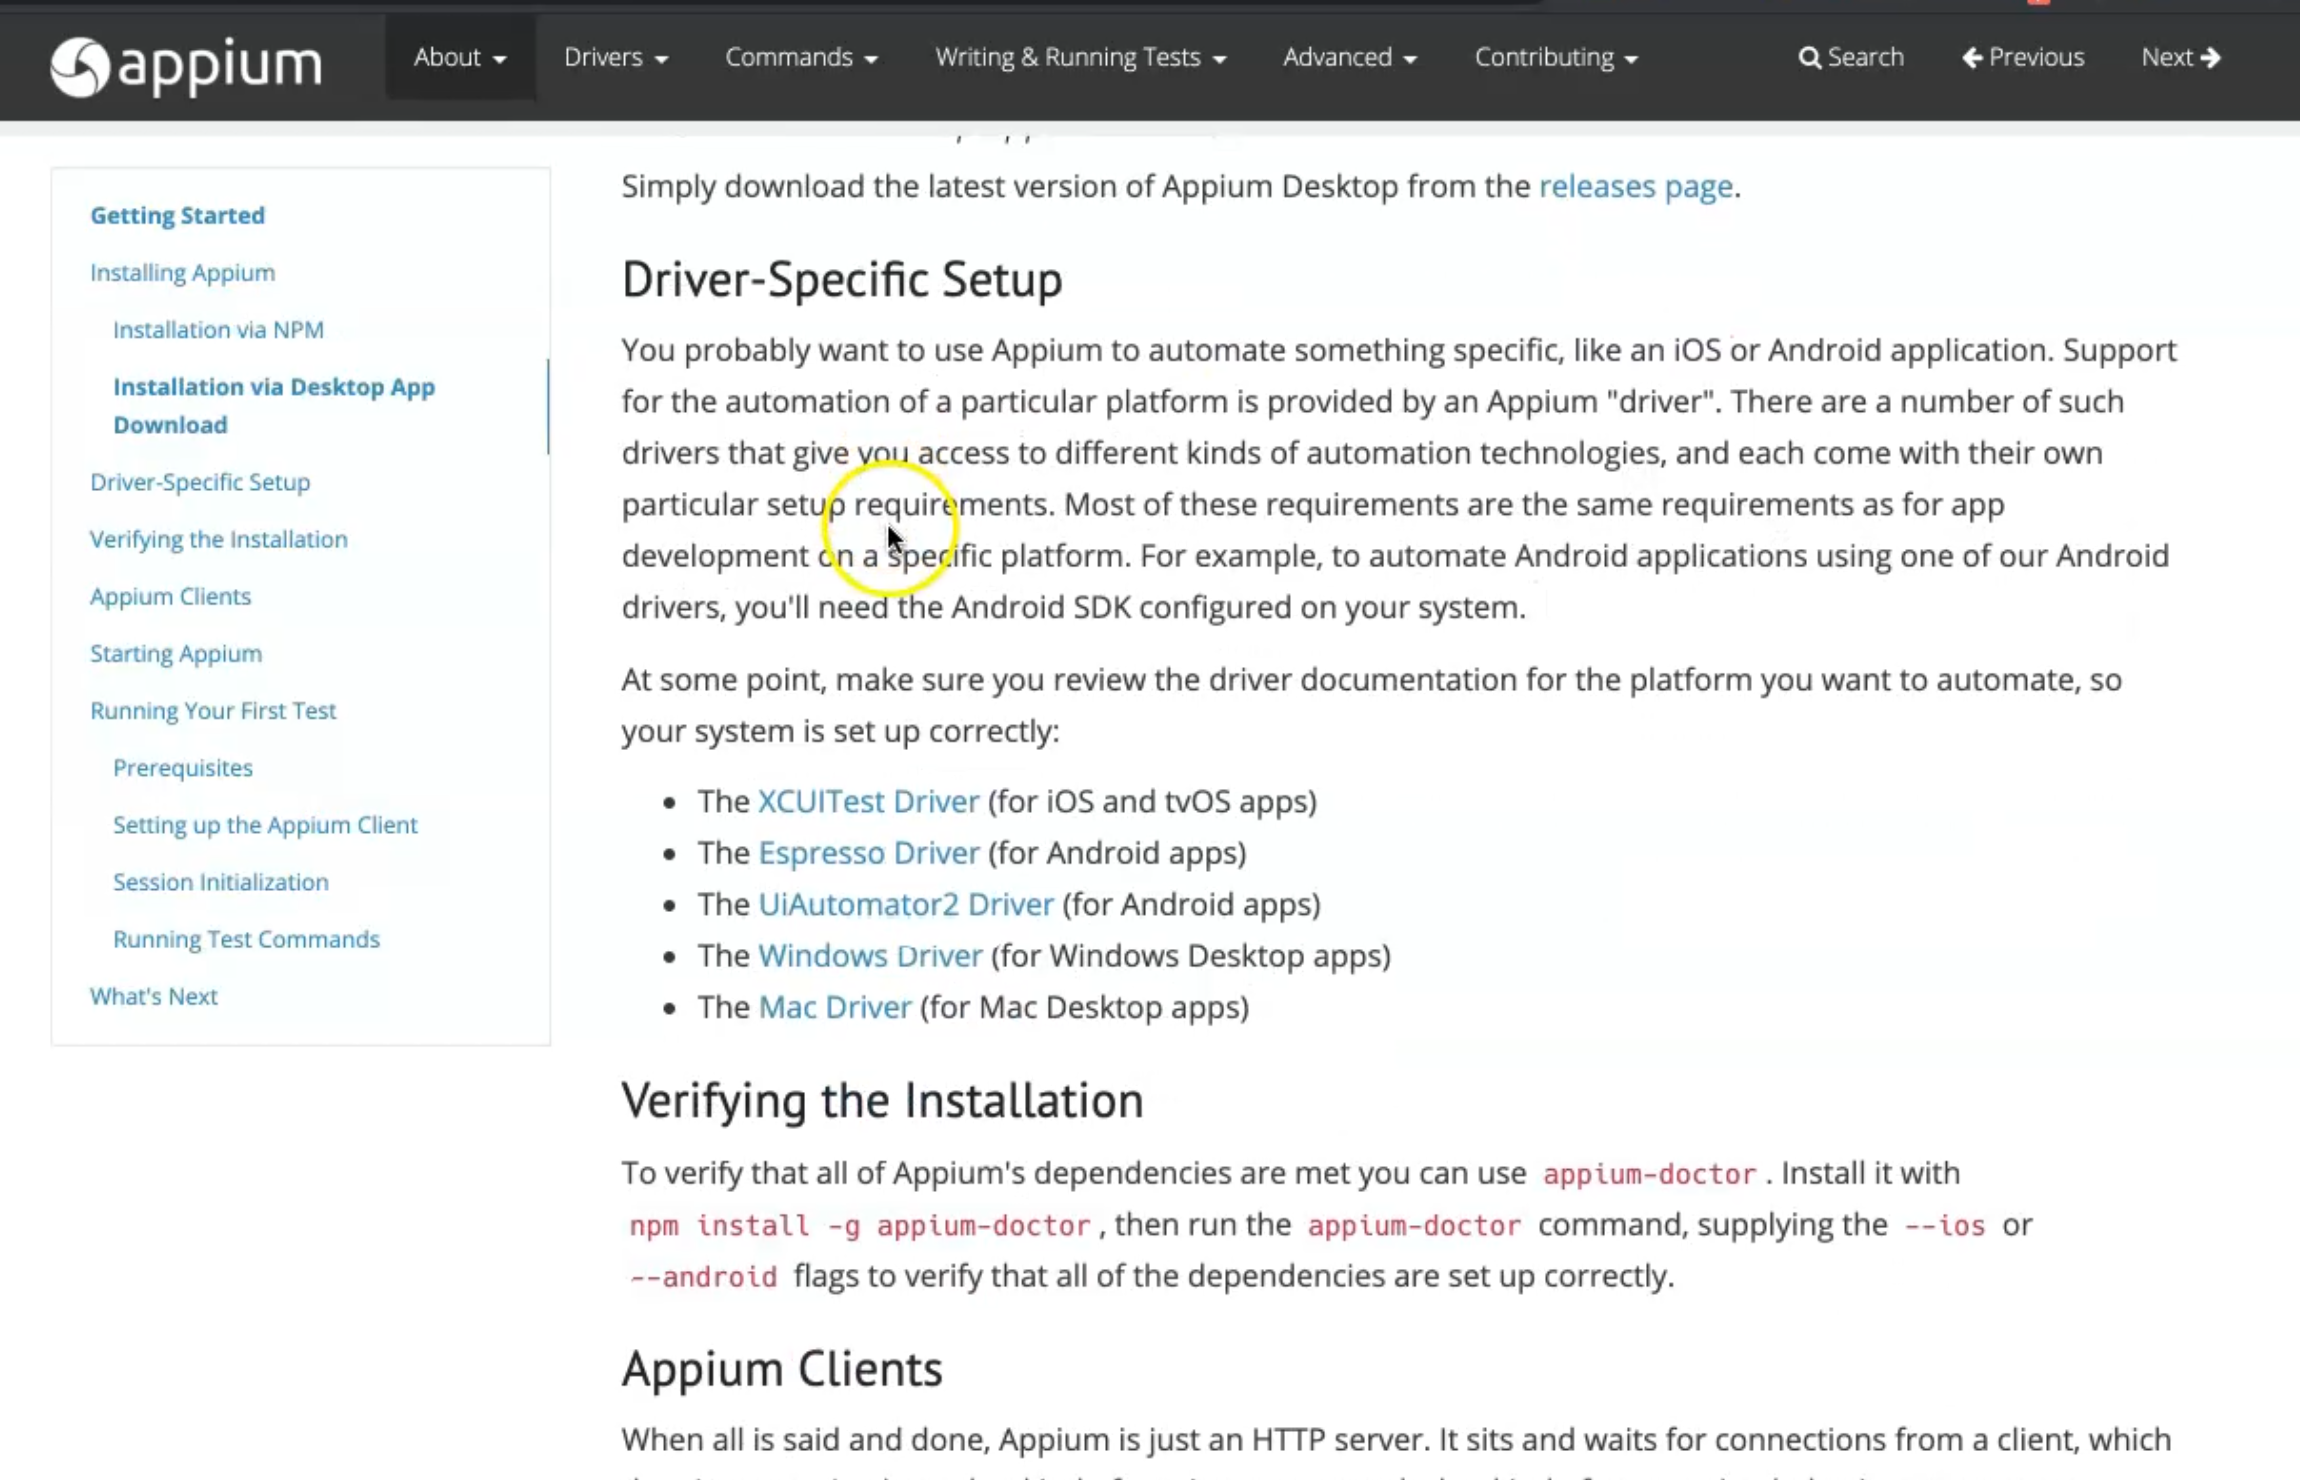
So for example, if you wanted to use XCUITest Driver, Espresso, UIAutomator tool, Windows, or Mac, you can also click on each one and go to the details.
To verify the Appium is installed correctly and all of the things are set up, we can just install and download:
npm install -g appium-doctor
After we finish installing Appium, and then we will install Appium Desktop, and then we will run appium-doctor again, and check what is still missing in our prerequisites, and start installing them.
So now to detect which version of Appium is installed, we can run:
appium -v
Now, it's time to go to the Appium Desktop to install Appium Desktop.
Appium Desktop is, as we mentioned, a server and the inspector together and a desktop application or GUI application for Mac, Windows, and Linux.
We can click on the "Releases" and click on the latest release and then you will have different images or different versions.
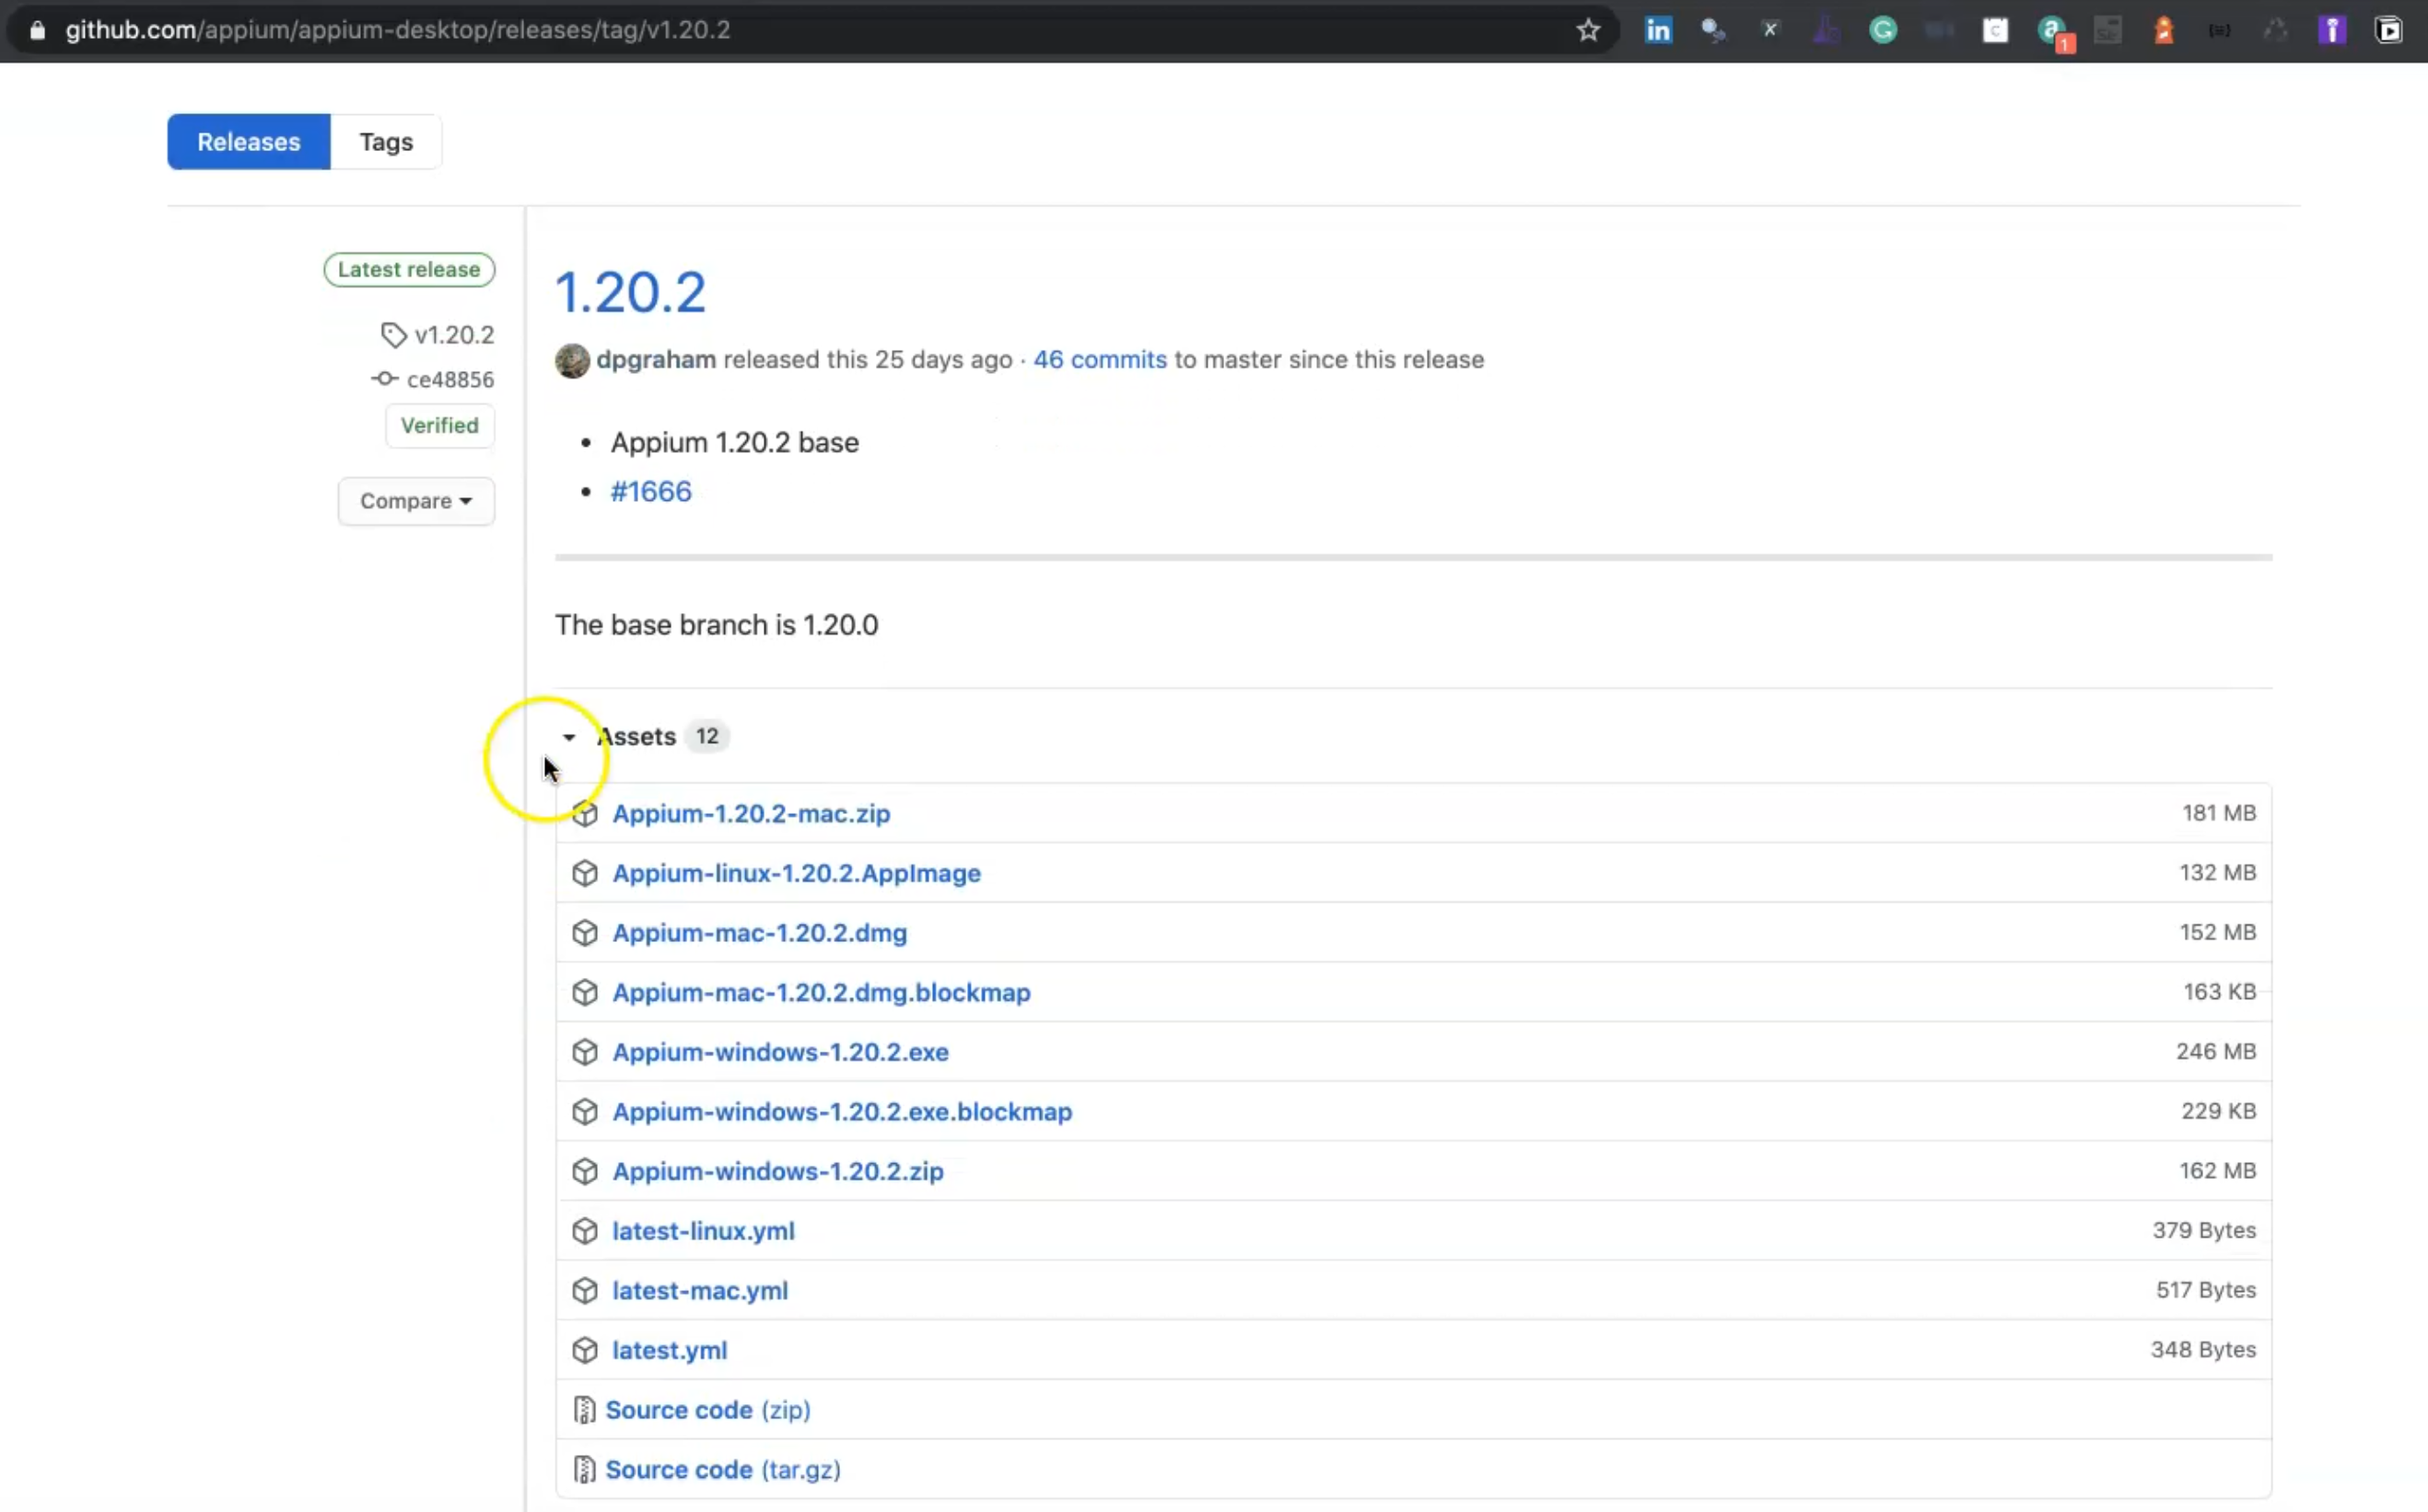
For Mac, we can just click on the Appium-mac DMG file and click Save.
After the file is downloaded, we can double-click or start installing the Appium desktop on our machine.
You need to drag and drop the Appium application into the Applications folder and we need to wait for
After we install Appium, now we can open the launchpad and search for Appium and click on the Appium icon to open the Appium Desktop application.
This is Appium 2 because I have an already existing version of the Appium desktop in my Applications folder.
Now it's opening, and sometimes we face this issue that Appium can't be opened by Apple because it could be malicious software.

So, we'll open the Finder and go to the application.
On Appium 2, we will right-click and then click Open.
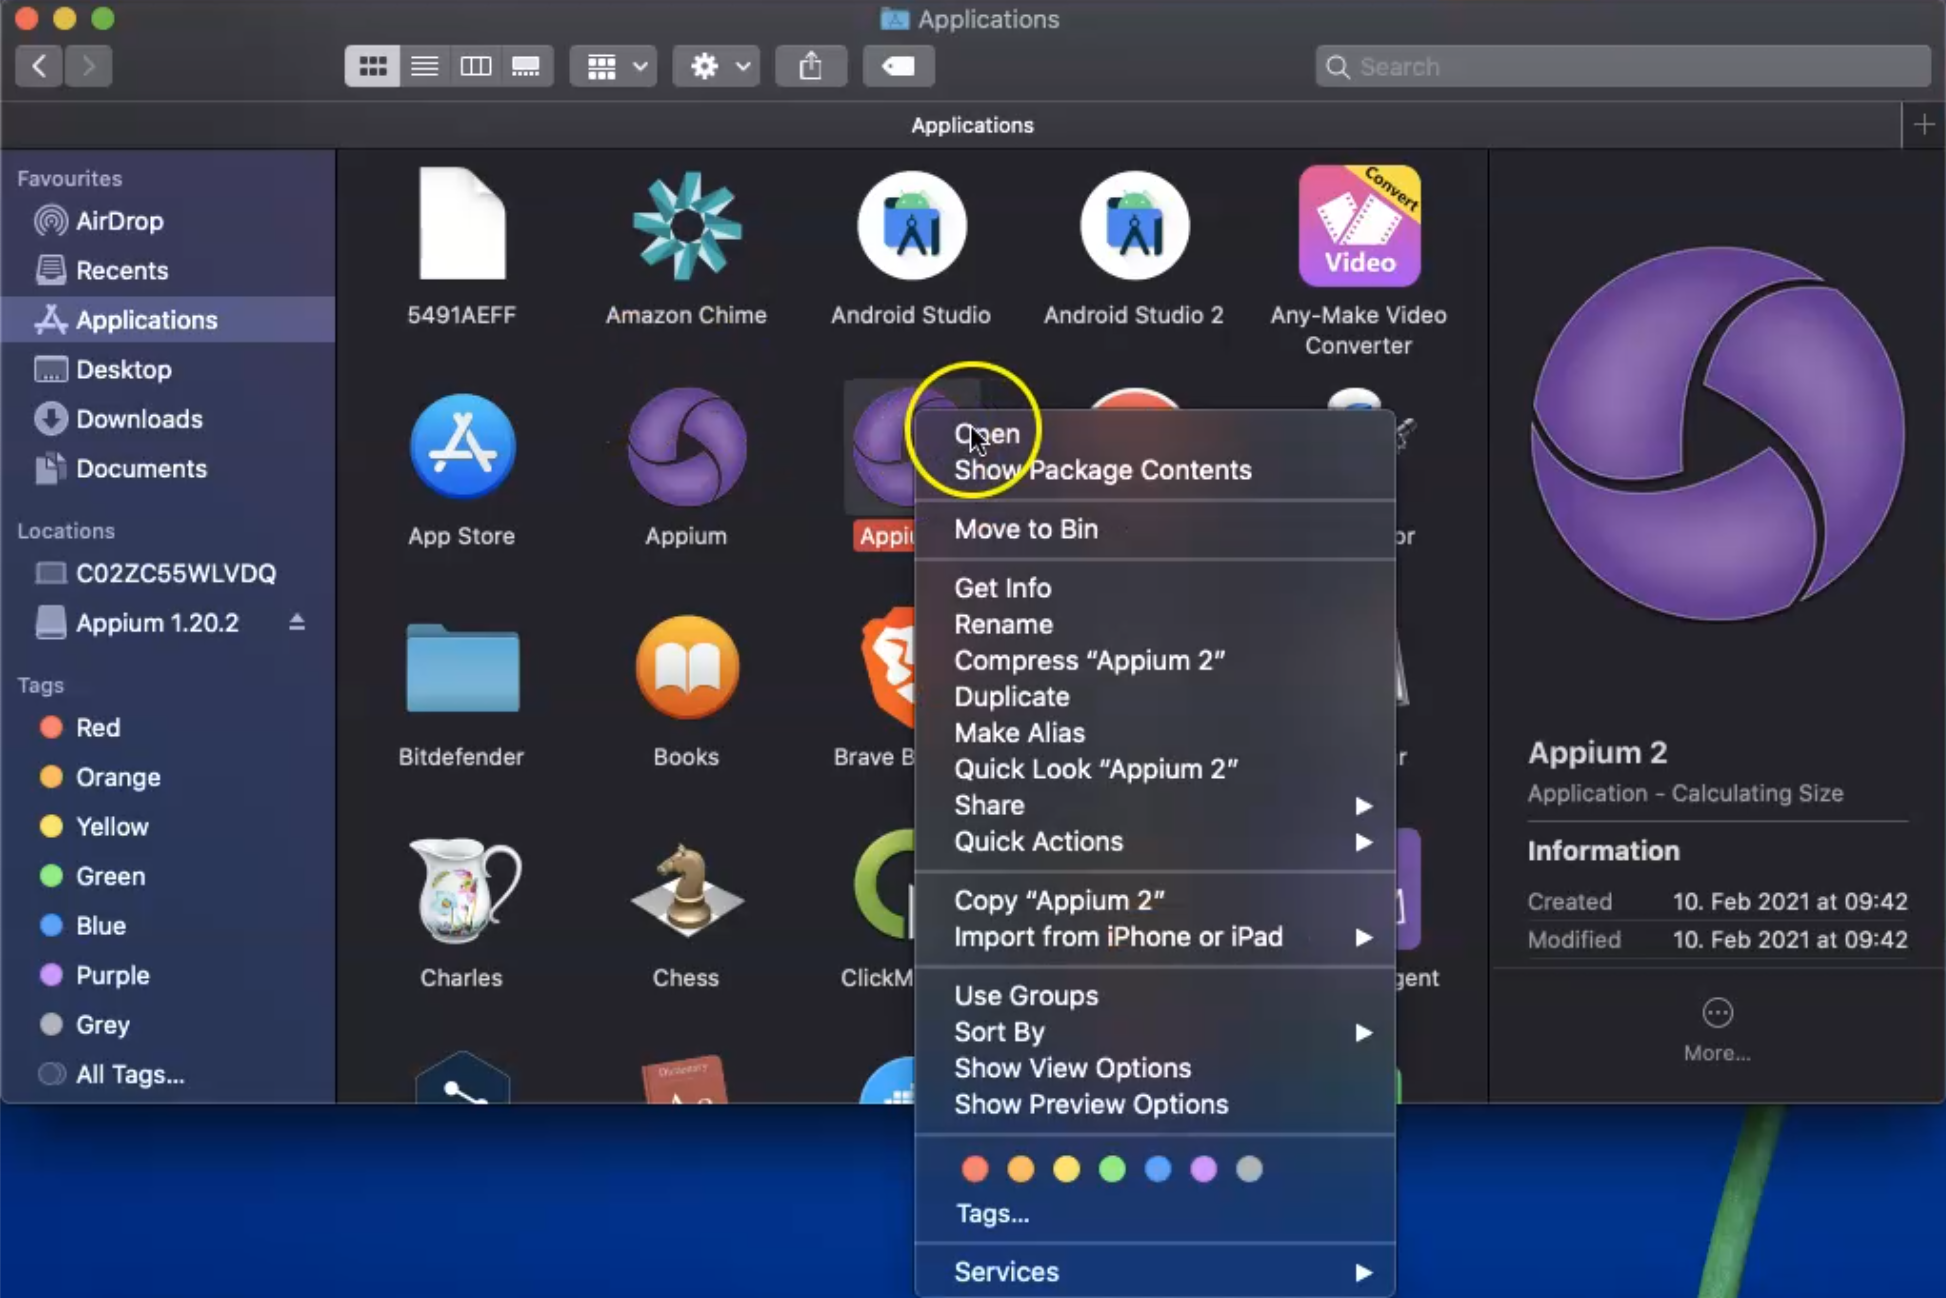
Next time, we can open it in the normal way.
This is a well-known issue with Appium Desktop so if you face this issue, just do this workaround to be able to open the Appium desktop.
So now here we have the Appium desktop open, and from this button "Start Server", we can run or start the Appium server on our local machine.
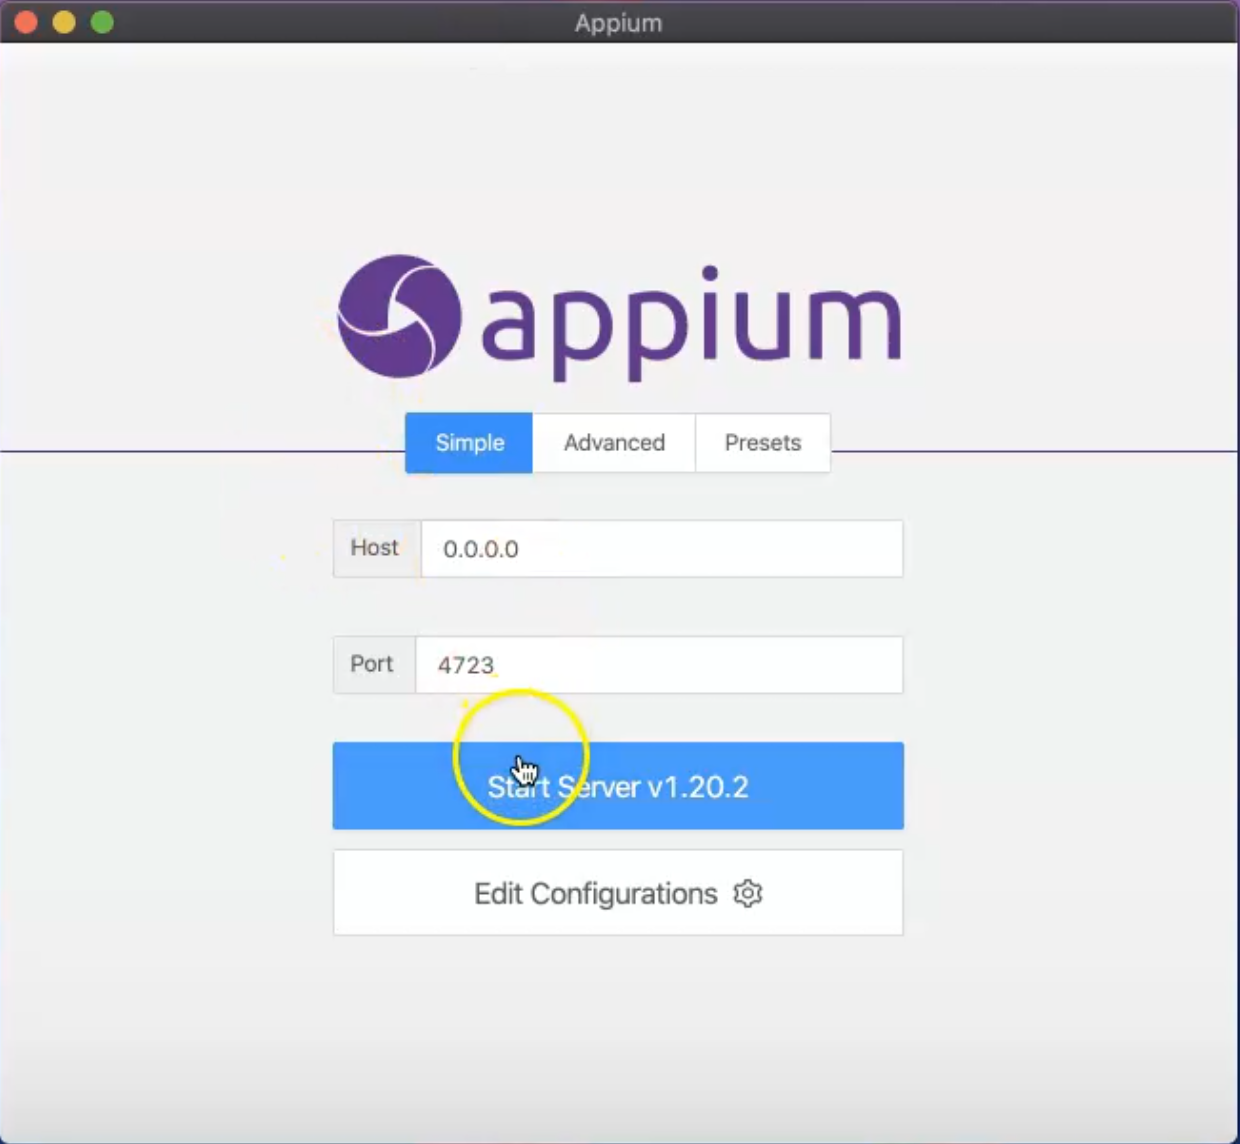
Here the server is running and the Appium restful server is now listening to this port on the localhost, and this is the default port for the Appium server.
Now for installing Appium Doctor, we can just run:
npm install -g appium-doctor
After we finish, we can run Appium doctor from the command line.
As we mentioned, Appium Doctor verifies the dependencies are set up correctly on our machine, and to be able to work with Appium after that, we can start Appium from the command line or from the Appium desktop as a server.
Then, the next step is to write our first script or our test using Appium clients.
Appium doctor is installed already, and then we can run:
appium doctor
We will wait until Appium Doctor finishes all the diagnostics and checks all the necessary and optional dependencies for Appium.
After Appium Doctor is finished, now we can check all the dependencies.

We start with Node.js installed already, with the latest version of Node.
Xcode is installed with the Xcode command-line tools.
The DevToolsSecurity is enabled for the developer mode in Xcode.
Carthage is installed.
ANDROID_HOME is already installed with the Android SDK.
The bin for the Java JDK and also the ADB and the emulator for Android SDK.
For the optional dependencies, we don't have opencv4nodejs, which will be used for image comparison, and also something for handling the iOS devices.
So for manual fixes, we should go download by ourselves, opencv4nodejs.
For example, I can go to this link, and here we can find that OpenCV is used for image comparison features.
To be able to install it, we just need to install this command line:
npm i -g opencv4nodejs
OpenCV is required to have cmake, so to be able to use it, we need to run:
brew install cmake
Now we are installing it and after we finish this, we will try to install OpenCV again.
What is still missing to be installed in our machine for Appium?
We should install ideviceinstaller - this is a tool for managing apps on iOS devices.
We can use brew and install ideviceinstaller by copying this command:
brew install ideviceinstaller
Another one is ios-deploy, which is for installing and debugging iPhone apps from the command line without using Xcode.
We can install it by running:
brew install ios-deploy
Here you can just check the usage options - for example, getting the ID of the device, detect, bundle, the environment, and all the things that you want to use.
For example, you can run ios-deploy --debug --bundle my.app to be able to send and debug the application on your connected device.
You can find different examples here.
In our demos, we will use this for sending our application to the device.
Now we already have ios-deploy and ideviceinstaller, so let's also install ffmpeg with npm.
This is for handling the videos and the audio and I can install by running:
npm install ffmpeg
Then we will run Appium Doctor at the end to check what is still missing in the installation.
Resources
Quiz
The quiz for this chapter can be found in Chapter 3.8
