

Transcripted Summary
Now let's write our first test script for Appium using Java.
We will create our first project and we will start with an Android example.
We will use IntelliJ as our IDE - you can use Eclipse or any preferred IDE or any environment or any application that you want.
I will start by creating a new project, and I will use Maven - we will use Maven in this course.

I will click "Next", and then in the project name, I will name it "FirstAppiumDemo" and then I will click "Finish".
This is the pom.xml file for our project and I will enable auto import for any upcoming dependency I will add or change in the pom file.
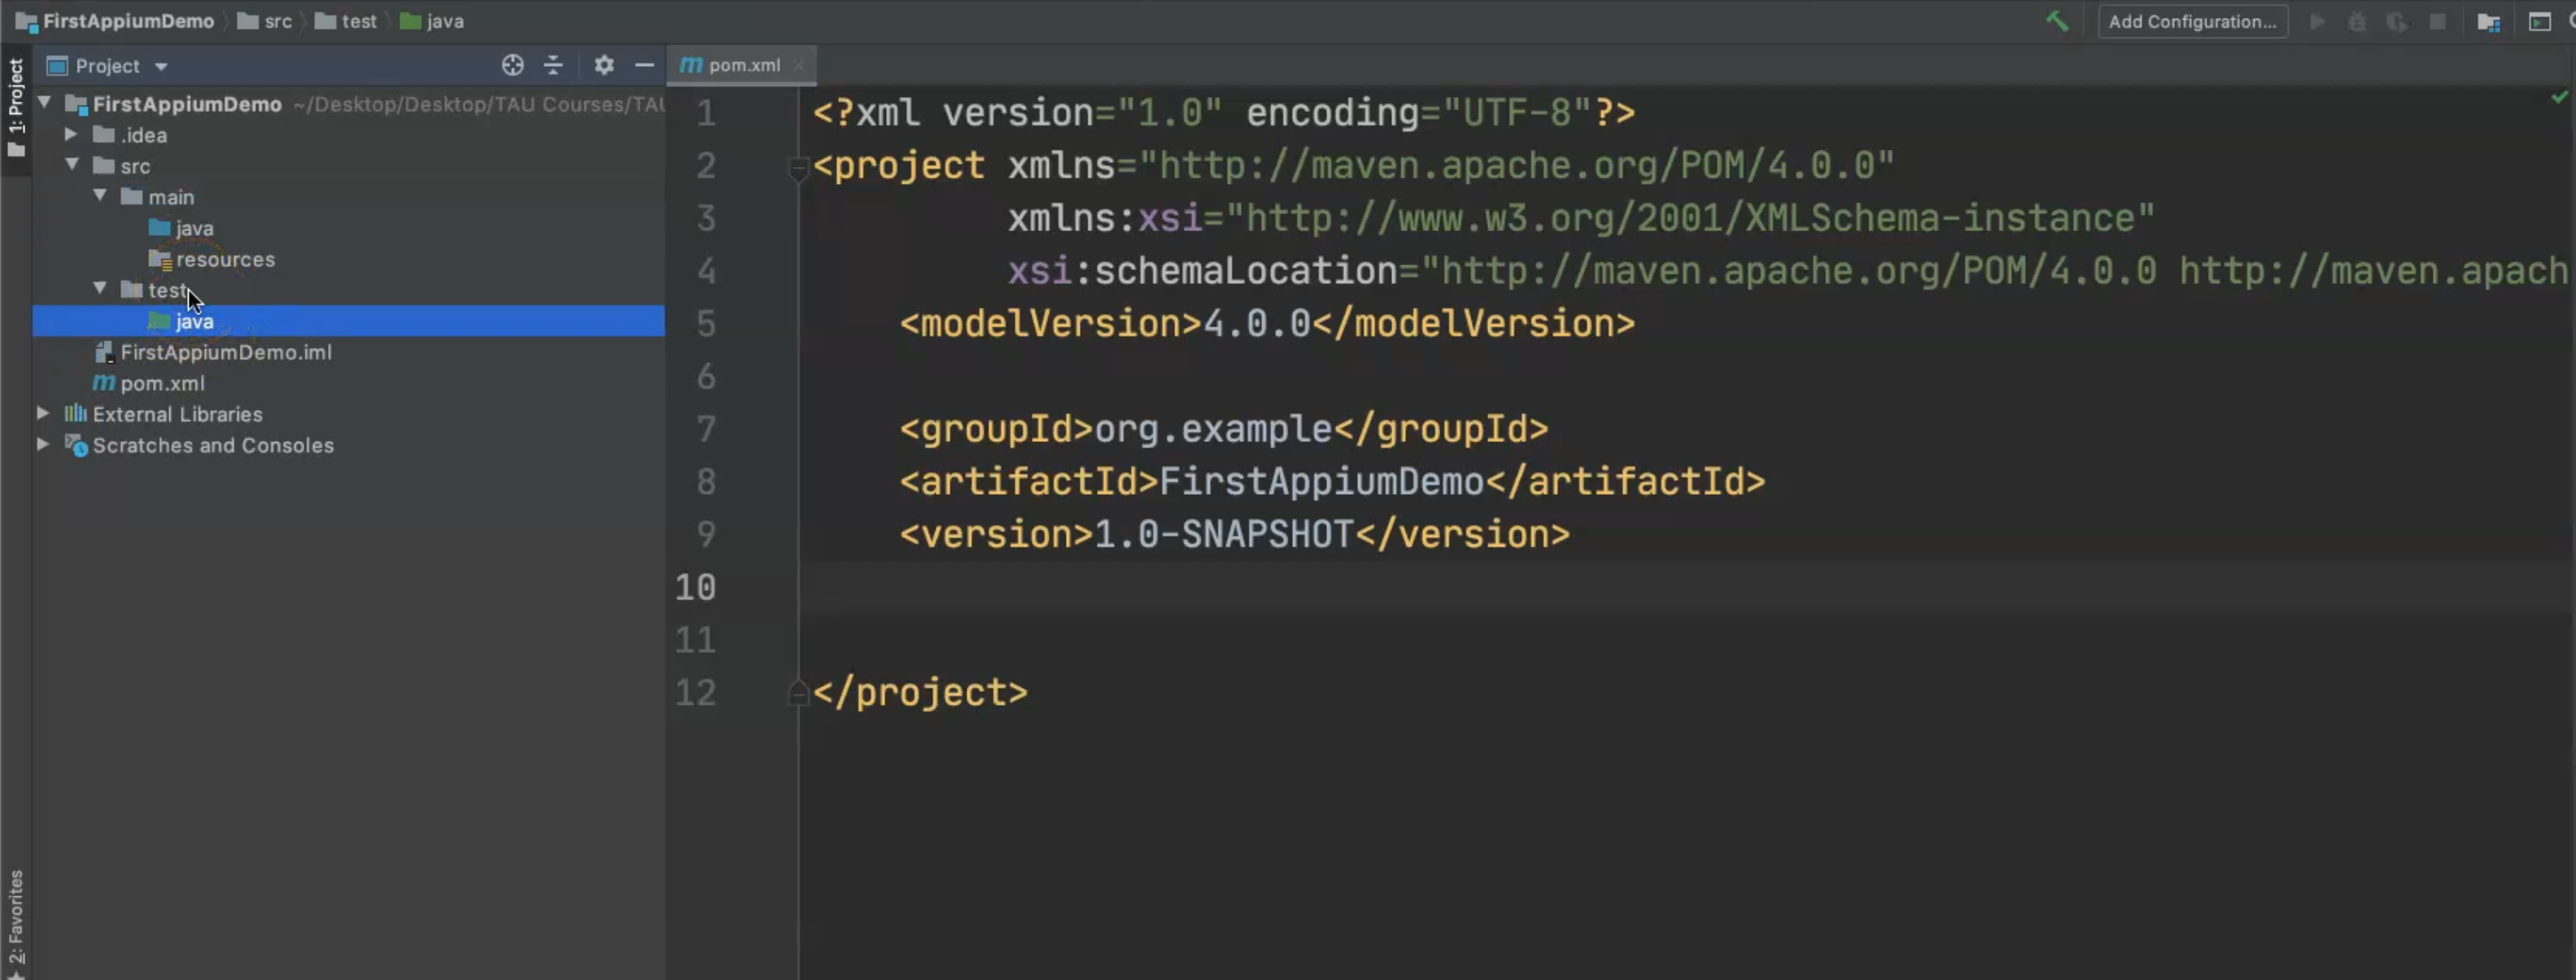
This is the first demo and here we have the src folder and then we have main.
Under main, we have java and resources and also, we have a test folder for adding our tests.
Our first project includes two dependencies - the Appium Dependency and the TestNG Dependency.
We will be using TestNG as our Test Runner and we will just add our Appium Maven Dependency.
I will open the browser, and I will search "appium maven dependency" and I will open the Maven Repository for Appuim Client with Java.
You can select the latest version (7.5.0), or 7.4.1.
Usually, I use 7.4.1 so I will copy this Maven Dependency.
<dependency>
    <groupId>io.appium</groupId>
    <artifactId>java-client</artifactId>
    <version>7.4.1</version>
</dependency>
I will go back to our project and here, I don't yet have any dependencies tags.
I will start to add dependencies and then I will just click to select and add.
Under dependencies, I will add this dependency and remove the comment line, and fix the formatting.
This is the first dependency that I want to add - this is Appium Client for Java, and then I need to add the TestNG one.
In the Maven search, I will search about TestNG, and from TestNG, I can select the latest one (7.4.0), or maybe I can use this one (6.14.3).
I'm still using version 6.14.3, just to be honest - maybe you can use the latest version in your case, as you like.
<dependency>
    <groupId>org.testng</groupId>
    <artifactId>testng</artifactId>
    <version>6.14.3</version>
    <scope>test</scope>
</dependency>
Then, I will add this dependency, and now Maven is downloaded already.
You can also click on "External LIbraries" for all the dependencies that we added in our project, like for TestNG and for Appium.

This is the Appium Client and under Appium, you will have here the Appium java file or jar file and so on.
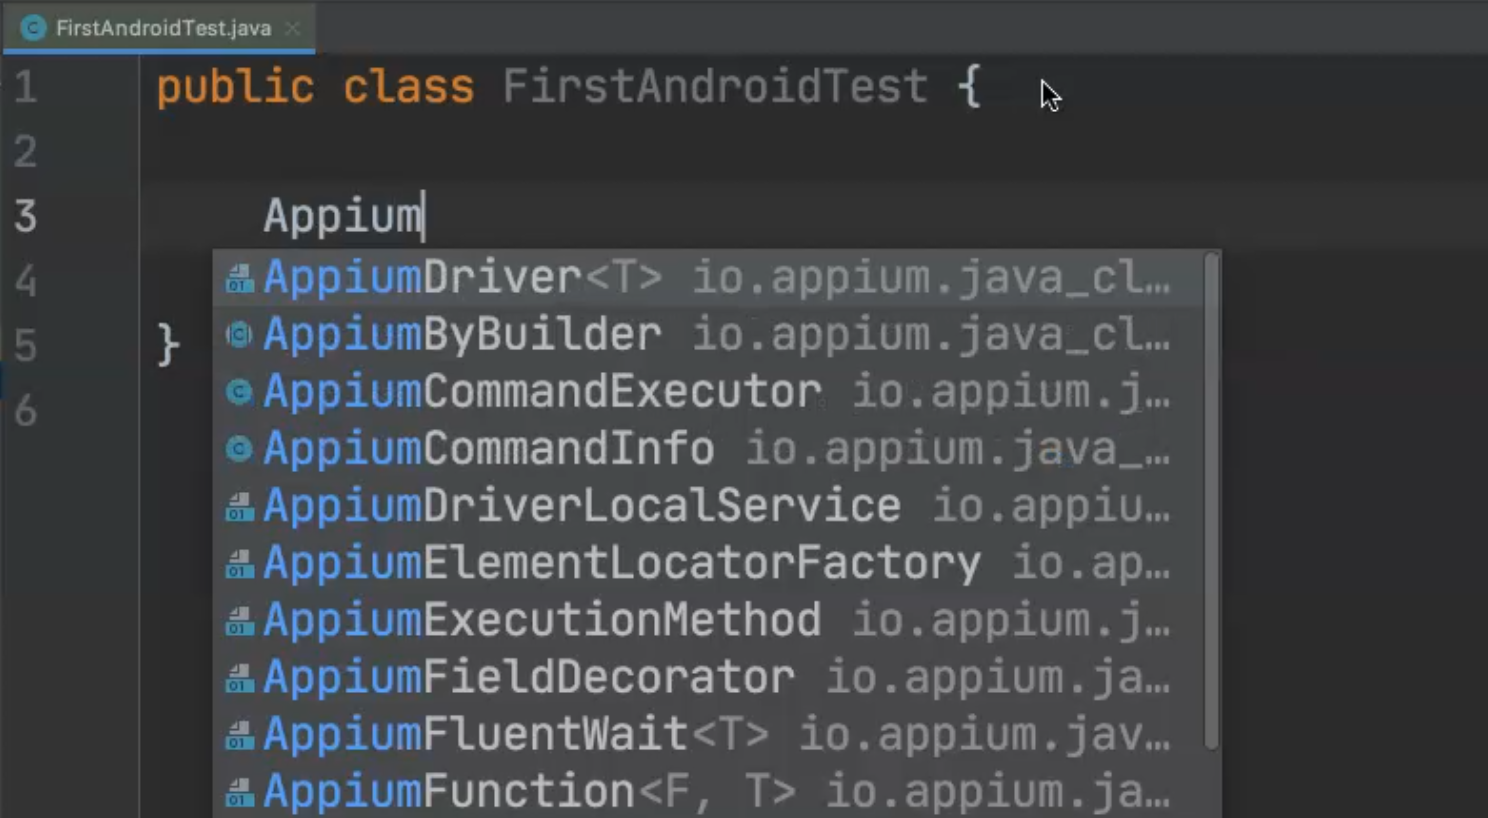
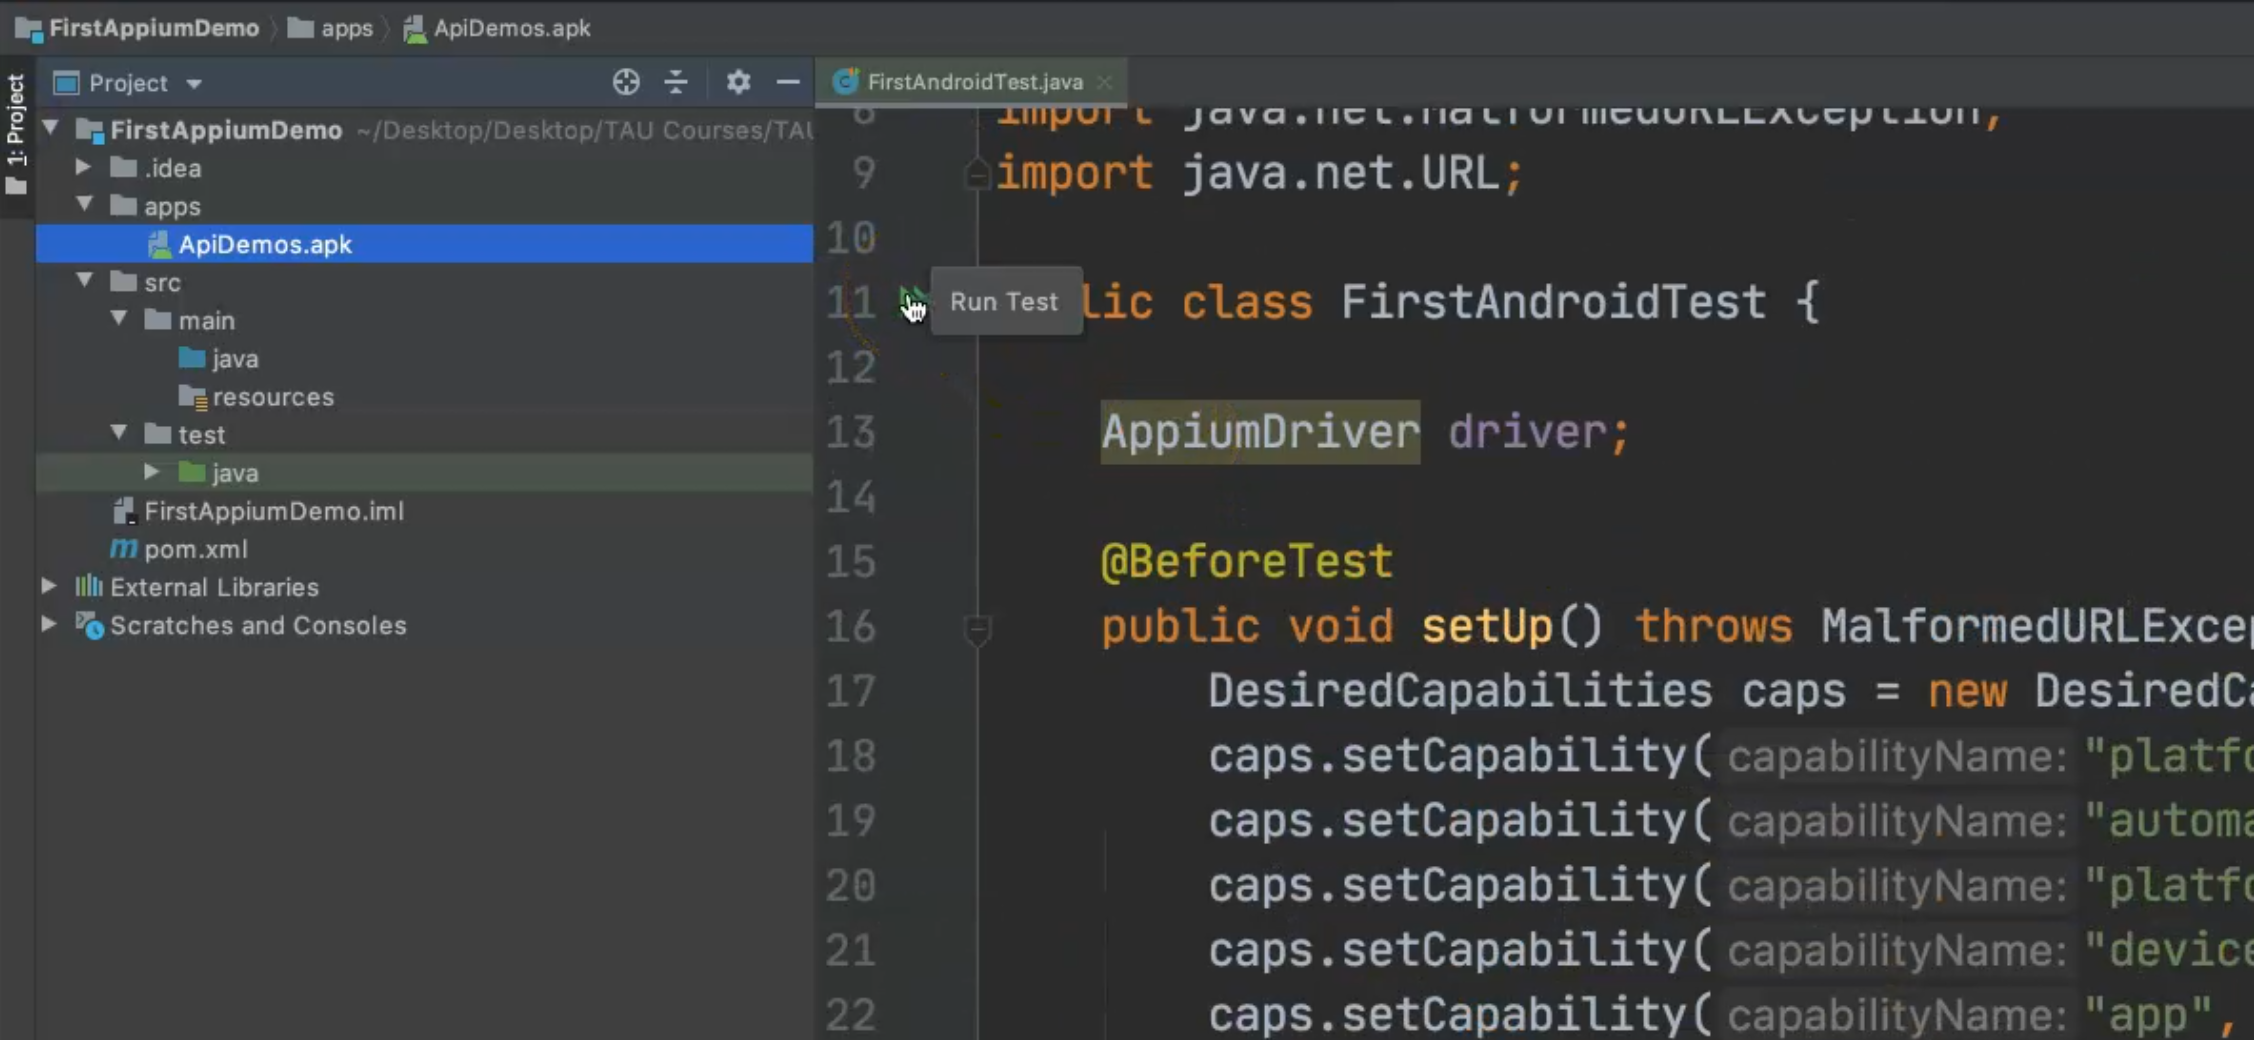
Our project is now prepared to write our first script, and then we will right-click on the java folder and select "New" > "Java Class", and I will name it "FirstAndroidTest".
Then, I will start by adding my Appium code.
The first thing that I will need to add is the Appium Driver.
As I add it, I already have the AppiumDriver, which means that my dependencies are working fine now.
I will name it driver and then I will add my desired capabilities.
As we mentioned in previous chapters, Appium Client is working with Appium Server using the desired capabilities to be able to create a new session with Appium.
I will add public void with setUp() and inside this, I will add my desired capabilities.
This setUp() will always run before my test.
I will add an annotation from TestNG, which is @BeforeTest, so I will run setUp() before running my test cases.
Then, I will add "DesiredCapabilities" from a Selenium remote, because I'm connecting with a remote session because it's Appium Server's desired capabilities, and I will name it caps and set it equal to new DesiredCapabilities(), and then I will add the semicolon.
After that, in caps, I will start by adding setCapability calls, and we have a list of capabilities that we need to use to be able to start a session with our Appium Server.
public class FirstAndroidTest {

    AppiumDriver driver;

    @BeforeTest
    public void setUp() {
        DesiredCapabilities caps = new DesiredCapabilities();
    }
For example, I can open Appium Server to check what are the desired capabilities that are required to use it with an Android application.
Here is my Appium Server - I will run it, and from the Appium server we will have a link - I will just open it with the default port and with the Host ID or URL.
I will start my Appium Server, and here I can click on a "Start Inspector Session".
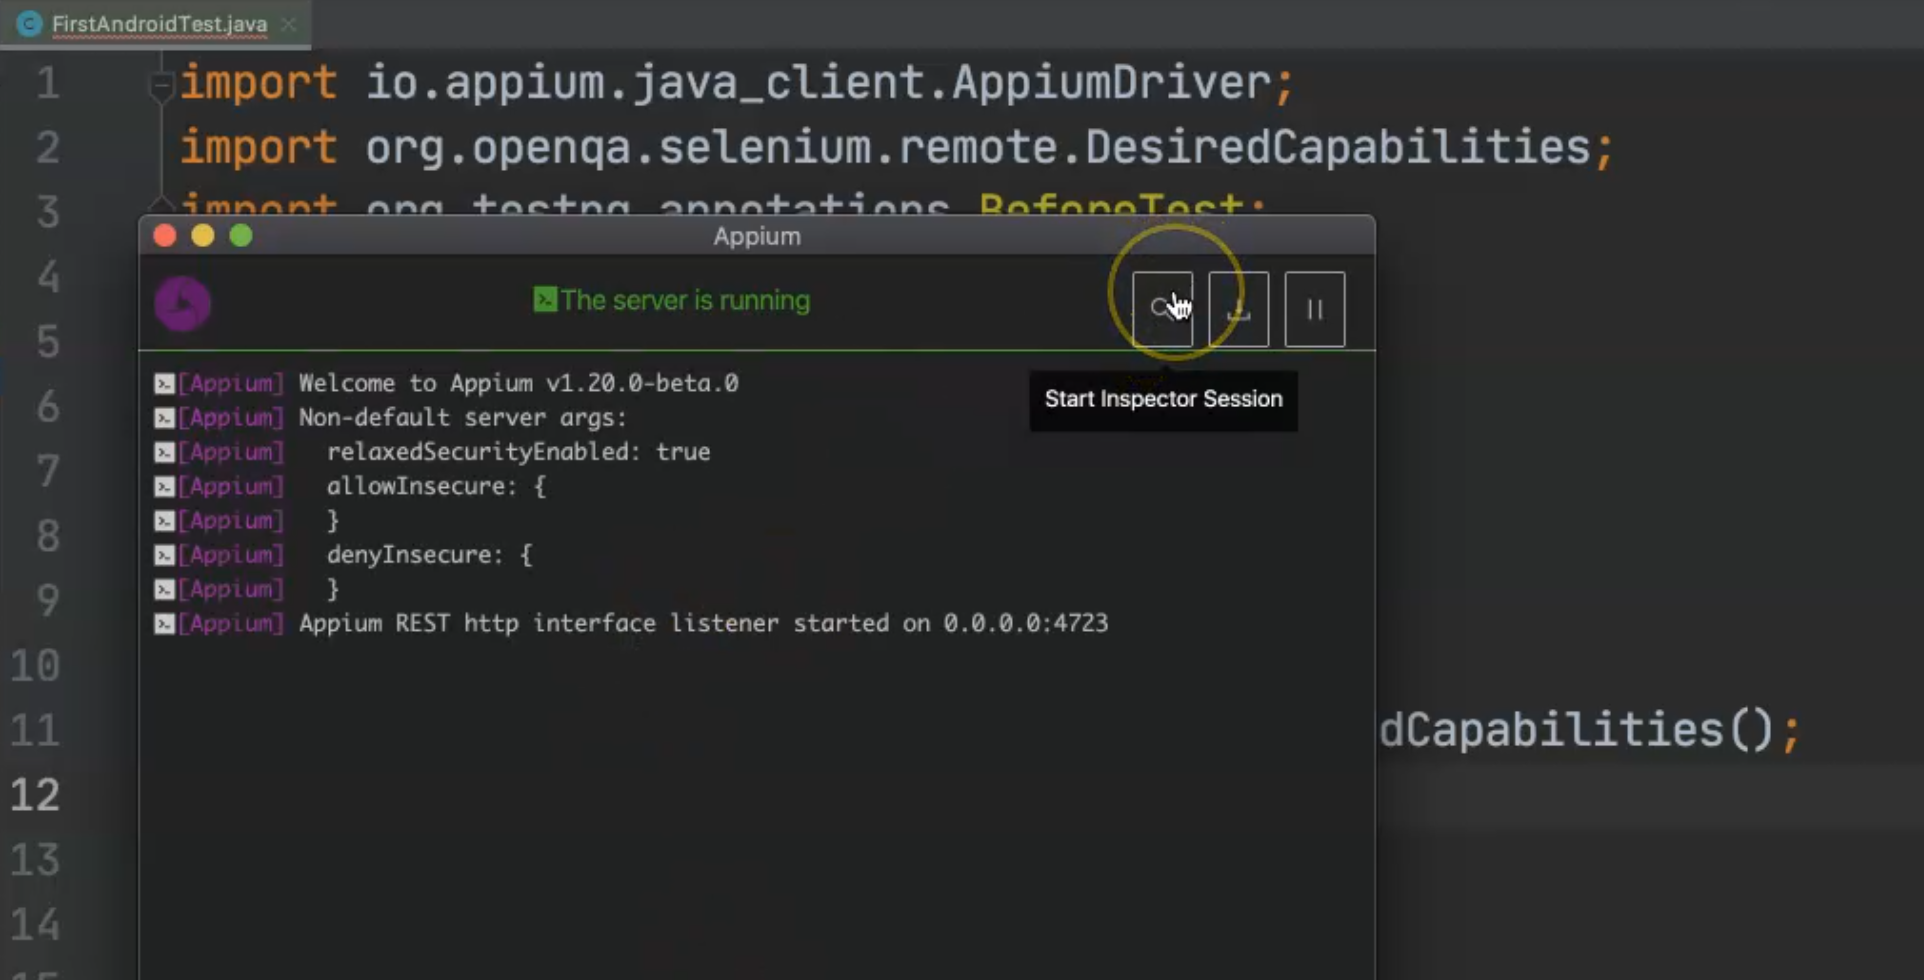
This is the Appium Log Server where you can find all the details when you run your Appium test script.
Here, I can just click on "Start Inspector Session" and inside the inspector session, we can inspect our application.
On this screen, I have a link for the Desired Capabilities Documentation.
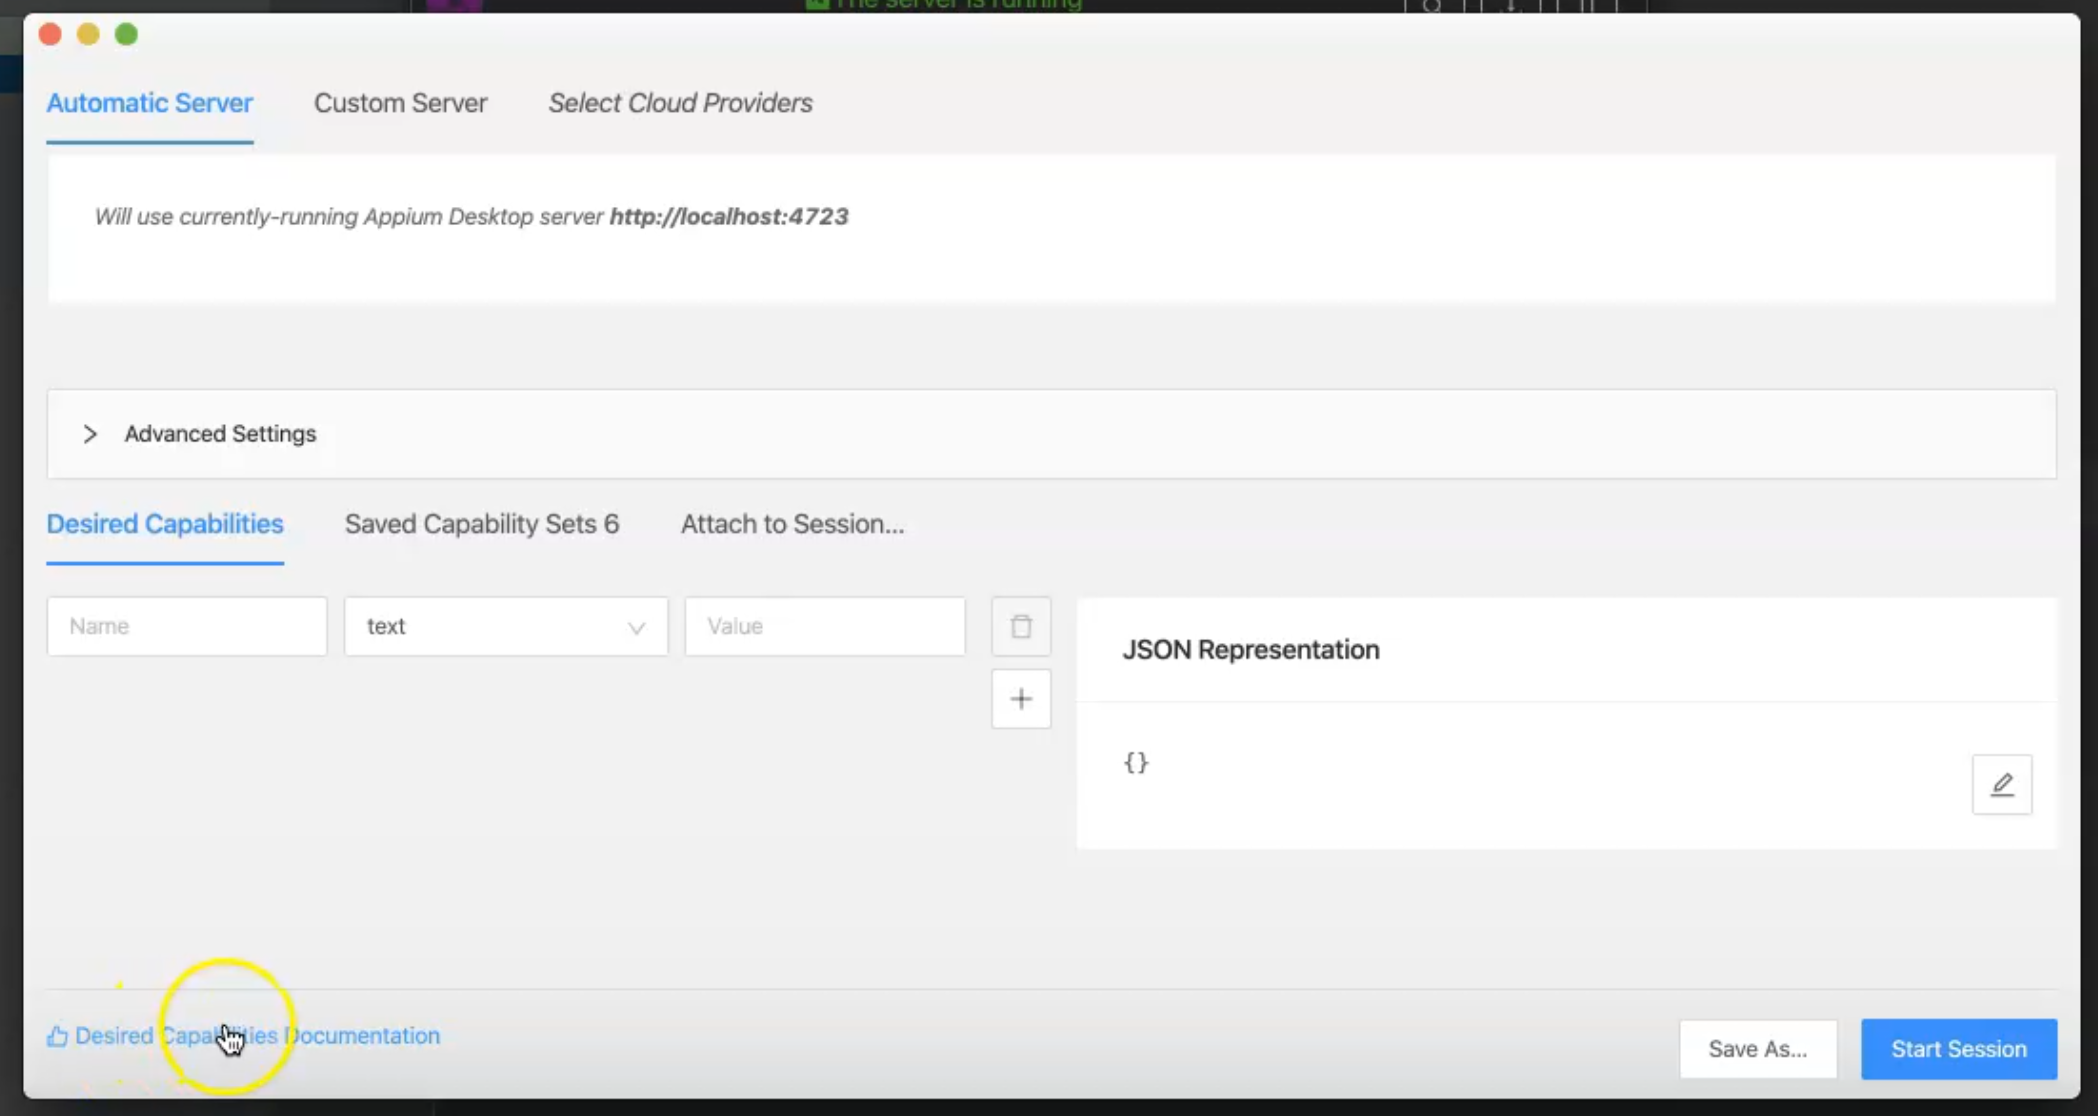
I can click on this and it will redirect me to Desired Capabilities documentation on the Appium Repository and here, you can find all the things that you wanted to use for the session or desired capabilities for your Android application.
For example, we have the automationName, which can be Appium by default, or UIAutomator2, or Espresso for Android, or XCUITest or Instruments for iOS.
There is also the platformName, platformVersion, deviceName, app, or you can add the browserName if you want to use it for the web.
Also, we have different things - udid or orientation, noReset, fullReset, for example, and a lot of things.
Here, you can copy the capability and start using it in our test case.
We will return it back to our test and we will start by adding our first one.
For the first caps.setCapability() - as we mentioned before, it's JSON, so a key and value - the one that we need has key platformName, and the value is Android.
Then again, caps.setCapability() with the key automationName - in our case, we will be using UiAutomator2, because we will not be using Espresso for the time being.
Here, I can also add caps.setCapability(), and then I will add platformVersion - this is a required desired capability to start a session with Appium.
The version here is based on your emulator version - for example, if it's 9, or 8, or 11 - you need to check, in your case, which version or operating system version is on your Android device and add it.
In my case, it's version 9.0.
Then, I will add the deviceName.
I add caps.setCapability() and I can add the capabilityName as deviceName, and then I will add the device name.
You don't need to mention the device name.
In our case, if it's a simulator or emulator, you can just add Android Emulator.
That's it - we added our desired capabilities, but we still have one left, which is our application.
We should have another caps.setCapability(), and then we should add app - it can be an absolute path on your machine or it can be the URL to download this application if you have it, or you can replace the application with appActivity and appPackage, if the application is already installed on the device.
In our case, we will use app.
Until now, we don't yet have an application for our demo.
I will create a new folder in this project and I will call it apps, and then I will drag and drop my application from the desktop.
So I'm copying the ApiDemos.apk to this folder, and now to add our application in this code, I can use system.getProperty() and I will use user.dir to get my current project location, and then I will append my application to this path.
public class FirstAndroidTest {

    AppiumDriver driver;

    @BeforeTest
    public void setUp() {
        DesiredCapabilities caps = new DesiredCapabilities();
        caps.setCapability("platformName", "Android");
        caps.setCapability("automationName", "UiAutomator2");
        caps.setCapability("platformVersion", "9.0");
        caps.setCapability("deviceName", "Android Emulator");
        caps.setCapability("app", System.getProperty("user.dir") + "/apps/ApiDemos.apk");
Now I have finished my required desired capabilities to be able to open a new session for an Android device using Appium Server.
Then I still have to add one thing, which is the Appium URL, or Appium server.
Here in the driver, we will create a new object with AndroidDriver.
With AndroidDriver, we should have two things - the URL for the remote address, and the desiredCapabilities.
The remote address will usually use new URL() from java.net and the URL will be my current URL server.
We can use http://localhost:4723/wd/hub with default port 4723, and then I will pass the desired capabilities.
Here, we have an error that we should handle the MalformedURLException, so we will click on this error and click "Add exception to method signature".

If the URL is not found, we will throw an exception with this type.
public class FirstAndroidTest {

    AppiumDriver driver;

    @BeforeTest
    public void setUp() throws MalformedURLException {
        DesiredCapabilities caps = new DesiredCapabilities();
        caps.setCapability("platformName", "Android");
        caps.setCapability("automationName", "UiAutomator2");
        caps.setCapability("platformVersion", "9.0");
        caps.setCapability("deviceName", "Android Emulator");
        caps.setCapability("app", System.getProperty("user.dir") + "/apps/ApiDemos.apk");
        driver = new AndroidDriver(new URL("http://localhost:4723/wd/hub"), caps);
    }
Now we prepared our application for our demo, and then we should start adding our tests.
We will add @Test and then we will add our first public void click_App_Button(), for example.
Here, we will add our code.
After we inspect our elements in our application, then we will add our elements here and start to use them.
And then for the @AfterTest, we will add public void tearDown and we will close the driver in this tearDown.
Here, if our driver does not equal null, then we will add driver.quit() just to close our driver connection after we finish.
public class FirstAndroidTest {

    AppiumDriver driver;

    @BeforeTest
    public void setUp() throws MalformedURLException {
        DesiredCapabilities caps = new DesiredCapabilities();
        caps.setCapability("platformName", "Android");
        caps.setCapability("automationName", "UiAutomator2");
        caps.setCapability("platformVersion", "9.0");
        caps.setCapability("deviceName", "Android Emulator");
        caps.setCapability("app", System.getProperty("user.dir") + "/apps/ApiDemos.apk");
        driver = new AndroidDriver(new URL("http://localhost:4723/wd/hub"), caps);
    }

    @Test
    public void click_App_Button() {
        // code
    }

    @AfterTest
    public void tearDown() {
        if (null != driver) {
            driver.quit();
        }
    }
}
So we added our desired capabilities from our client Java, and then we will add this application.
Now, the step that is still left is that we need to inspect to know which element.
If we open our device and the ApiDemo here, we need to click on App, for example.
To click App, I need to inspect this element to be able to click on this element.
From the Appium server, I will open an inspection session and I will add the same desired capabilities using this inspection session.
Here, we have our current URL and you can add all the desired capabilities, but I already have saved desired capabilities from before for Android.
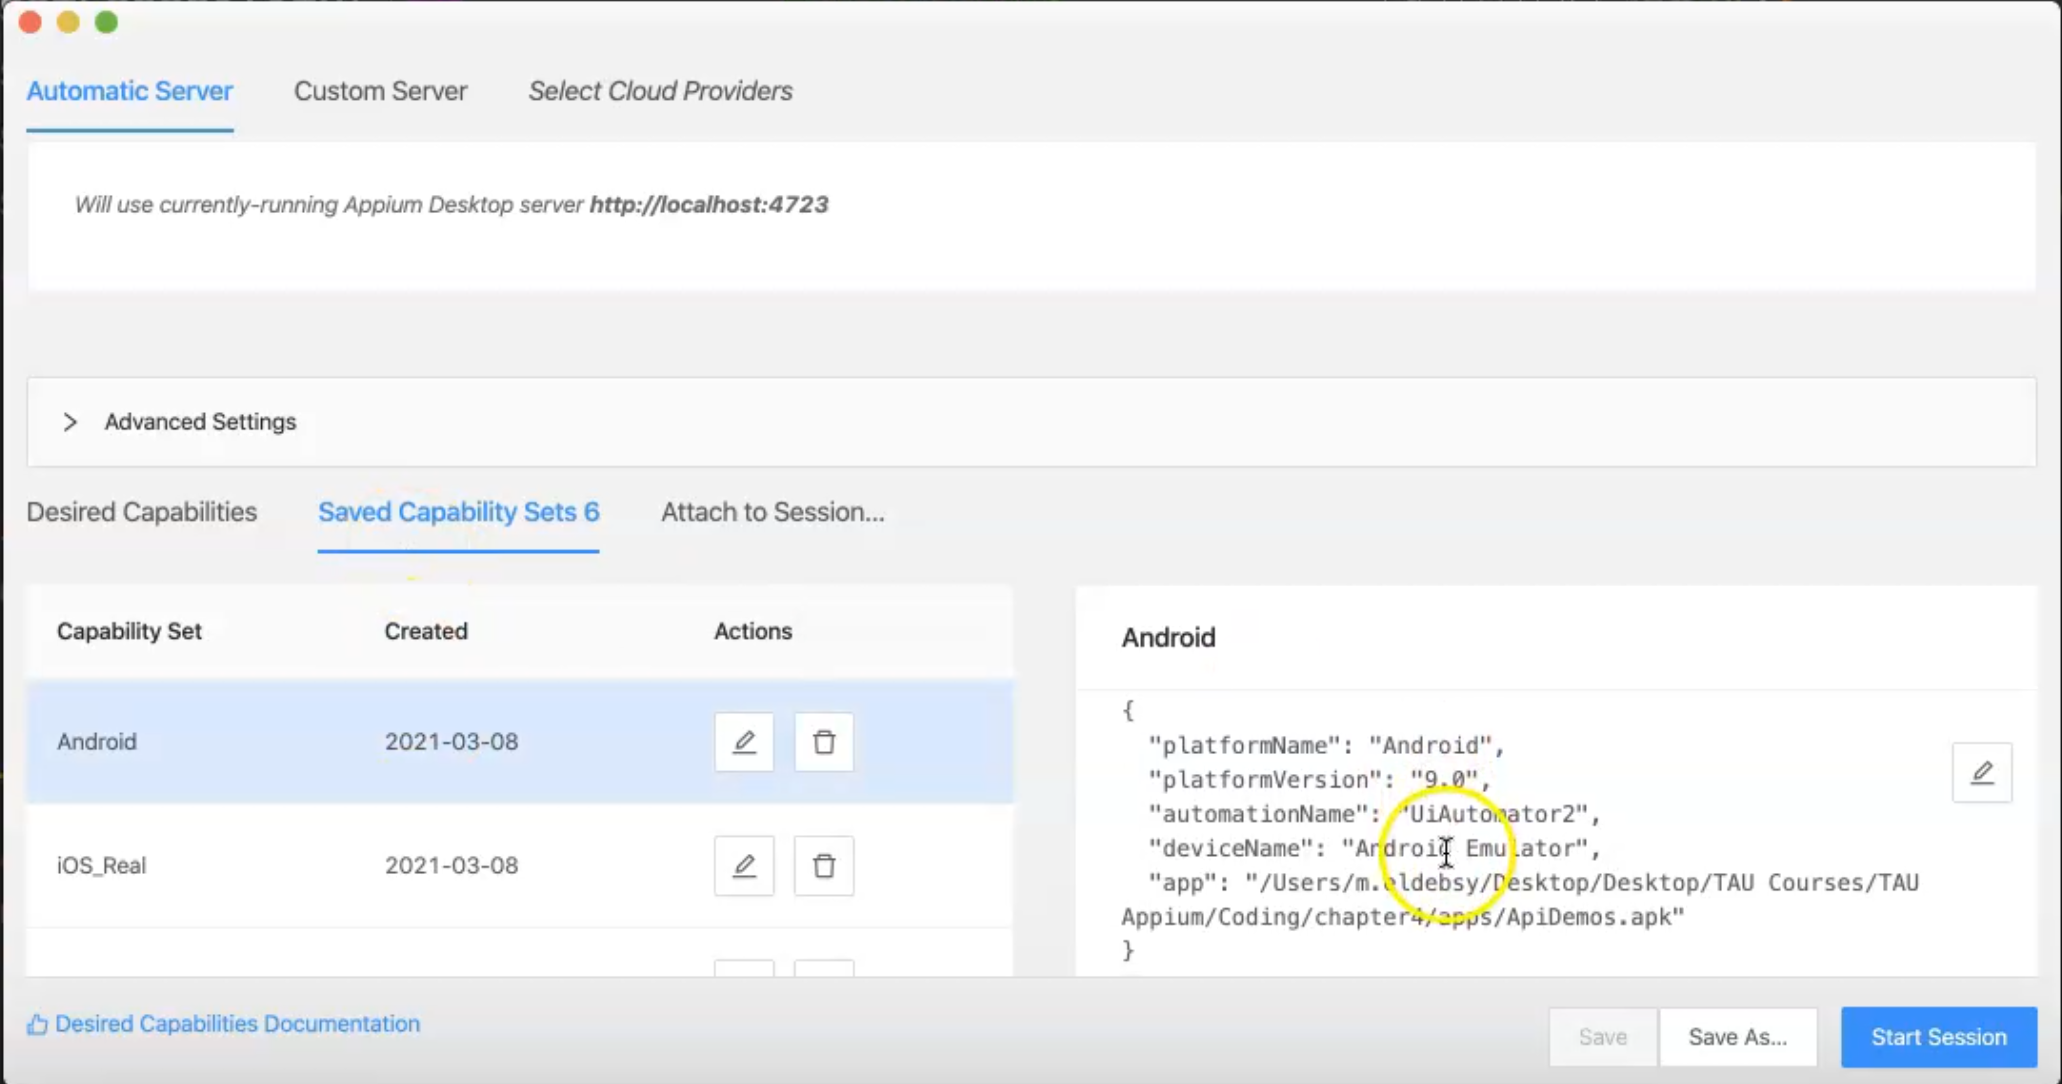
You can save different desired capabilities.
Here, I have UIAutomator2, this is ApiDemo, version - this is a different view because this is in JSON.
Then I will start my session by clicking "Start Session".
Here, the Appium server starts adding all the logs in the Appium server - I started with the BaseDriver, which takes all the desired capabilities.

Then after that, I switch to the ADB to detect the build-tools for Android SDK, then switch to AndroidDriver to retrieve the device list that is connected to my application - it already has the device I have - Android with version 9.0.
It starts connecting with this version and all the things that I need.
Now here is the application, this is the inspection session, and this is a server.

From here, I can just select "App" and I can find the element or different selectors that I can use to find this element.
For example, in this case, I will use the "accessibility id" because I'm using Android, so I will copy this value.
Also, from the inspection session, you can use different things here.
For example, you can click on "Tap", so you can work with the device.
I click on "Tap", which opens "App", or I can click "Back" again.
Then I can also "Send Keys" if it's a text box, for example, I can clear it.
Here, also we can start the recording - you can record and then playback your script.
After that, you can "Search for element", "Copy XML Source to Clipboard".
I will find the element by "accessibility id" so I will copy this one and go inside the code.
I will add driver.findElementByAccessibilityId() and here we can add accessibility ID as a string and then I can click on this button.
package Android;

import io.appium.java_client.AppiumDriver;
import io.appium.java_client.android.AndroidDriver;
import org.openqa.selenium.remote.DesiredCapabilities;
import org.testng.annotations.AfterTest;
import org.testng.annotations.BeforeTest;
import org.testng.annotations.Test;

import java.net.MalformedURLException;
import java.net.URL;

public class FirstAndroidTest {

    AppiumDriver driver;

    @BeforeTest
    public void setUp() throws MalformedURLException {
        DesiredCapabilities caps = new DesiredCapabilities();
        caps.setCapability("platformName", "Android");
        caps.setCapability("automationName", "UiAutomator2");
        caps.setCapability("platformVersion", "9.0");
        caps.setCapability("deviceName", "Android Emulator");
        caps.setCapability("app", System.getProperty("user.dir") + "/apps/ApiDemos.apk");
        driver = new AndroidDriver(new URL("http://localhost:4723/wd/hub"), caps);
    }

    @Test
    public void click_App_Button() {
        // code
        driver.findElementByAccessibilityId("App").click();
    }

    @AfterTest
    public void tearDown() {
        if (null != driver) {
            driver.quit();
        }
    }
}
So in our code, we will open the session with desired capabilities and then connect to the server, then we will open the application or install the application from this path, and then we will open it.
Appium will open the application, then we will try to find this button using accessibility ID and then click on this button.
After that, we will close this connection.
I will close the inspection session now because we just inspected the element that we needed for the first demo, and I will try to run my test from my project.
From here, you can click on "Run Test" from the public class if you have different test cases, or you can run just one.
When you run the test, it will run the @BeforeTest first and it will set up the device.
Let's run it again from our code and then check what happened during our test.
Now we are running our script, and here Appium server starts creating a new session, taking desired capabilities, connecting to the device and installing the application, and then running our tests if everything is okay.
So now we are waiting for the Appium server to be initialized, and then starts a session, and then it will open the application.
Now the application is open, we clicked on the "App" button and our test case passed.
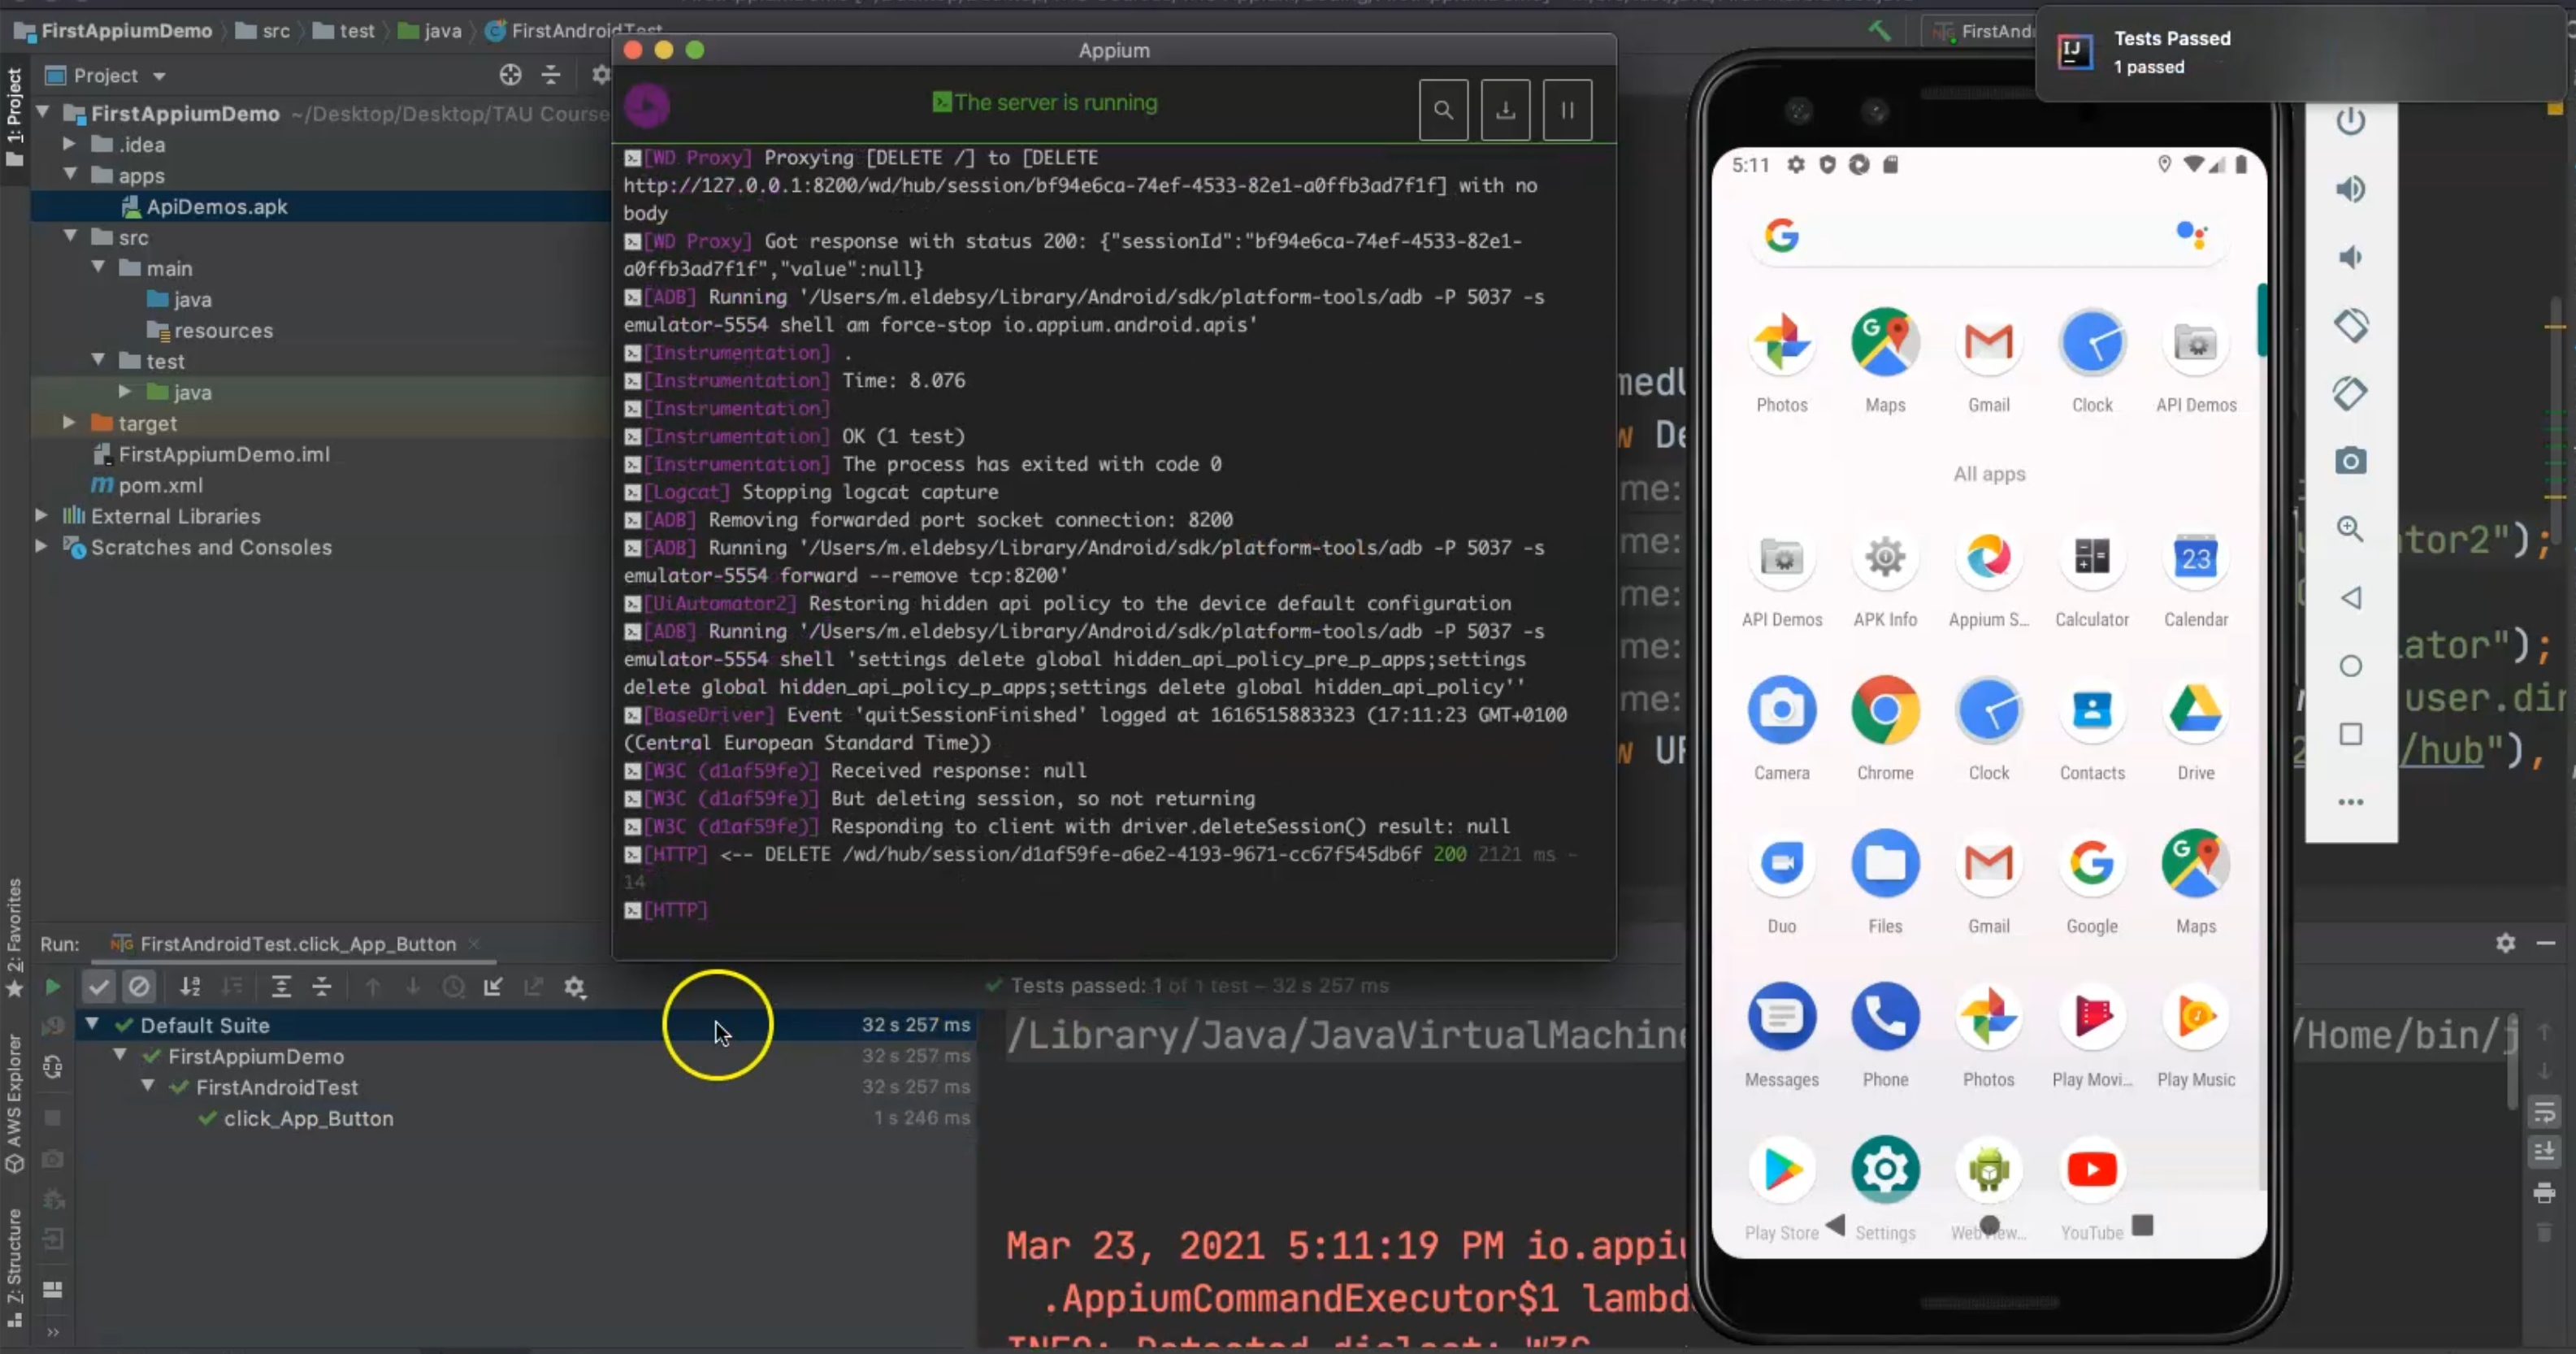
We finished our first test case using Appium for Android, and we used our application.
We are sending the application to the device and then we can use it to find all the elements using the inspection sessions.
We start using the different commands with these elements and then you can close the connection after you have finished.
In the next demo, we will try to use a built-in application on the device by not sending the APK, but using the appPackage and appActivity, and learn how we can use it with Android.
Resources
Quiz
The quiz for this chapter can be found in Chapter 4.8
