

Transcripted Summary
In this demo, we will create our Cucumber step definitions to convert the feature file to the actual steps and using Appium and Java.
Then we will add our test runners to be able to run our test script using the Cucumber test runner and then we can check the report and finalize our project.
To create the step definitions we need to open the feature file and here we will find that the feature file is highlighted.

If we open or click on this one, we can, from here, create a step definition for one step or create all the step definitions for all the feature files.
I can select "Create all step definitions" and here I can add the test case CreateNewTask and I just need to select "Java" and then click OK.
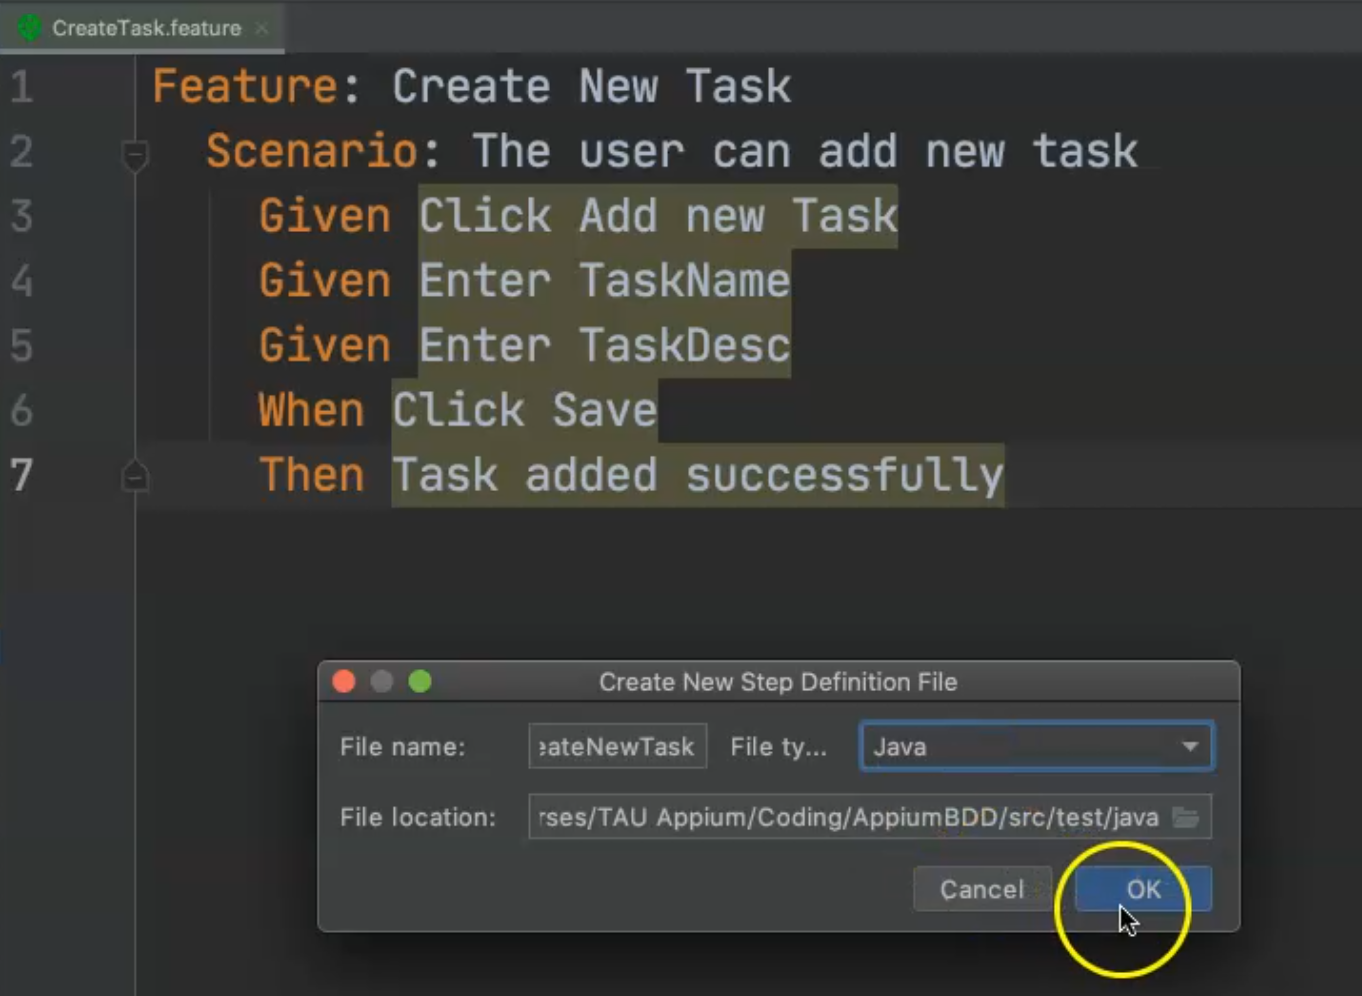
So here, we will find that the class is created with the three @Givens and we have one @When and then we have @Then and added the strings from our feature file.
package steps;

import io.cucumber.java.en.Given;
import io.cucumber.java.en.Then;
import io.cucumber.java.en.When;

public class CreateNewTask {
    @Given("Click Add new Task")
    public void clickAddNewTask() {
    }

    @Given("Enter TaskName")
    public void enterTaskName() {
    }

    @Given("Enter TaskDesc")
    public void enterTaskDesc() {
    }

    @When("Click Save")
    public void clickSave() {
    }

    @Then("Task added successfully")
    public void taskAddedSuccessfully() {
    }
}
We can create a package to organize our test cases, so under java under tests, we can create a New Package tests and we can move all the test cases - all 3 test cases - inside this package, and then we just need to refactor the testng files.
After that, we can create one more package for steps and we will move our step definitions inside this one.
After that, we can create a new package for runner, and here, we will create a class for the Cucumber runner just to organize our test cases.
So here, inside steps, we have our test cases.
Then, we need to start adding, for each function, the specific step from our Page Object.
The first thing that we need to do is to extend this class from TestBase.
This is from TestBase to be able to open the driver and work with Android setup and so on.
Then we can add the Page Object from here, so we can add the CreateTaskPage createTaskPage, and same as we have done before, we can also create the TasksListPage tasksListPage object.
Inside clickAddNewTask(), we can add the first thing as Android_setUp() method to give us the ability to run the test cases or this Cucumber test on Android.
We need to add MalformedURLException because it's including this one.
Then, tasksListPage = new TasksListPage() and then we need to pass the driver.
After that, we will create another one for the createTaskPage = new CreateTaskPage() and also pass the driver.
Then here, we will click on the AddNewTask button, so from the tasksListPage, we need to call callAddTaskBtn().
@Given("Click Add new Task")
public void clickAddNewTask() throws MalformedURLException {
    Android_setUp();
    tasksListPage = new TasksListPage(driver);
    createTaskPage = new CreateTaskPage(driver);
    tasksListPage.clickAddTaskBtn();
}
In enterTaskName(), we need to use createTaskPage.enterTaskName() to enter the task name string, which would be the value we add here - for example, "Task 1".
Inside enterTaskDesc(), we will call createTaskPage.enterTaskDesc() and it can be "Desc 1", for example.
Then, in clickSave(), we need to click on the Save button.
And then in taskAddedSuccessfully, maybe we could add an assertion or we can add driver.hideKeyboard(), and then we can call the tearDown().
    @Given("Enter TaskName")
    public void enterTaskName() {
        createTaskPage.enterTaskName("Task 1");
    }

    @Given("Enter TaskDesc")
    public void enterTaskDesc() {
        createTaskPage.enterTaskDesc("Desc 1");
    }

    @When("Click Save")
    public void clickSave() {
        createTaskPage.clickSaveBtn();
    }

    @Then("Task added successfully")
    public void taskAddedSuccessfully() {
        driver.hideKeyboard();
        tearDown();
    }
Now we converted the feature file with step definitions to map to the actual steps using Appium and the Page Object and we're also adding our setup.
Then we need to create a runner inside the runner folder to be able to run our Cucumber test cases.
Inside the runner folder, we will right-click and select a New Java class.
In this case, it will be, for example, TestRunner and we will extend this class from TestBase, and then we need to do one more step.
We need to go into TestBase and extend it from Cucumber's AbstractTestNGCucumberTests to be able to run our TestBase.
With the Cucumber runner, we will be able to add the annotations here and to be able to run our test cases and take the configurations from TestBase.
Now, for our TestRunner class, we need to add @CucumberOptions and we need to import this one from testng.CucumberOptions and this contains where the features are located in our project - under resources/features - and for now I run all the features inside this folder.
With glue, we can add steps, which include the test cases or the implementation of this feature.
With plugin, we use "pretty" with the HTML tag and display the report at the end in cucumber-html-report.html.
package runner;

import io.cucumber.testng.CucumberOptions;
import tests.TestBase;

@CucumberOptions(features="src/test/resources/features/CreateTaskExampleTable.feature"
,glue= {"steps"}
,plugin= {"pretty","html:target/cucumber-html-report.html"})
public class TestRunner extends TestBase {
}
We can start running our test cases and check the test results.
Here is the Appium server and we have already implemented it for Android so from here, we can start running it.
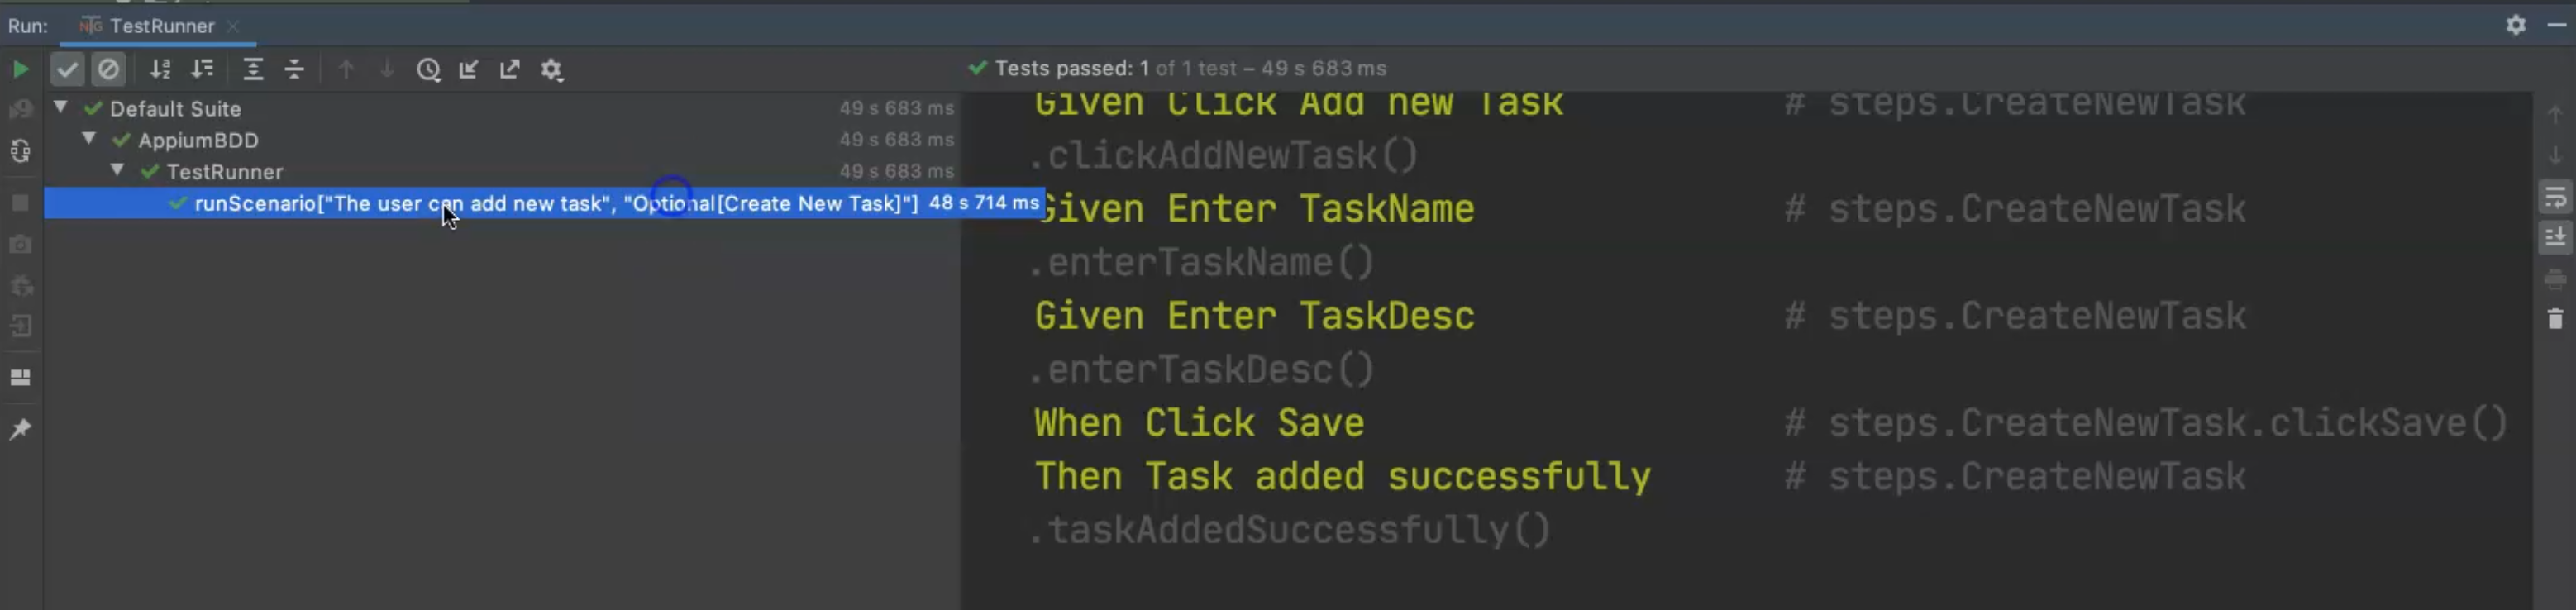
We will find that the TestRunner is now running this scenario - the user can add a new task, and we can also continue watching the other steps in the feature file when we run our test cases.

Now, we open the application and we find that we have the "Given Click Add new Task", so we will continue with each step.
Then we have "Given Enter TaskName", "TaskDesc", "When Click Save", and then we will hide the keyboard and tear down the application, so this is everything in the scenario that we have.
Now we close the application and our test case is successfully finished.
The task was added successfully, which includes the teardown, and the hide keyboard.
This is the main idea about Cucumber.
We ran this test case, and then in the target folder, we can find the test report.
For example, here we can open target, and in target we can find cucumber-html-report.html - we can right-click on this report and open in the browser, or Chrome, or any browser you like.
This will be localhost, our project, target, and the report which includes all the steps.

This is one scenario - the test case is passed and all the things are here like the CPU, operating system, and also you can search about tags if you add something in your test script.
Then we can click on this one.

We will find the feature and all the steps are marked green.
Now we've finished running our test cases using Cucumber.
We can do the same thing for iOS by adding our feature and creating one step definition for iOS.
What if I wanted to add different data in the feature file?
For example, here we are using "Enter TaskName" and "Enter TaskDesc" and we hard-coded the values in our step definition, but what if I wanted to do something like this...
I added here a new feature file CreateTaskExampleTable.feature using Scenario Outline.
With the example, I just added the <TaskName> and <TaskDesc> as parameters.
I added "Cucumber Task 1" with "Task 1 Details" and "Cucumber Task 2" with "Task 2 Details".
This will run every iteration with a different set of data.
Feature: Create New Task
 Scenario Outline: The user can add a new task
    Given Click add new Task
    Given Enter "<TaskName>" and "<TaskDesc>"
    Then Task Added Successfully

Examples:
 	 | TaskName | TaskDesc |
 	 | Cucumber Task 1 | Task 1 Details |
 	 | Cucumber Task 2 | Task 2 Details |
After that, I created a new step definition for this step CreateNewTaskWithData - this is the same as the previous class but here, I am passing the parameters taskName and taskDesc with createTaskPage.enterTaskName(taskName) and createTaskPage.enterTaskDesc(taskDesc).
Then in the test runner, I specified that I wanted to run this feature CreateTaskExampleTable - the one that I created - and then I will run the script.
Let's try to run our test script and check what happened.
Now I'm running the scenario "The user can add new task", and then it will run different iterations based on the data.
The application is open now, and we will click add a new task.
We will find that we created Click add new Task and here we will find that the data is added.
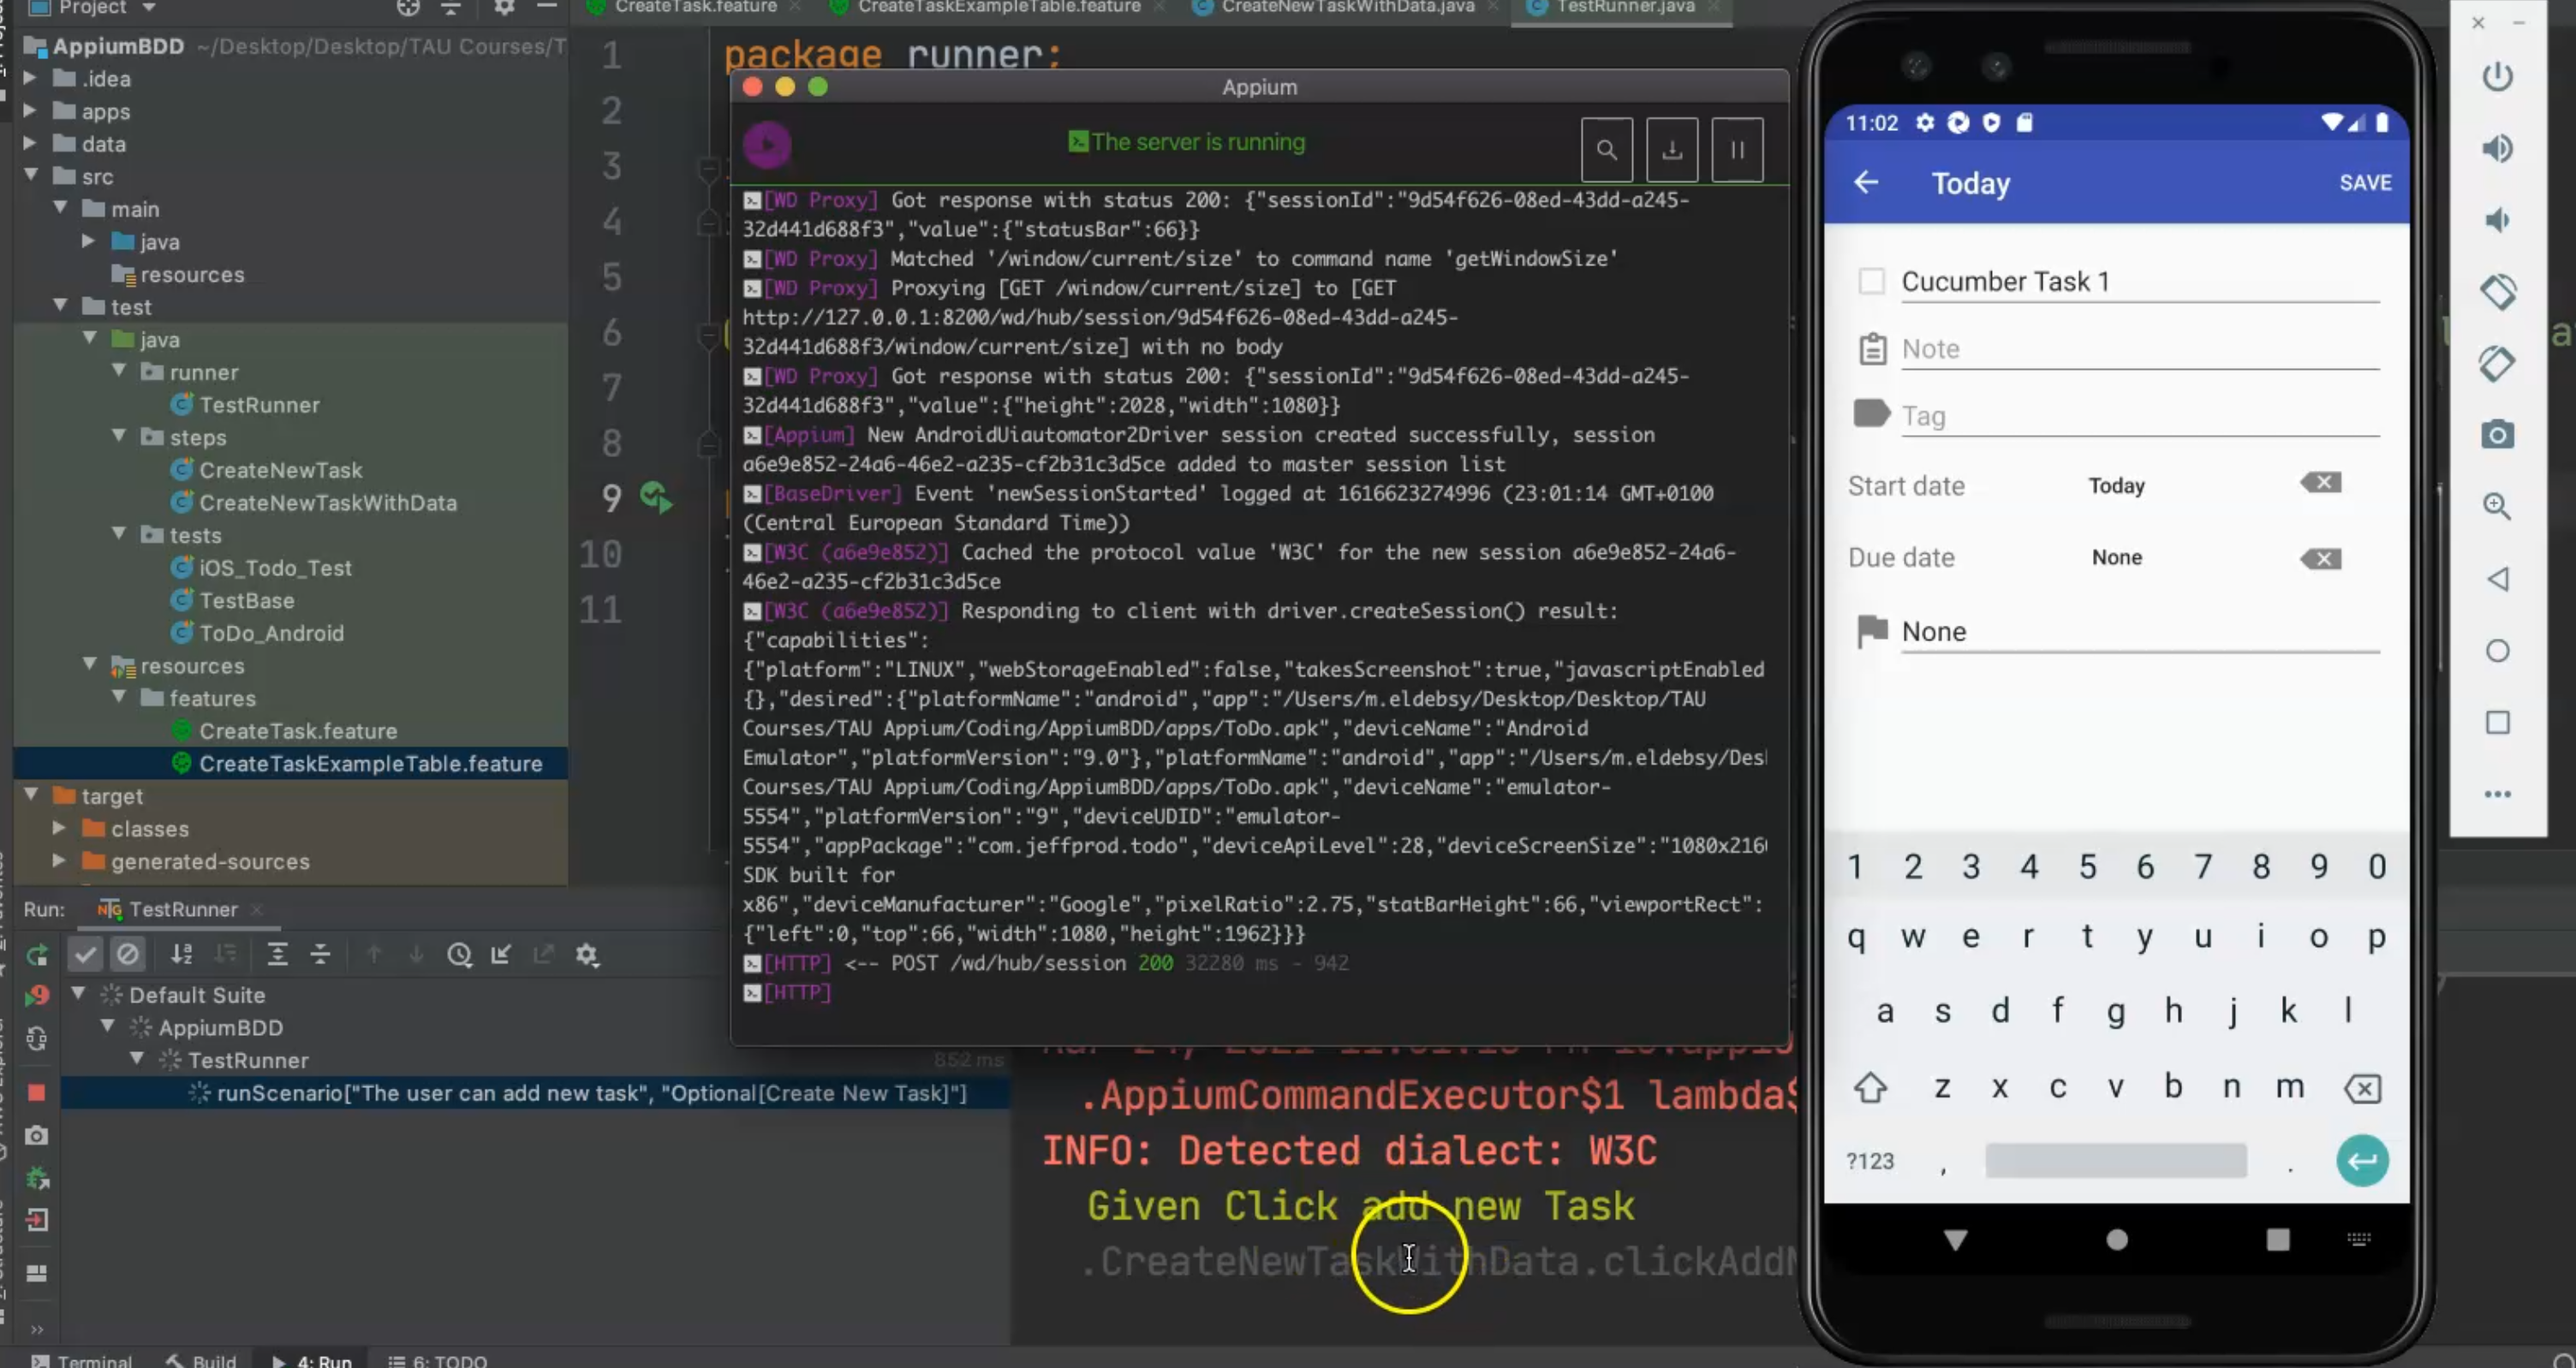
Given Enter "Cucumber Task 1" is the first row in that data table, and then I close it and after that, I will run the second iteration.
This is the run scenario for the second iteration of using different data.
The application is open again, and we will run the data and process "Cucumber task 2" and "Task 2 Detail" and our test case passed successfully.
Then we can open the cucumber-html-report by right-click and open in the browser.
In Chrome here, I can find that we have two scenarios, and then I can open this one, and this is the feature file using a scenario outline, and this is the example.

So all of them are passed and our feature file is already passed and covered with our step definition.
