

Transcripted Summary
# Sending Photos to Android with Appium
In this demo, we will learn how to send photos to an Android device using Appium.
Here, I prepared our test class Sending_Photos_Android_Test and we have the AndroidDriver and we have the setup with desired capabilities, but still we need to add the appPackage and appActivity for this demo.
Then for the test, we will add our code in this function send_Photo().
Then, this is @AfterTest to close the driver.
package Android;

import io.appium.java_client.android.AndroidDriver;
import org.openqa.selenium.By;
import org.openqa.selenium.remote.DesiredCapabilities;
import org.openqa.selenium.support.ui.ExpectedConditions;
import org.openqa.selenium.support.ui.WebDriverWait;
import org.testng.annotations.AfterTest;
import org.testng.annotations.BeforeTest;
import org.testng.annotations.Test;

import java.io.File;
import java.io.IOException;
import java.net.MalformedURLException;
import java.net.URL;

public class Sending_Photos_Android_Test {

    public AndroidDriver driver;

    @BeforeTest
    public void setUp() throws MalformedURLException {
        DesiredCapabilities capabilities = new DesiredCapabilities();
        capabilities.setCapability("platformName", "Android");
        capabilities.setCapability("platformVersion", "8.0");
        capabilities.setCapability("deviceName", "Android Emulator");
        capabilities.setCapability("appPackage", "com.google.android.apps.photos");
        capabilities.setCapability("appActivity", ".home.HomeActivity");

        driver = new AndroidDriver<>(new URL("http://localhost:4723/wd/hub"), capabilities);
    }

    @Test
    public void send_Photo() {

    }

    @AfterTest
    public void tearDown() {
        if (null != driver) {
            driver.quit();
        }
    }
}
From the device, this is Android Photos - the built-in application that we will use.
We can open it and then we will find that we have a window displayed where we need to, for example, click on this button.
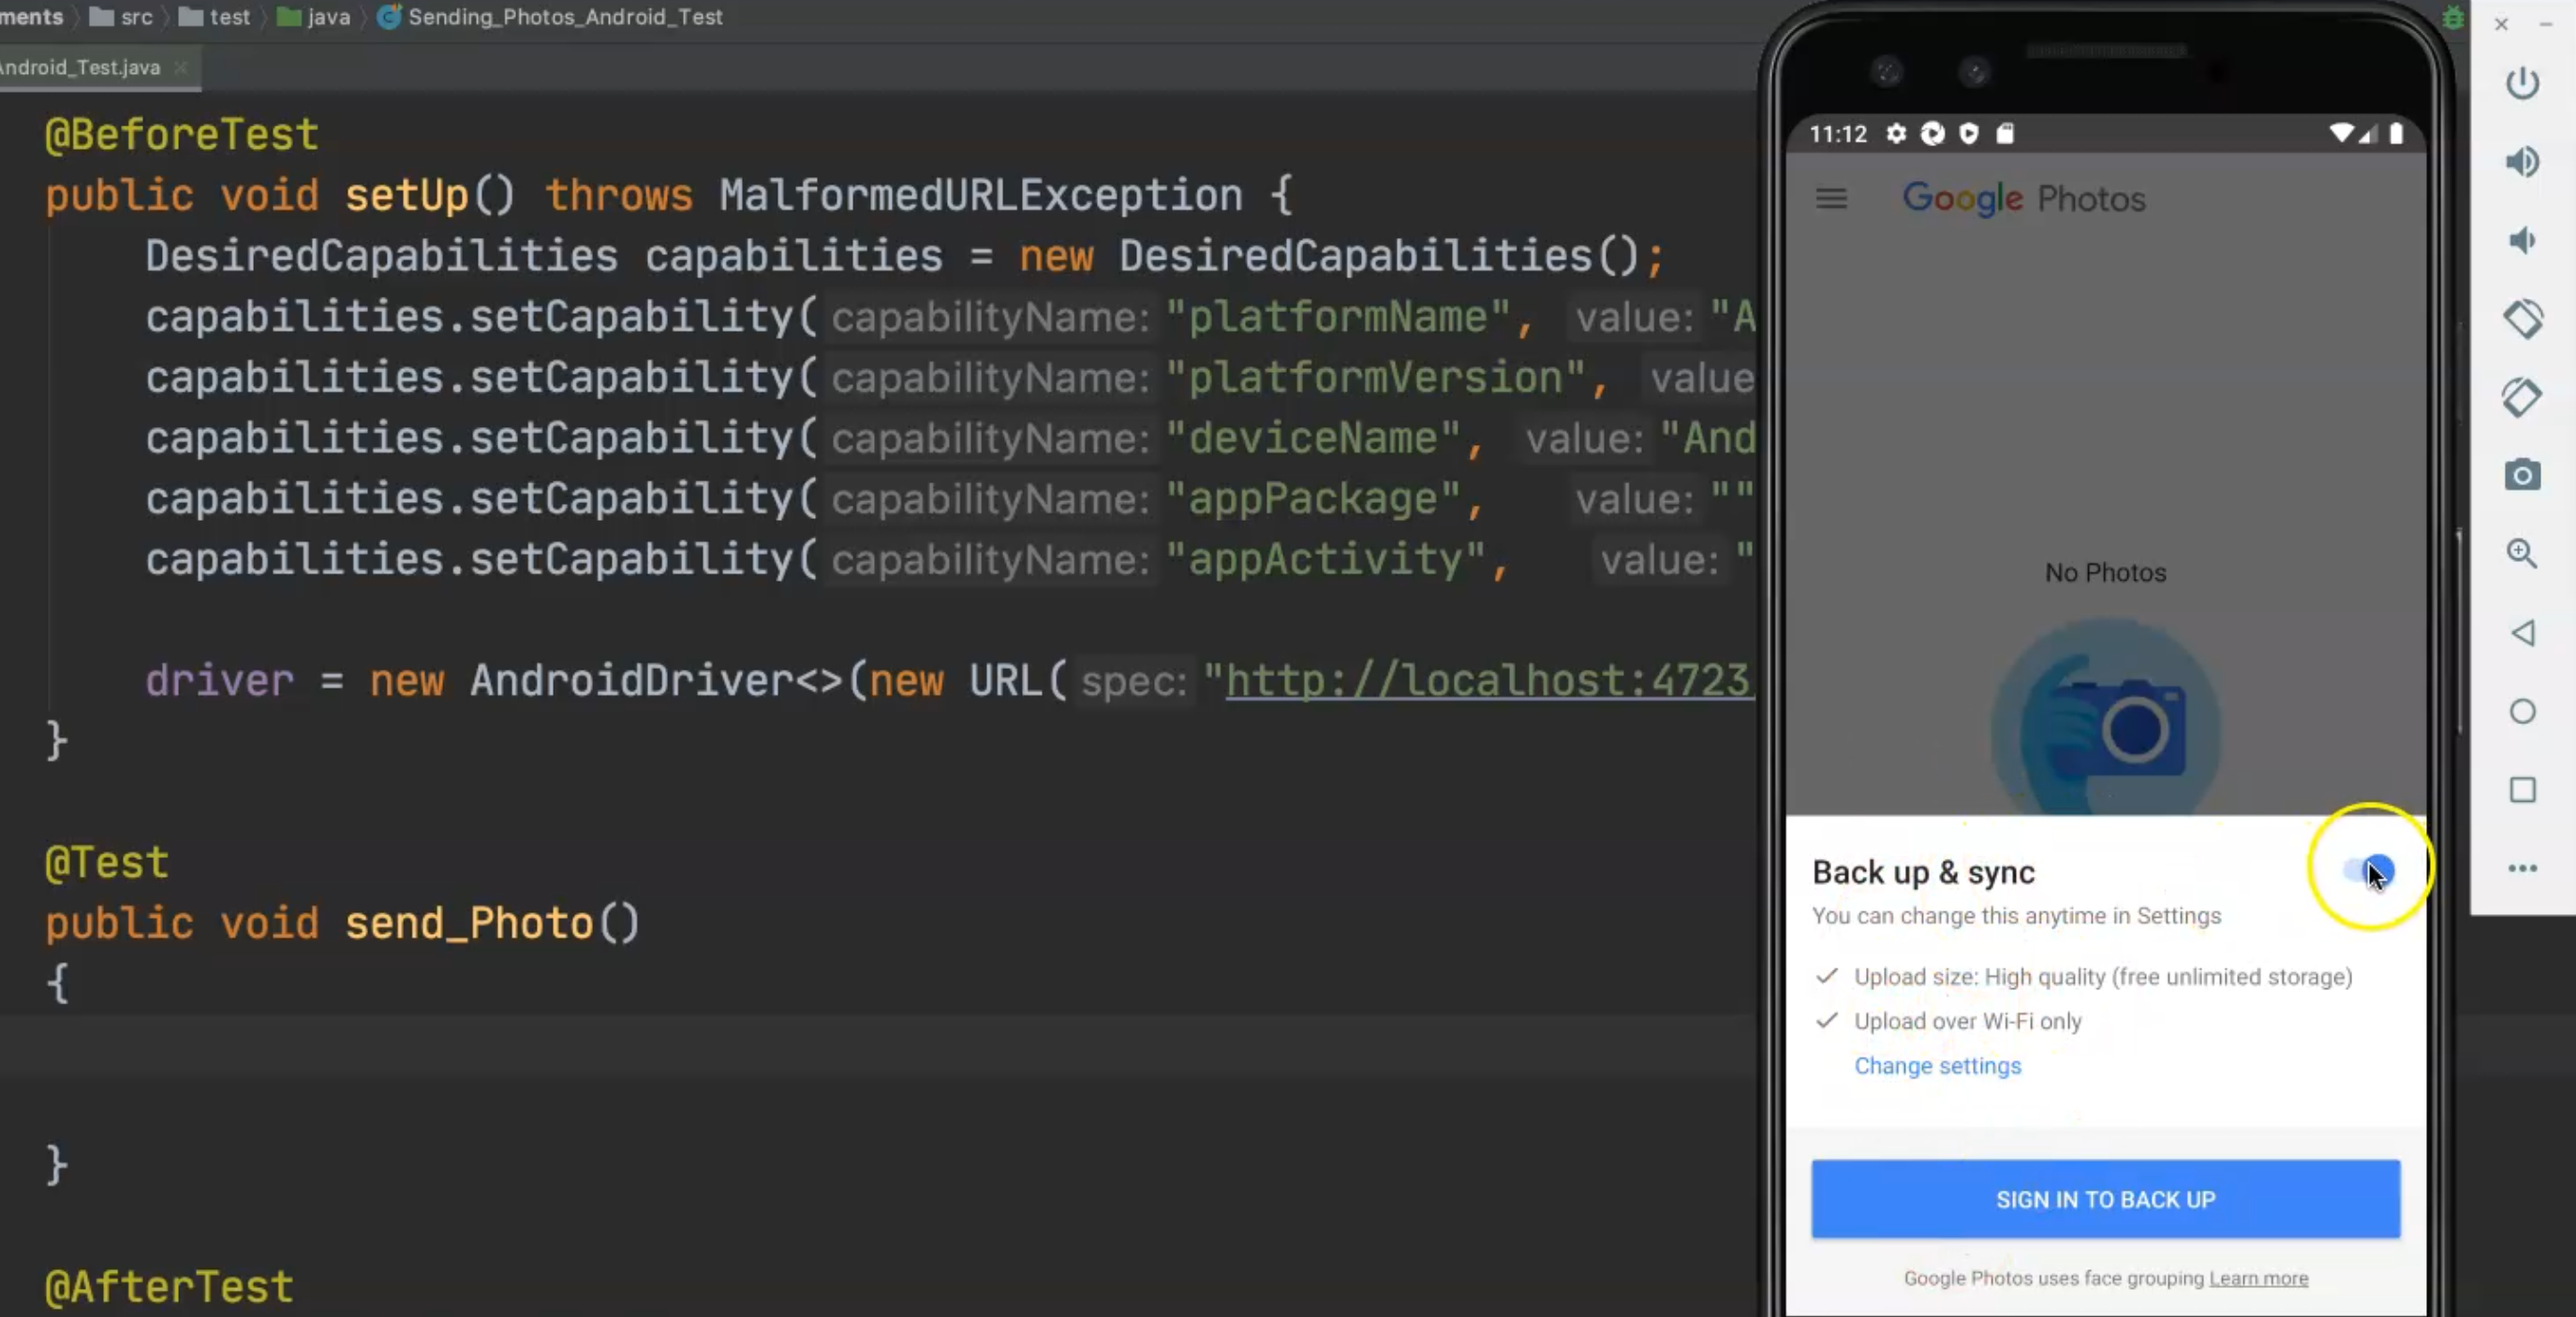
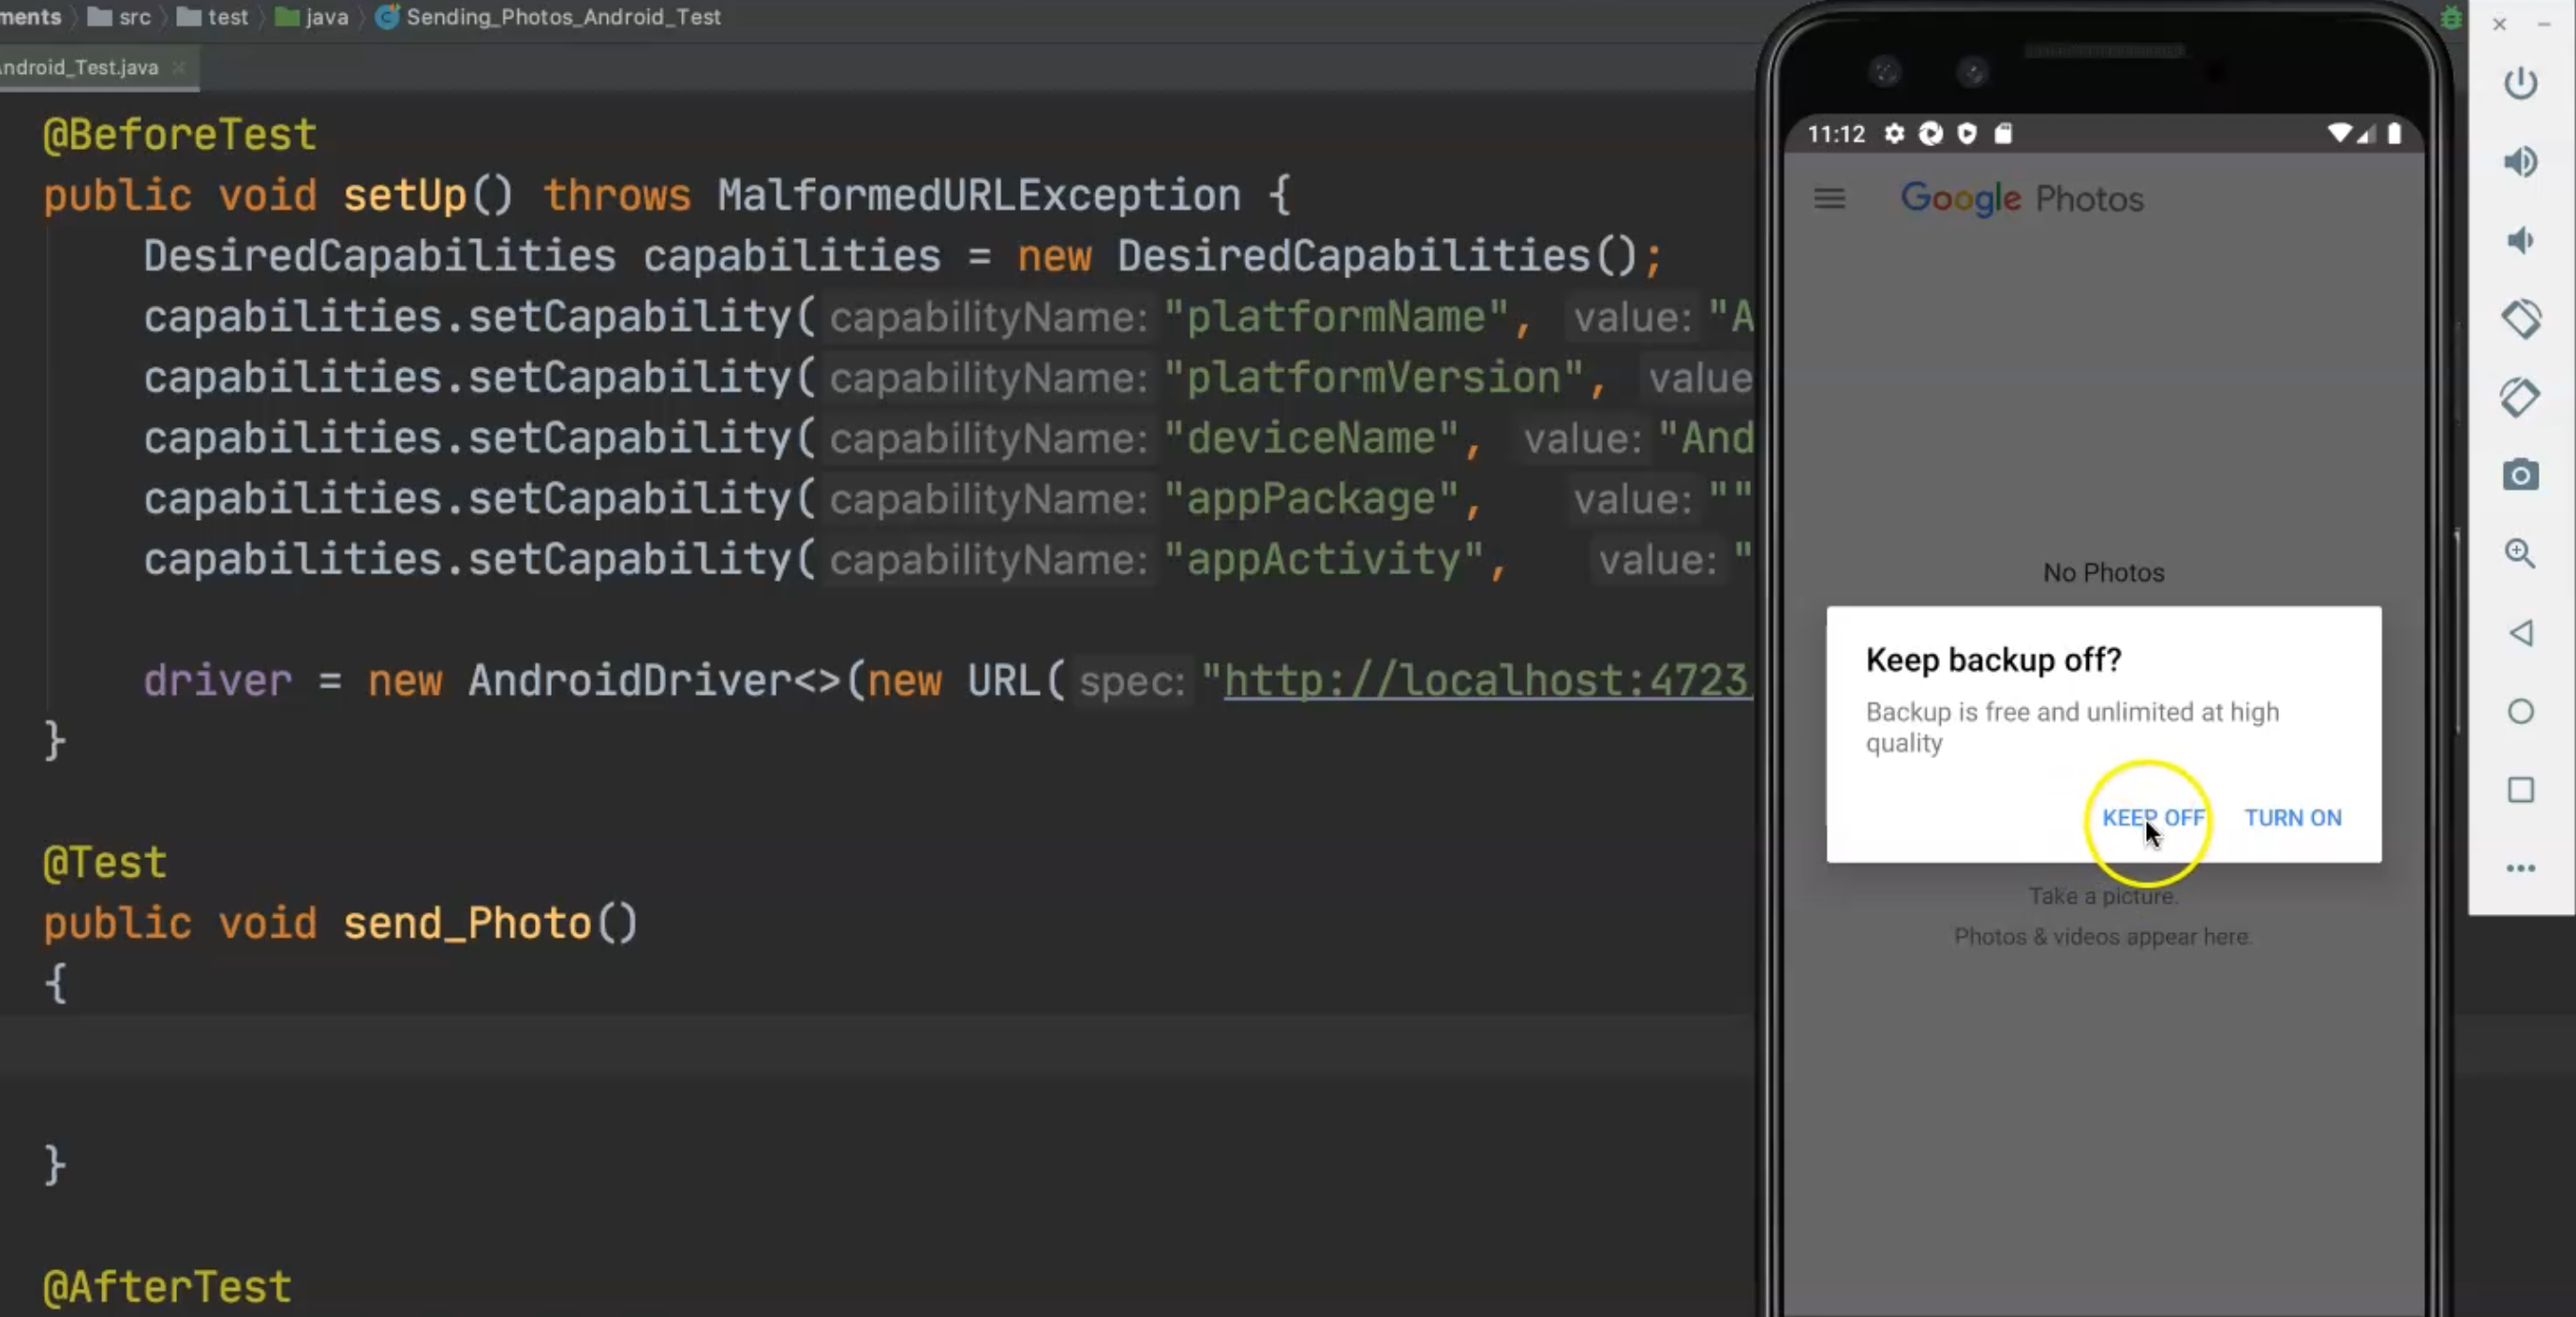
Then we need to click on this screen to be able to send a photo, but also, we have another element displayed and we need to click "Keep off".
This is the main application that we need to use.
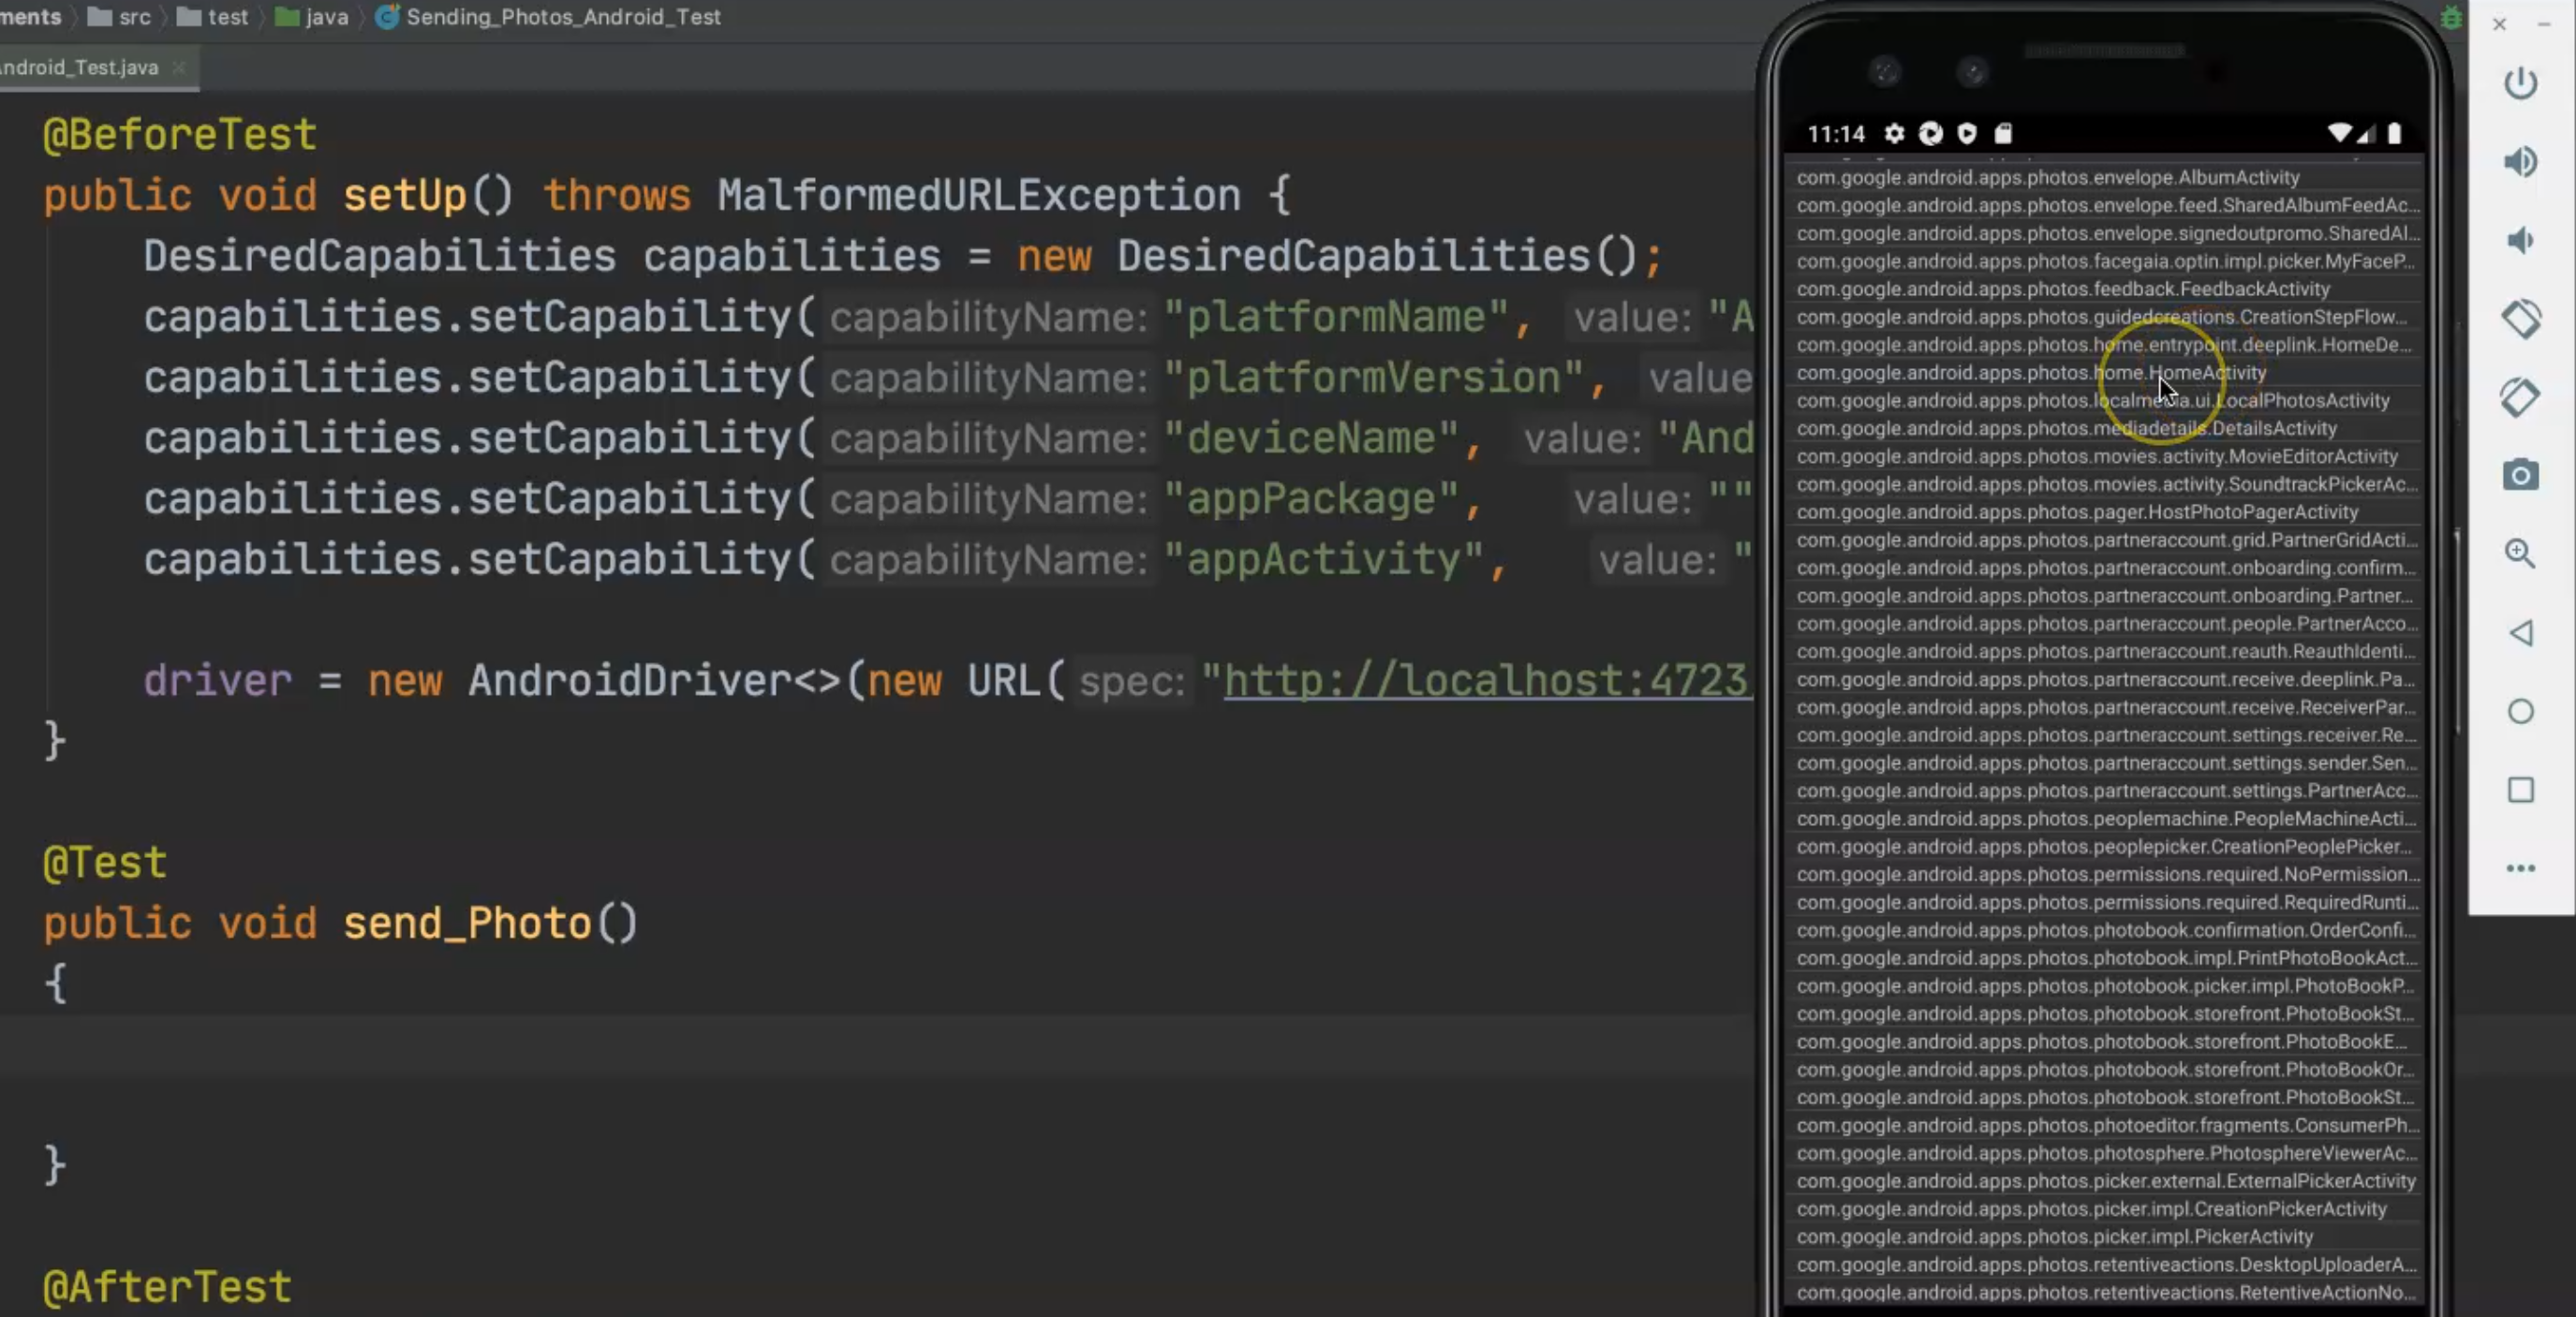
From the APK Info app, we need to get the appPackage and appActivity so we will search for "Photos", then long press and click "Detailed Information".
Here, the permissions, and here we have activities.
It usually starts, as we know, with com.google.android.apps.photos.album and all of these things.
We need to find the "home" activities - photos.home.HomeActivity - this is the main activity that we need to find.
At the beginning, let's add the appPackage - com.google.android.apps.photos.
Then in the value for appActivity we should add .home.HomeActivity.
So we added the appPackage and the appActivity.
Let's run our test to make sure that we are opening the correct application and then we can continue with our test case.
So we are now running our test script, we will start searching about the appPackage and appActivity on the device, and if we find them, we will open it on the emulator.
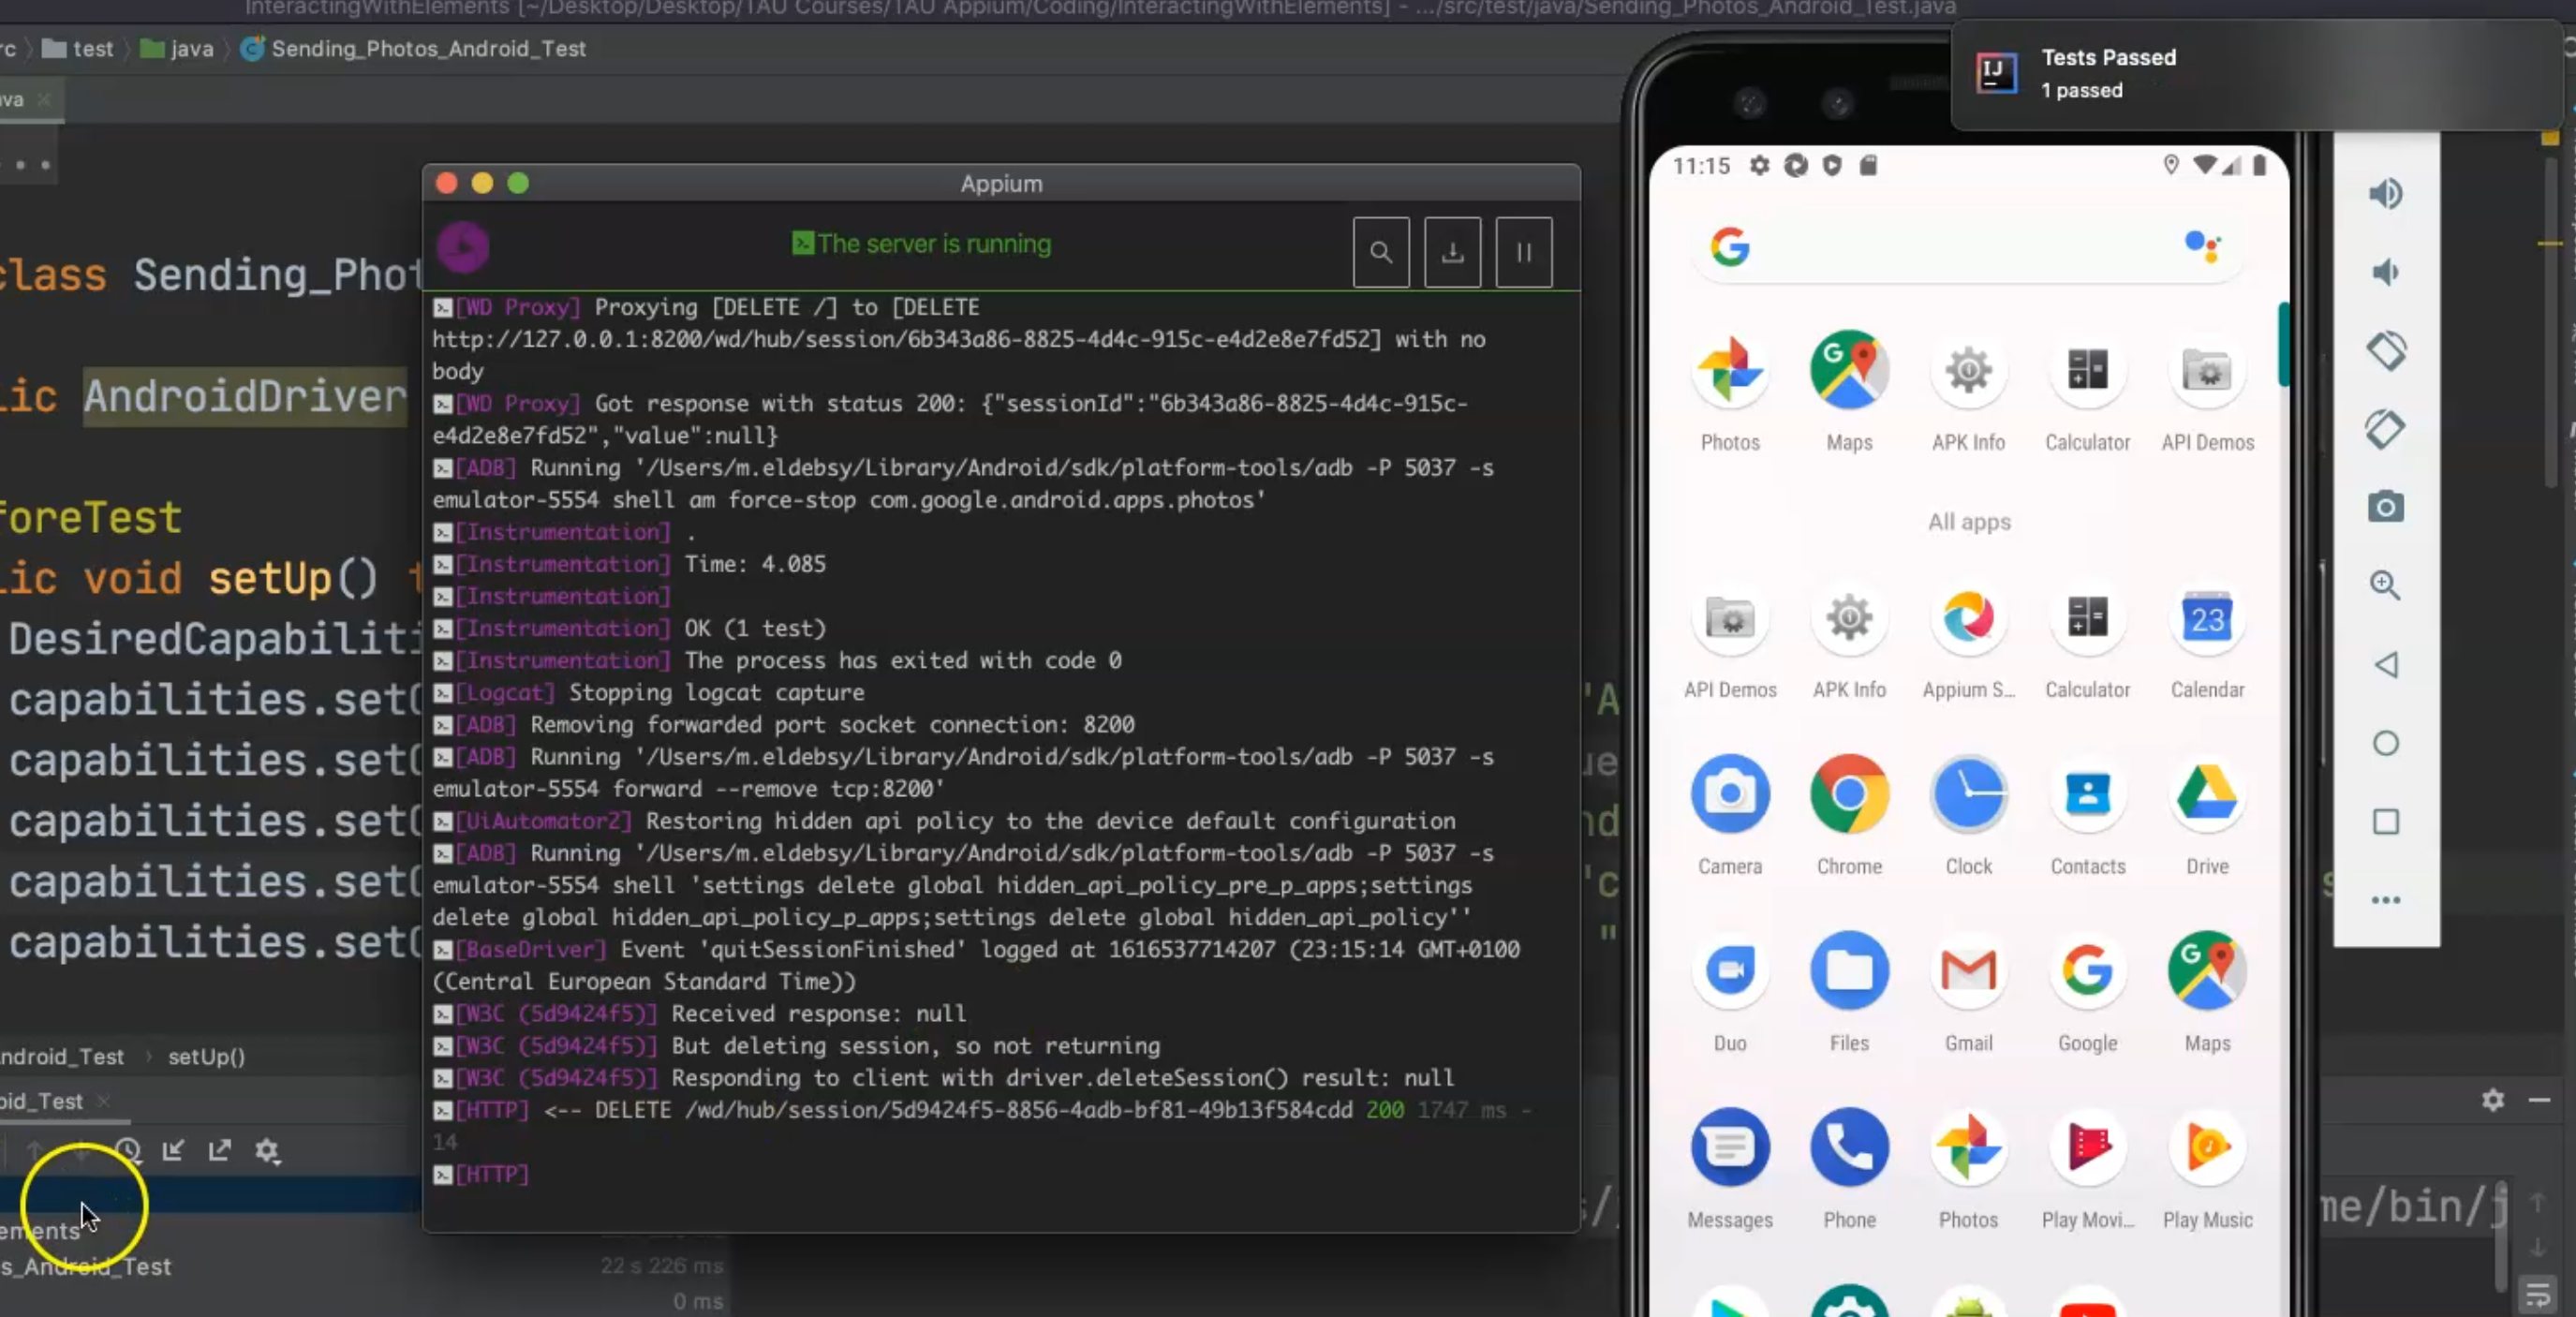
We've opened it already and our test is finished and now we can continue with sending a photo.
Let's just start with opening an inspection session to start finding the elements because here we have different elements like the on and off buttons, and backup, and everything that we need to find.
From the desired capabilities, and maybe we can search about Android for built-in.
So here is the Android built-In, and just we need to change the appPackage and appActivity.
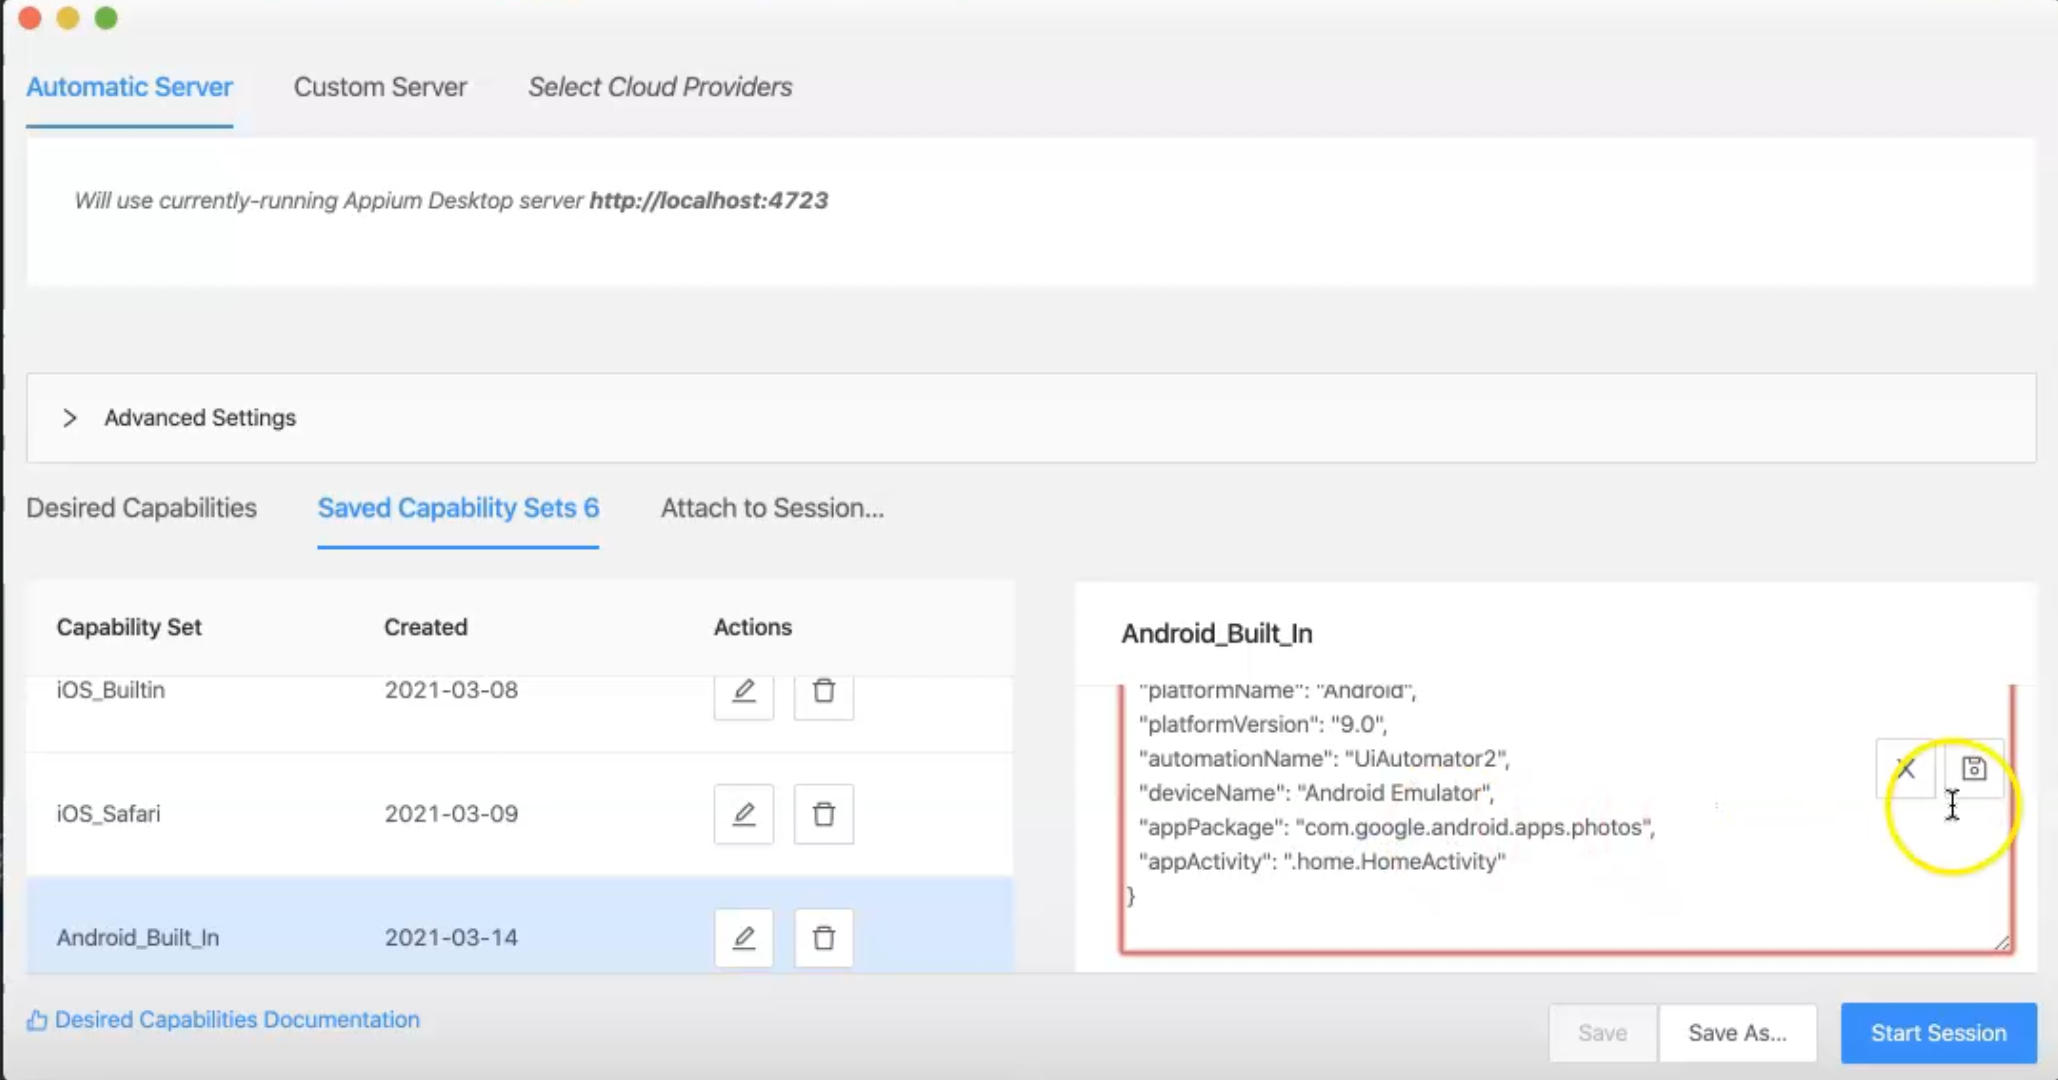
We can copy these from our code and then save and start the session.
Our server is started now and the inspection session will be open if everything is okay.
The application Google Photos is opened, and now our inspection session is prepared to take a screenshot from our device.
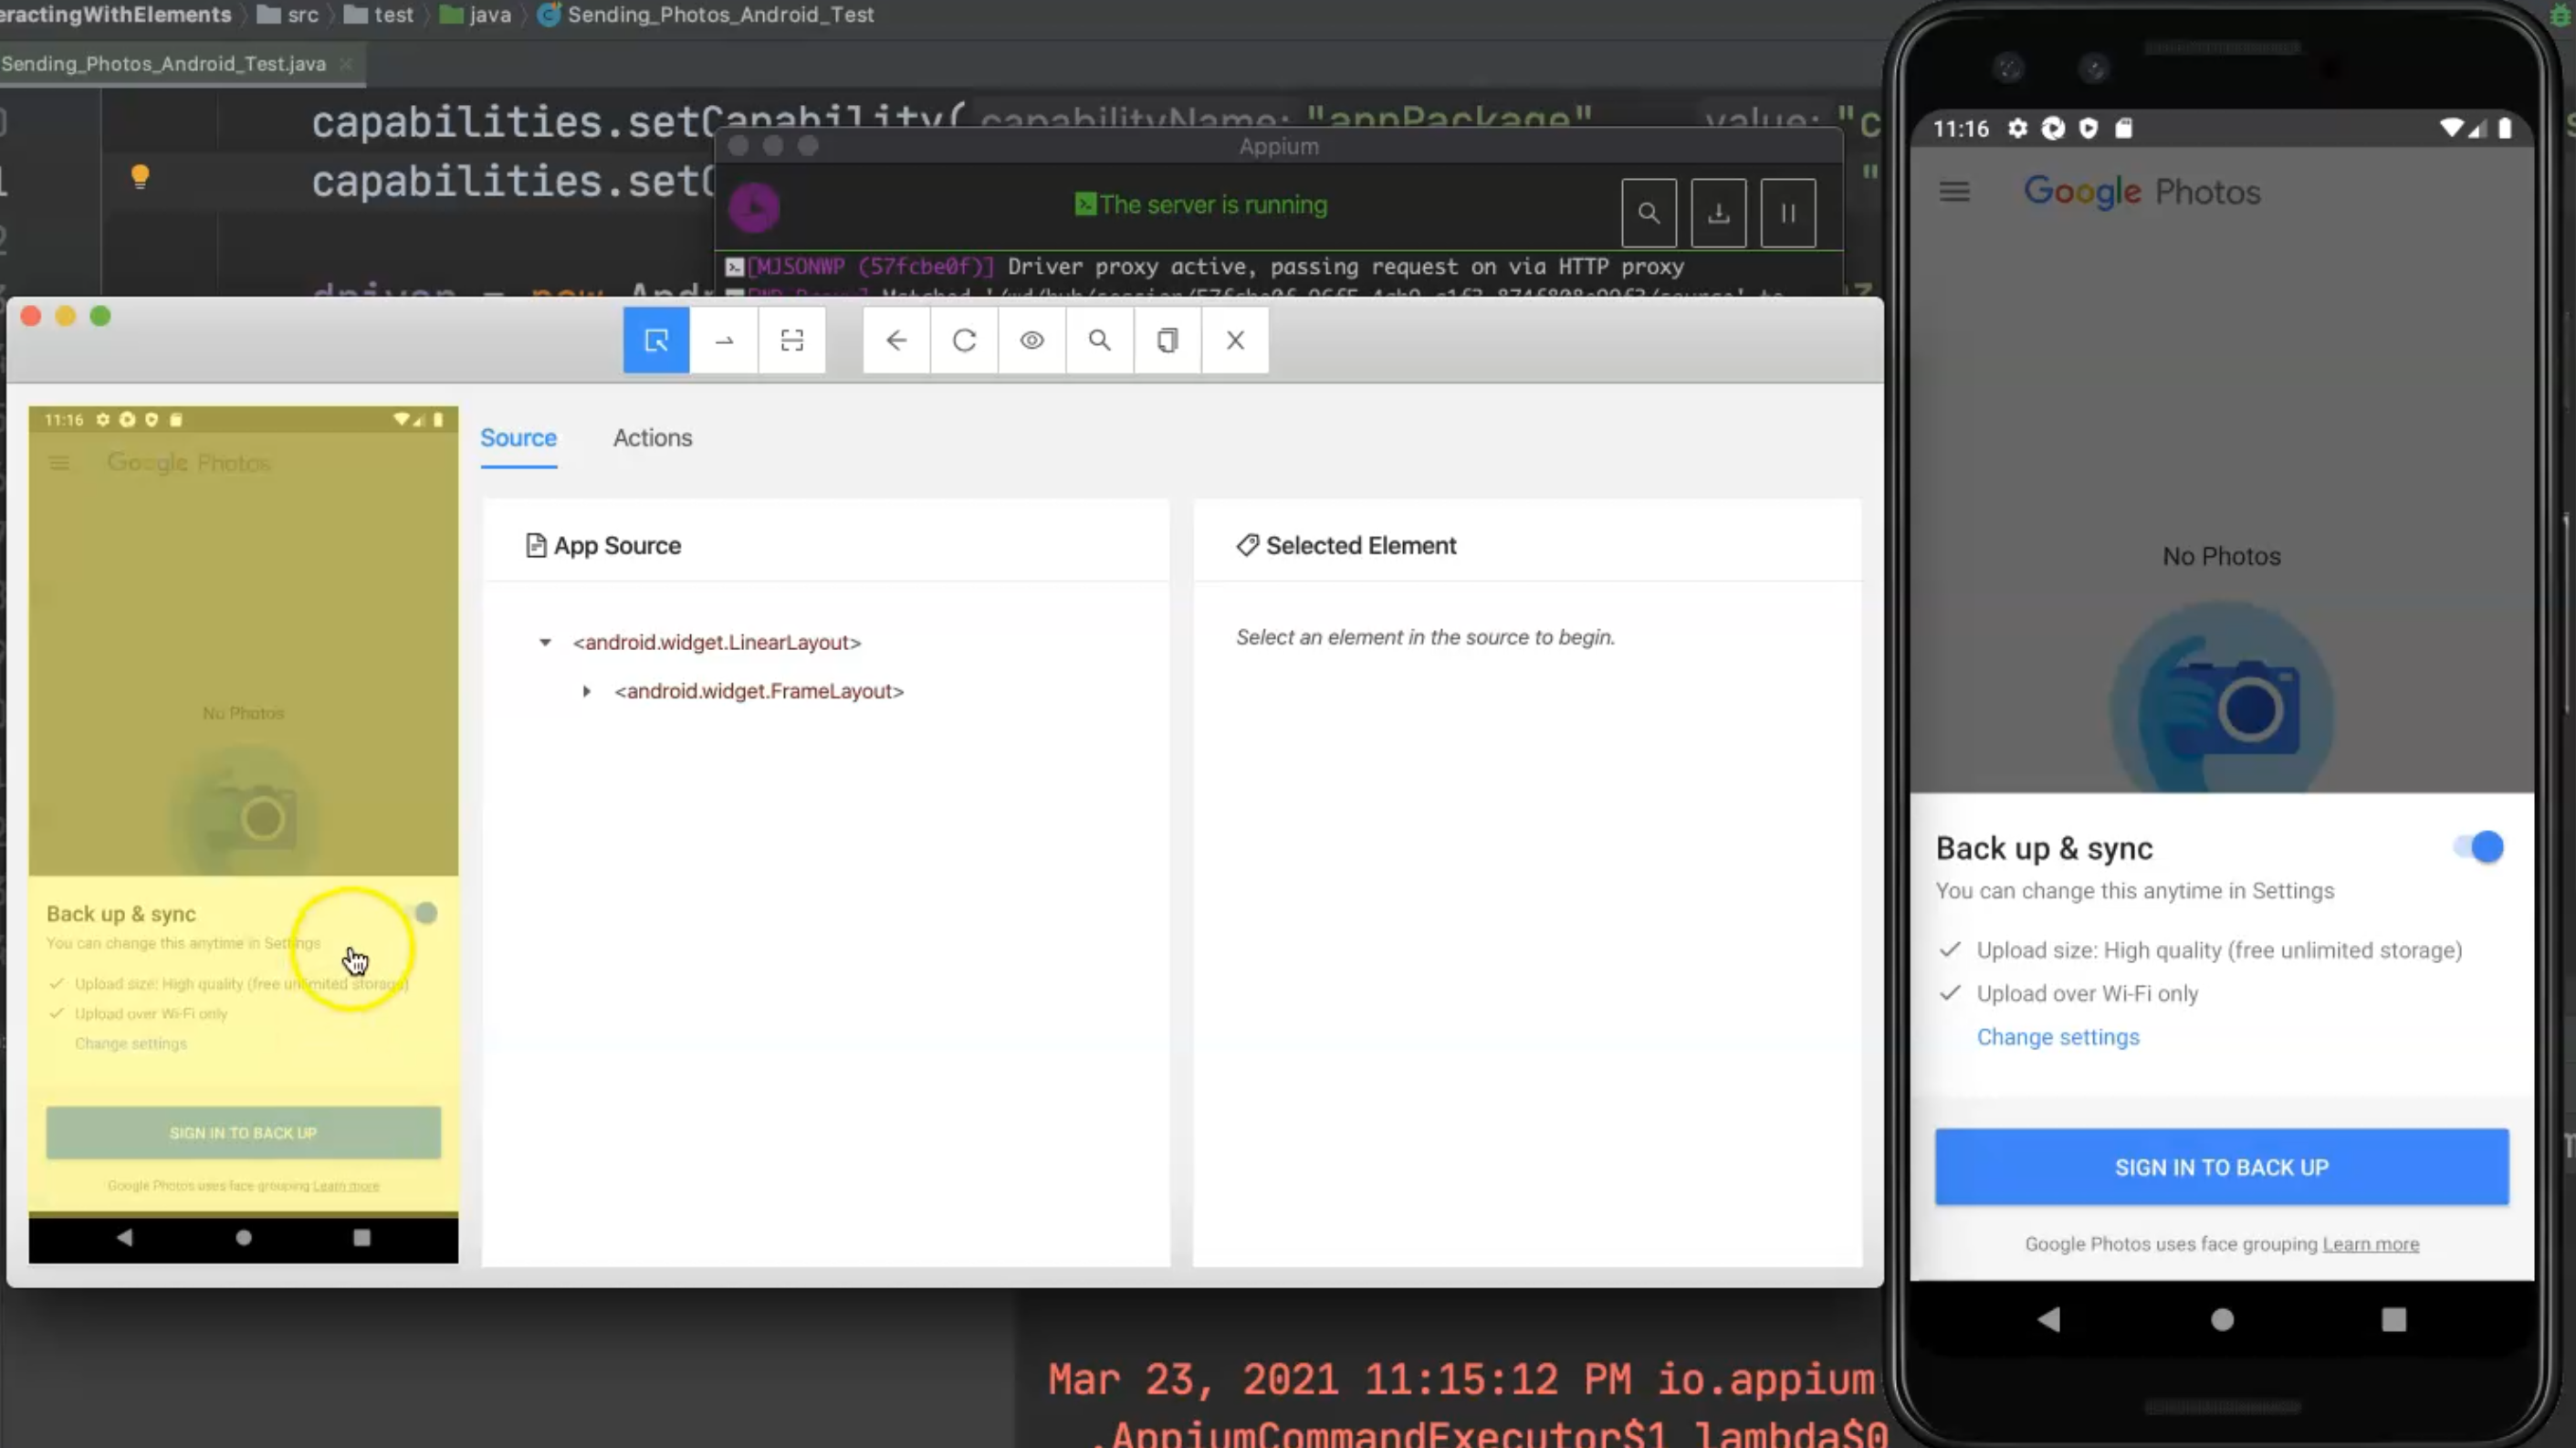
Now we need to click on this button because we don't need to backup or sync our images for the time being.
Then after that, we need to touch this area to disable this screen, or to remove this notification, and then after that, we need to work with this one.
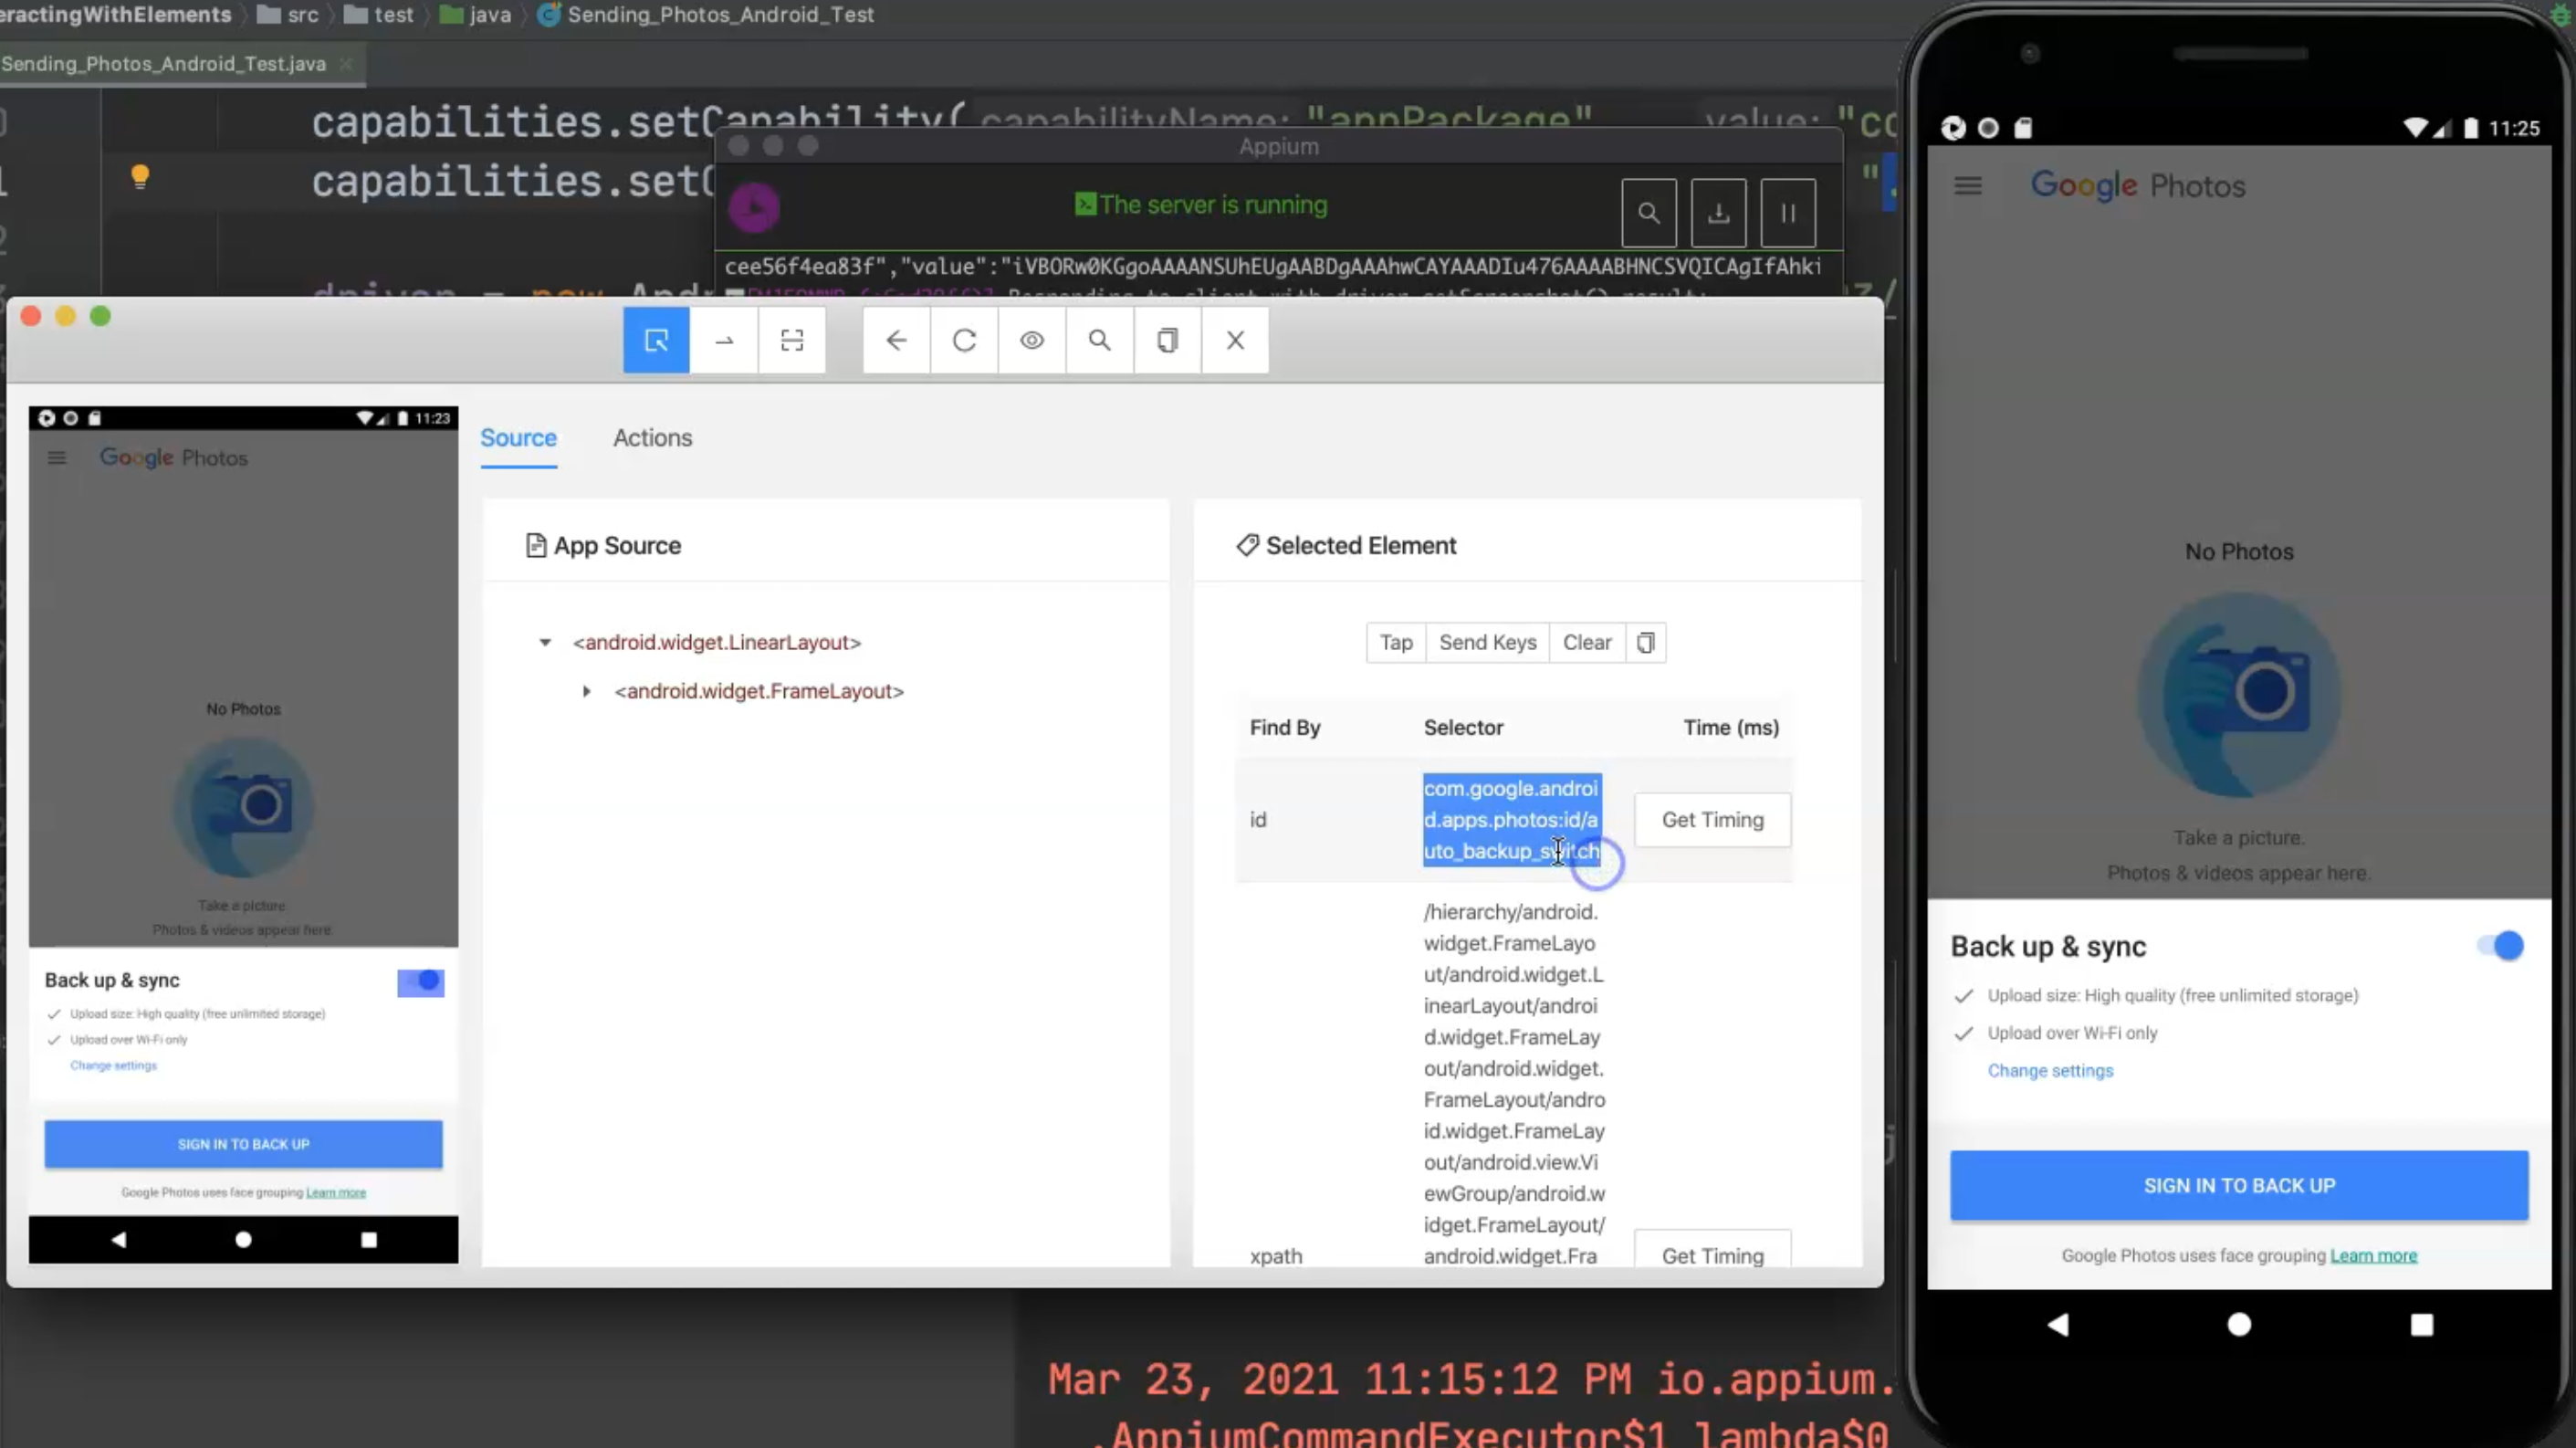
Now let's try to find this element so we will click on this one here it has the ID.
Sometimes it changes from one version of AndroidDevice to another version from OS, from different operating systems or Android Operating System to another one.
Sometimes it's hard to find these images, but with this version, you can find this one.
Here is the ID that I need to use, so in our test script, let's try to use another way to find the element by using By.
We are using By to find by because here we need to add wait because we are working with different notifications and different alerts, so we will use wait in this script.
We will add a private static By which is from Selenium, and we will call this backupBtn and it equals By.id() - in this case, we will copy the ID, which is "auto_backup_switch".
Then after that, let's click on this one with "Tap" to see what is on the next screen.
Now we need to touch outside the screen to disable this screen.
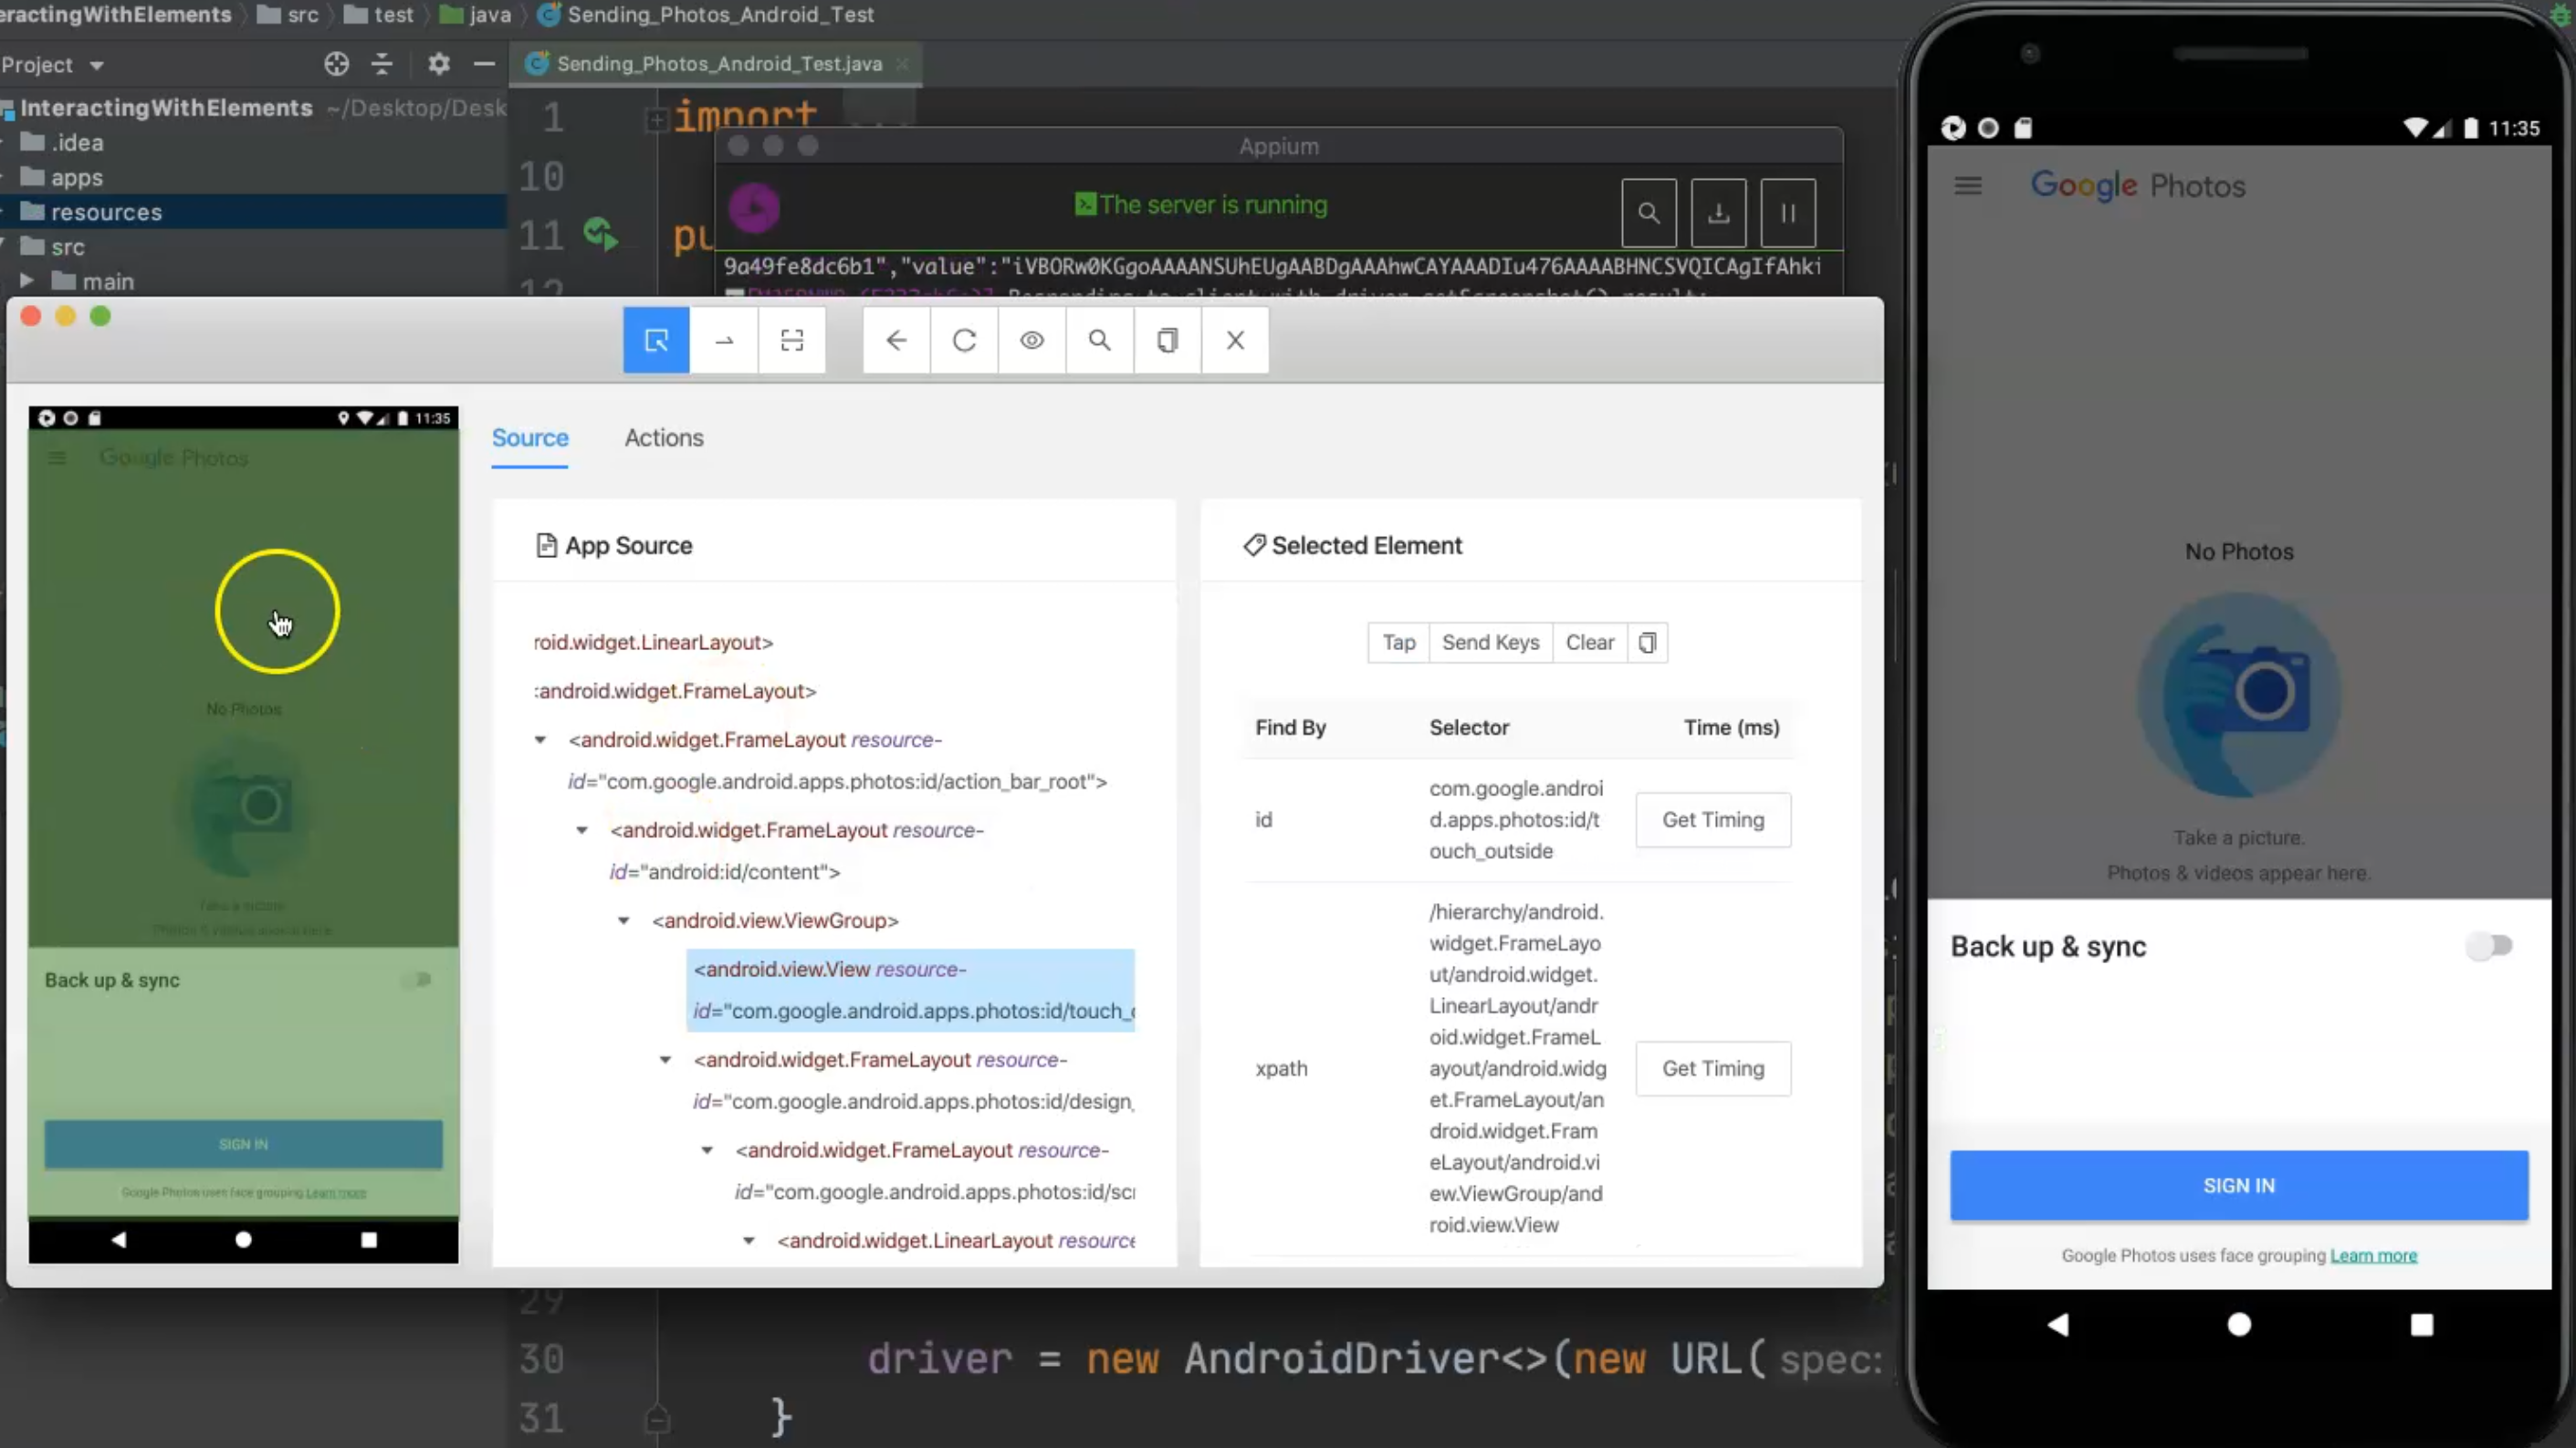
For example, if we click on this one, here we have the ID for this group which is "touch_outside".
So we can copy this again we can add private static By and it will be touchOutsideBtn = By.id("touch_outside") .
Here we have a touch screen and then let's continue - I will tap and I think we will have another message.
So yes, "Keep off" to keep the backup off.
We already have an ID and we have an xpath so let's try to use xpath with the text.
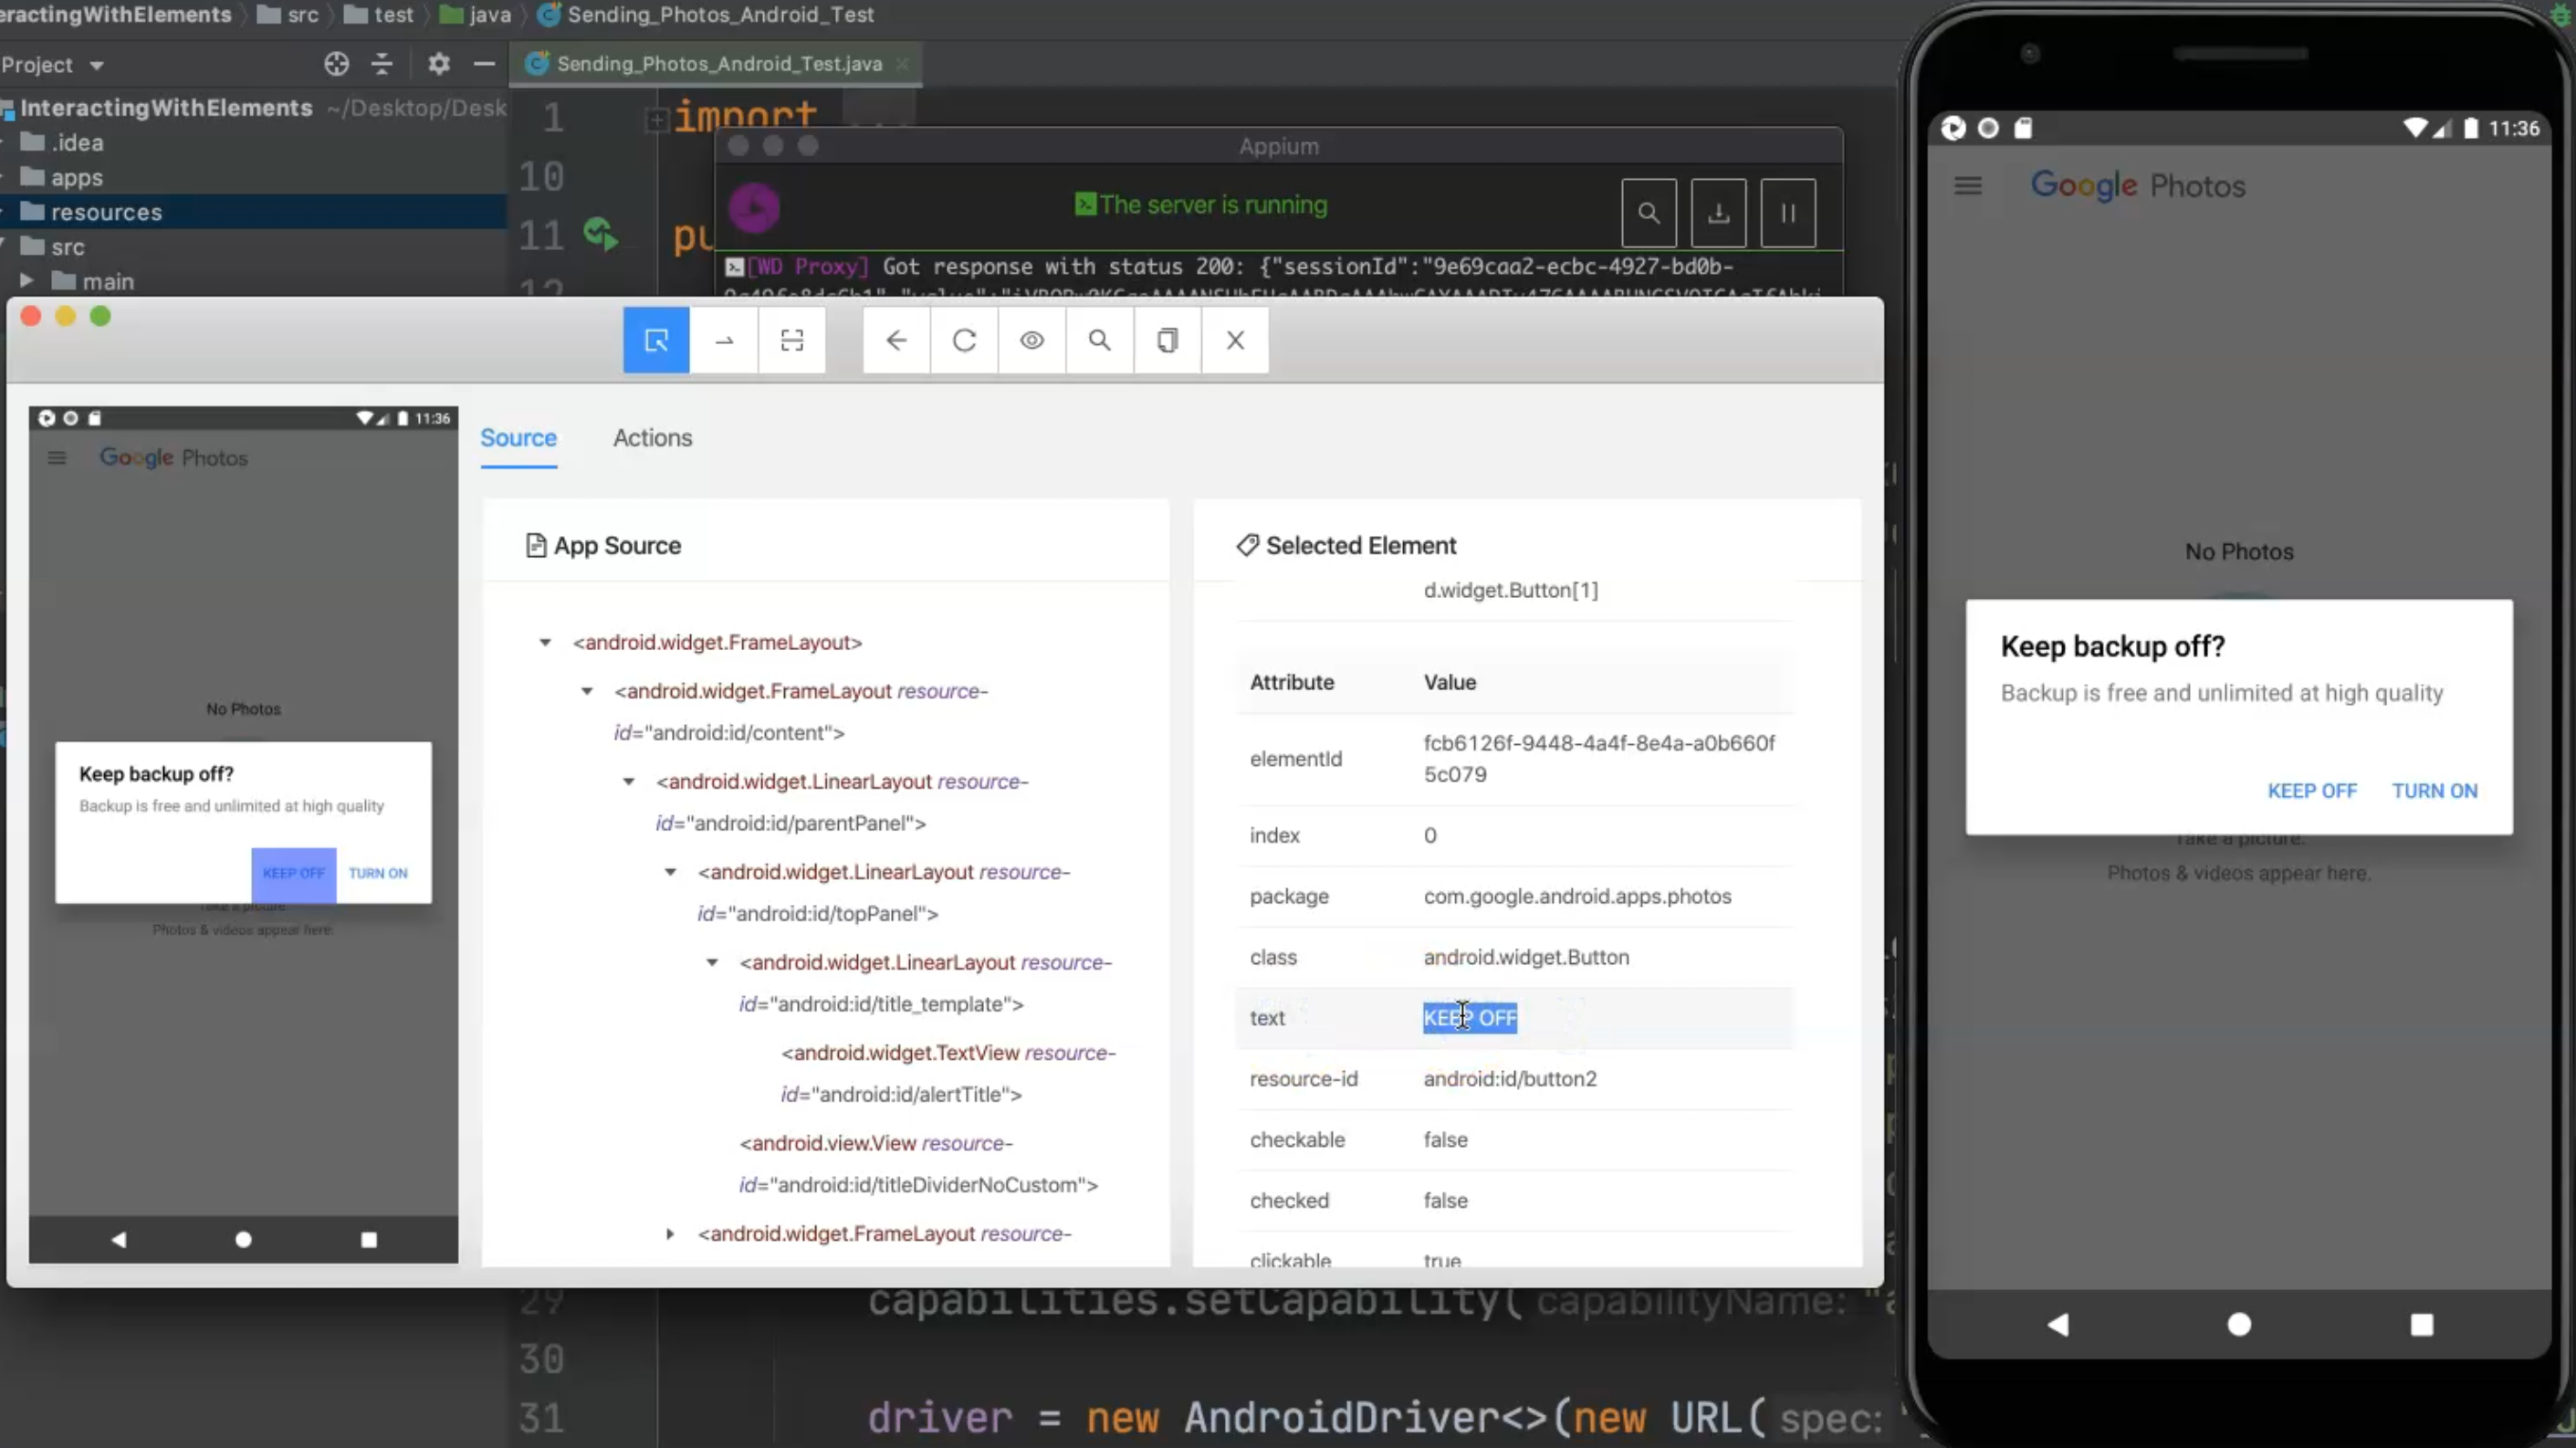
For example, we can copy this text and use a custom xpath.
So here we have a private static By keepoffBtn = By.id() and the custom xpath with the text is //*[@text='KEEP OFF'].
So here we have the "Keep off", and then we need to click on this button so we will tap, and then we need to find the element to send the message here.
This is a photo and maybe we can start searching about something related to the photo inside of this one.
Maybe we can use a view group that contains "photo taken" or something like this.
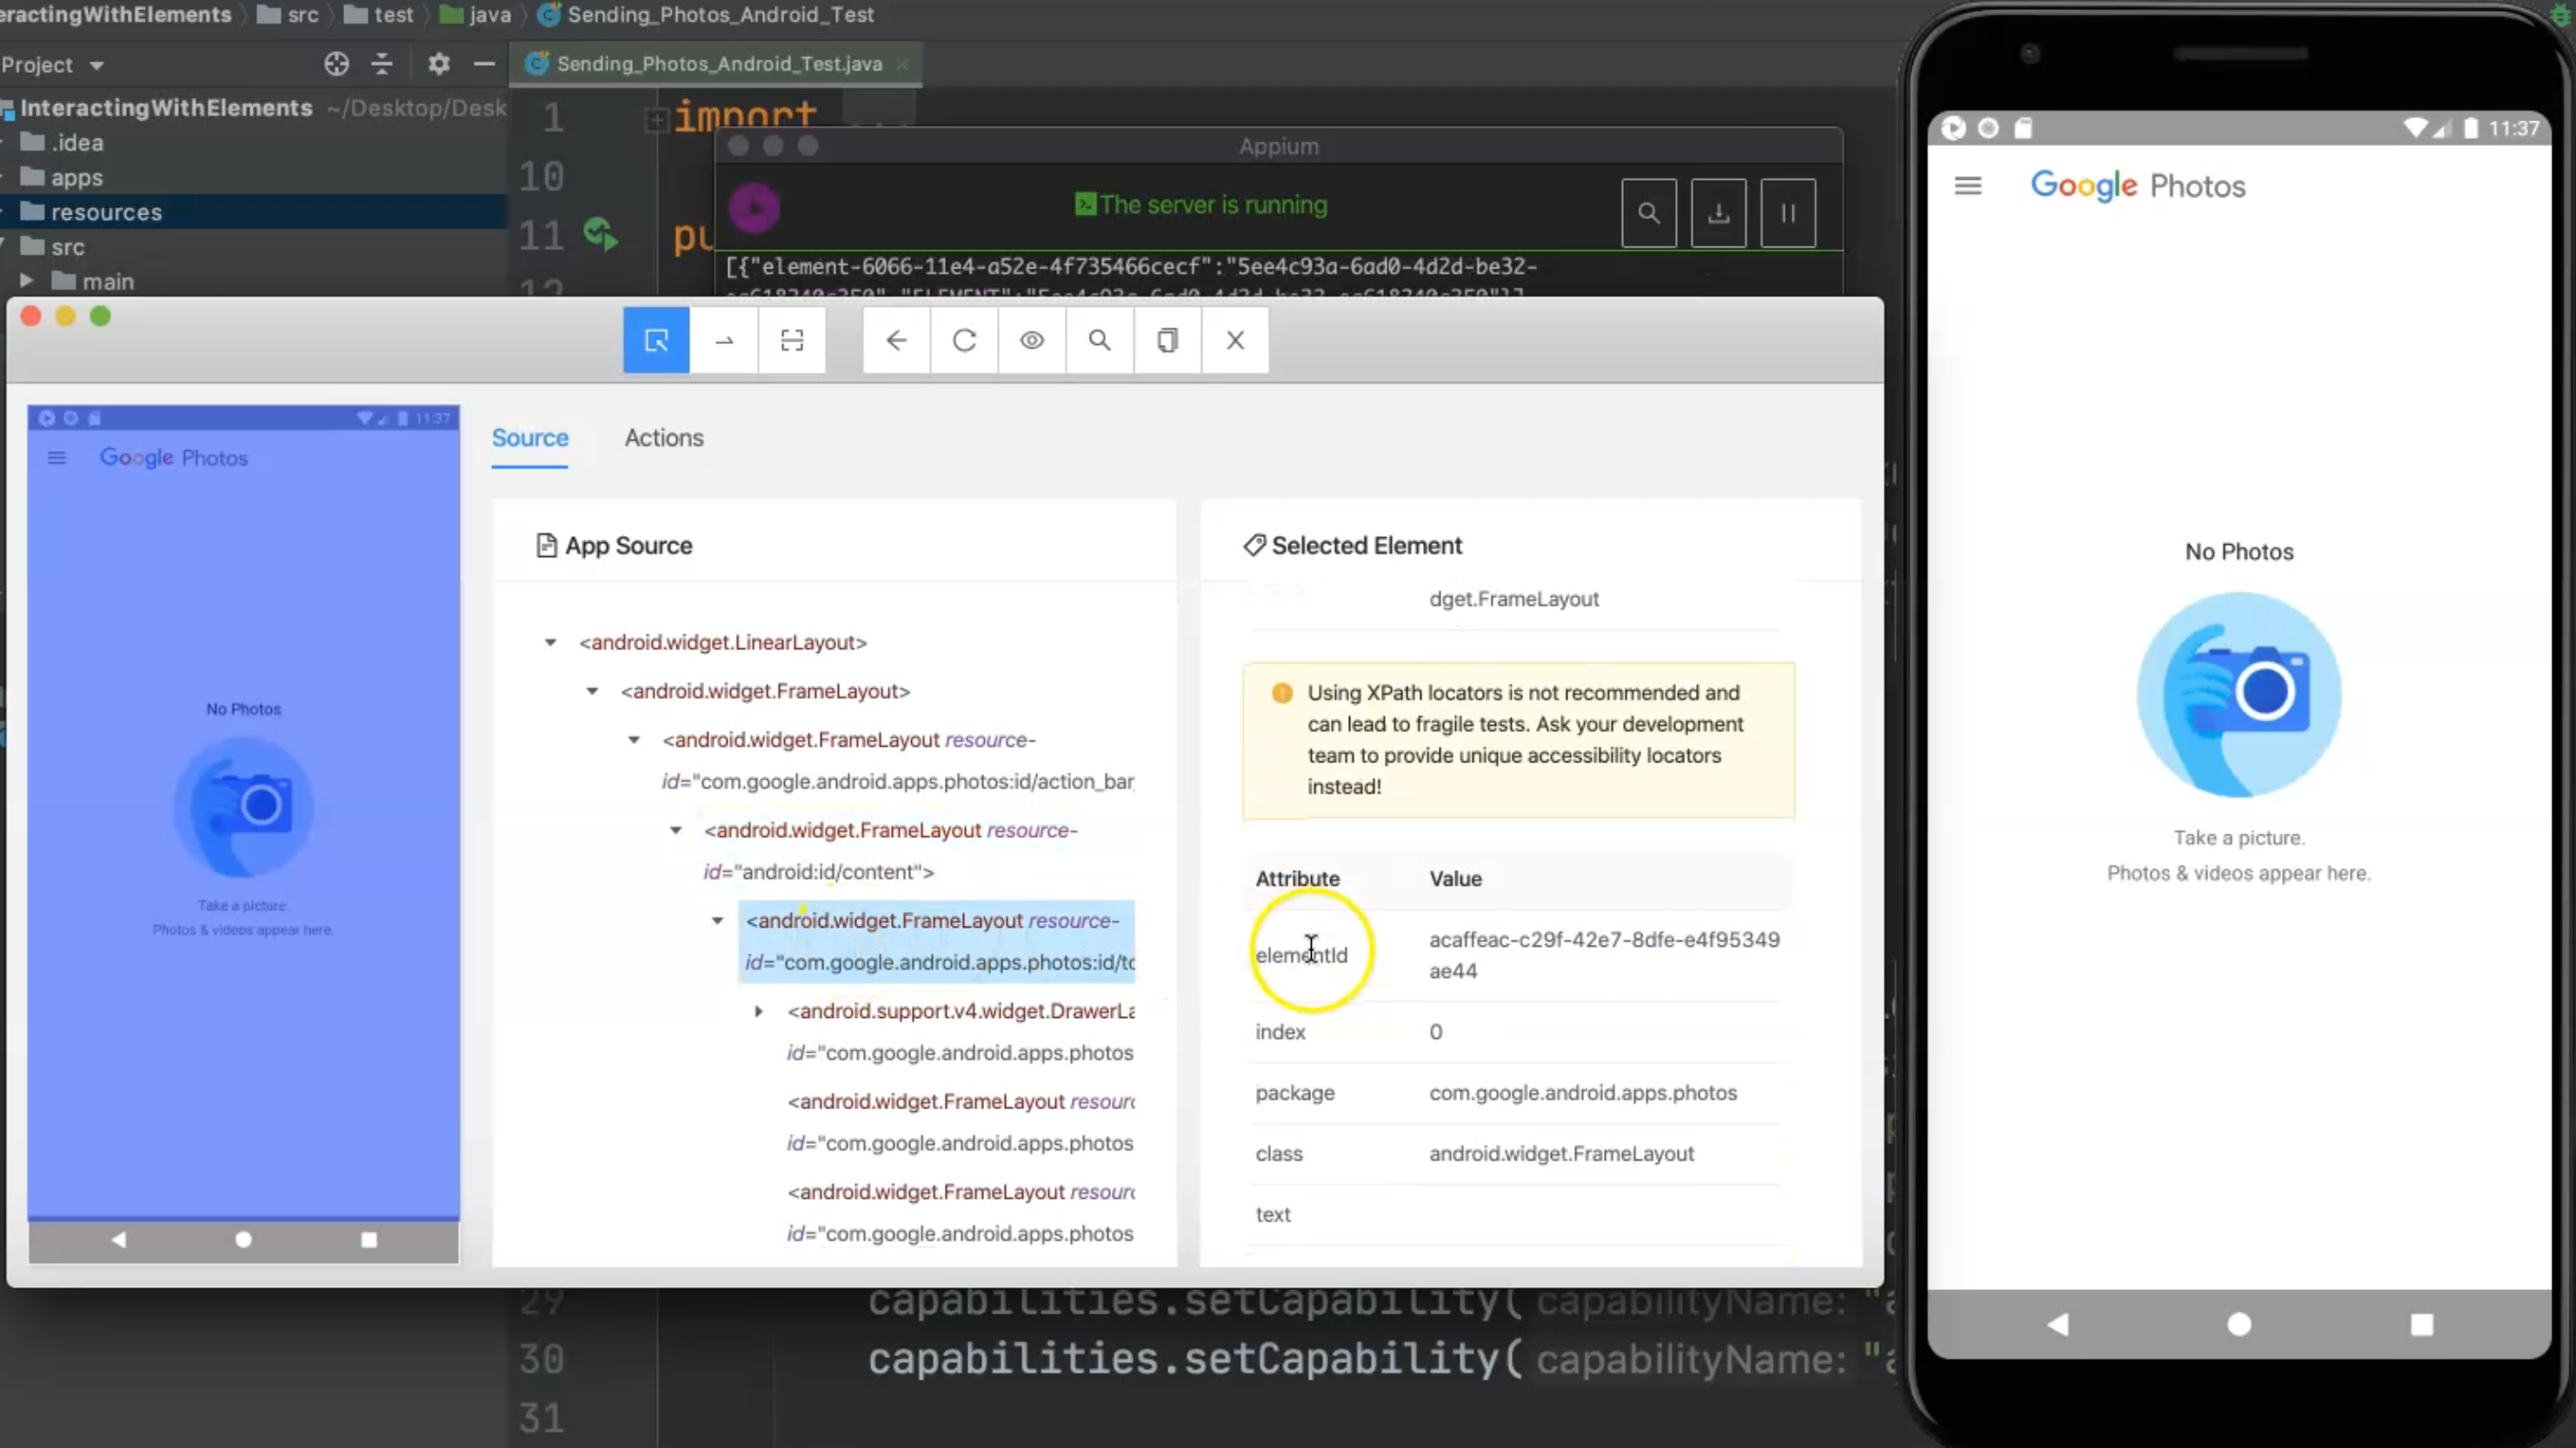
So here this is photos:id, the frame... I will continue searching for anything that I can use with this one.
This is the main container - in the main container, this is the FrameLayout, then I can open this widget and this frame, this is the android fragment - this is empty - maybe we can use this one with view group.
Here we have this, "No Photos", so maybe we can use something like this widget with android.widget.ViewGroup.

Let's try first to send one random image to the Google Photos application and check if we are still missing something when we have already images in that location and we have the element to be used.
Inside the resources folder, I added the images folder, and I have the Test Automation University logo added here, and I can open this folder in the Finder and just use drag and drop.

I will open images, and then drag and drop the image to the device, and the image now is displayed in the application.
Let's go back to our inspection session and refresh the screen and here we have the image.
Here we have the ViewGroup and this is the accessibility id - "Photo taken on" - and this is the date and the time - but we can use this xpath without the time.
We will a custom path for this one - for example, we can use a content description that contains "Photo taken".
So in our script, we can add our last element here - private static By photo and then this will be By.xpath("") because we will add a custom xpath and then we will add android.view.ViewGroup with the @content-desc='Photo taken'.
So the photo is from the xpath ViewGroup with the content description 'Photo taken'.
private static By backupBtn = By.id("auto_backup_switch");
private static By touchOutsideBtn = By.id("touch_outside");
private static By keepOffBtn = By.xpath("//*[@text='KEEP OFF']");
private static By photo = By.xpath("//android.view.ViewGroup[contains(@content-desc,'Photo taken')]");
This is the element that I will start working with.
Also, I need to find the path for the image to be able to use it.
We will start to use send_Photo() directly to check what we need to prepare in our script.
Here, I will add driver.pushFile() - we have a pullFile and we have a pushFile if you wanted to get a file from the device or push a file to the device.

To send a photo, we need to send the remotePath and the file.
We need to define the file, or the image as a file, and then we need to add the remote path.
We should add something like this on our class level - we can add File from Java IO, and we can add the classPath, imageDir, and the image.
File classPath, imageDir, img;
So here we have three files: the classpath or the root of the file, the image directory, and also the images.
Then in our test case, we can start using it.
In our test case, before we push the file - we will comment this one for now - we can add classPath = new File(System.getProperty()) and we are reading the file from "user.dir". This is the first one.
Then imageDir = new File(), and we'll pass classpath, and the path inside our application /resources/images.
Then img itself will also be a new file because pushFile uses File, and it will be from imageDir.getCanonicalFile() and the image is "TAUlogo.png" and we will put it here.
For getCanonicalFile(), we should add an IOException because we are reading the file from the disc.
So we prepared our files.
classPath = new File(System.getProperty("user.dir"));
imageDir = new File(classPath, "/resources/images");
img = new File(imageDir.getCanonicalFile(), "TAU-logo.png");
So now, this for just for reading an image from the path.
After that, we can add a WebDriverWait since the elements will not be displayed immediately.
We will add wait = new WebDriverWait() and then we are passing driver to it and a time, like 10 seconds.
Then we will add wait.until(ExpectedConditions.presenceOfElementLocated(backupBtn)) because we need to find the backup button first, and if it's already displayed, we need to click on this button.
For the second one, we need to add wait until the second button, which is touchOutsideBtn, to be available so we will need wait.until(ExpectedConditions.presenceOfElementLocated(touchOutsideBtn)) and then we will click on this one.
Then, we need wait.until(ExpectedConditions.presenceOfElementLocated(keepOffBtn)), because it's from the system and sometimes it may take time to display, so we add wait here.
    @Test
    public void send_Photo() throws IOException {
        classPath = new File(System.getProperty("user.dir"));
        imageDir = new File(classPath, "/resources/images");
        img = new File(imageDir.getCanonicalFile(), "TAU-logo.png");

        WebDriverWait wait = new WebDriverWait(driver, 10);
        wait.until(ExpectedConditions.presenceOfElementLocated(backupBtn)).click();
        wait.until(ExpectedConditions.presenceOfElementLocated(touchOutsideBtn)).click();
        wait.until(ExpectedConditions.presenceOfElementLocated(keepOffBtn)).click();
    }
Then we need to push the file to a remote URL so let's uncomment this.
We need to add a remote path, which is the SD key card or the pictures folder inside Android, so we'll add String Android_Photo_Path = "mnt/sdcard/Pictures".
Then we can use driver.pushFile() now - we need to send the file to Android_Photo_Path, and we need to send the image, so then we need to add a "/" and then we need to add img.getName()' because it's a file, and then the img.
So, this is the remote path Android_Photo_Path + "/" + img.getName(), and img is the image that I wanted to send out.
After that, we can add an ExpectedCondition condition and this is equal to ExpectedConditions.numberOfElementsToBe(), and for this, we are checking that photo only contains 1 element.
After that, we need a wait.until() the condition happens.
    @Test
    public void send_Photo() throws IOException {
        classPath = new File(System.getProperty("user.dir"));
        imageDir = new File(classPath, "/resources/images");
        img = new File(imageDir.getCanonicalFile(), "TAU-logo.png");

        WebDriverWait wait = new WebDriverWait(driver, 10);
        wait.until(ExpectedConditions.presenceOfElementLocated(backupBtn)).click();
        wait.until(ExpectedConditions.presenceOfElementLocated(touchOutsideBtn)).click();
        wait.until(ExpectedConditions.presenceOfElementLocated(keepOffBtn)).click();

        String Android_Photo_Path = "mnt/sdcard/Pictures";
        driver.pushFile(Android_Photo_Path + "/" + img.getName(), img);
        wait.until(ExpectedConditions.numberOfElementsToBe(photo, 1));
    }
So this is mainly how we can send the files to Android.
We added our file and our elements at the beginning of the class and added the classpath and the directory and the image file.
Then after that, we added the appPackage and appActivity.
We added the file with the user directory, the path for the directory, and the image name.
Then we click on the backup button, touch outside, and then close or click on the keep off button.
Then this is the Android folder mnt that sends the images to this remote path and then we push the file and then wait for the condition.
Let's run our test and check what happened.
Now we have a problem in our setup - "Unable to create a new remote session".

Let's check what our problem is.
I think our application is now running on Android Emulator Version 8.0, so I'll adjust it, and then I will start running my script again.
Now, we are running our script.
We will search for the Photos application, open it, close the backup, click on "Keep off" -
maybe we have a problem with this element.
Let's double-check what happened during our test.
Here we have an error "no such element" - so we have a problem with the UIAutomator can't find this strategy "id", so this is a problem.
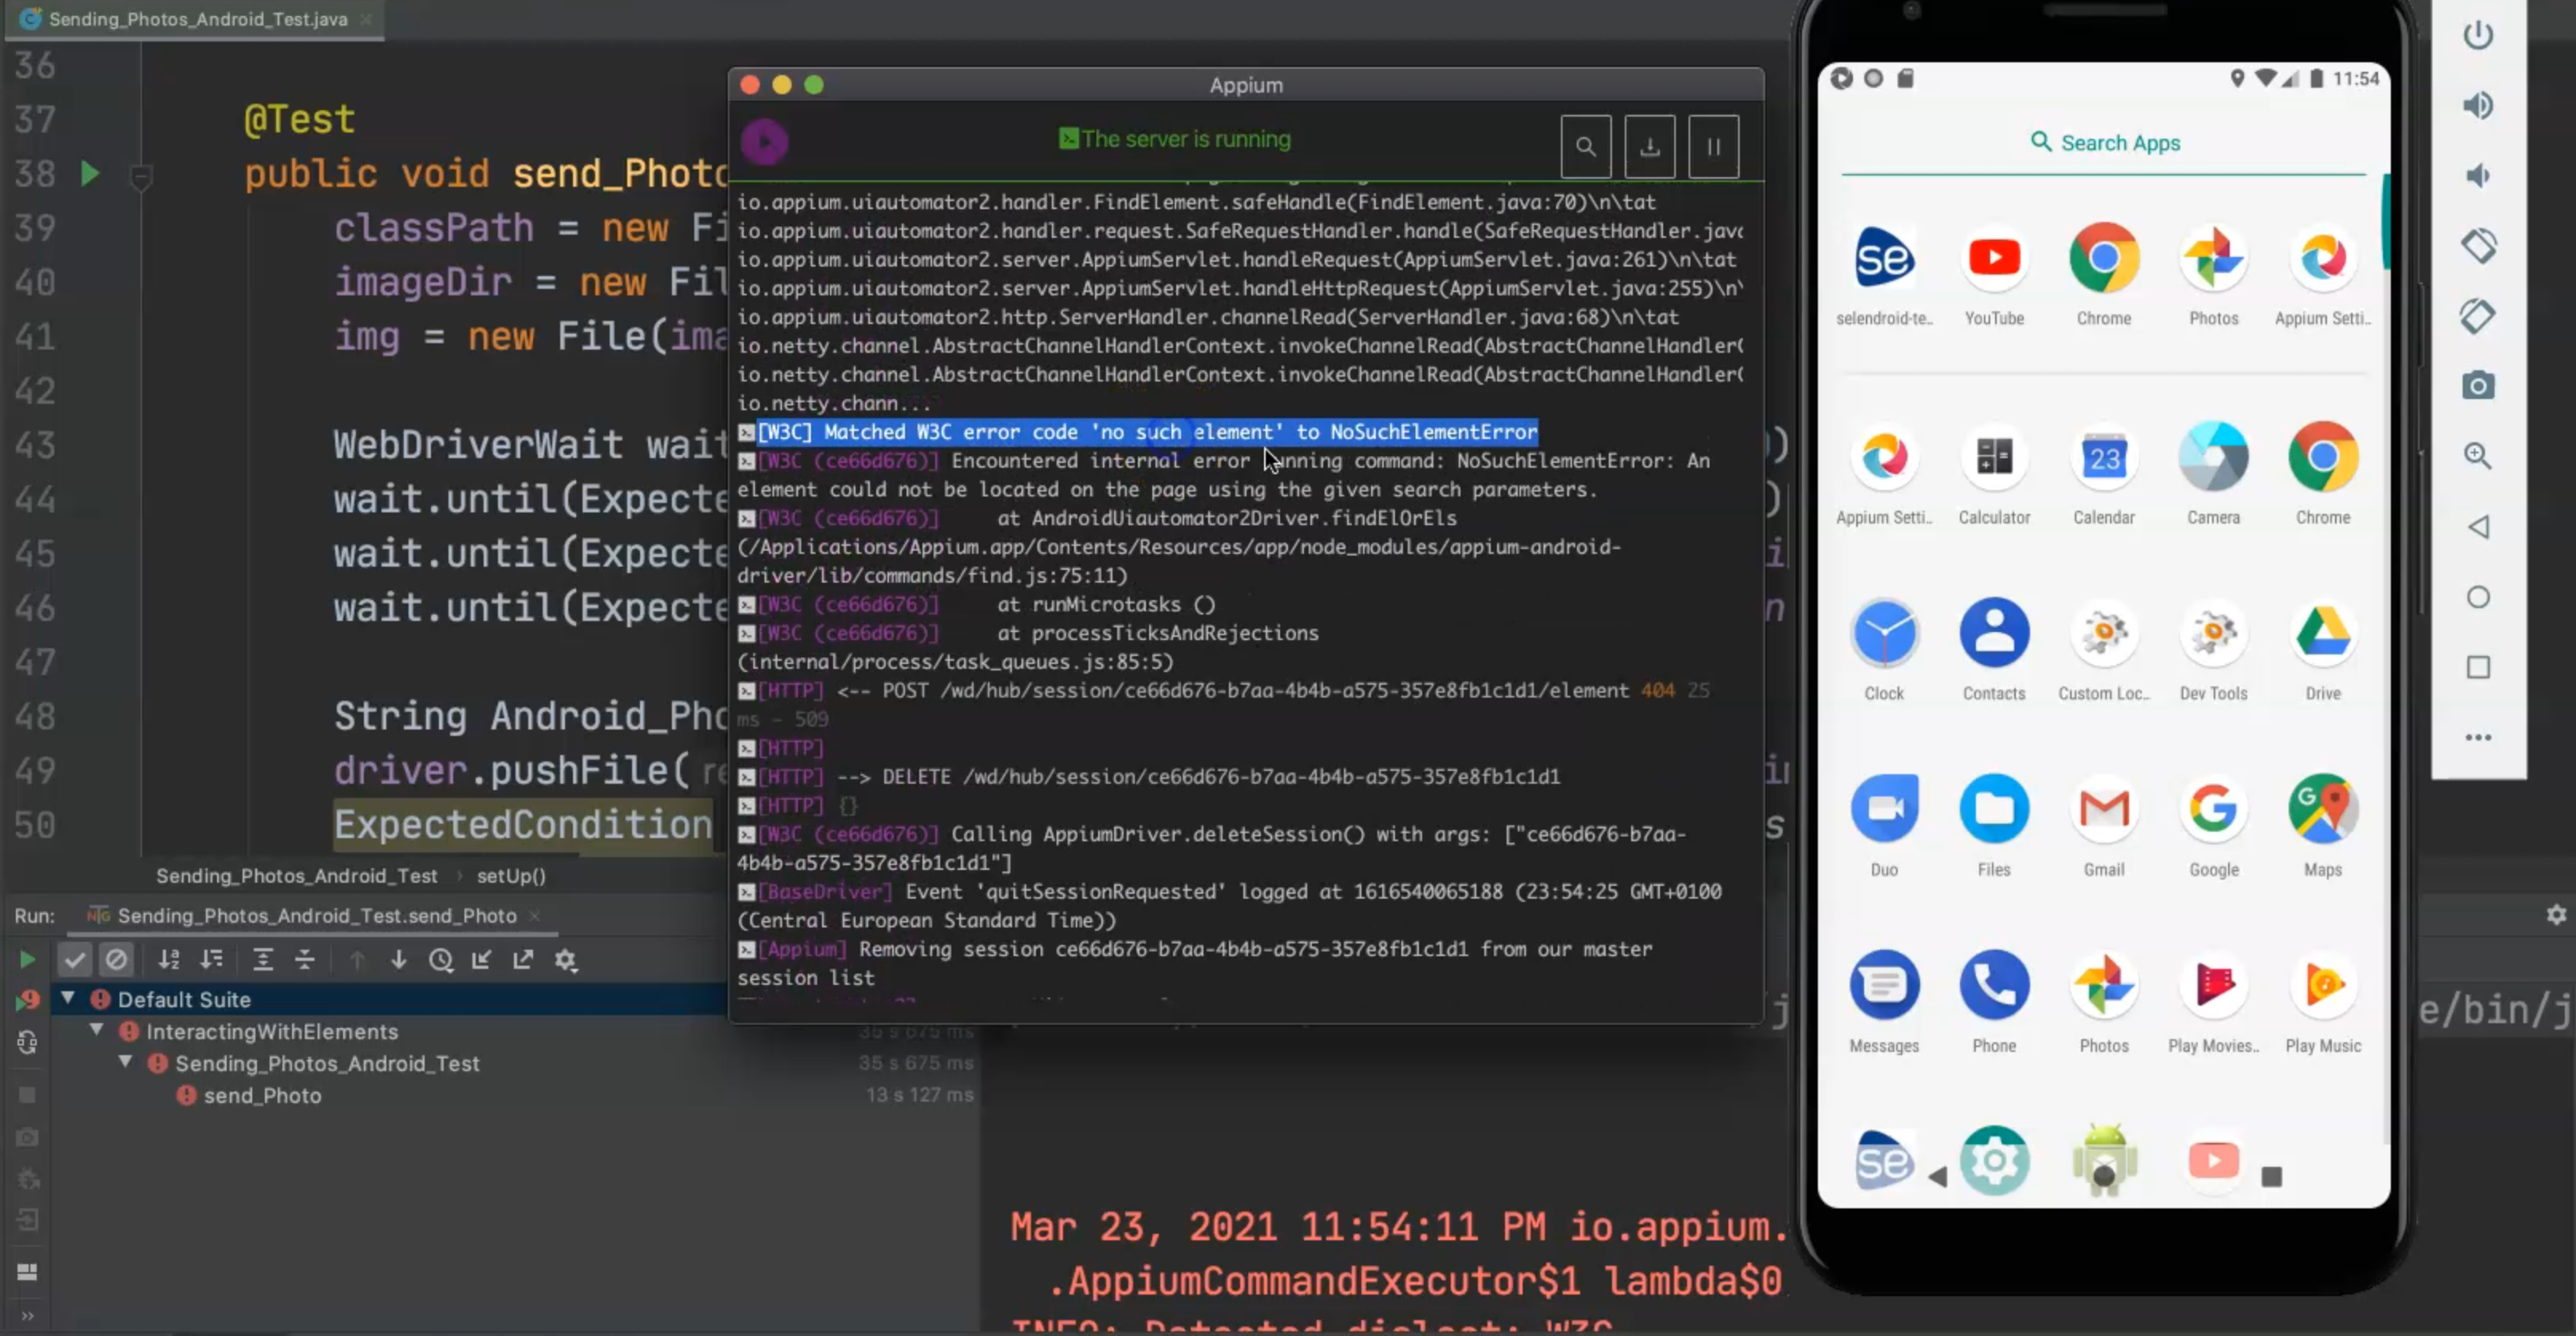
Here we have a mistake where we are using xpath but we are using strategy id.
So let's go up and we can find that we are using xpath with By.id, so it should be By.xpath.
Let's run it again and check what happened during our test.
Google Photos is opened, we close the backup, we will send the image, and our image is displayed here.
Now we are asserting that the image is already displayed.
So now we have another problem - we have a timeout exception when we are trying to find this element with the content description 'Photo taken'.
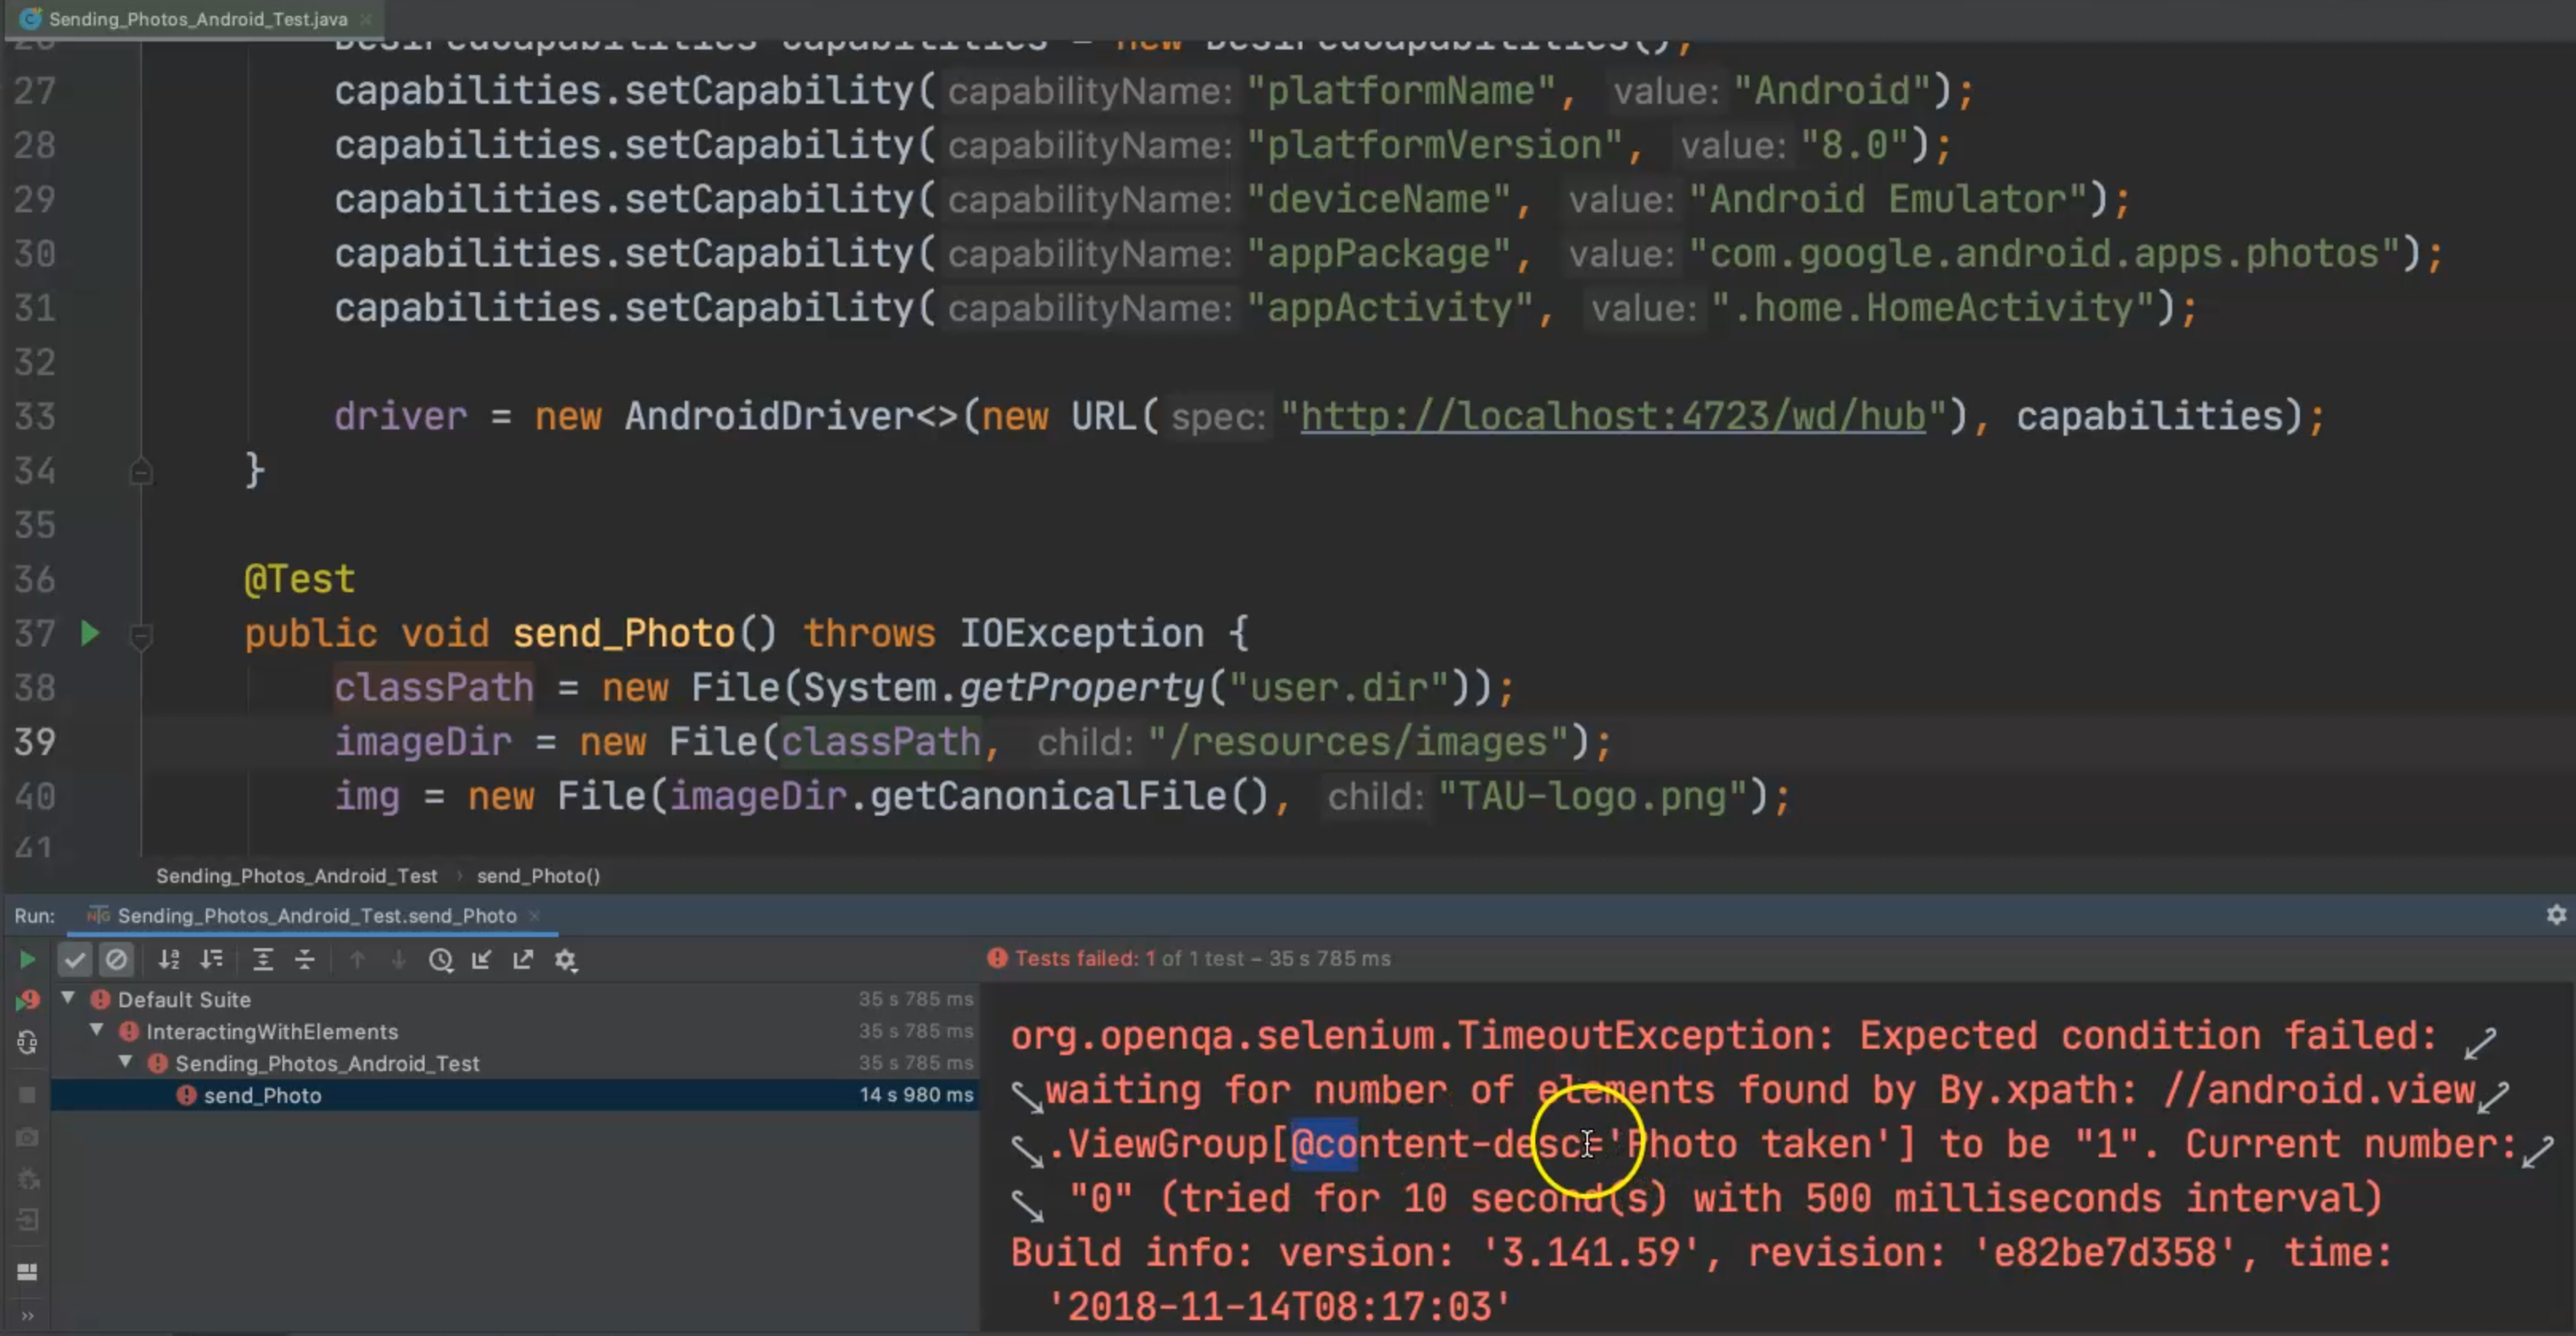
So we wait for the time, but we can't find it.
I think we have a problem with this one so let's go to the element with this xpath.
Here we added that we need to search for the content description with 'Photo taken', but in the real case, 'Photo taken' includes the date and the time for the image.
I think here we can change a little bit in our xpath by adding the contains keyword.
So we search that @content-desc contains 'Photo taken' and if it contains 'Photo taken' we can find this element.
Let's now run our test again and to check if the problem is fixed.
The Google Photos application is opened, we click on the button, we will replace the current image and our test case passed successfully.
So every time, we will assert we have 1 photo because we are initializing the application from scratch, but if, for example, we add one capability with no reset, then we will open that application with the previous state, and in this case, maybe we can have different images.
So this is the demo for sending photos using Android and Appium and in the next video, we will be using the IOS for this purpose also.
Resources
Quiz
The quiz for this chapter can be found in Chapter 5.10
