

Transcripted Summary
# Using Picker View with IOS and Appium
In this demo, we will learn how to automate a Picker View in an iOS application.
So I already added a new class Picker_View_iOSTest and changed the desired capabilities to work with the UIKitCatalog application.
package iOS;

import io.appium.java_client.ios.IOSDriver;
import io.appium.java_client.ios.IOSElement;
import org.openqa.selenium.remote.DesiredCapabilities;
import org.testng.annotations.AfterTest;
import org.testng.annotations.BeforeTest;
import org.testng.annotations.Test;

import java.net.MalformedURLException;
import java.net.URL;

public class Picker_View_iOS_Test {
    public IOSDriver driver;

    @BeforeTest
    public void setUp() throws MalformedURLException {
        DesiredCapabilities capabilities = new DesiredCapabilities();
        capabilities.setCapability("platformName", "iOS");
        capabilities.setCapability("platformVersion", "14.4");
        capabilities.setCapability("deviceName", "iPhone 12");
        capabilities.setCapability("app",
                System.getProperty("user.dir") + "/apps/UIKitCatalog.zip");
        driver = new IOSDriver(new URL("http://localhost:4723/wd/hub"), capabilities);
    }

    @Test
    public void testPickerView() {
    }

    @AfterTest
    public void tearDown() {
        if (null != driver) {
            driver.quit();
        }
    }
}
Here is the test public void testPickerView, and we can add our script here.
What is the Picker View in our application?
If you open the UIKitCatalog, and then we have something called a "Picker View" and here we can have different sliders - we can change the value, and based on this value, the color is changed here.

So it's something like RGB, or red, green - we can change the values which affect the color in this rectangular.
This is the idea of Picker View, so how can we set values for this element to be able to change the color, or to be able to change the text or value in the "Picker View"?
From our inspection session, we need to find these three column elements here.
We have here the accessibility ID - for example, the accessibility ID that we can use - "Red color component value".
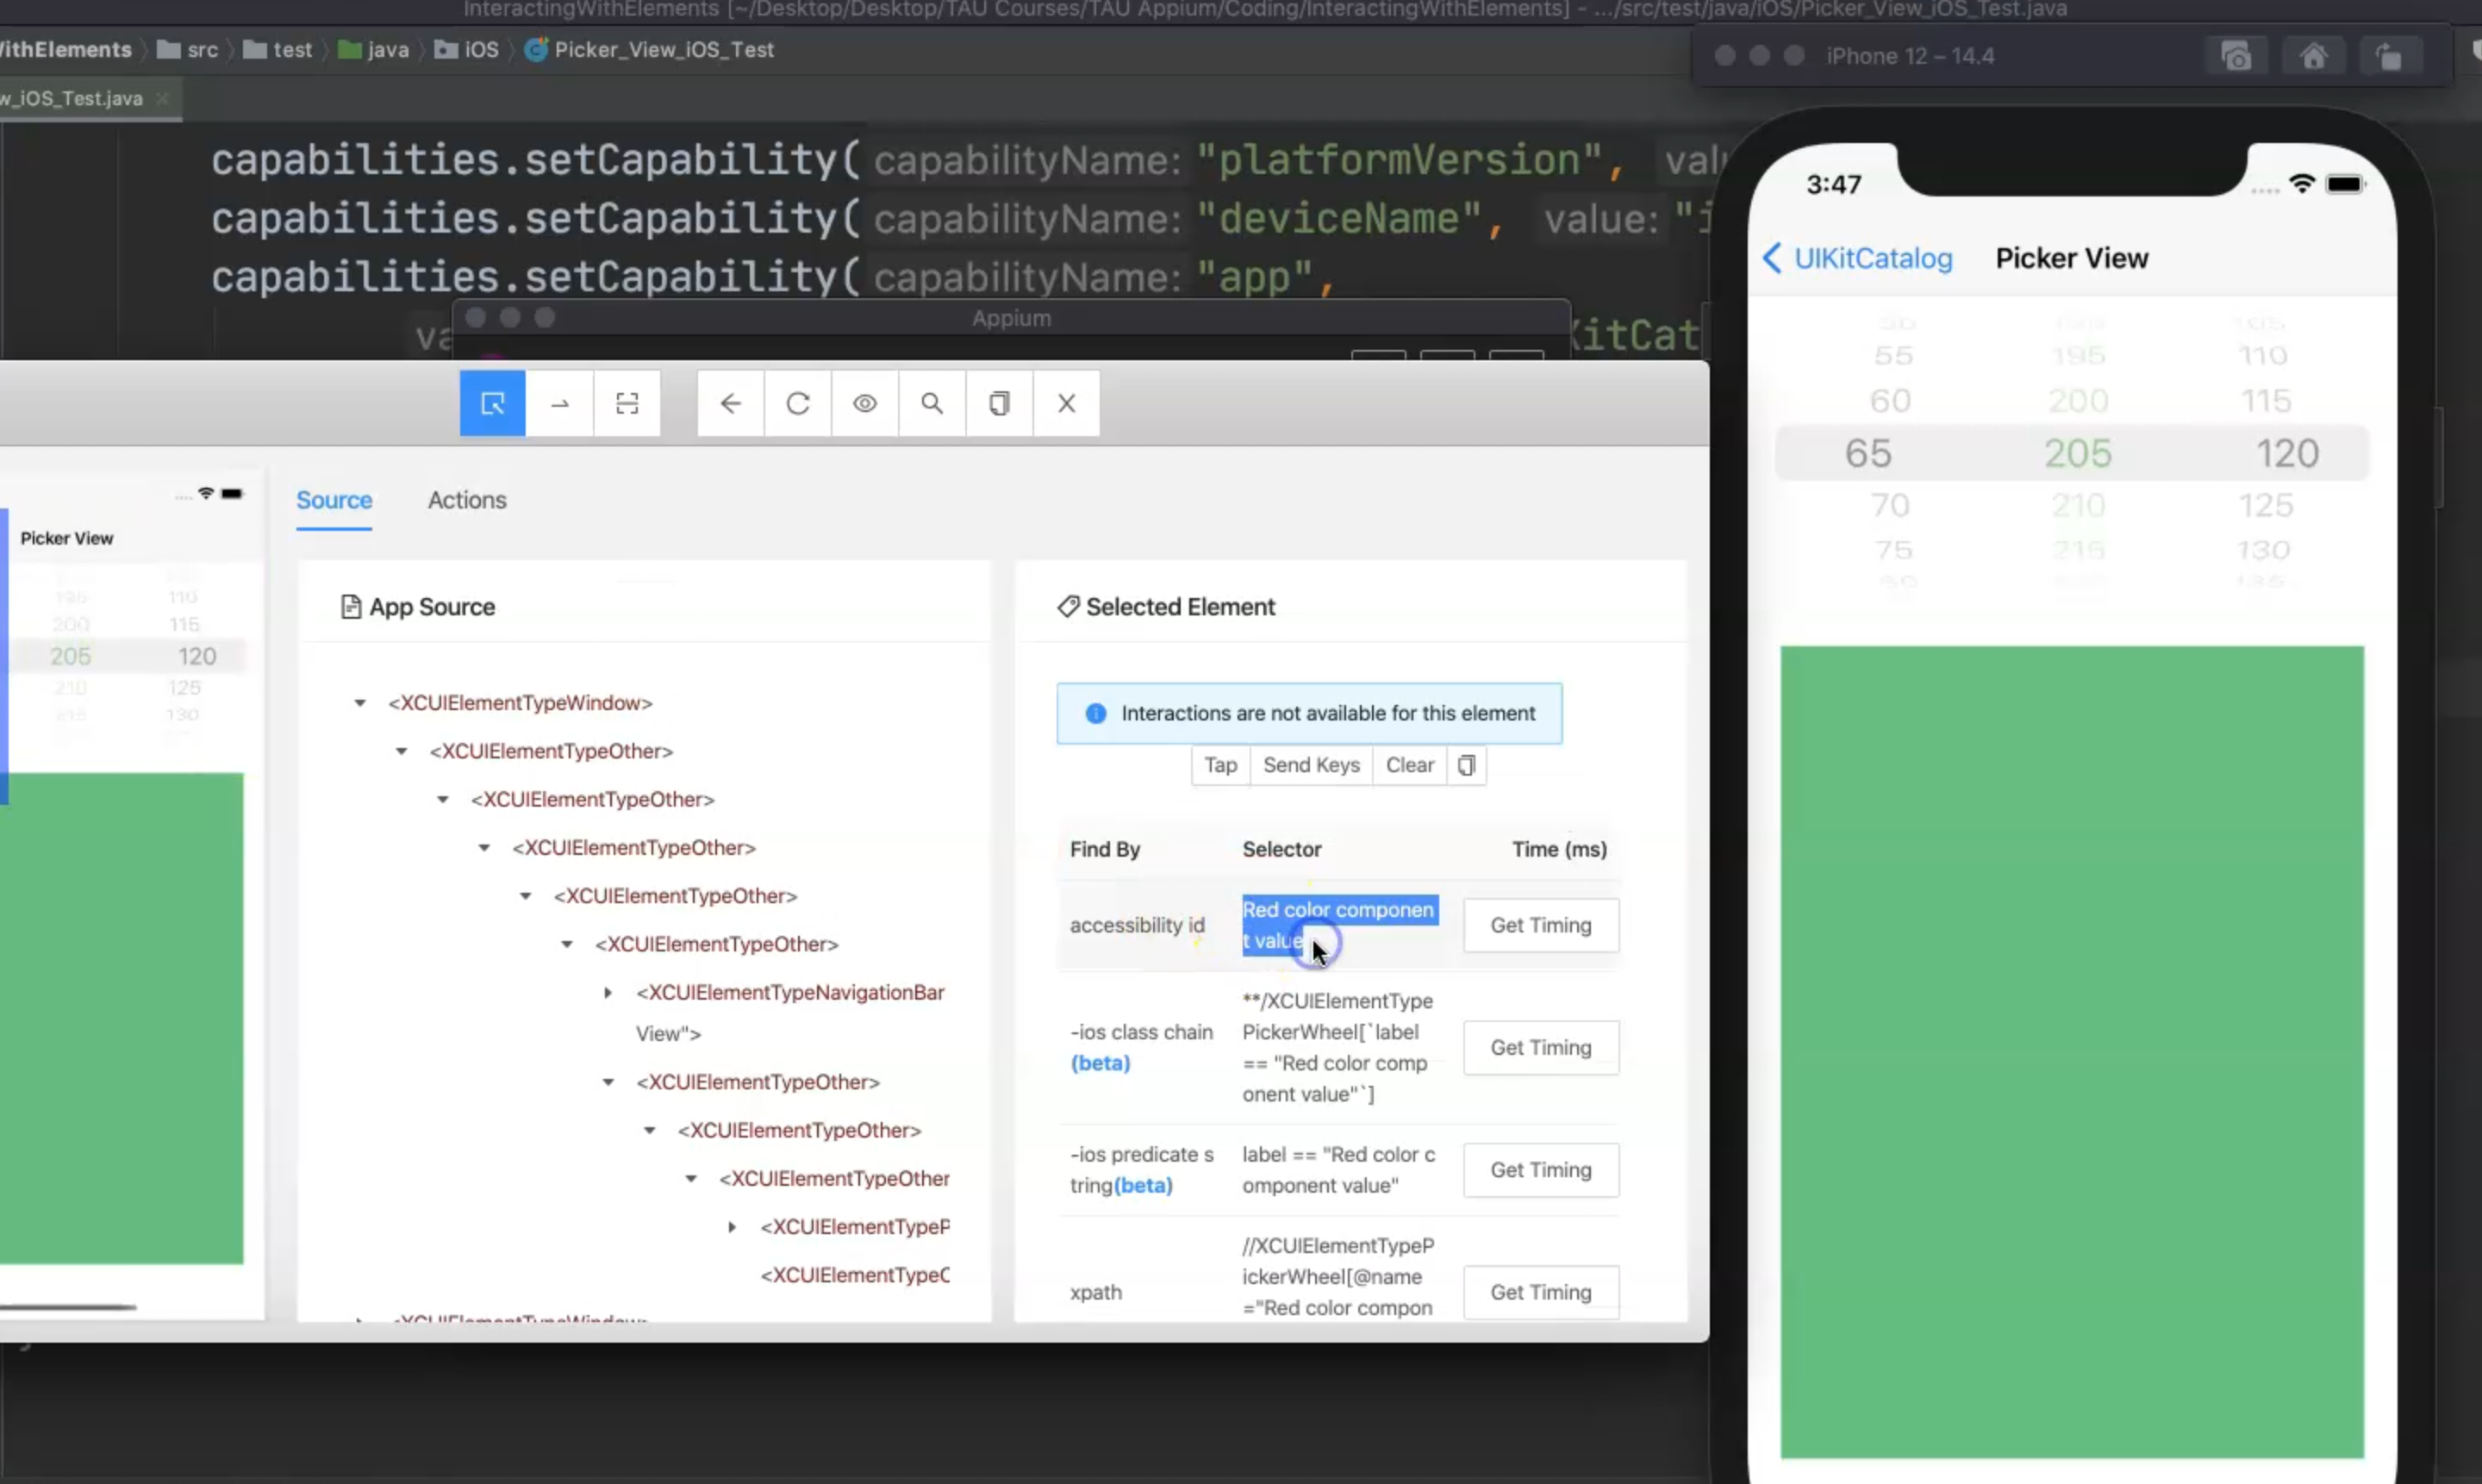
There is one for "Green color component value", and one for "Blue color component value".
We can use "accessibility id", or we can use "-ios class chain", which is still in the beta version from Appium but you can use it, or we can use -ios predicate string and use the label in this case, or you can use XPath, but let's use accessibility ID because ID is sometimes better than the rest of the elements.
We will start to find the three elements and then we need to set the value because, for something like the slider, if we click on this element again, here you can find that under the selected element, we have a value here.
The value is 65, so maybe we can set the value and change the number of the three elements.
In our test case, let's start to find the elements using the accessibility ID.
So, we will use driver.findElementByAccessibilityId() and copy the accessibility ID from the inspector session and paste it here.
But first, we need to click on "Picker View" - don't forget to do that.
So we need driver.findElementByAccessibilityId(), and the accessibility id is "Picker View" and then we need to click on this element.
Then, after that, we need to find the red component and we can use it directly by adding .sendKeys() - for example, we can send 30.
After that, another driver.findElementByAccessibilityId() and in this case, we will select the second one, which is "Green color component value" and then we can .sendKeys() and we can assign the value to be 200.
And then, another driver.findElementByAccessibilityId() and the third one is blue so the accessibility id is "Blue color component value", then we can .sendKeys() with the value 100, for example.
Also, to make sure that the values really changed, we can add a print line.
For example, we can add a System.out.println() and we can create an IOSElement blue.
We can say blue equals the blue element and we need to cast it to an IOSElement.
We will remove the sendKeys from here because at the beginning, we just need to initialize our element.
Then, we can add `blue.sendKeys("100").
Why did we do that?
Because we need to assert the same element and assert that blue.getText() changed to 100.
So this is just to use it again, and we don't have to add driver.findElementByAccessibilityId() again in the print line.
    @Test
    public void testPickerView() {
        driver.findElementByAccessibilityId("Picker View").click();
        driver.findElementByAccessibilityId("Red color component value").sendKeys("30");
        driver.findElementByAccessibilityId("Green color component value").sendKeys("200");
        IOSElement blue = (IOSElement) driver.findElementByAccessibilityId("Blue color component value");
        blue.sendKeys("100");
        System.out.println(blue.getText());
    }
Now let's run our test and check the test results.
We will open the simulator, installing the UIKitCatalog application, click on the "Picker View".
Here, we will change the values to 30 and 200, and 100, and then our test case has passed.
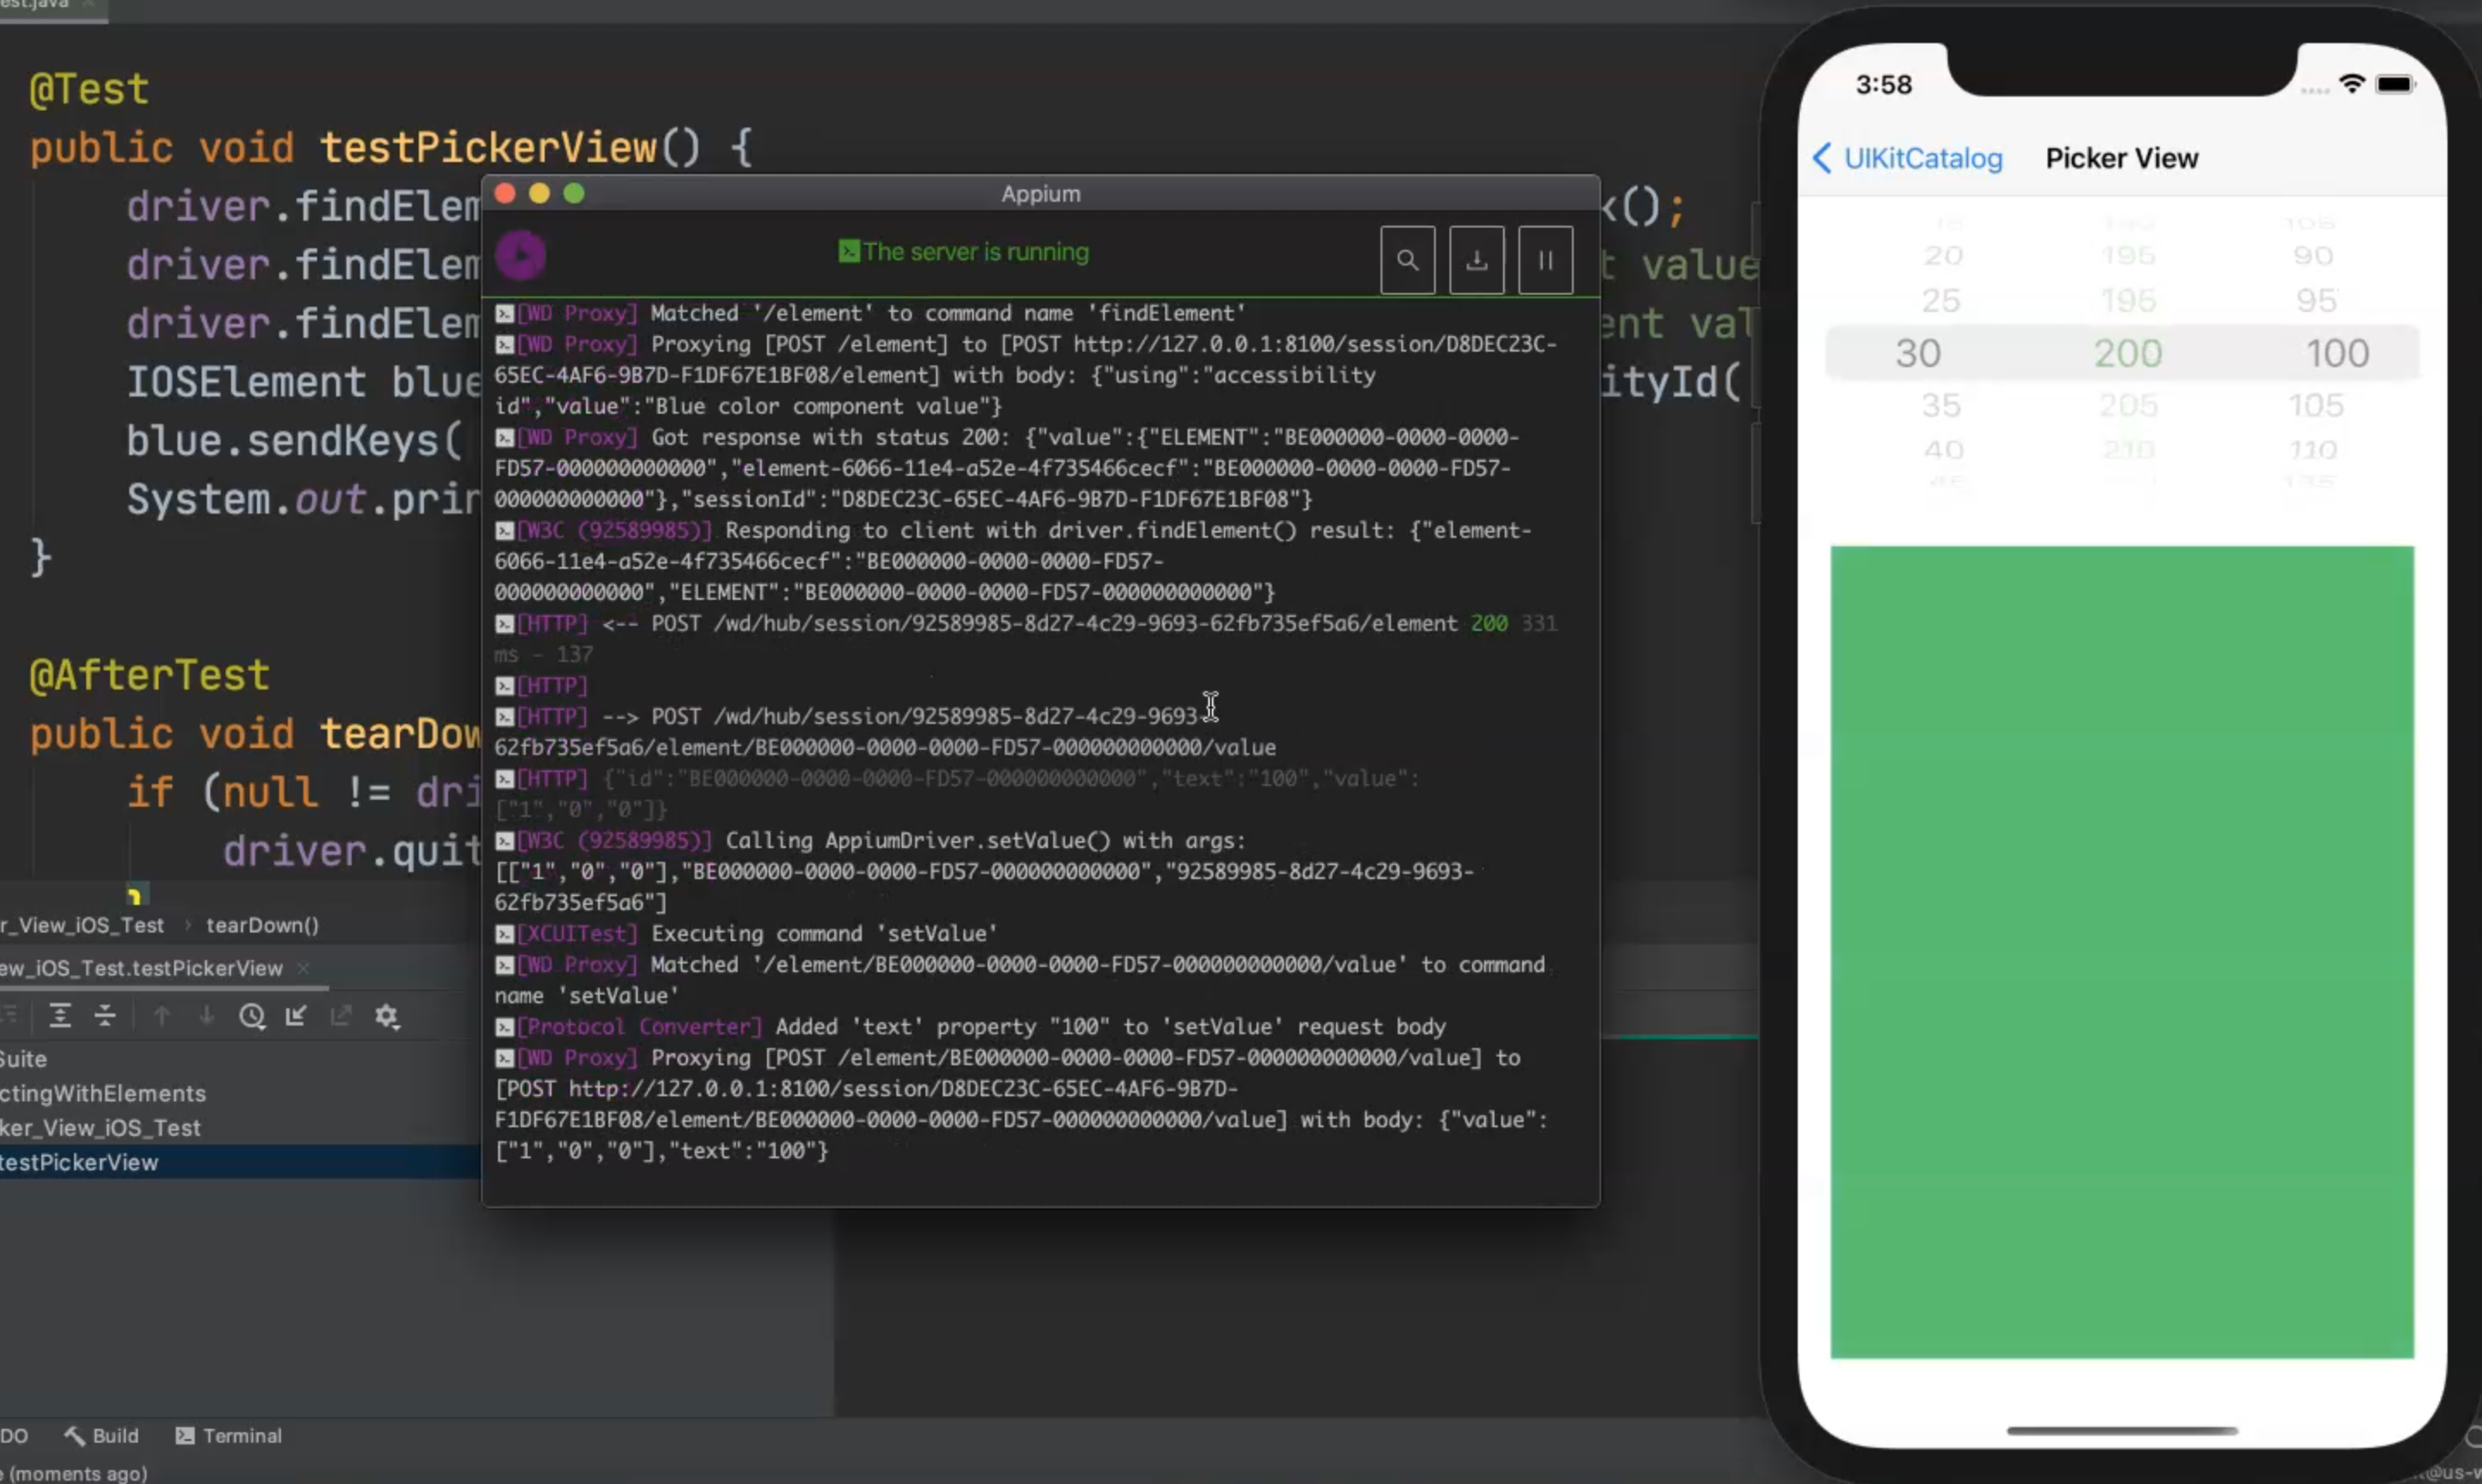
And here we have the value 100 for blue.getText(), so we already changed the value.
Here, we make sure that everything is changed and we see that it changed the numbers that we sent.
So this is how we work with a Picker View using the IOSDriver and using Appium.
# Using Slider with IOS and Appium
In this demo, we will start using a slider with an iOS application.
In this demo, we will learn how to click on a slider, how we can increase or decrease the value of a slider element in an iOS application using Appium.
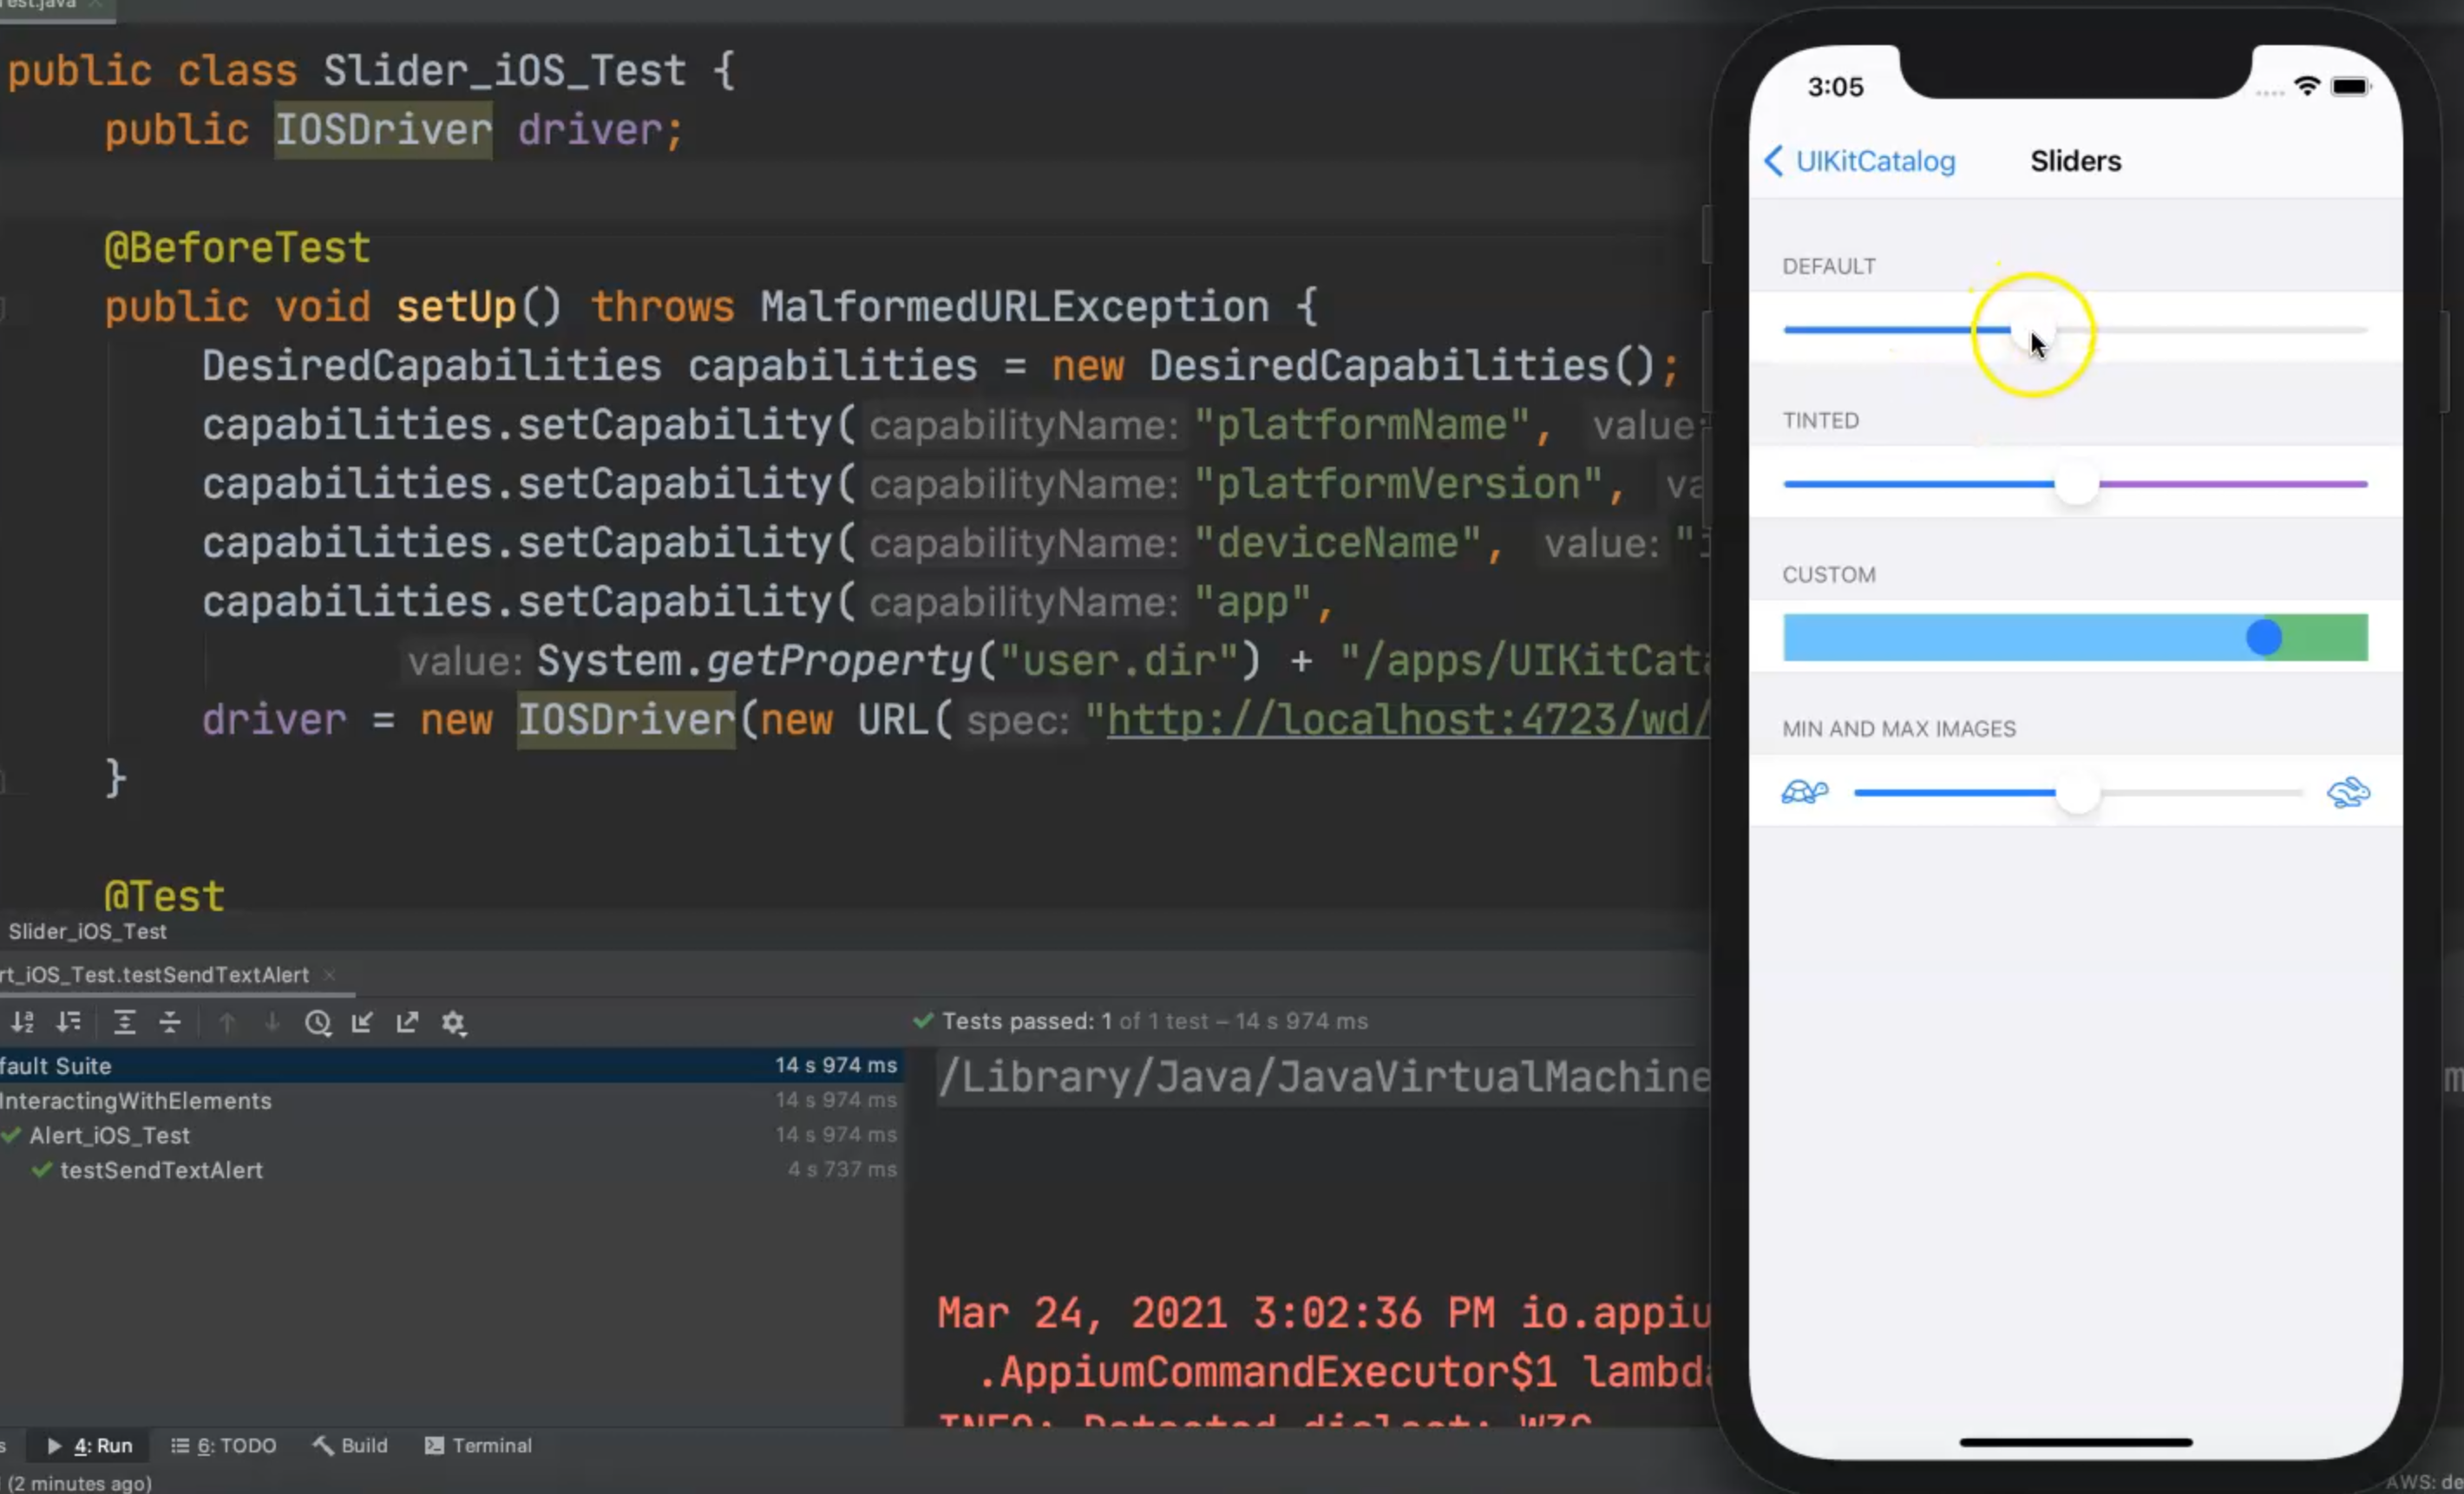
For example, if we open our UIKitCatalog, here we have "Sliders" and in "Sliders", this is a different view from the sliders.
We will work with the default one to increase the value and decrease the value.
We need to use a mechanism with Appium to do this.
This is a custom slider, and this is another one, just to change the color and another view of the slider.
So this is the idea of the slider and our application UIKitCatalog.
So in the inspection session, let's click on "Sliders" and then let's refresh this view, to get the sliders.
From here, we can click on the default slider to be able to find this element.
We have an XPath, a type, and maybe we can start searching in the chain for different sliders.
So here we have this ElementType, but let's assume what if we have this type of slider.
We have another feature in our inspection session that we can search for elements using the Appium inspection session.
So, for example, I will click on locator strategy and select XPath, and then I can start searching for //XCUIElementTypeSlider, and then click the Search button.
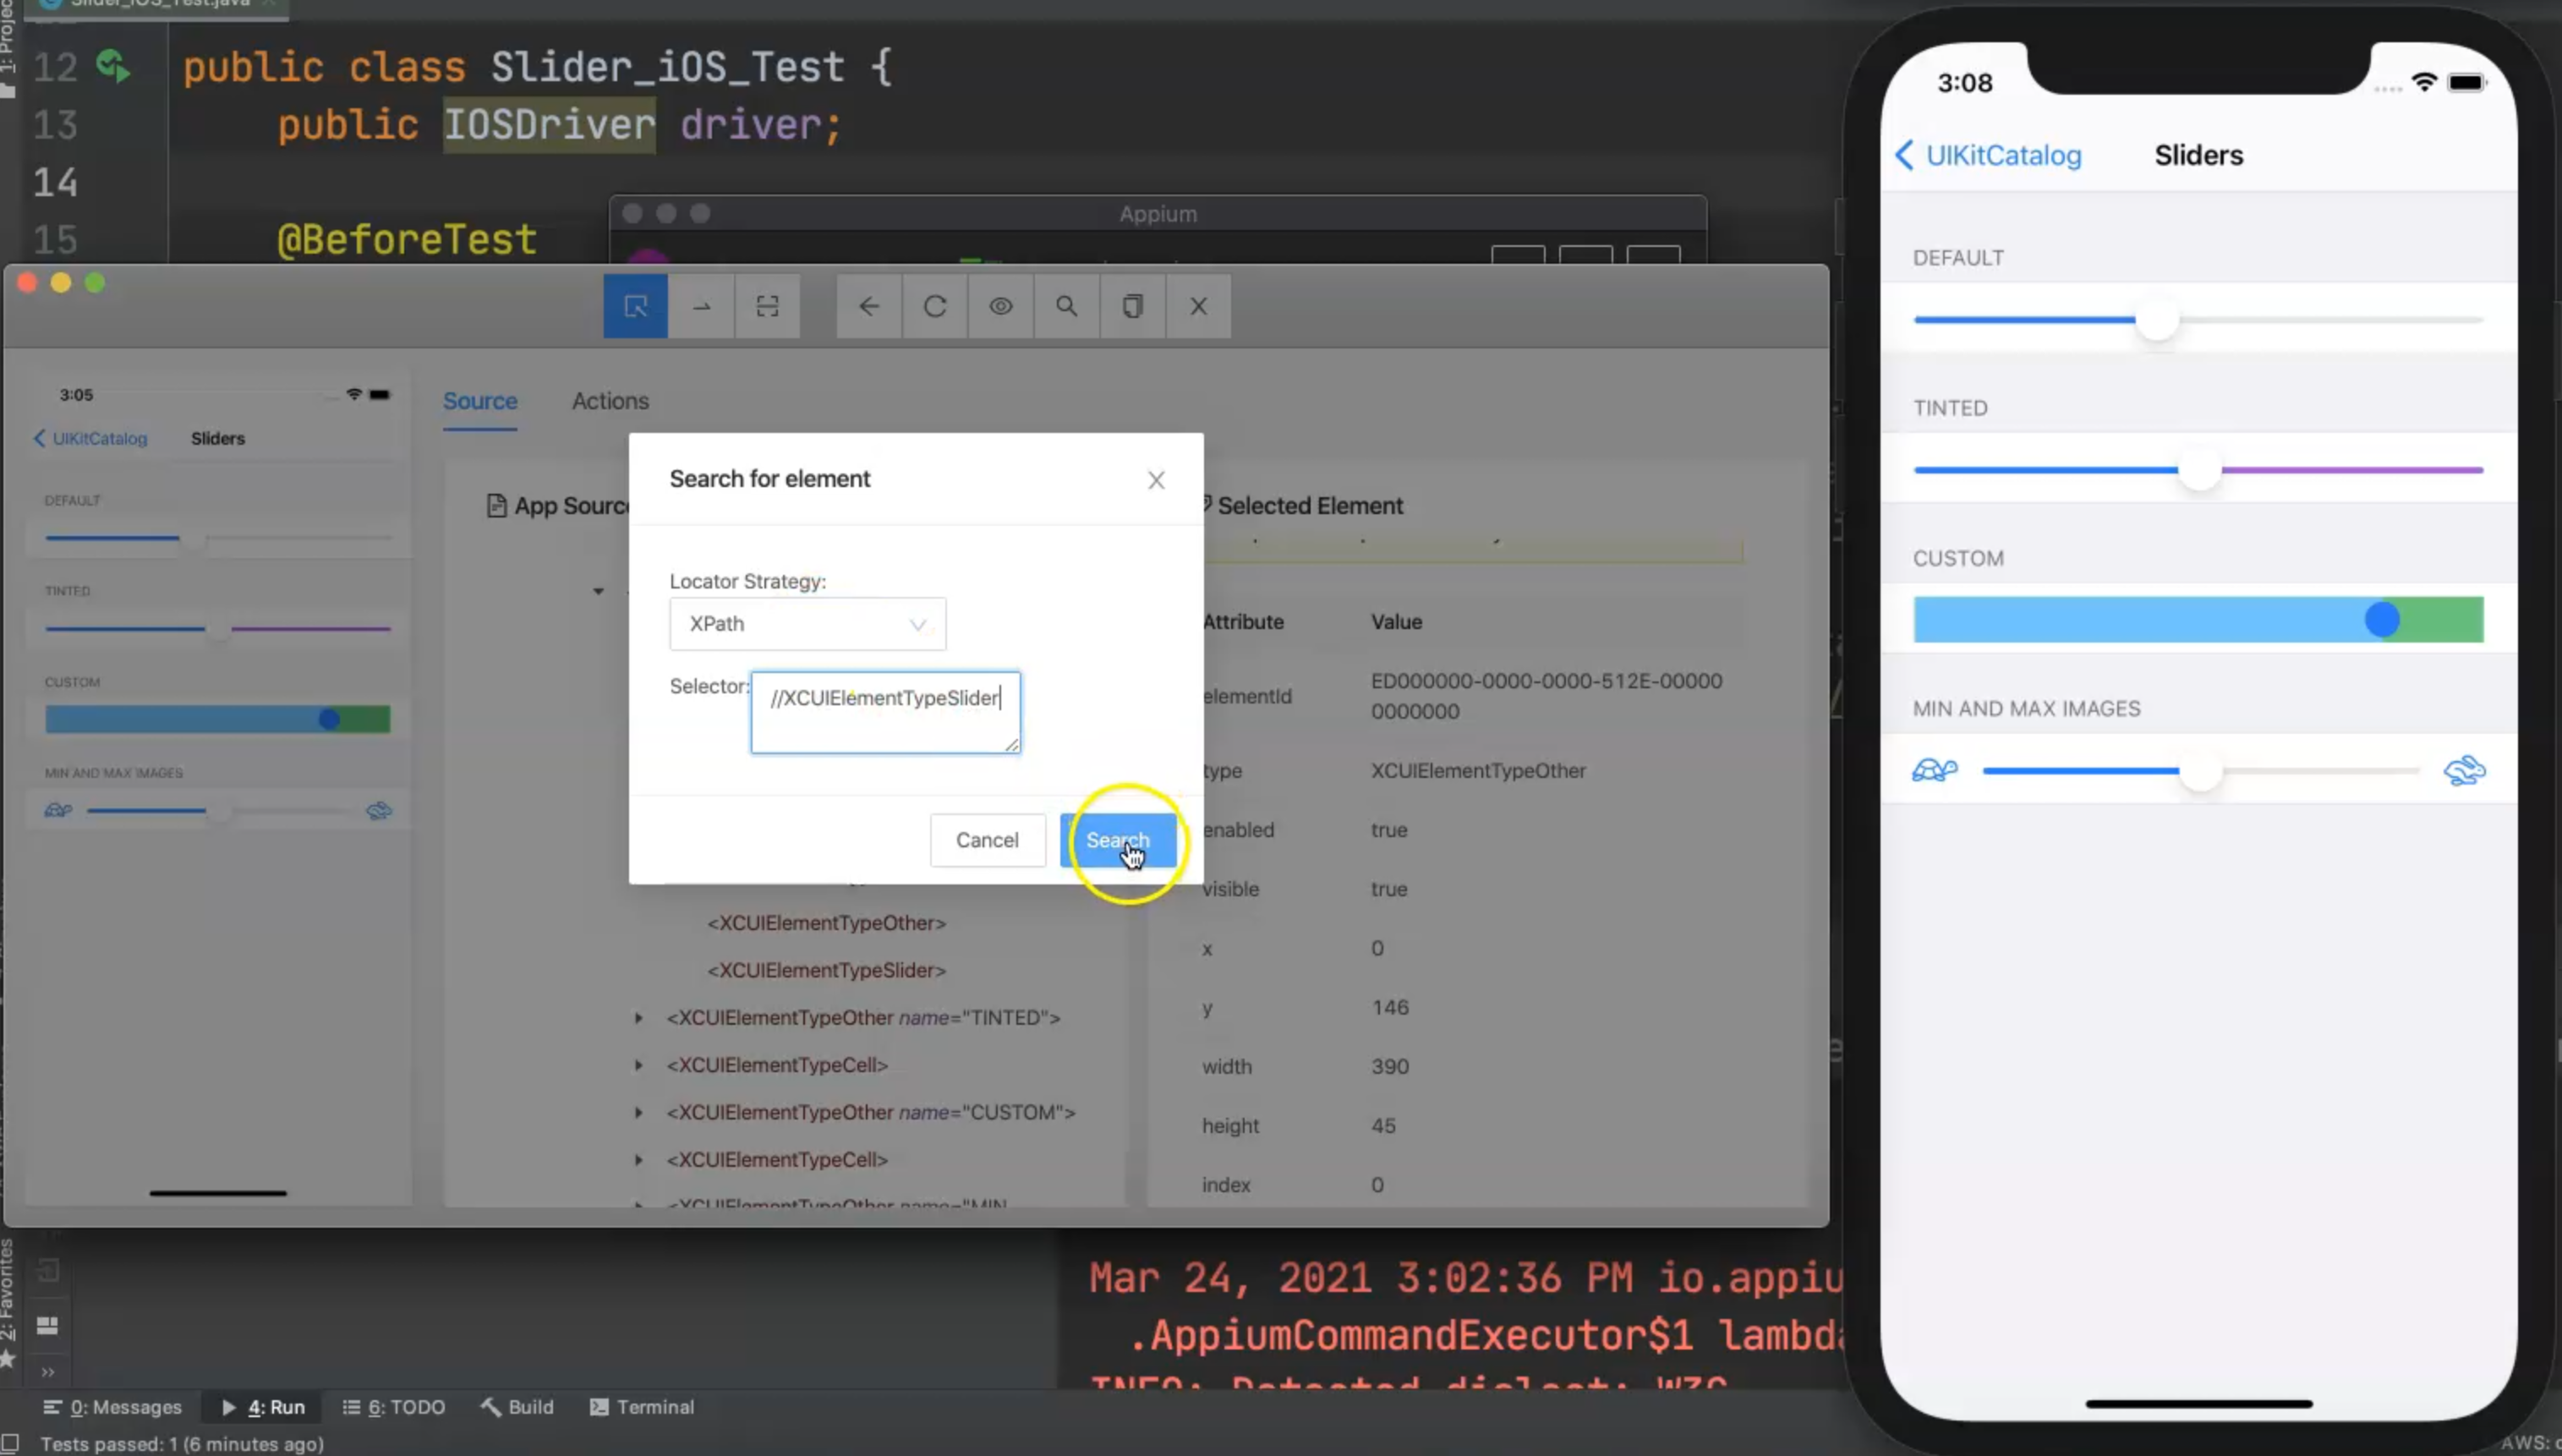
Here we already have four elements with this XPath.
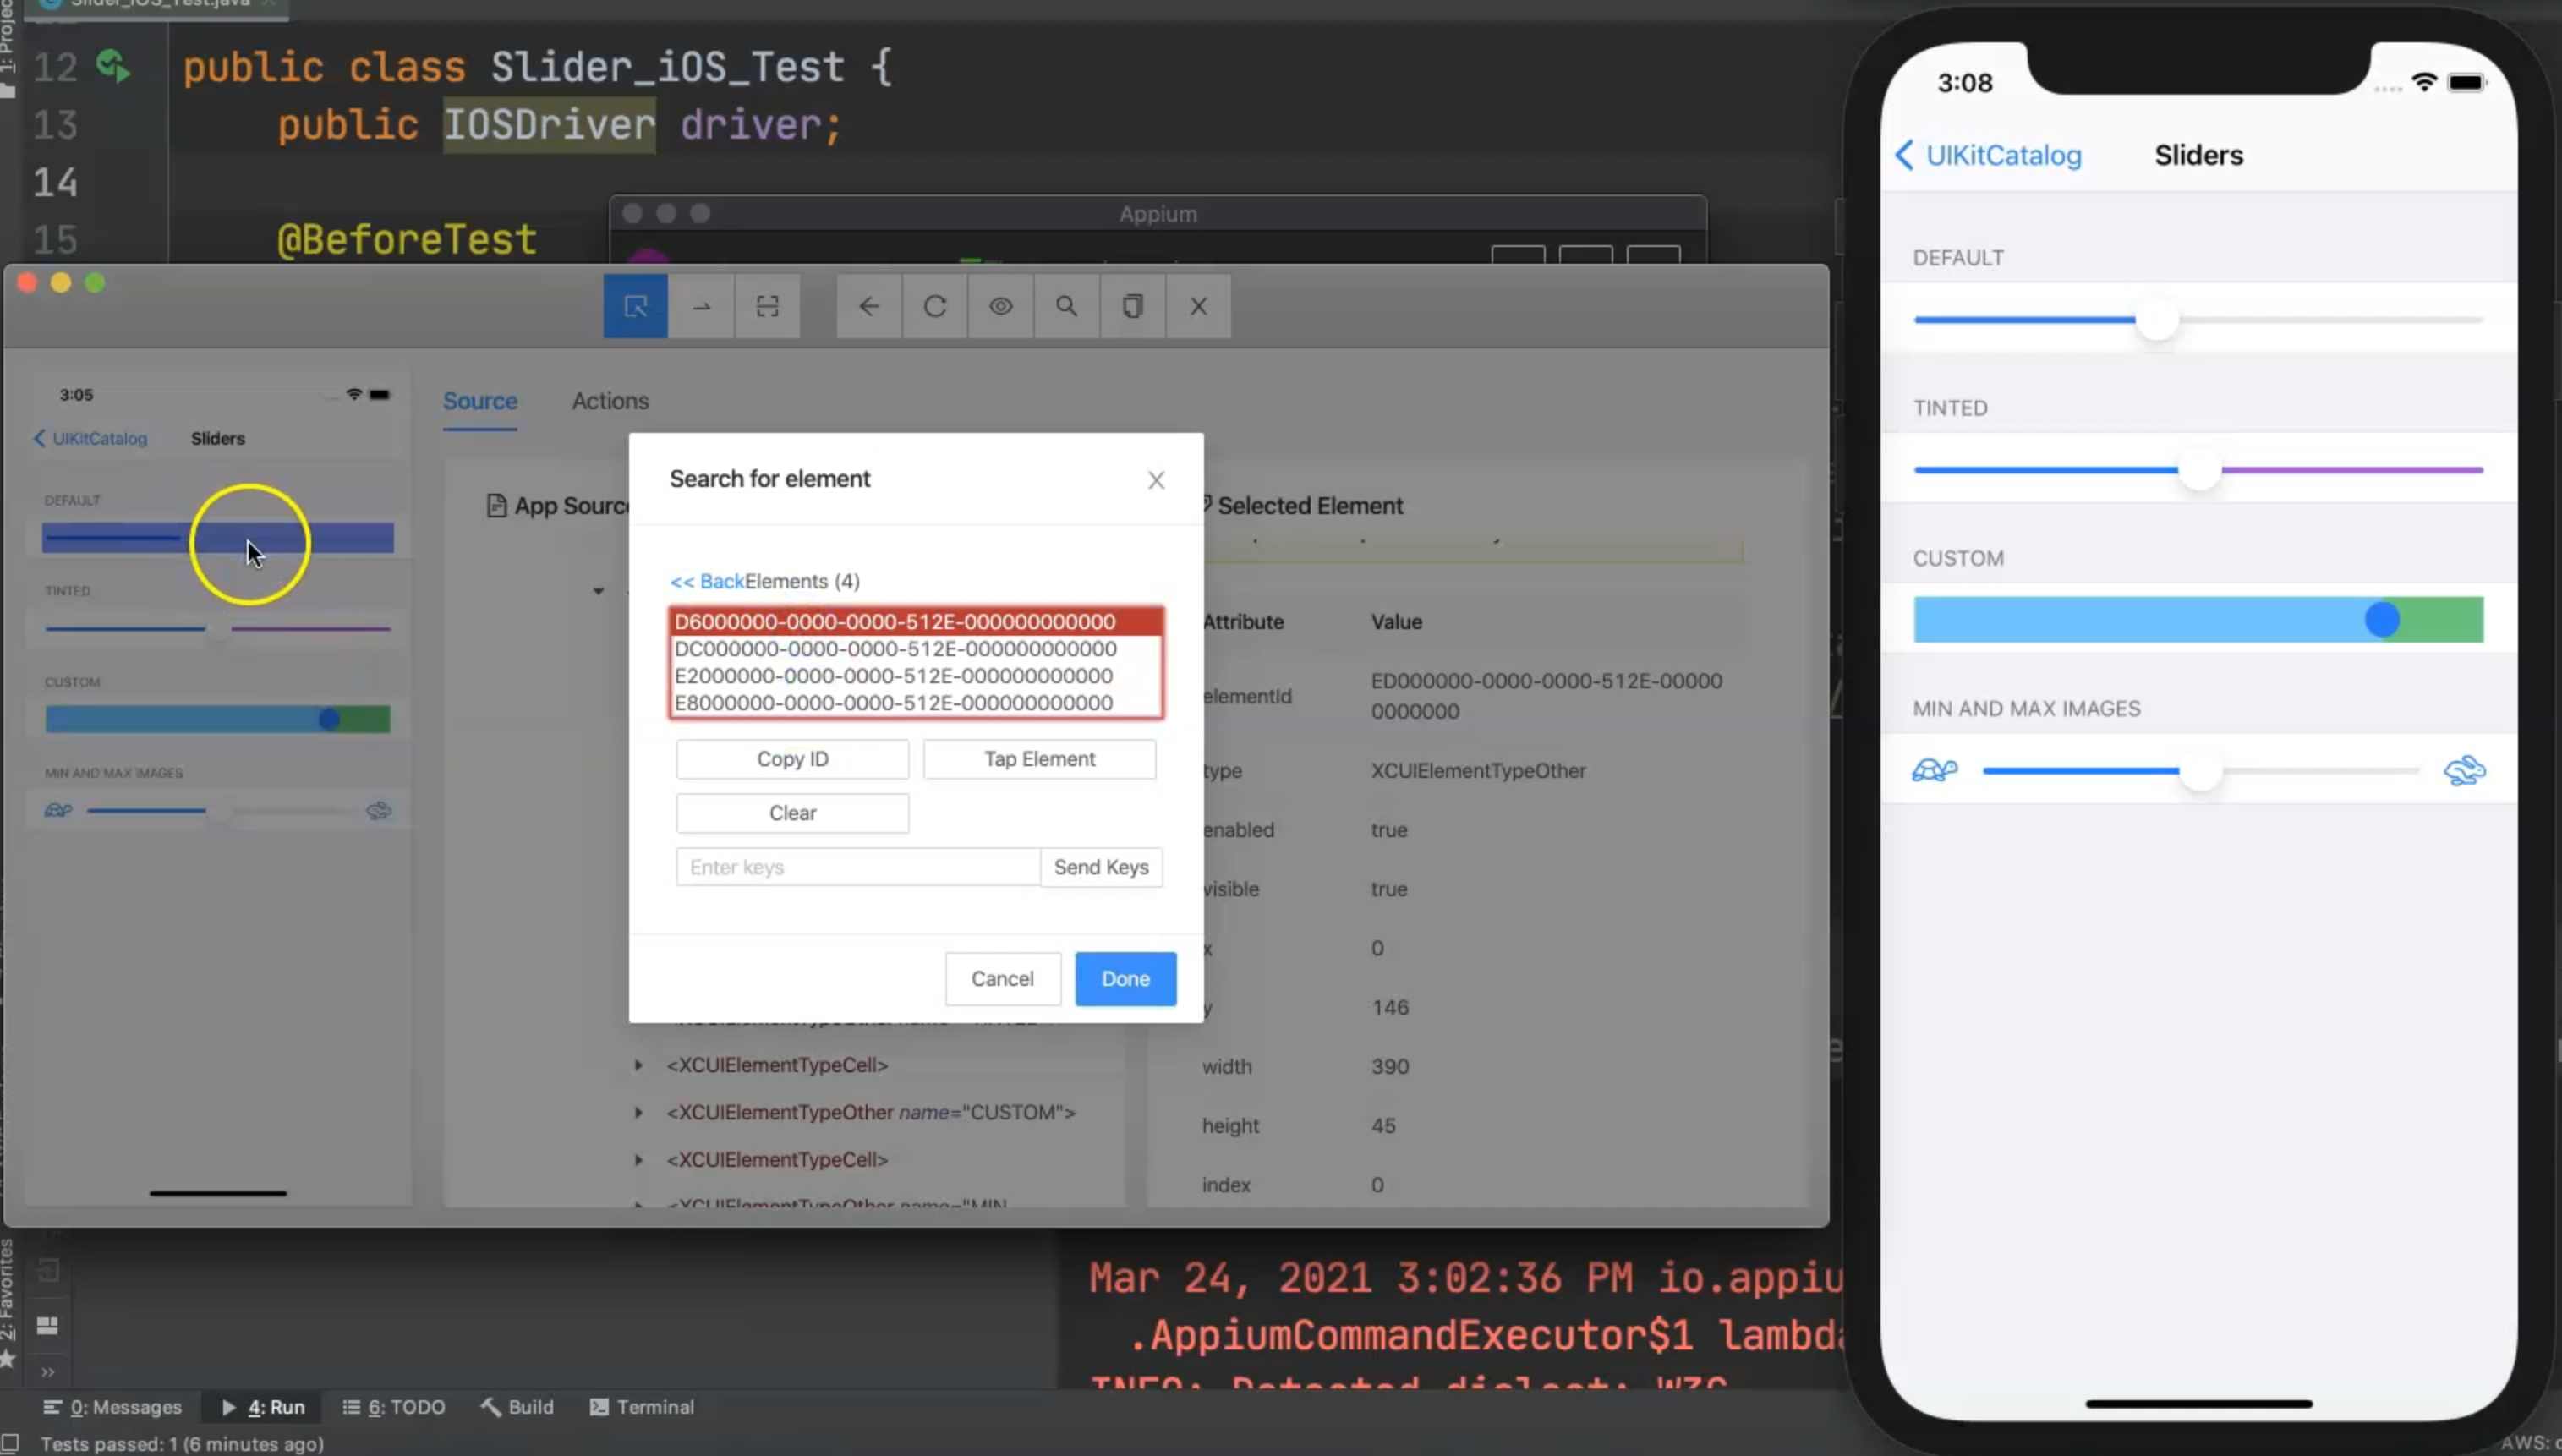
So, for example, we can use this XPath in our test case, because we will use the first one.
When we go to the test case and run the script, we will find this element as the first element in our test.
So we can copy this XPath and start our test case, and here we can start adding our test.
We can add driver.findElementByAccessibilityId() and first we need to add "Sliders" and then we need .click() to go into the "Sliders" view.
Then, we can create an IOSElement slider and this equals driver.findElement(By.xpath()) and then we can add our XPath here.
We need to cast this, as we usually do, to IOSElement, and then, after that, we have slider.setValue() which comes from IOSDriver; it's not in the Appium driver, but it's in the specific driver.
We can set the value to 0%, for example. and then, in the slider view, we need to increase the value by setting the value to 1%, which in our case, will be 100%.
Then for example, with the slider.setValue() again, we can set the value to 0.5% to decrease it again - this is something like 48%.
package iOS;

import io.appium.java_client.ios.IOSDriver;
import io.appium.java_client.ios.IOSElement;
import org.openqa.selenium.By;
import org.openqa.selenium.remote.DesiredCapabilities;
import org.testng.Assert;
import org.testng.annotations.AfterTest;
import org.testng.annotations.BeforeTest;
import org.testng.annotations.Test;

import java.net.MalformedURLException;
import java.net.URL;

public class Slider_iOS_Test {
    public IOSDriver driver;

    @BeforeTest
    public void setUp() throws MalformedURLException {
        DesiredCapabilities capabilities = new DesiredCapabilities();
        capabilities.setCapability("platformName", "iOS");
        capabilities.setCapability("platformVersion", "14.4");
        capabilities.setCapability("deviceName", "iPhone 12");
        capabilities.setCapability("app",
                System.getProperty("user.dir") + "/apps/UIKitCatalog.zip");
        driver = new IOSDriver(new URL("http://localhost:4723/wd/hub"), capabilities);
    }

    @Test
    public void testSlider() {
        driver.findElementByAccessibilityId("Sliders").click();
        IOSElement slider = (IOSElement) driver.findElement(By.xpath("//XCUIElementTypeSlider"));
        slider.setValue("0%");
        slider.setValue("1%"); // 100%
        slider.setValue("0.5%"); // 48%
    }

    @AfterTest
    public void tearDown() {
        if (null != driver) {
            driver.quit();
        }
    }
}
Now, let's run our test and check our results.
We will install the application, open "Sliders" and then start moving the sliders to increase and decrease the value.
So we start at zero, then change it to 100 and now it's moved down.
Then what if we need to add an assertion?
We need to assert now that the slider value is equal to 48%.
We can add Assert.assertEqual(), and then with the slider, we need to find something to be able to get the value from the slider, and then we can compare it with our number.
Here, from our inspection session, we can find that in the element of the type slider that we are using in our test case, we can go down under Attributes and find that we have an attribute with the "value", which is equal to "42%".
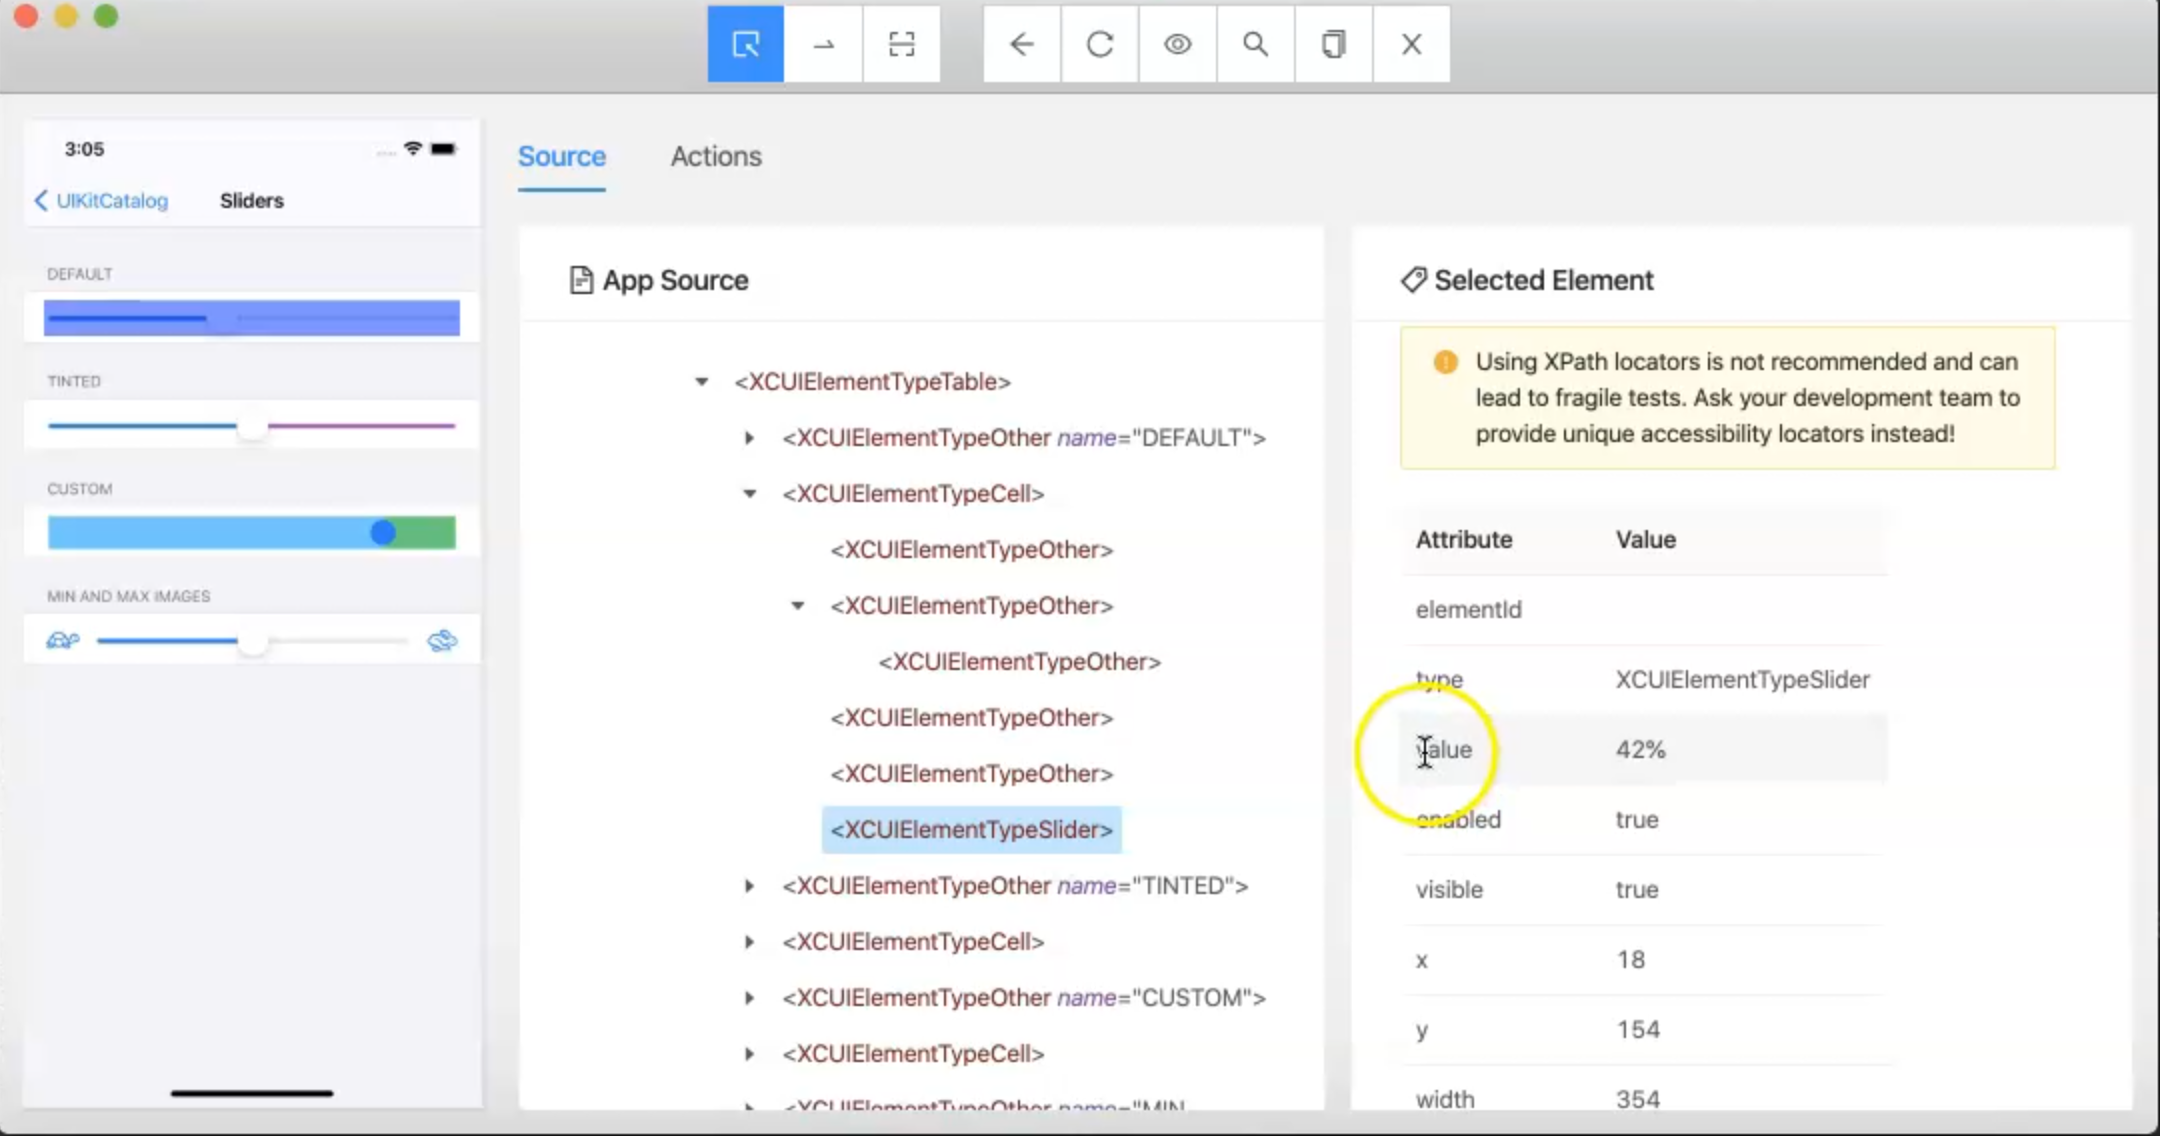
If we change the value on the emulator, I can refresh the view here, click on the element again, and here I can find that it is 50%, for example.
When you change this slider, the value is affected.
So, I can compare between them - I can assert that slider.getAttribute("value") is equal to 48%.
    @Test
    public void testSlider() {
        driver.findElementByAccessibilityId("Sliders").click();
        IOSElement slider = (IOSElement) driver.findElement(By.xpath("//XCUIElementTypeSlider"));
        slider.setValue("0%");
        slider.setValue("1%"); // 100%
        slider.setValue("0.5%"); // 48%
        Assert.assertEquals(slider.getAttribute("value"),"48%");
    }
If it's not the correct one, then we can change it to the correct one.
Let's run our test and check what happened during our test, and if the value we added is correct or not.
So now we are running the script, installing the application, clicking on "Sliders".
Then we start moving to zero, start moving to 100, and then it starts moving to this point, and the test case is passed now.
So the value is equal to 48% and our test case is passed now.
Resources
Quiz
The quiz for this chapter can be found in Chapter 5.10
