

Transcripted Summary
# How to use a built-in application on an Android device using Appium
In this demo, we will learn how to use a built-in application on an Android device using Appium.
In the first example, we used the APK and sent the application to an Android device, and started using that.
In this demo, we will use a different way.
We will copy the desired capabilities in @BeforeTest and then we will create a new Java Class.
The new class will be called Android_Built_In_App_Demo.
In here, we will add the Appium driver and we will also add our required imports - so for AppiumDriver, DesiredCapabilities, AndroidDriver, and URL.
package Android;

import io.appium.java_client.AppiumDriver;
import io.appium.java_client.android.AndroidDriver;
import org.openqa.selenium.remote.DesiredCapabilities;
import org.testng.annotations.BeforeTest;

import java.net.MalformedURLException;
import java.net.URL;

public class Android_Built_In_App_Demo {

    AppiumDriver driver;

    @BeforeTest
    public void setUp() throws MalformedURLException {
        DesiredCapabilities caps = new DesiredCapabilities();
        caps.setCapability("platformName", "Android");
        caps.setCapability("automationName", "UiAutomator2");
        caps.setCapability("platformVersion", "9.0");
        caps.setCapability("deviceName", "Android Emulator");

        driver = new AndroidDriver(new URL("http://localhost:4723/wd/hub"), caps);
    }
In this demo, we will not use app and we will use the APK, so we will remove the app capability and we will add a new capability for appPackage.
Then we'll copy this one and add another one for appActivity.
If you are not using app, you can add browser in case it's the web, or you can add appPackage or appActivity, if you are using an installed application or built-in application.
So here we have appActivity and appPackage, and we should add the value for our application.
In this case, we will start using a calculator.
So for example, we need to search for the calculator.
We need to open the Calculator and start using the different elements or operations.
But how can we know the appPackage and appActivity with the Calculator?
As we mentioned in the previous video, we already installed the "APK Info" application, which will help us find out what the appActivity and appPackage are for all of the applications that are installed on this device.
So we will open "APK Info" and it will load all of the applications on this device.
I will start searching for Calculator and I will long press on this to get "Detailed Information".
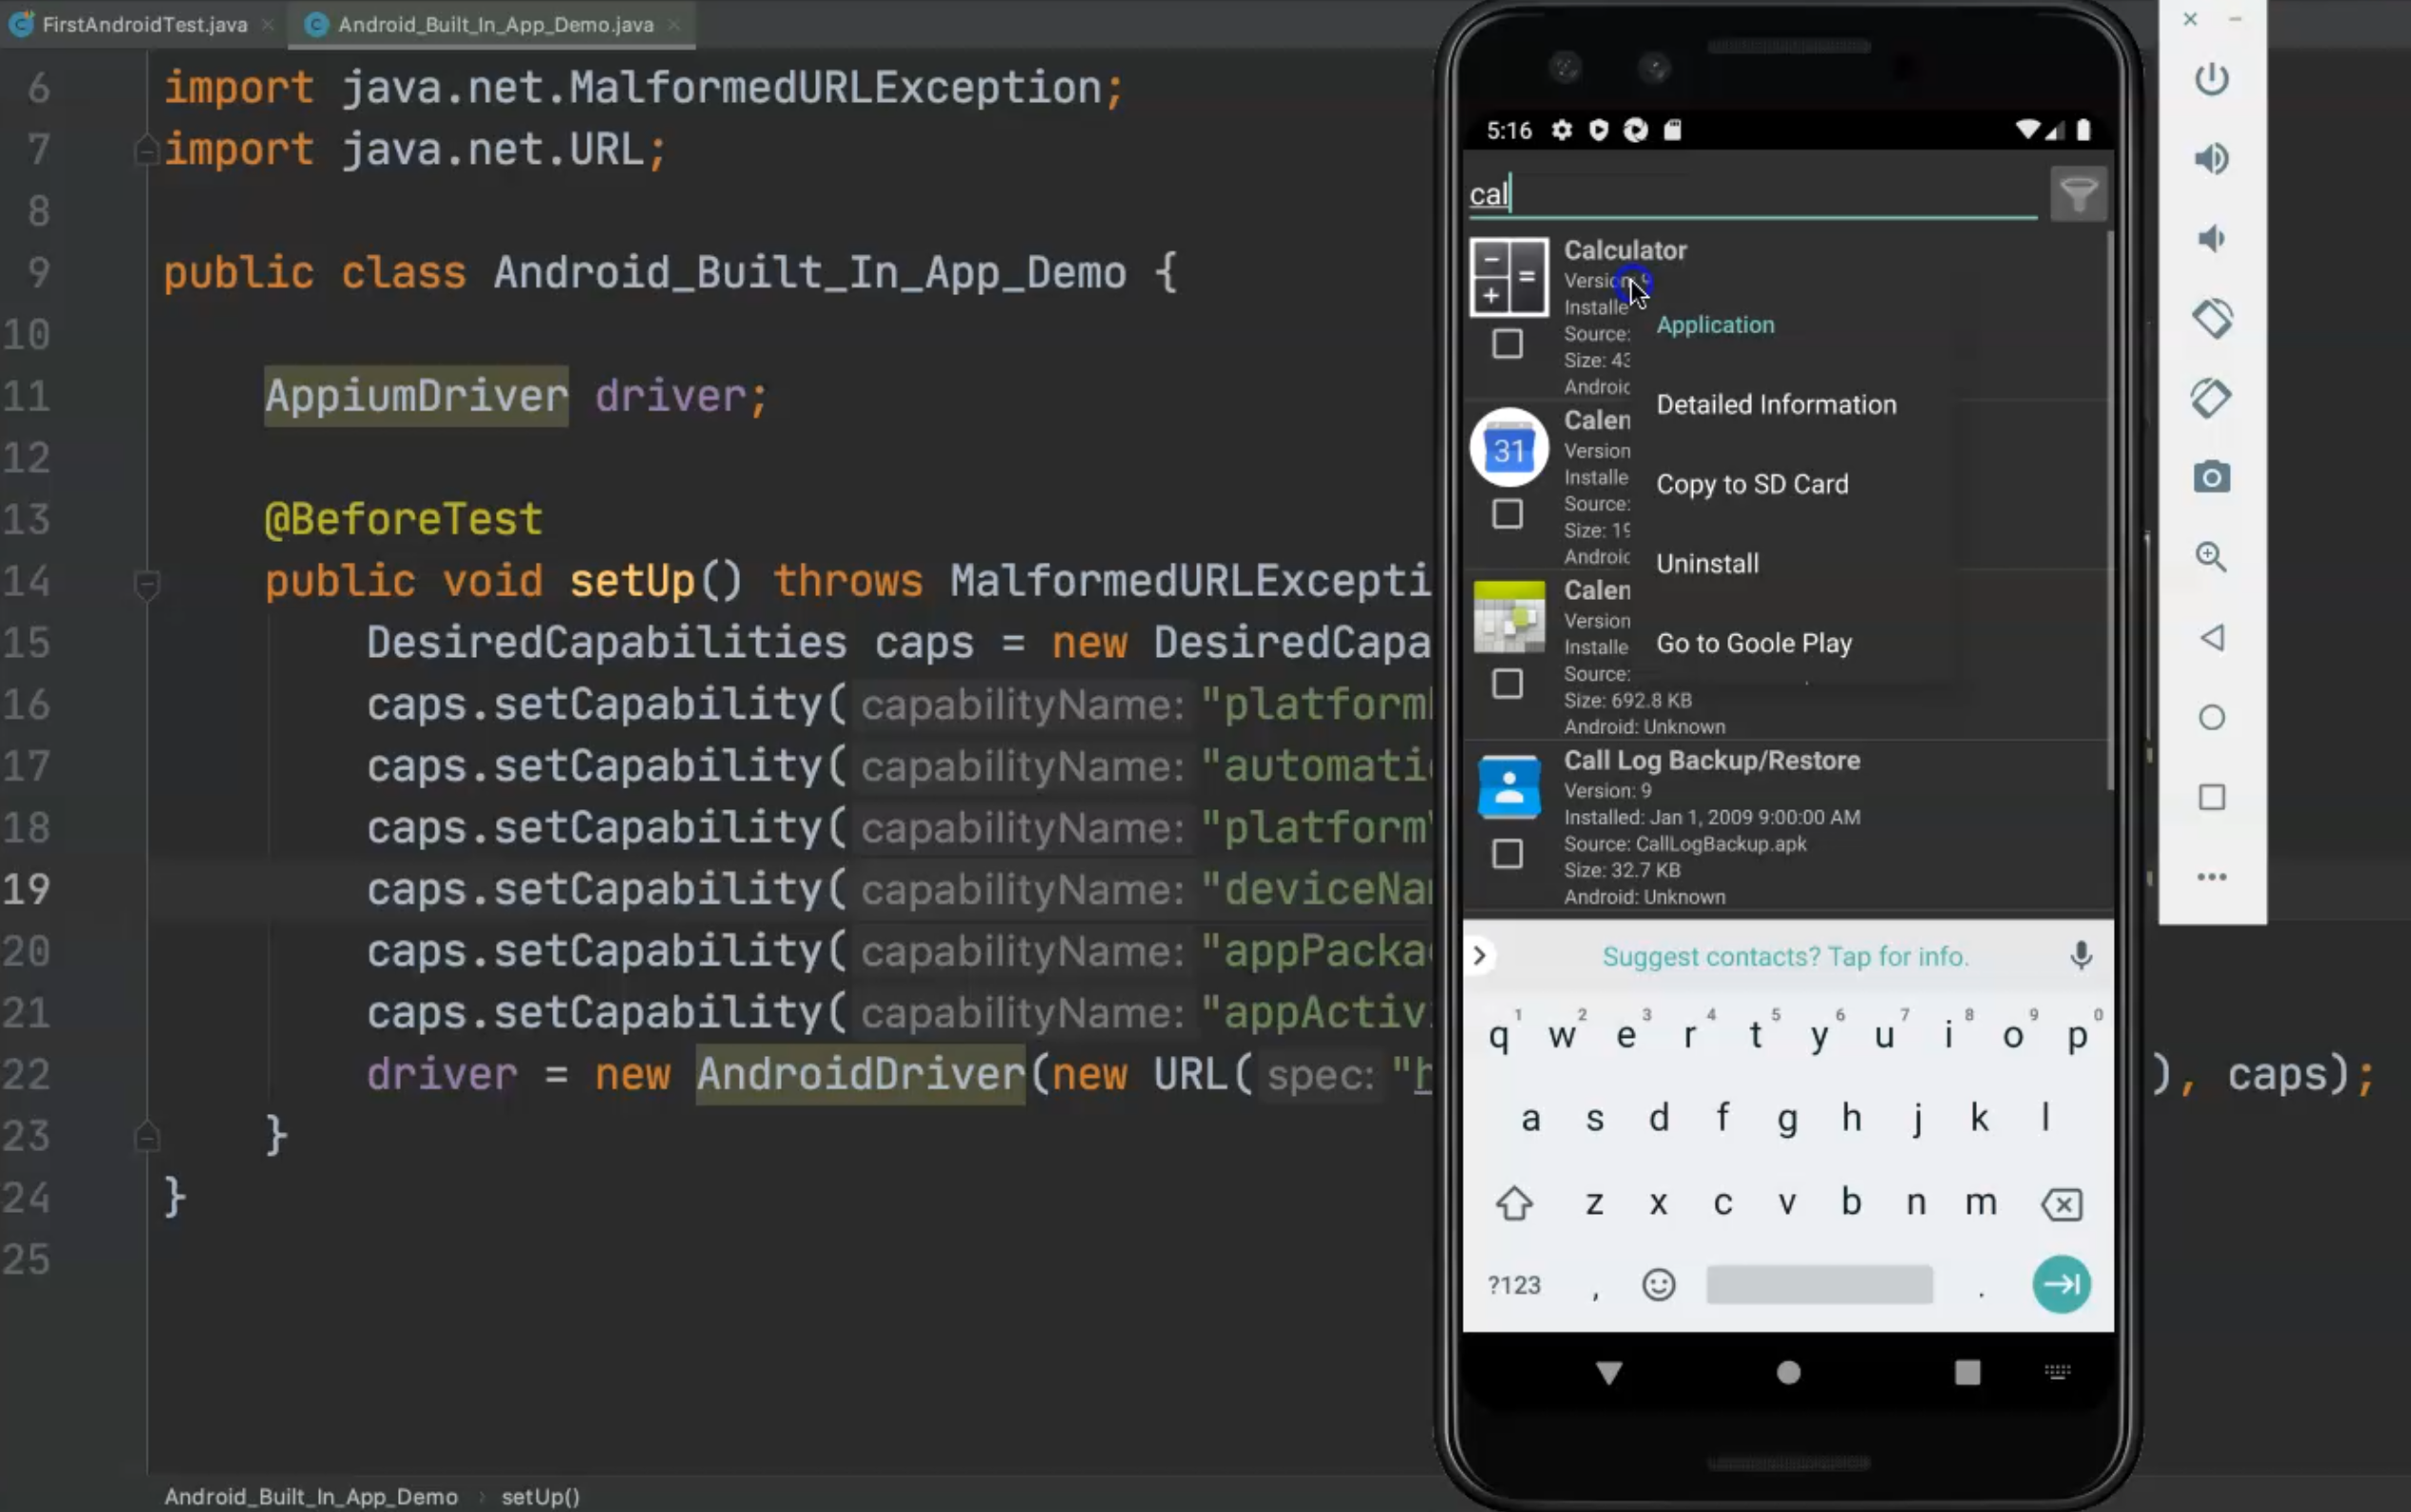
Here I can find the "Activities".
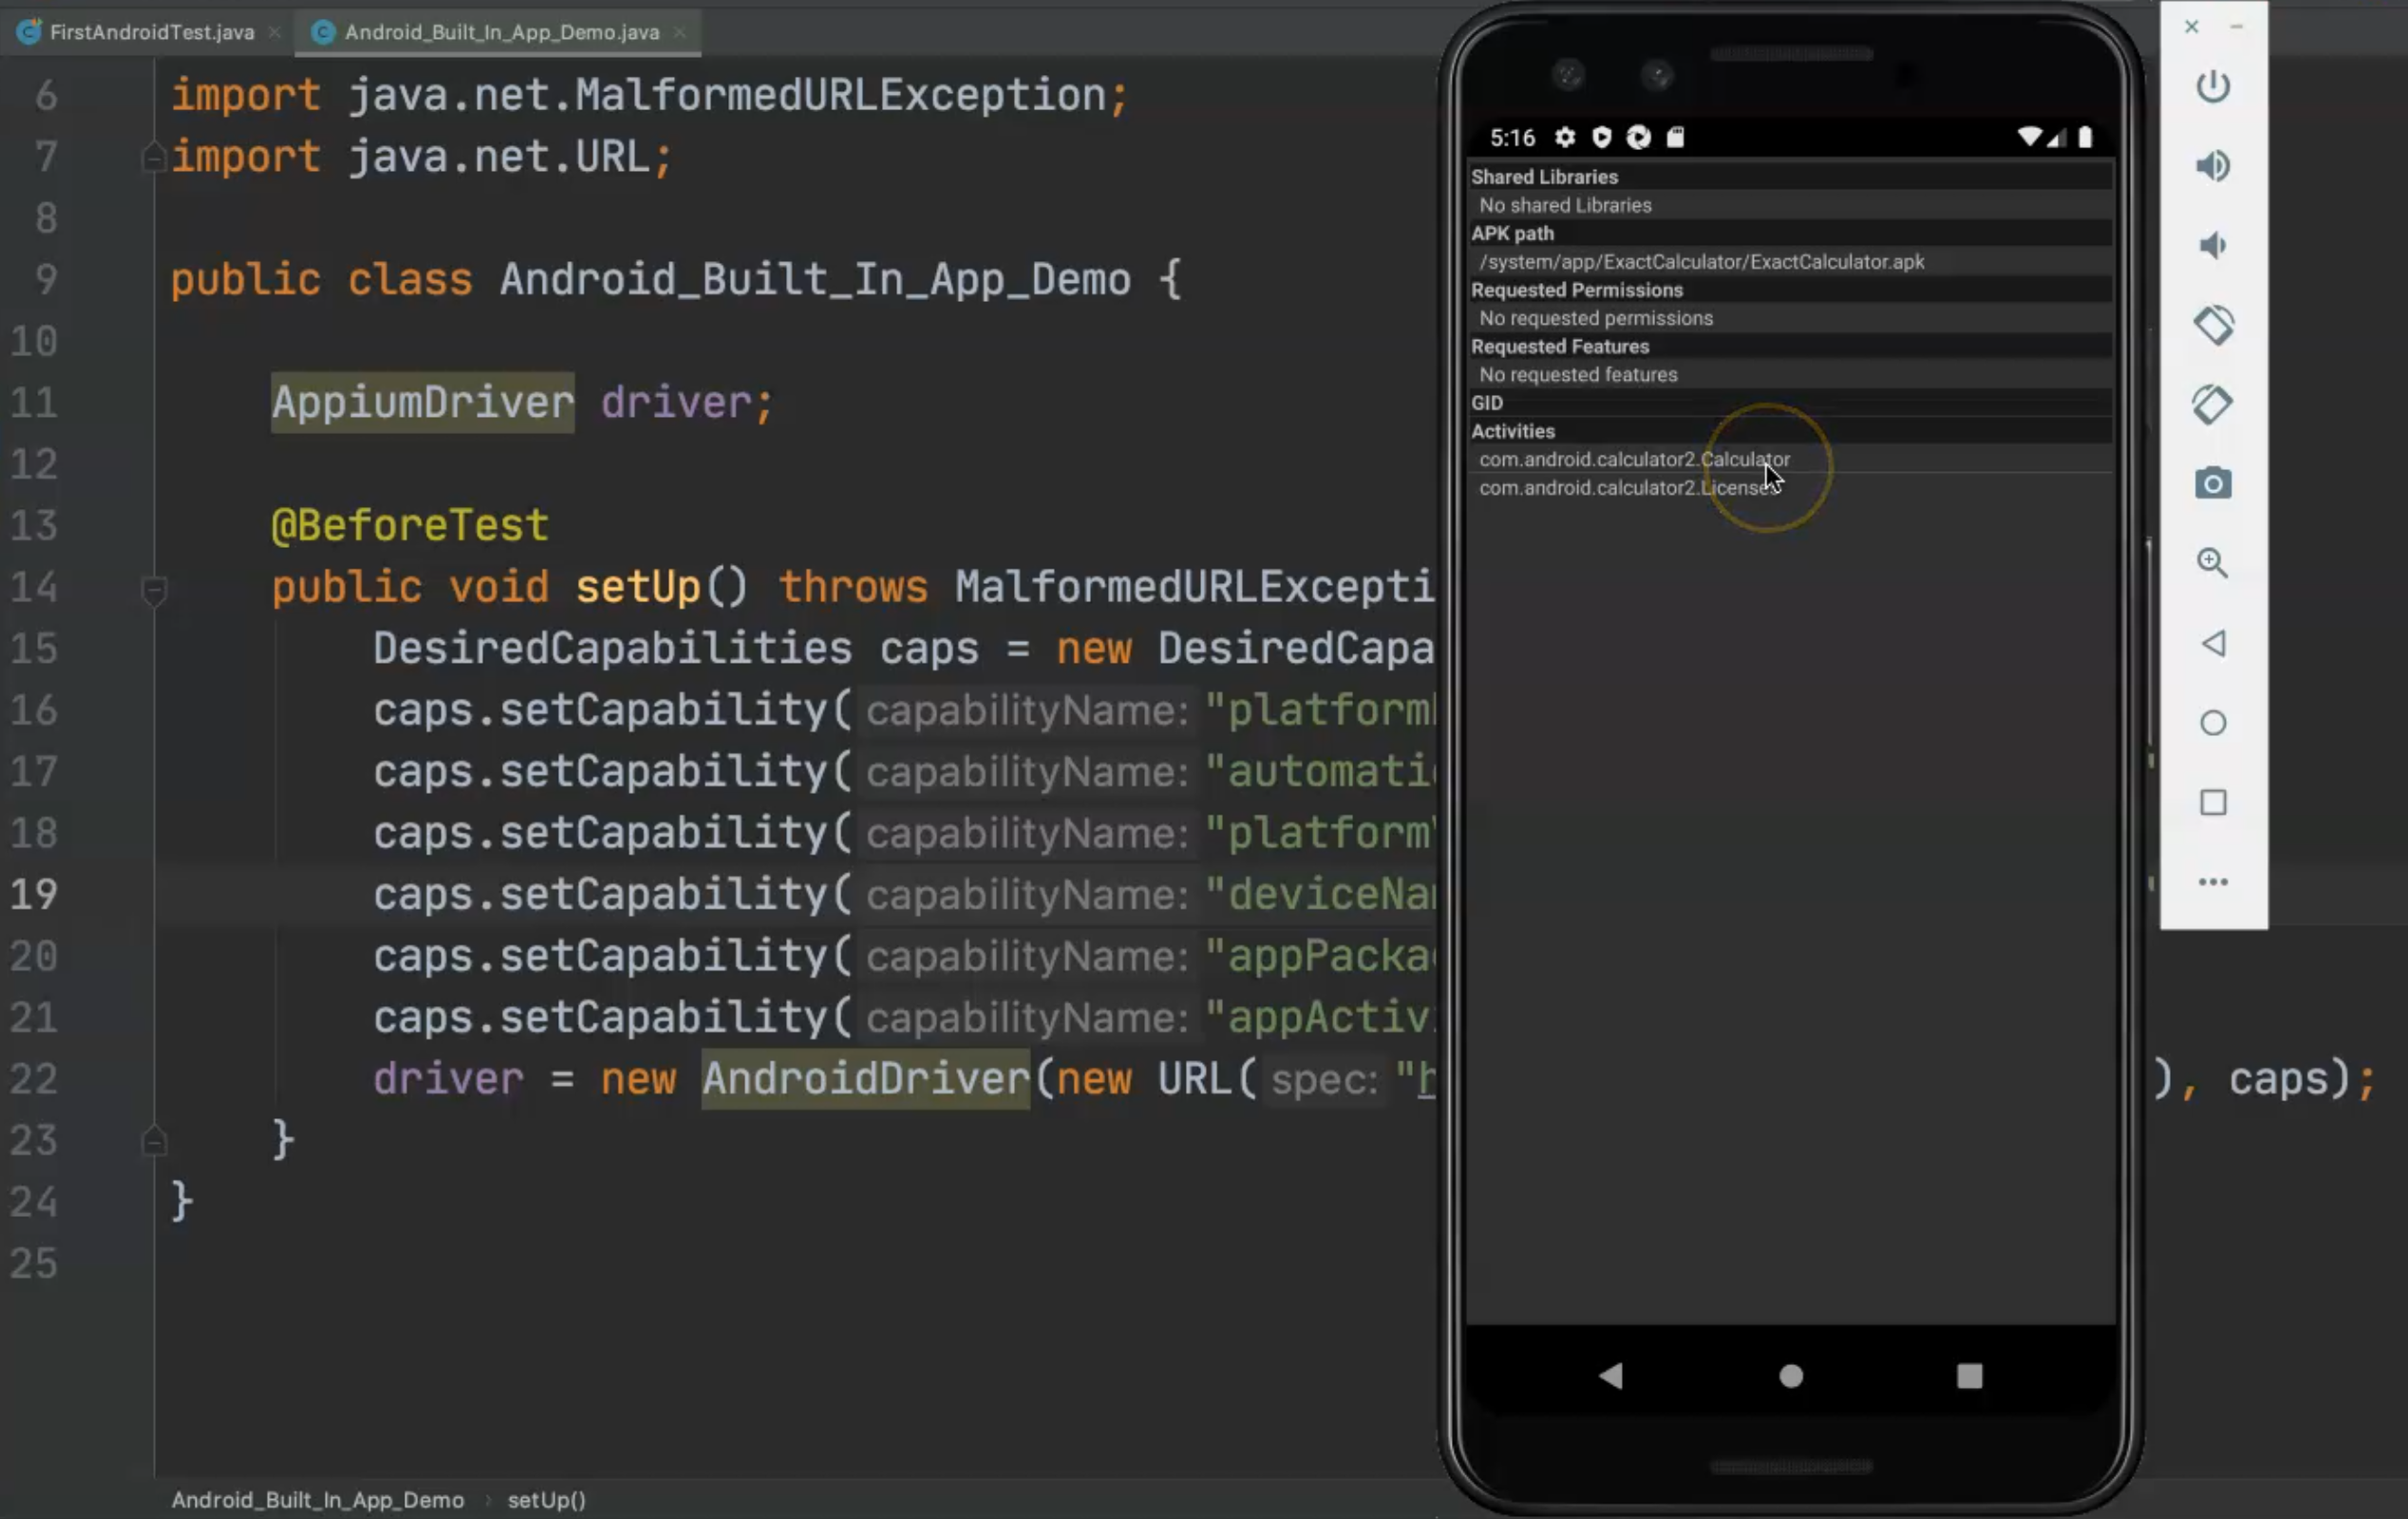
So the appPackage is com.android.calculator2 and the activity is Calculator.
Usually, the application starts with the appPackage, which is com.android.calculator2 and then we have different activities here - we have a Licenses activity and a Calculator activity and this is the activity name.
So I will add the appPackage and then for the appActivity I can add something like .Calculator.
You can add the whole package and then add the activity name or we can use just the activity name, for example.
Let's try with just the activity name and if it doesn't work, we can change it by adding our full appPackage.
So here, we are using this activity and this package name.
This is all in our @BeforeTest.
package Android;

import io.appium.java_client.AppiumDriver;
import io.appium.java_client.android.AndroidDriver;
import org.openqa.selenium.remote.DesiredCapabilities;
import org.testng.annotations.BeforeTest;

import java.net.MalformedURLException;
import java.net.URL;

public class Android_Built_In_App_Demo {

    AppiumDriver driver;

    @BeforeTest
    public void setUp() throws MalformedURLException {
        DesiredCapabilities caps = new DesiredCapabilities();
        caps.setCapability("platformName", "Android");
        caps.setCapability("automationName", "UiAutomator2");
        caps.setCapability("platformVersion", "9.0");
        caps.setCapability("deviceName", "Android Emulator");
        caps.setCapability("appPackage", "com.android.calculator2");
        caps.setCapability("appActivity", ".Calculator");

        driver = new AndroidDriver(new URL("http://localhost:4723/wd/hub"), caps);
    }
Then, in the @Test, we can add our test case here and we will add public void and then name the method click_test, for clicking on different elements on the calculator.
For the teardown, we can just copy the tearDown from the previous step and start using it in our test case by importing the AfterTest.
In this case, we don't need to install any application from our device or our machine - we will use an already installed application.
So, we need to open the Calculator in the Appium inspector session to be able to use it to find the element we want to use in our script.
We will open the Appium inspector and start adding the appPackage and appActivity instead of application.
So under the "Saved Capability Sets" I already have "Android_Built_In" which has the appPackage dialer so I will change it to com.android.calculator2 and the appActivity to .Calculator.
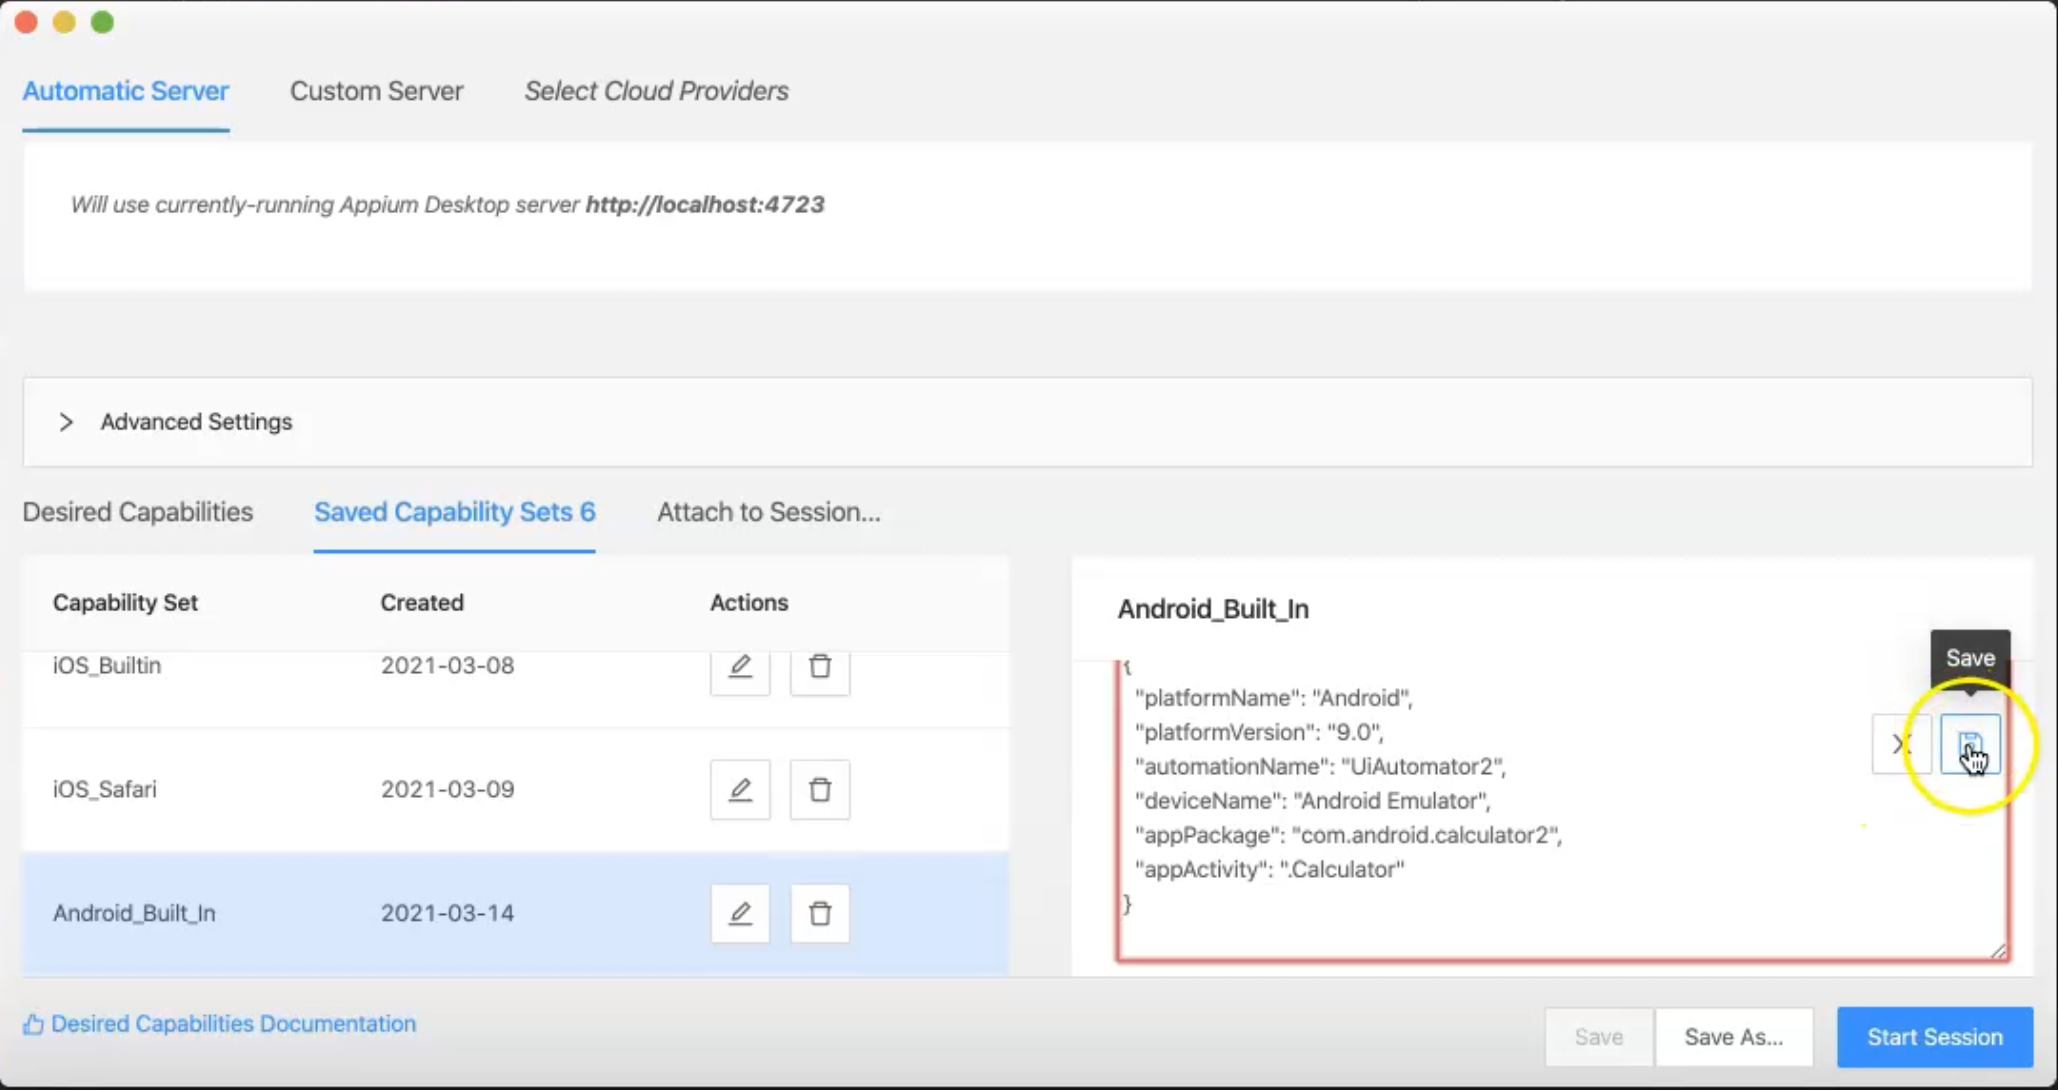
I will "Save" and then "Start Session".
So here, I'm connecting to the Appium server.
This is the Appium server searching for the appActivity and appPackage on the connected device.

If everything is okay, it will open the session and start to open the inspector session.
If there is any problem, I will get an error message from the Appium inspector session.
So now, the application is open.

Now, for example, I can start searching for the element for the number "1".

Here I have the "id" and in this case, I will use the "id" and not the "accessibility id", since "id" is already unique.
So, for example, there is an "id" for digit 5, digit 6, 9, 8, and so on.
For "+", I have "accessibility id" or "id", so in this case, you can use "accessibility id" like in the previous example, or you can use "id" if you wanted to.
So I will copy the "id" and go to my script and start using the driver to find the element.
I can use findElement - since I will not use "accessibility id", I just need to find the element by "id", and in this case, it is the one that I got from the inspector.
I can paste in the "id", which includes the whole "appPackage" and ":id/" and then the "id" name, but I can remove everything except the "id" name to simplify.
Then I will add .click, so I'm clicking on the first ID.
Then I can copy this and use it to click on digit number three because all of them use the same concept, but the number is changed.
Between them, I can just add a "+" or any operation that I want to use.
So I can go back to the inspector session and click "+" to get the "id".
So now I'm clicking on "1", then "plus", and then on "3".
Then, we can go back to the inspector session again and click on "=" to get the id, and then we can add this one.
If you want to assert that the value is correct, we can continue and click on the "result" and get the "id".
We can check that the "result" is equal to the result of 1+3.
We can use Assert from testng and use assertEquals and use driver to find the element and check that the result is equal to 3.
package Android;

import io.appium.java_client.AppiumDriver;
import io.appium.java_client.android.AndroidDriver;
import org.openqa.selenium.By;
import org.openqa.selenium.remote.DesiredCapabilities;
import org.testng.Assert;
import org.testng.annotations.AfterTest;
import org.testng.annotations.BeforeTest;
import org.testng.annotations.Test;

import java.net.MalformedURLException;
import java.net.URL;

public class Android_Built_In_App_Demo {

    AppiumDriver driver;

    @BeforeTest
    public void setUp() throws MalformedURLException {
        DesiredCapabilities caps = new DesiredCapabilities();
        caps.setCapability("platformName", "Android");
        caps.setCapability("automationName", "UiAutomator2");
        caps.setCapability("platformVersion", "9.0");
        caps.setCapability("deviceName", "Android Emulator");
        caps.setCapability("appPackage", "com.android.calculator2");
        caps.setCapability("appActivity", ".Calculator");
        driver = new AndroidDriver(new URL("http://localhost:4723/wd/hub"), caps);
    }

    @Test
    public void click_test() {
        driver.findElement(By.id("digit_1")).click();
        driver.findElement(By.id("op_add")).click();
        driver.findElement(By.id("digit_3")).click();
        driver.findElement(By.id("eq")).click();
        Assert.assertEquals(driver.findElement(By.id("result")).getText(),"4");
    }

    @AfterTest
    public void tearDown() {
        if (null != driver) {
            driver.quit();
        }
    }
Let's run our tests and if we have any problems, we can fix them.
I will start running my script from my application here.
I will open the server to check what happened during our test and now we are running, connecting from the server, and searching for the application, running our script, and then we will check if everything is okay.

The calculator is opened and here, we have a problem because 1+3 is 4.
Here we have our session error because we expected three, but we found that it's different.
So we'll add a getText() and change what we expect to be 1 and 3 equals 4, not 3.
I made this mistake just to check what happens during our test and how we can fix this problem.
We were comparing an element from the driver with a value, but we need to getText() from the element to be able to compare it with this value.
So let's run it again.
Now we are running again, connecting, sending desired capabilities, creating a new session, and then running the test script.
The calculator is opened, we clicked... and again, we have another problem - "expected [4], but found [4]".
We need to switch the value 4 to a string "4".
Now our test passed - we were comparing a string to an integer so we switched the integer to a string, so now it passes.
Resources
Quiz
The quiz for this chapter can be found in Chapter 4.8
