

Transcripted Summary
In this chapter, we will start using the Page Object pattern with Appium and Java.
We will cover:
Introduction to Page Objects
How we can create Page Object classes
Writing our tests using the Page Objects
In the beginning, let's start by asking what is the Page Object Design Pattern?
**Every functional unit of the displayed page or screen should be wrapped by a Page Object. **
The Page Object allows you to interact with the UI as if you are sitting in front of the screen, and it offers the reusability of writing code.
Transform this pattern over to the mobile world.
For example, here we have three different screens.

The first screen contains two tabs and one text box, the second one contains a second tab.
When we click on the second tab, we will find a different screen that includes three inputs and one button.
Then after we click on the submit button, we will have a third screen and final screen.
So here, we have FirstFragment, SecondFragment, and ThirdFragment, which means that each fragment or screen will contain different or specific methods that are not related to the other screen.
In this demo, we will start creating our Appium Page Object classes to be able to use them in our test scripts for both Android and iOS.
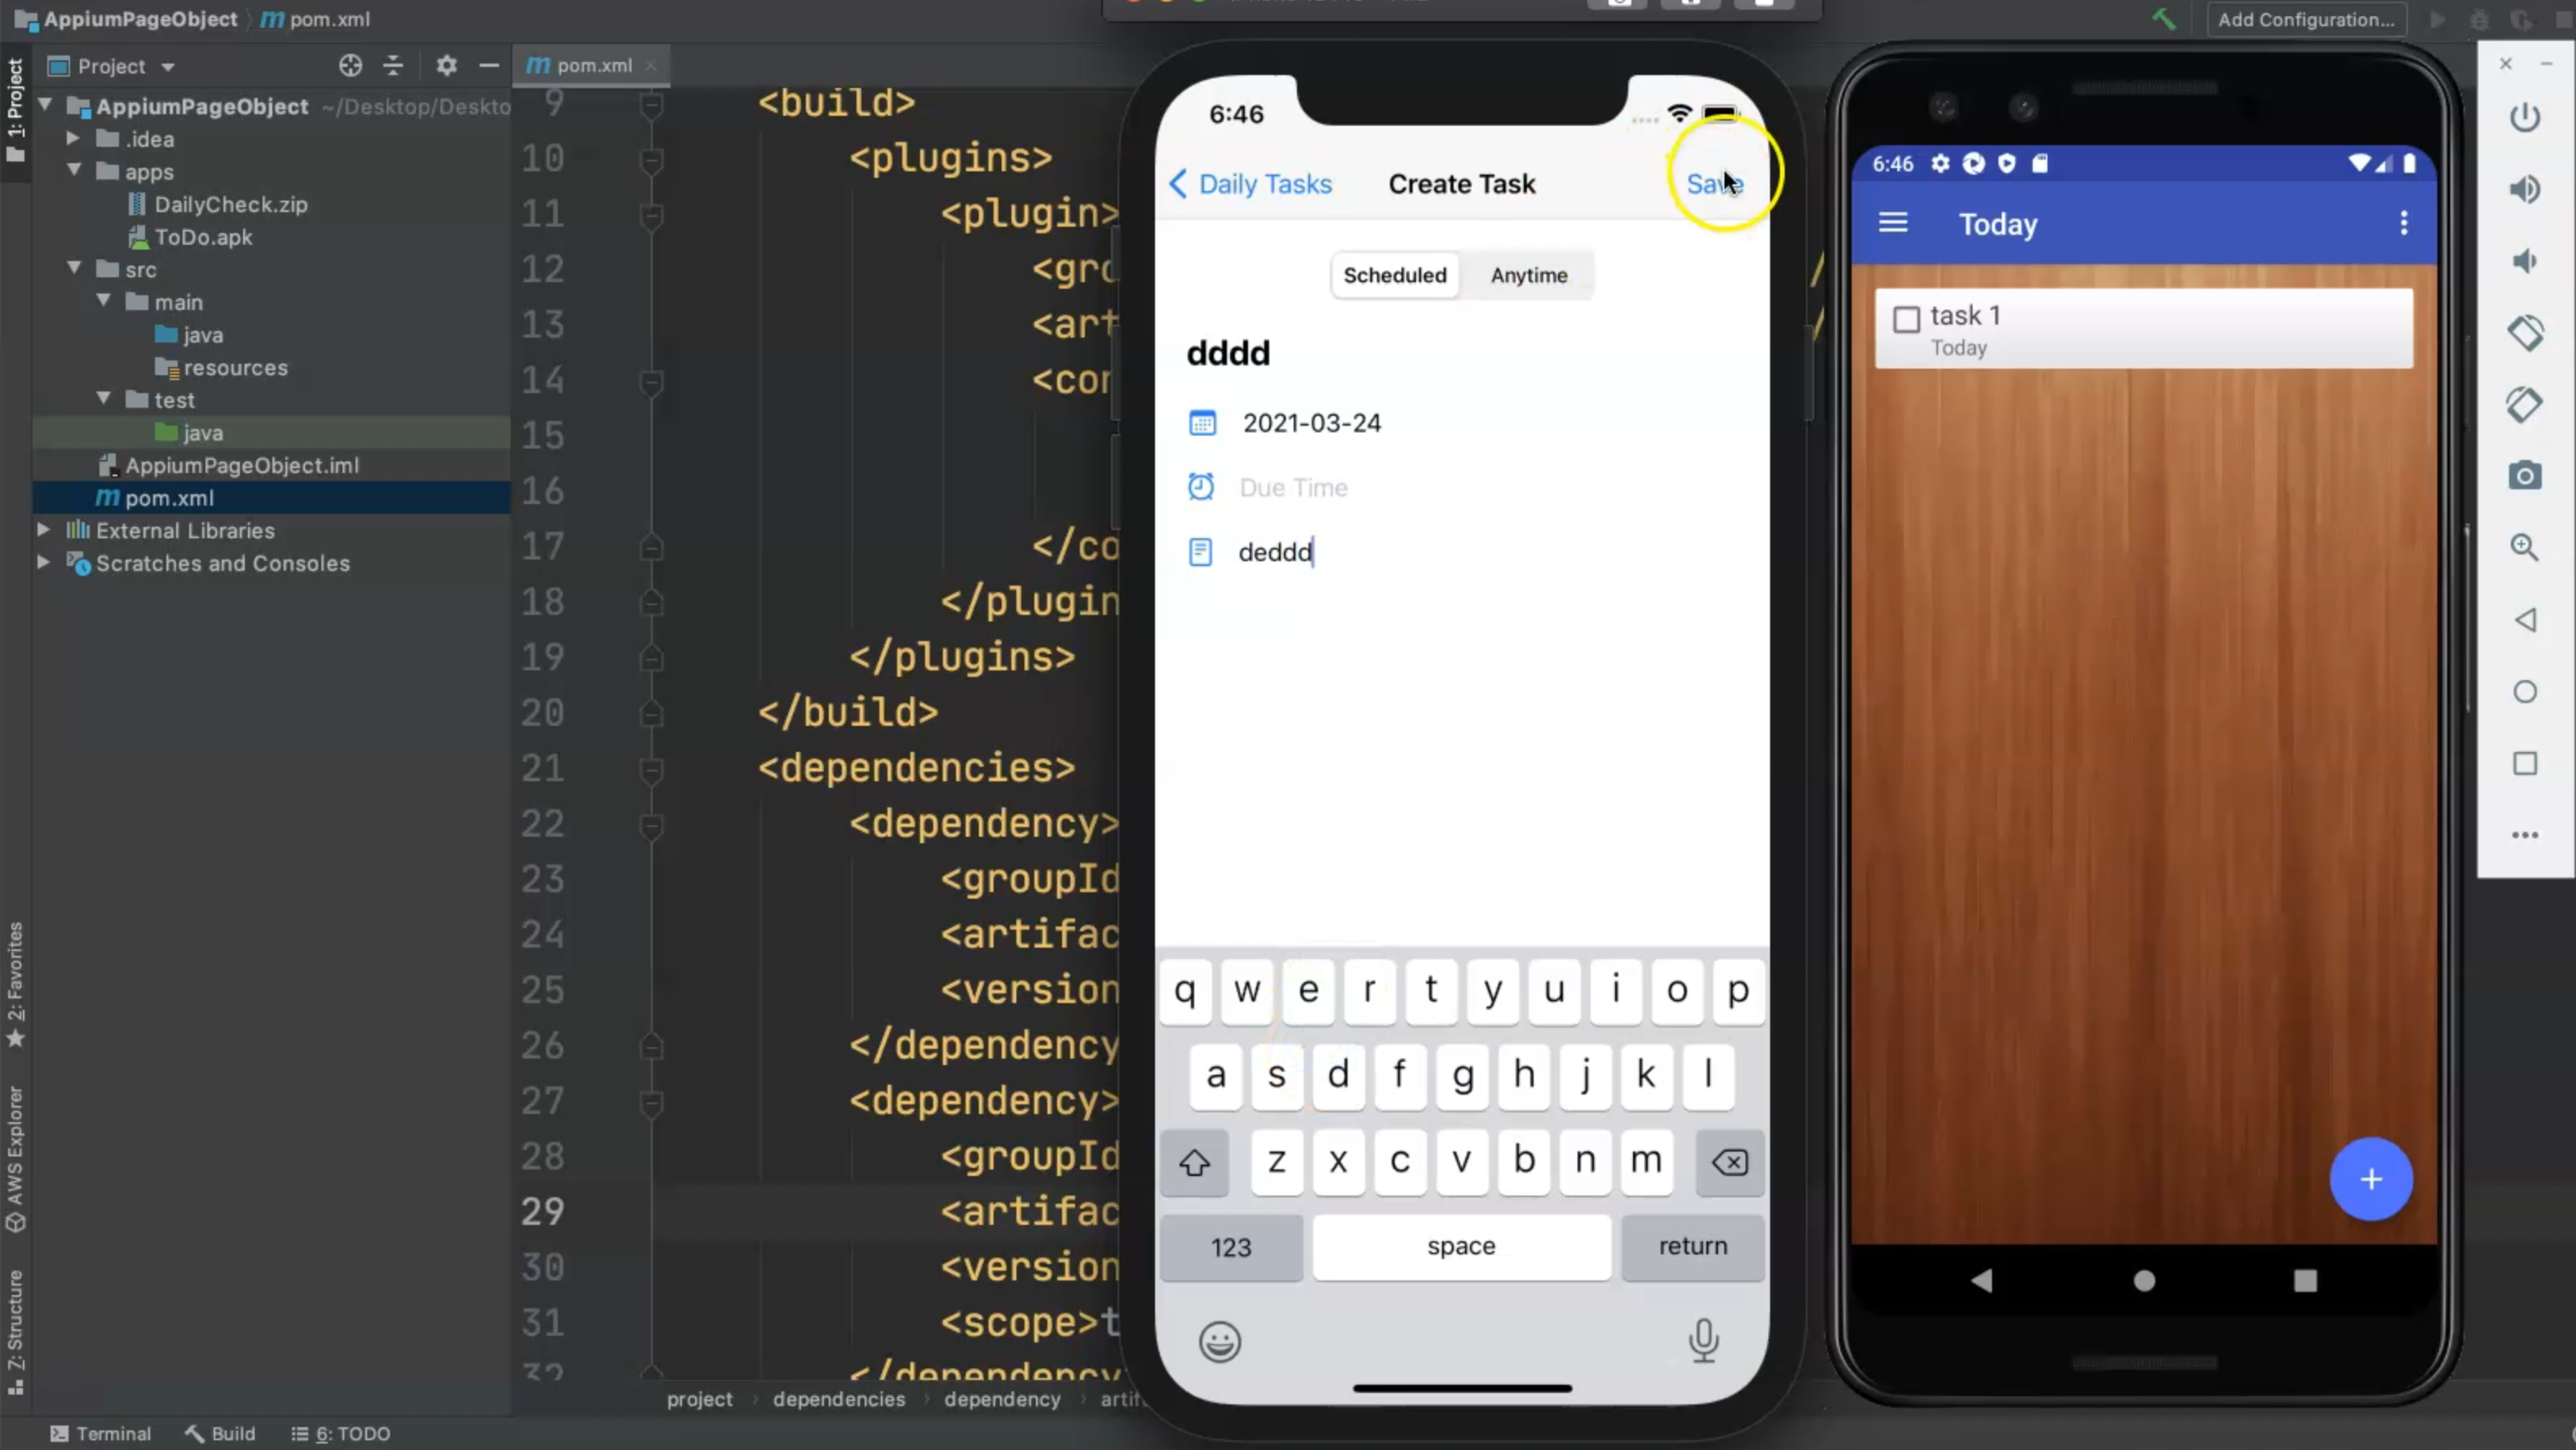
I created a new project for our Page Object test, called AppiumPageObject, and I added our two applications - we have To Do applications - one for iOS and one for Android.

With src, we will start adding our Page Object classes under the main folder, under the java folder, and we will add our test cases in the java folder under test.
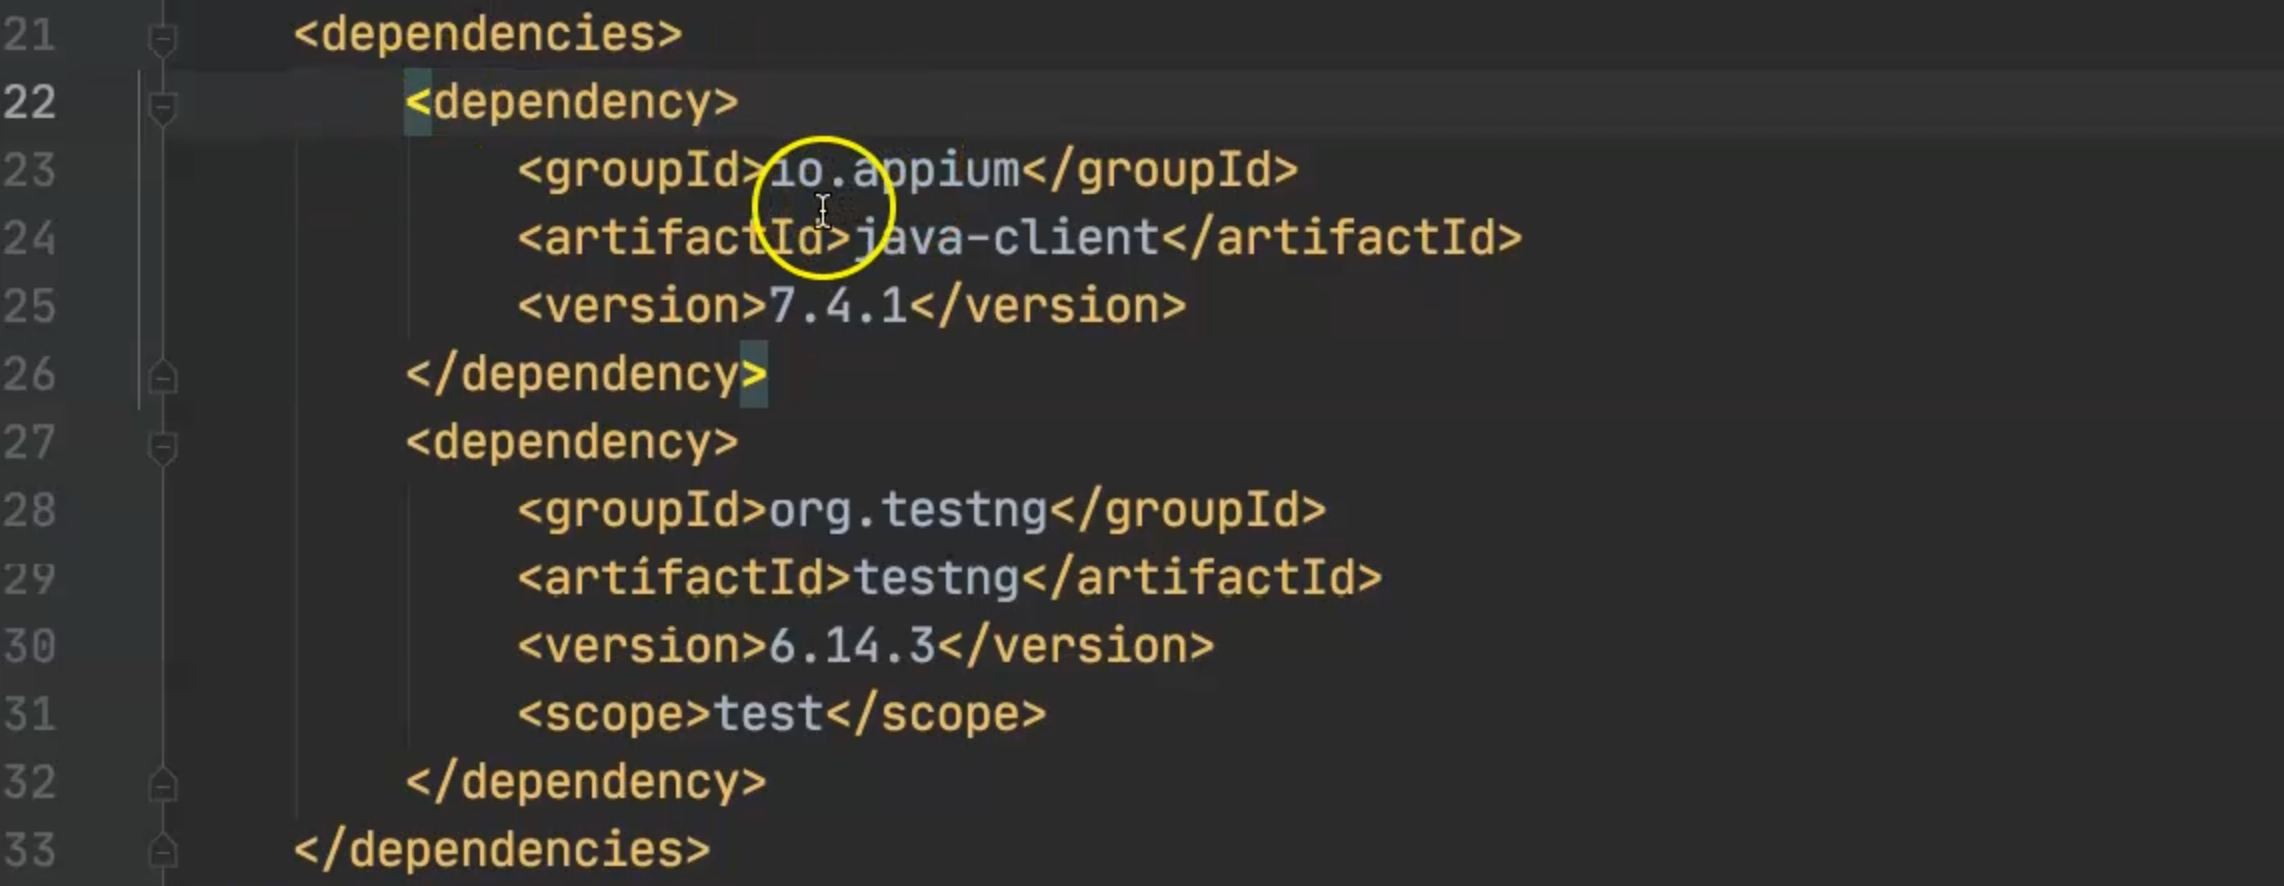
Also with the pom.xml, we just added our Appium client and testing, because we will use them in our test cases.
So, what are our applications?
I just prepared our application here - I have 2 to-do applications, one for iOS and one for Android.
The application is as simple as clicking on the add button and adding the title of the task.
For example here, I need to add in a string and as a description, for example, and then I need to click save.
After that, maybe we can check this one for it to be done, or you can just leave it in the tasks list.
In the same concept, this is a different application in Android.
I just found it to be similar to iOS to be able to understand how we can handle the same Page Object classes with the two platforms for Android and iOS with different applications.
So here is the same idea - I also click to add and here I have the title - for example, "test, then I can add notes like the description.
If I wanted to use the start date, I can add the start date, or add the due date or due time.
Then I can click on a save button, then I will have the task here, then I can click on this one to remove the task from the list.
This is the main application, so we will start finding the elements on these two applications, but we'll start with Android and then after that, we can add the iOS in the next video.
We will start with the Android application to find the elements and start adding them in the Page Object.
But, let's first create our first PageObject class, which is PageBase, because we will share the different things and we will create custom functions or voids to be used with the Page Object classes.
We will start with PageBase, which will be centralized and extended from the different test classes, or from the different Page Object classes.
Let's go to the main folder, to the java folder, and then right-click and create a new class, and here we will add PageBase.
This will be our PageBase class, and then in here, we will initialize AppiumDriver and the Page Factory like Selenium.
With Page Factory, we will initialize the element because we will use annotations with the elements in the Page Object classes.
So here I will add Appium Driver, and I will just name it AppiumDriver.
Then I will create a constructor public PageBase(), and as we know, the constructor is with the same class, but it's not a void, so the constructor will be initialized once we get a new object from this class.
import io.appium.java_client.AppiumDriver;

public class PageBase {

    AppiumDriver driver;

    public PageBase() {

    }
}
I added the Page Class, and then I will call the PageFactory from Selenium so it's the same concept as Selenium, and then we need to initialize the elements.
In the initialization of the elements, we can pass new AppiumFieldDecorator.
The AppiumFieldDecorator is the method that is responsible for collecting all the elements that have annotations, like @Android, @AndroidFindBy, or @iOSFindBy.
With AppiumFieldDecorator, we should add a driver here, and with PageBase, we should also pass a driver which will be used in our test cases, so we will pass AppiumDriver appiumDriver and this to the AppiumFieldDecorator.
this means that we are using this class and refers to all the PageObject classes that use PageBase.
After that, we need to get the value for the Appium Driver from the one that we have in PageBase.
So, this is the main idea, we are initializing the Appium Driver and then after that, when we create the first PageObject class, we will just extend it from PageBase.
import io.appium.java_client.AppiumDriver;
import io.appium.java_client.pagefactory.AppiumFieldDecorator;
import org.openqa.selenium.support.PageFactory;

public class PageBase {

    AppiumDriver driver;

    public PageBase(AppiumDriver appiumDriver) {
        PageFactory.initElements(new AppiumFieldDecorator(appiumDriver), this);
        driver = appiumDriver;
    }
}
Let's continue with PageBase, and start creating the reusable component that we will use in PageBase.
To begin, we will just create one for waitForVisibility(), so waiting for the item to be visible.
Then we can add the WebDriverWait.
Let's first add on the class level public static final long WAIT = 10.
Then in waitForVisibility(), we can add WebDriverWait wait = new WebDriverWait(driver, WAIT), where driver is our AppiumDriver and WAIT is the value we added in our class, which is 10.
Then we'll add wait.until(ExpectedConditions.visibilityOf()) and we need to pass the element.
First, we need to pass the element to this function - MobileElement element - and then we can pass this to visibilityOf().
import io.appium.java_client.AppiumDriver;
import io.appium.java_client.MobileElement;
import io.appium.java_client.pagefactory.AppiumFieldDecorator;
import org.openqa.selenium.support.PageFactory;
import org.openqa.selenium.support.ui.ExpectedConditions;
import org.openqa.selenium.support.ui.WebDriverWait;

public class PageBase {

    AppiumDriver driver;
    public static final long WAIT = 10;

    public PageBase(AppiumDriver appiumDriver) {
        PageFactory.initElements(new AppiumFieldDecorator(appiumDriver), this);
        driver = appiumDriver;
    }

    public void waitForVisibility(MobileElement element) {
        WebDriverWait wait = new WebDriverWait(driver, WAIT);
        wait.until(ExpectedConditions.visibilityOf(element));
    }
}
This is the first void in our PageBase, and we can use it in the PageObject class.
The second one is, clear().
If we have a textbox and we want to clear it first, then we can use public void clear(), and in clear(), we can call waitForVisibility() and then we need to pass the MobileElement element and then we can call element.clear().
So, after we call this function clear, we need to pass the element that we want to clear, and wait for the element to be visible for 10 seconds, and then we can clear the element after that.
import io.appium.java_client.AppiumDriver;
import io.appium.java_client.MobileElement;
import io.appium.java_client.pagefactory.AppiumFieldDecorator;
import org.openqa.selenium.support.PageFactory;
import org.openqa.selenium.support.ui.ExpectedConditions;
import org.openqa.selenium.support.ui.WebDriverWait;

public class PageBase {

    AppiumDriver driver;
    public static final long WAIT = 10;

    public PageBase(AppiumDriver appiumDriver) {
        PageFactory.initElements(new AppiumFieldDecorator(appiumDriver), this);
        driver = appiumDriver;
    }

    public void waitForVisibility(MobileElement element) {
        WebDriverWait wait = new WebDriverWait(driver, WAIT);
        wait.until(ExpectedConditions.visibilityOf(element));
    }

    public void clear(MobileElement element) {
        waitForVisibility(element);
        element.clear();
    }
}
The next one will be public void click(), and we need to also pass the MobileElement element, and then waitForVisibility(element) and then element.click().
Also for sendKeys(), we can create a reusable functionpublic void sendText() to differentiate between the default sendKeys.
We will add this MobileElement element here and then we need an additional parameter - the String text that we need to add in the text box.
Then, we need to add waitForVisibility(element), and element.sendKeys(text) where text is the string that we added as an argument.
import io.appium.java_client.AppiumDriver;
import io.appium.java_client.MobileElement;
import io.appium.java_client.pagefactory.AppiumFieldDecorator;
import org.openqa.selenium.support.PageFactory;
import org.openqa.selenium.support.ui.ExpectedConditions;
import org.openqa.selenium.support.ui.WebDriverWait;

public class PageBase {

    AppiumDriver driver;
    public static final long WAIT = 10;

    public PageBase(AppiumDriver appiumDriver) {
        PageFactory.initElements(new AppiumFieldDecorator(appiumDriver), this);
        driver = appiumDriver;
    }

    public void waitForVisibility(MobileElement element) {
        WebDriverWait wait = new WebDriverWait(driver, WAIT);
        wait.until(ExpectedConditions.visibilityOf(element));
    }

    public void clear(MobileElement element) {
        waitForVisibility(element);
        element.clear();
    }

    public void click(MobileElement element) {
        waitForVisibility(element);
        element.click();
    }

    public void sendText(MobileElement element, String text) {
        waitForVisibility(element);
        element.sendKeys(text);
    }
}
Let's continue and add the last one public void getAttribute() if we want to get the attribute for one element in the application.
We need to pass the MobileElement element and also the String attribute.
Then we call waitForVisibility(element).
This function will not be a public void because it will return the attribute as a string, so it needs to be `public String getAttribute.
Then we need to add the return statement return element.getAttribute(attribute), where attribute is the argument passed from our class.
import io.appium.java_client.AppiumDriver;
import io.appium.java_client.MobileElement;
import io.appium.java_client.pagefactory.AppiumFieldDecorator;
import org.openqa.selenium.support.PageFactory;
import org.openqa.selenium.support.ui.ExpectedConditions;
import org.openqa.selenium.support.ui.WebDriverWait;

public class PageBase {

    AppiumDriver driver;
    public static final long WAIT = 10;

    public PageBase(AppiumDriver appiumDriver) {
        PageFactory.initElements(new AppiumFieldDecorator(appiumDriver), this);
        driver = appiumDriver;
    }

    public void waitForVisibility(MobileElement element) {
        WebDriverWait wait = new WebDriverWait(driver, WAIT);
        wait.until(ExpectedConditions.visibilityOf(element));
    }

    public void clear(MobileElement element) {
        waitForVisibility(element);
        element.clear();
    }

    public void click(MobileElement element) {
        waitForVisibility(element);
        element.click();
    }

    public void sendText(MobileElement element, String text) {
        waitForVisibility(element);
        element.sendKeys(text);
    }

    public String getAttribute(MobileElement element, String attribute) {
        waitForVisibility(element);
        return element.getAttribute(attribute);
    }
}
So, we have getAttribute, sendKeys, click, clear, and you can do anything else.
For example, you can add the scroll method that we did for Android or iOS here, an executeScript, or anything that we will use in the PageObject classes or to the test cases.
So, here we prepared our PageBase, and then let's go to the next PageObject class, which will be the to-do list page, and then create a new task page class.
Resources
Quiz
The quiz for this chapter can be found in Chapter 7.5
