

Transcripted Summary
Now, it's time to build on top of our working GitHub Action to introduce the important bits for our specific use case.
That means that what we need to do is we need to add a step that runs the Maven tests.
So again, I'm going to use pseudo-code to say, "Run: mvn test."
As I'm looking at that, I'm realizing that we probably have a few things we need to do first.
For example, we need to be able to use Java.
So, "install java" needs to be created first.
The other thing is that we're running Chrome during these Maven tests, and there's some interesting bits around how to run Chrome on a remote server.
So, I'm just going to add a comment here - "Handle remote server chromedriver".
With these three actions, when we complete them we will be able to see our tests running in GitHub.
So, let's work through them.
First, to install Java.
Here, we can rely on, again, a publicly available action.
So I can use the uses command to call an action, which is called setup-java and this is also on version two.
The interesting thing about setting up Java is unlike the checkout command, it requires certain parameters to be set.
We set these parameters using a with header.
So, with the parameters distribution, to indicate which Java distribution - we'll be using the default zulu - and java-version.
Because our maven file is set up with Java version 16, I will also use java-version: 16 here.
# Event name
name: on_push

# When the event should run

on:
  push:
    branch:
      - "**" # This will run on all branches and must be quoted to be handled by yaml

# What jobs to execute

jobs:

  build_and_test:
    runs-on: ubuntu-latest

  steps:
    - uses: actions/checkout@v2
    # install java
    - uses: actions/setup-java@v2
      with:
        distribution: 'zulu'
        java-version: 16
    # Run: mvn test
    # Handle remote server chromedriver
With Java installed, it's time to look at how to run our tests.
This is the first time we're going to be running a more custom step.
And so with that, I'm going to set a name for that step.
The name for this step is Run tests with maven and within here, we need to tell it what command to do.
When we're using these publicly available actions, all of this is wrapped up in a nice package for us, but for here, we need to set the command ourselves by calling the run command.
And under this, it's basically like running anything you can on a command line so for Maven, the command would be mvn test.
But as we talk about the fact that this is like running anything on the command line, one thing we have to think about is where this is being run from.
By default, when you're running things in GitHub Actions, it runs from the root of your repository, or from the selenium-webdriver-java-course directory, but that's not actually where Maven is, right?
Maven is inside of webdriver_java and you can find that here with pom.xml, so we need to tell GitHub Actions that as well.
The way that we do that is we tell it about a working-directory and this tells it basically where to run the command, and for us, we want to run it in the webdriver_java directory.
With this, we've been able to install Java, which will let us run mvn test, so I can remove these two comments.
name: on_push

on:
  push:
    branch:
      - "**" # This will run on all branches and must be quoted to be handled by yaml

jobs:

  build_and_test:
    runs-on: ubuntu-latest

  steps:
    - uses: actions/checkout@v2
    - uses: actions/setup-java@v2
      with:
        distribution: 'zulu'
        java-version: 16
    - name: Run tests with maven
      working-directory: webdriver_java
      run: mvn test
    # Handle remote server chromedriver
The thing is we're trying to run ChromeDriver and right now, the way that ChromeDriver runs on our computer is that we've installed ChromeDriver into a specific repository that is under resources, but is your computer an ubuntu-latest?
Mine isn't - mine's a Windows computer.
In order to make this pass, we need to make sure that we are using the correct ChromeDriver in the different scenarios, both locally and remotely.
To do that, we have a little bit of code that helps us.
We can find this code inside of the BaseTests.
So, under src > test > base > BaseTests, we can see here that during our setUp, we are trying to set the chromedriver, but we allow for an extension based on an environment variable called RUNNER_OS.
If the RUNNER_OS environment variable is set to anything, as long as it's null, then we will be using the -linux extension for the ChromeDriver.
If I return to my actions file, I want to add this environment variable.
I can do that here inside of the step, or I can do it more globally.
Since this is a pretty global concept, I'm going to add it here at the top.
So, env, RUNNER_OS and I'm just going to say true.
As long as it's not empty, it will work.
While I'm talking about environment variables, it's probably valuable to add one more.
If I go back to BaseTests and I scroll down to the other bits of the setUp, I can see things like ChromeOptions and in specific, the ChromeOption of whether or not it should be run headless.
Headless means that you won't be able to see the browser window open.
This is an option locally, but it's actually a requirement when running on a continuous integration server, because they don't come with the necessary hardware to deal with a visual browser and so they can actually fail your tests for not having it.
Again, this is set by an environment variable - this time, the word HEADLESS_CHROME.
So I want to come back to my actions, add one more variable here called HEADLESS_CHROME and I'm going to again say true.
name: on_push

on:
  push:
    branch:
      - "**" # This will run on all branches and must be quoted to be handled by yaml

jobs:

  build_and_test:
    runs-on: ubuntu-latest
    env:
      RUNNER_OS: true
      HEADLESS_CHROME: true

  steps:
    - uses: actions/checkout@v2
    - uses: actions/setup-java@v2
      with:
        distribution: 'zulu'
        java-version: 16
    - name: Run tests with maven
      working-directory: webdriver_java
      run: mvn test
    # Handle remote server chromedriver
I don't need this product window open anymore so I'm going to close that.
Now, my tests know that they need to run on Linux and that they need to run headless, but I need to make sure that it has the ChromeDriver it needs for that.
So, I'm going to return to the same actions I took during setup, and I'm going to download another ChromeDriver.
Here I am on the ChromeDriver Download page.
I've been using ChromeDriver 94, so I'm going to open that and I'm going to have the option to download the Linux zip file.
I'm going to download that directly into my webdriver_java/resources directory, and "Save".
Now, I can ask that to show me in the folder and I can extract that so I can get to the actual ChromeDriver itself.
Inside of this chromedriver_linux64 directory, I can see a chromedriver I can use, but if I try and put this in my resources directory, it will overwrite the one I use for my laptop.
So what I'm going to do is I'm going to rename this, just like it is in the code, to -linux.
Then, I'm going to copy and drag that over to the resources directory.
With that, I can do a bit of cleanup.
I no longer need the zip folder or this now empty folder, and I get left with a chromedriver and a chromedriver-linux in this folder.
I can see that in IntelliJ as well if I open up the "Projects" tab, I can see chromedriver-linux.
It's now time for us to add these files to Git.
To do that, I'm going to use IntelliJ to commit and add these.
As you can see, I already have a commit message ready and it has an interesting note about making sure that the file is executable in order to be run.
In order to do that, I'm going to need to use the command line, so I'm going to commit these, but I'm not going to immediately push.
Here on the command line, I can check what the status of that file is.
I can do that using a command called ls -l.
ls is to list the files and -l gives me a little bit of extra information about those files.
I specifically want to list the files that are inside of webdriver_java/resources.
In here, I can see the WebDriver, the one I'm using on my laptop, is executable.
The way I can see that is this x at the end of this first line.

The chromedriver-linux though, is not executable - there's no x on this line.
It doesn't matter if this is executable on my own computer, but it does matter that Git knows that it's executable.
So, to do that, I need to make sure that Git sets this file as executable.
I use a command called git update index and I tell it what I want to update - so I want to change the mode of that file to be "+x" and the file I want to change is webdriver_java/resources/chromedriver-linux.
git update-index --chmod=+x webdriver_java/resources/chromedriver-linux
When I git status, I can see that everything's ready now to be committed.
I can git commit this change - this is just a small one, so I can add it directly on the command line with the commit message "make chromedriver-linux executable in github".
Once those commits have been pushed, they can take a minute to run, but here I am with that commit having run on my GitHub Actions tab - I can see that it's failed.

When I click through and click into the "build_and_test", I can see what parts of it failed - namely, I can see that the "Run tests with maven" bit failed.
So, let's see how it failed.
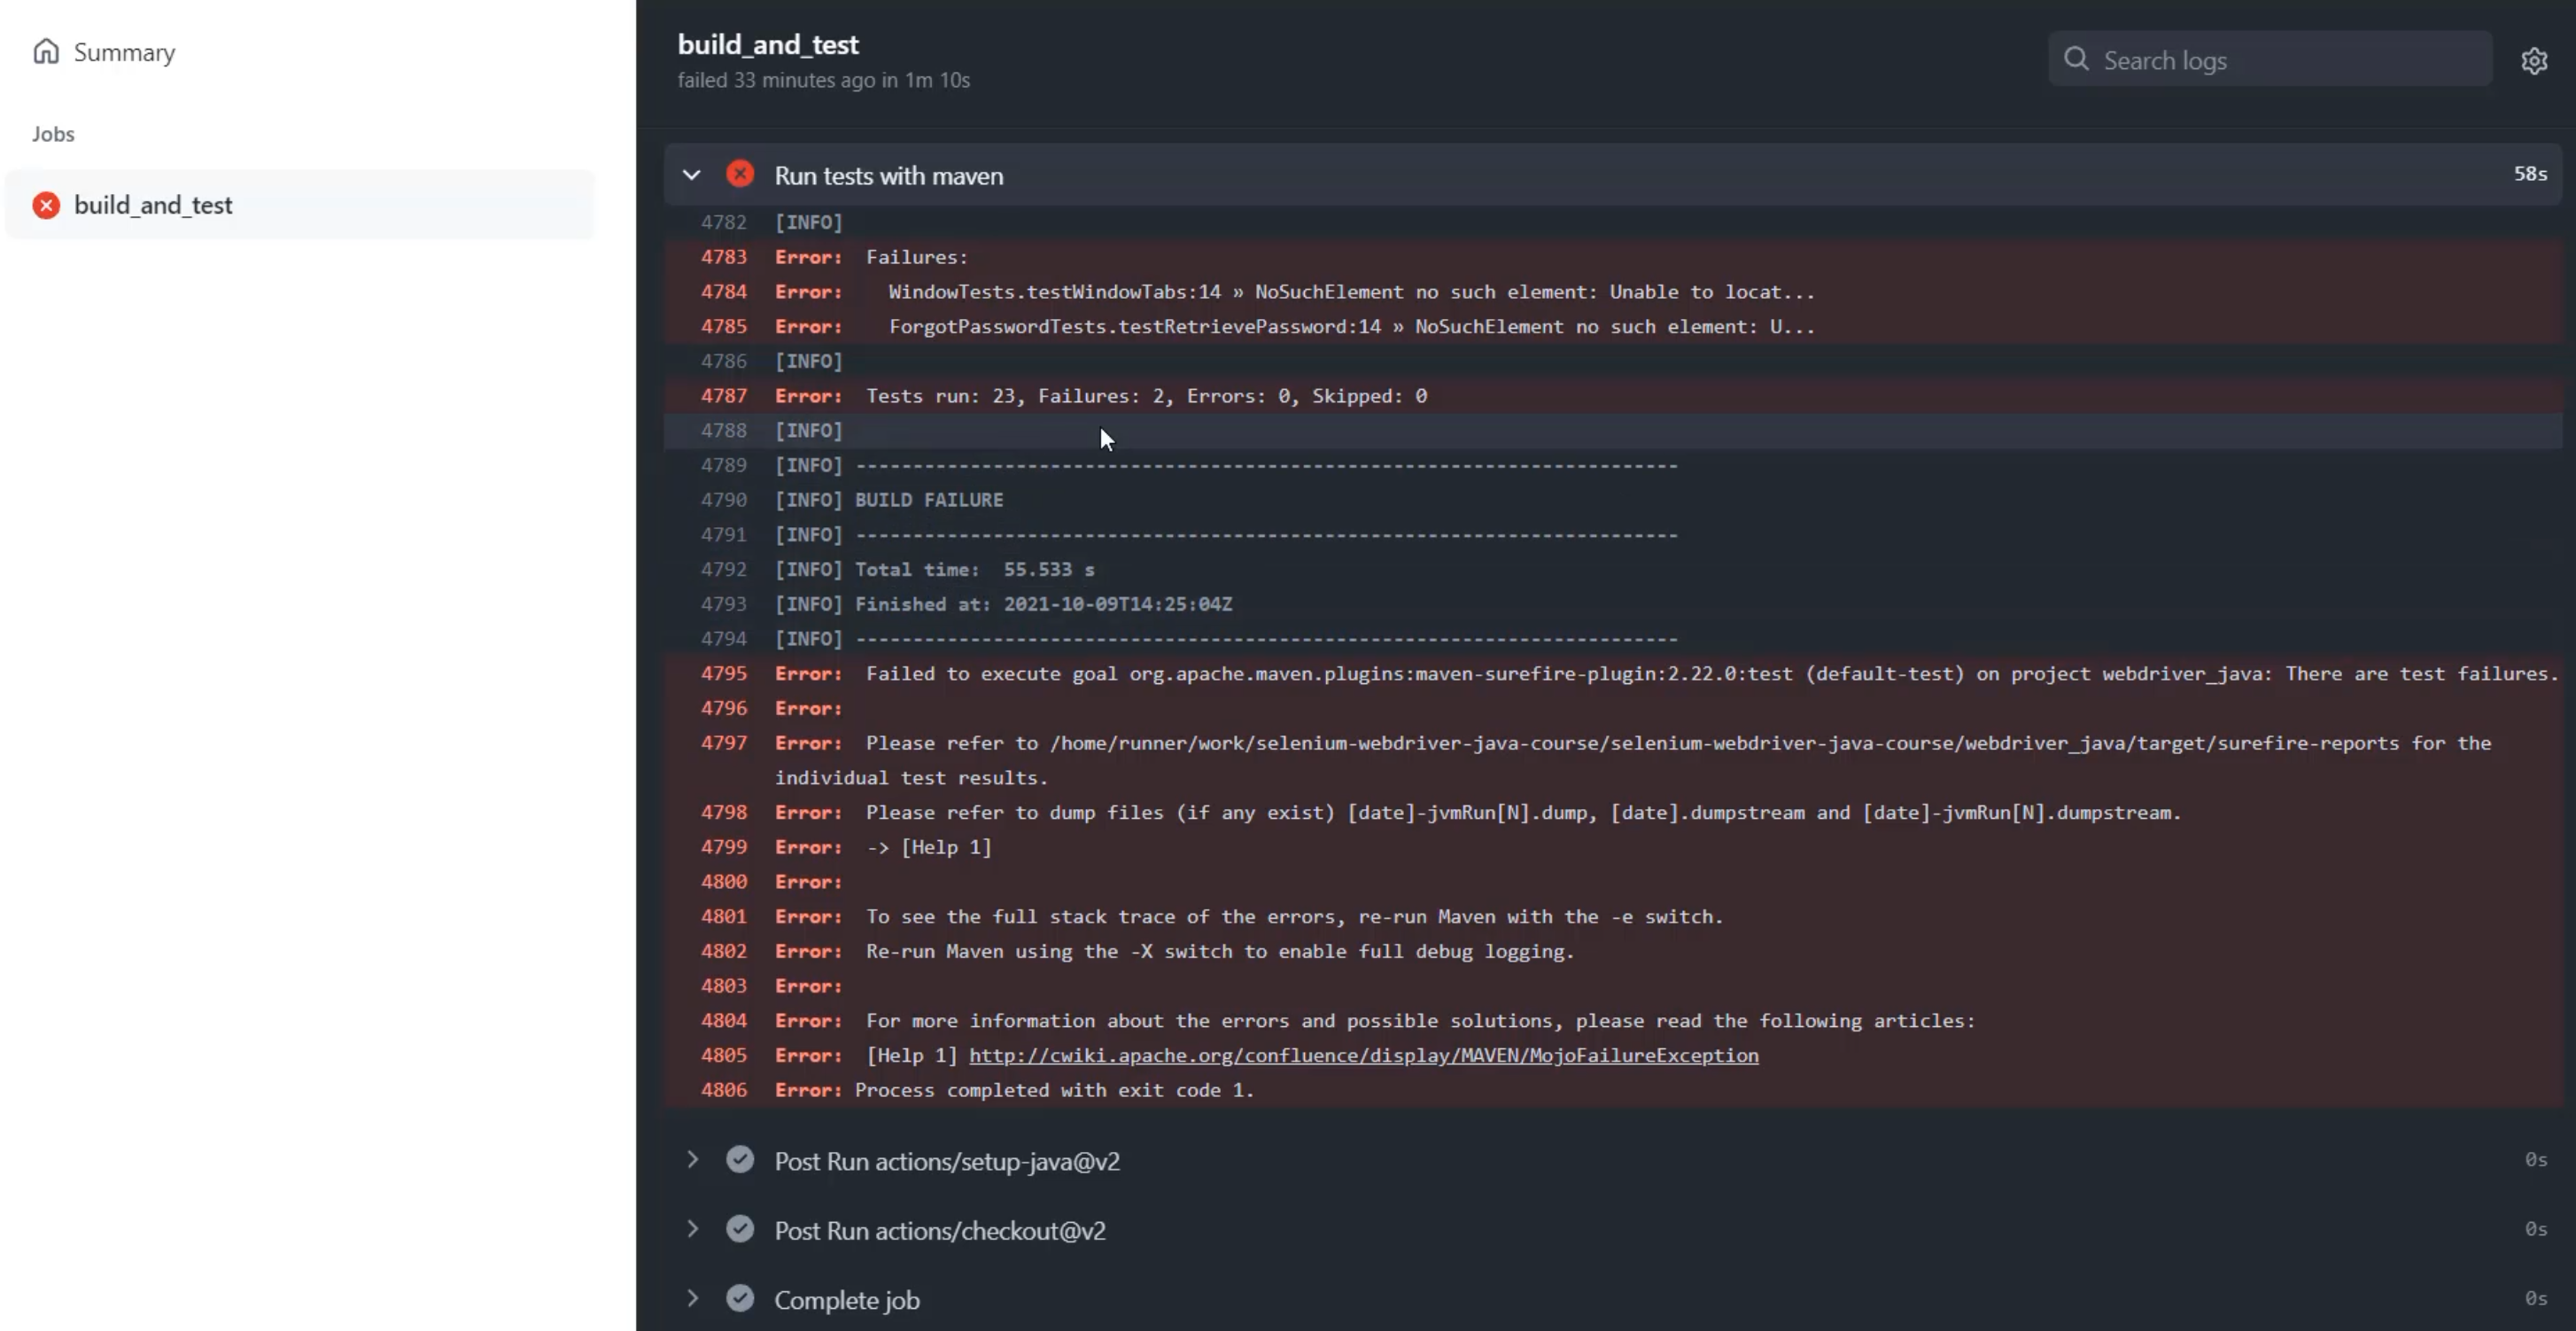
Scrolling all the way to the bottom, I can see that there were two test failures.
One of which is the test that we know has been failing locally, which is this "ForgotPassword" test, and there was another test failure, which is this "WindowTests" failure.
This proves to me that the ChromeDriver successfully was able to run our Maven test in the remote server, which is fantastic.
But yet, I still have some work to do as a test automation specialist with making sure I get this test consistent and passing, and we don't have those failures, like the "WindowTests".
This is when having some observability into the system could help me with my job.
Continue on with the course to learn more about what types of observability we can extract and how to get those into a more usable format.
