

Transcripted Summary
As promised, the remainder of our course will be about creating your own personal playground.
With this playground, you will be able to gain experience with both monitoring and observability.
To do this, we want to create an isolated and secure environment, yet we need to replicate the remote characteristics of where using these tools and techniques are most useful.
To do this, we will be using a continuous integration pipeline as our "subject under test", or if you prefer, our "subject under observation".
We will be using a continuous integration suite, or CI suite, for a few reasons.
# Using a Continuous Integration Suite
First of all, this is something which you, as a test automator, may have experience working with and investigating.
In addition, it's a part of our system that is often overlooked or under-invested in, yet it can benefit just as much as a web app from understanding its behavior and identifying areas for improvement.
Finally, we are choosing to focus on a CI pipeline because it is often an area organizations and teams are happy to let people work on and improve, with a lower barrier to entry.
These reasons combine to say that a continuous integration pipeline is not only a reasonable target, it is also one that you may find useful to apply to your organizations sooner rather than later.
This chapter will not be focusing on any observability specific topics, but instead, we're going to take a slight detour to discuss what makes a test suite CI ready, and make sure that we all have one ready to go for the remaining chapters.
# What is Continuous Integration?
Continuous integration is a term that covers how teammates verify their many changes after the source version control software has merged their changes into one shared codebase.
CI really covers a way of working as well as a technical implementation.
Today, we're going to focus on the technical implementation side, but if you want to learn more about the ways of working, check out some of the links that I've listed below.
For technical implementation, it is about what happens once the codebase is merged together.
The merge itself is handled by a piece of software, like Git or SVN, but these source control languages don't guarantee that the software works correctly after the merge - that is up to our team to test in a CI pipeline.
A pipeline will have many steps, of which some will be run in parallel, while others will have dependencies on earlier steps.
Here's an example of a high-level pipeline, where we run some very fast feedback tests like code linting early on.
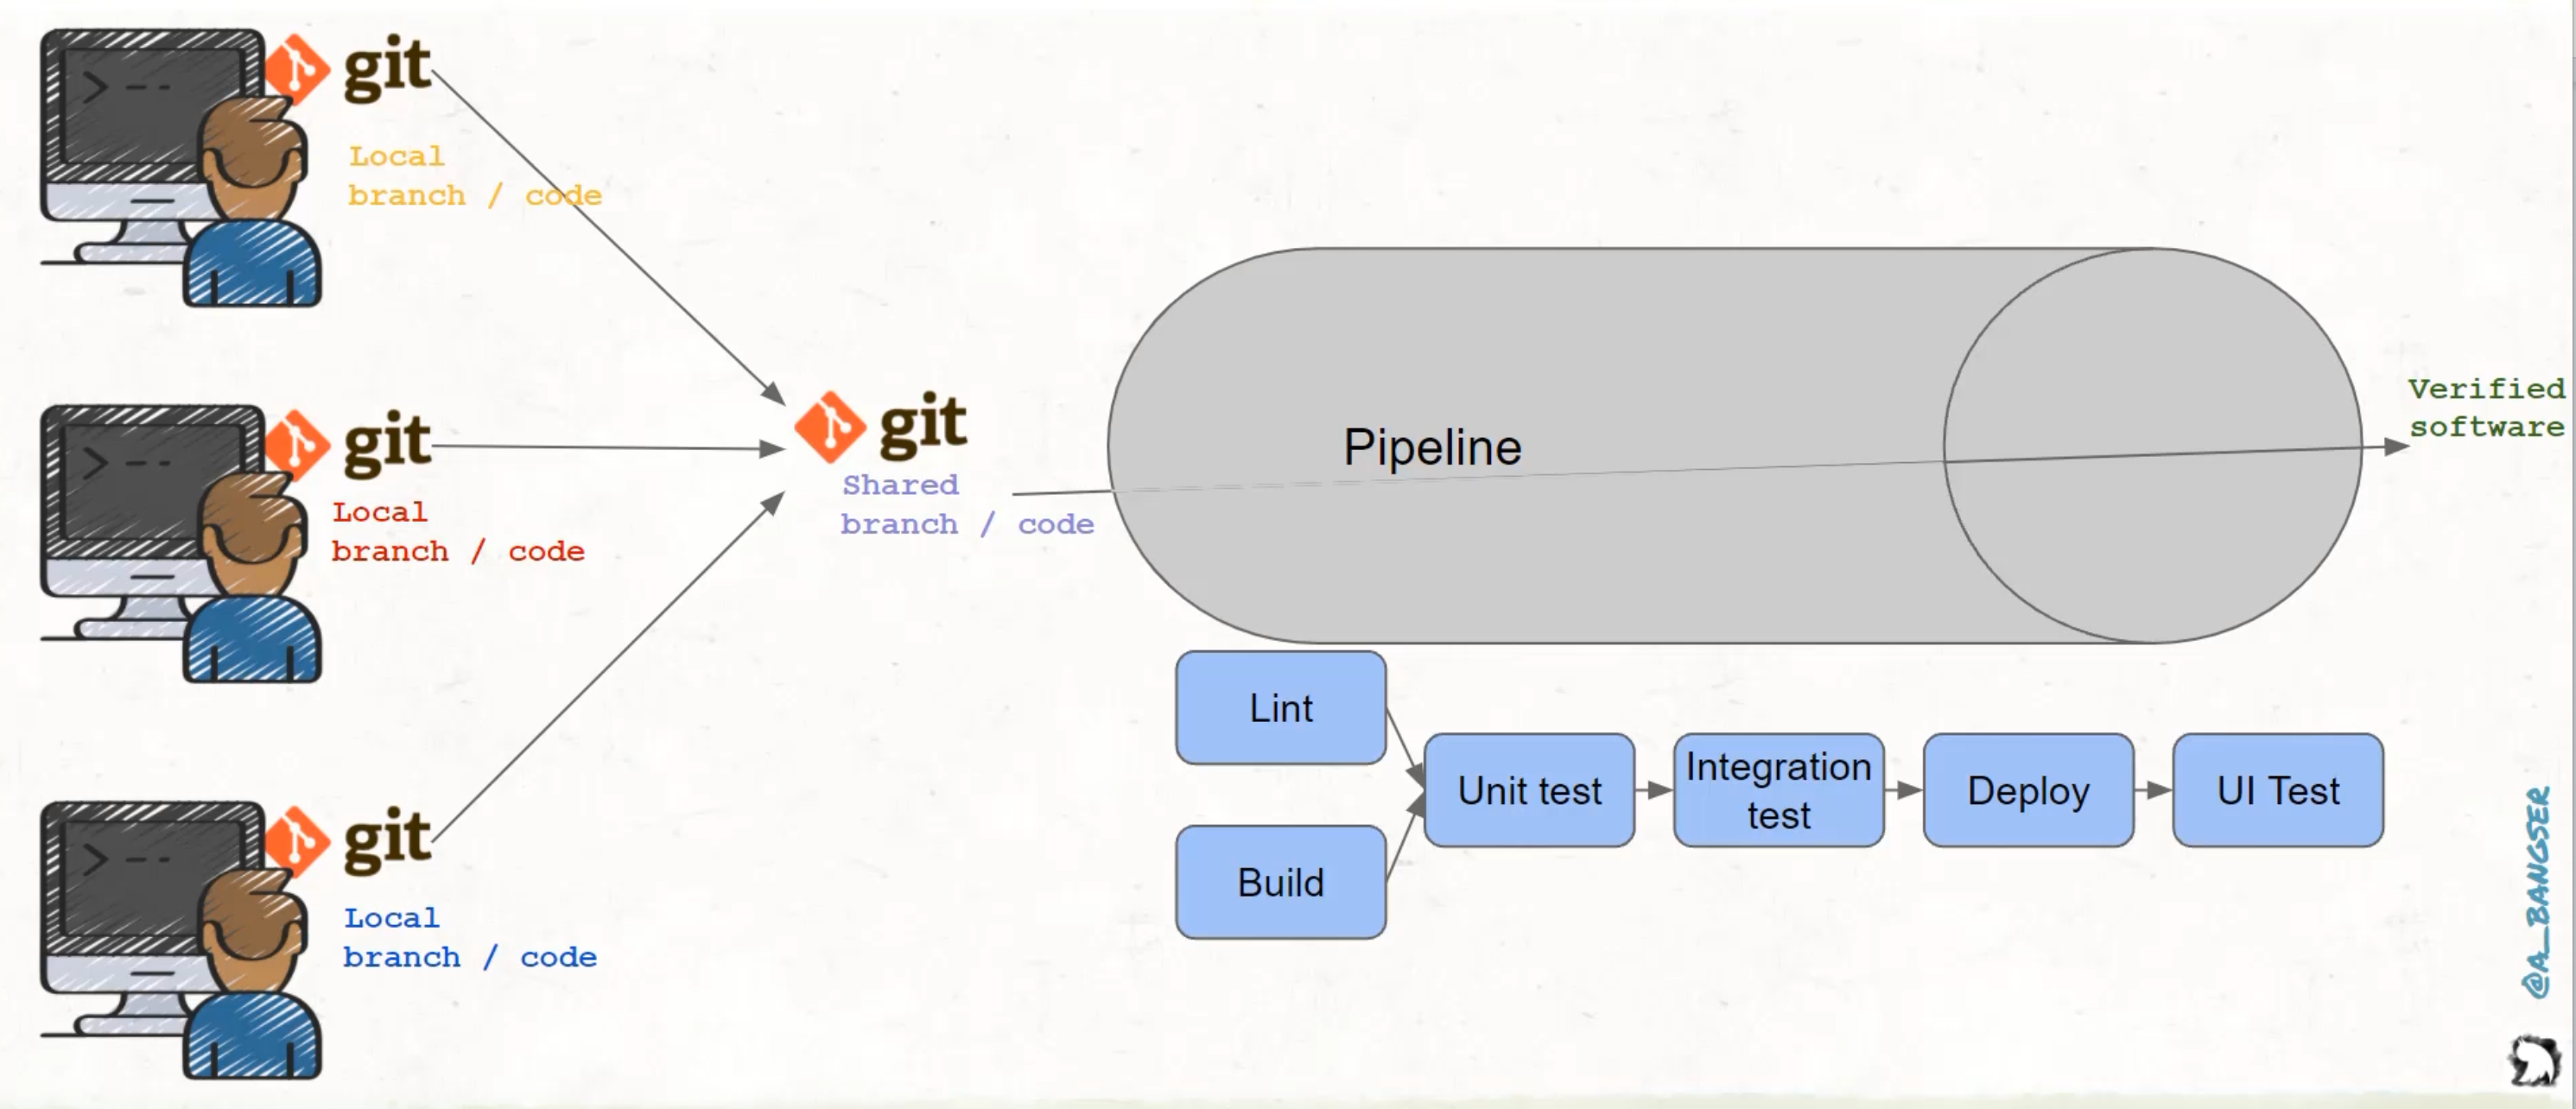
Then, we move on to things like our test suites, and finally onto deploying the code into our environments and running user interface tests.
# Where does CI run?
CI can take on many forms, and can include things like scripts run on your own computer, before you even try to merge it with teammates.
But a key characteristic is that the tests can be run both locally and remotely, so that all teammates can review their changes in the same way, and debug any errors that are occurring in other environments.
Sometimes, as a test automator, I've used Selenium Record and Playback, Postman, and IntelliJ test runners in order to run tests via a piece of software on my own computer.
While these and others have been very convenient, they can be hard to reproduce for other teammates.
And due to things like licensing or configuration that can be tweaked per computer, you can end up in a situation where teammates are getting different results, or not able to run the test at all.
While it has been okay to use these, we must as a team prioritize tests that can be run on all machines and in our remote repository, or else we risk drift.
What this means is that we must prioritize tests that can be run by the command line and handle all dependencies and set up, with the configuration stored in code.
Therefore, we can run these via the tools listed here, like Jenkins, Circle CI, GitLab, or GitHub Actions, which is what we'll be using throughout the rest of this course.
With that in mind, let's get into the code.
We are not here to learn to write the test, so we will be building off of the fantastic test suite created in the Test Automation University Selenium for Java course by Angie Jones.
This is a set of Selenium tests written in Java, compiled in Maven, and we will be using IntelliJ as an IDE to work with them.
I encourage you to follow along as we go, and by using similar tools, you may find it easier to follow along.
But, of course you are welcome to use any codebase or any tooling that you're comfortable with, because these principles and tools are available in all popular languages.
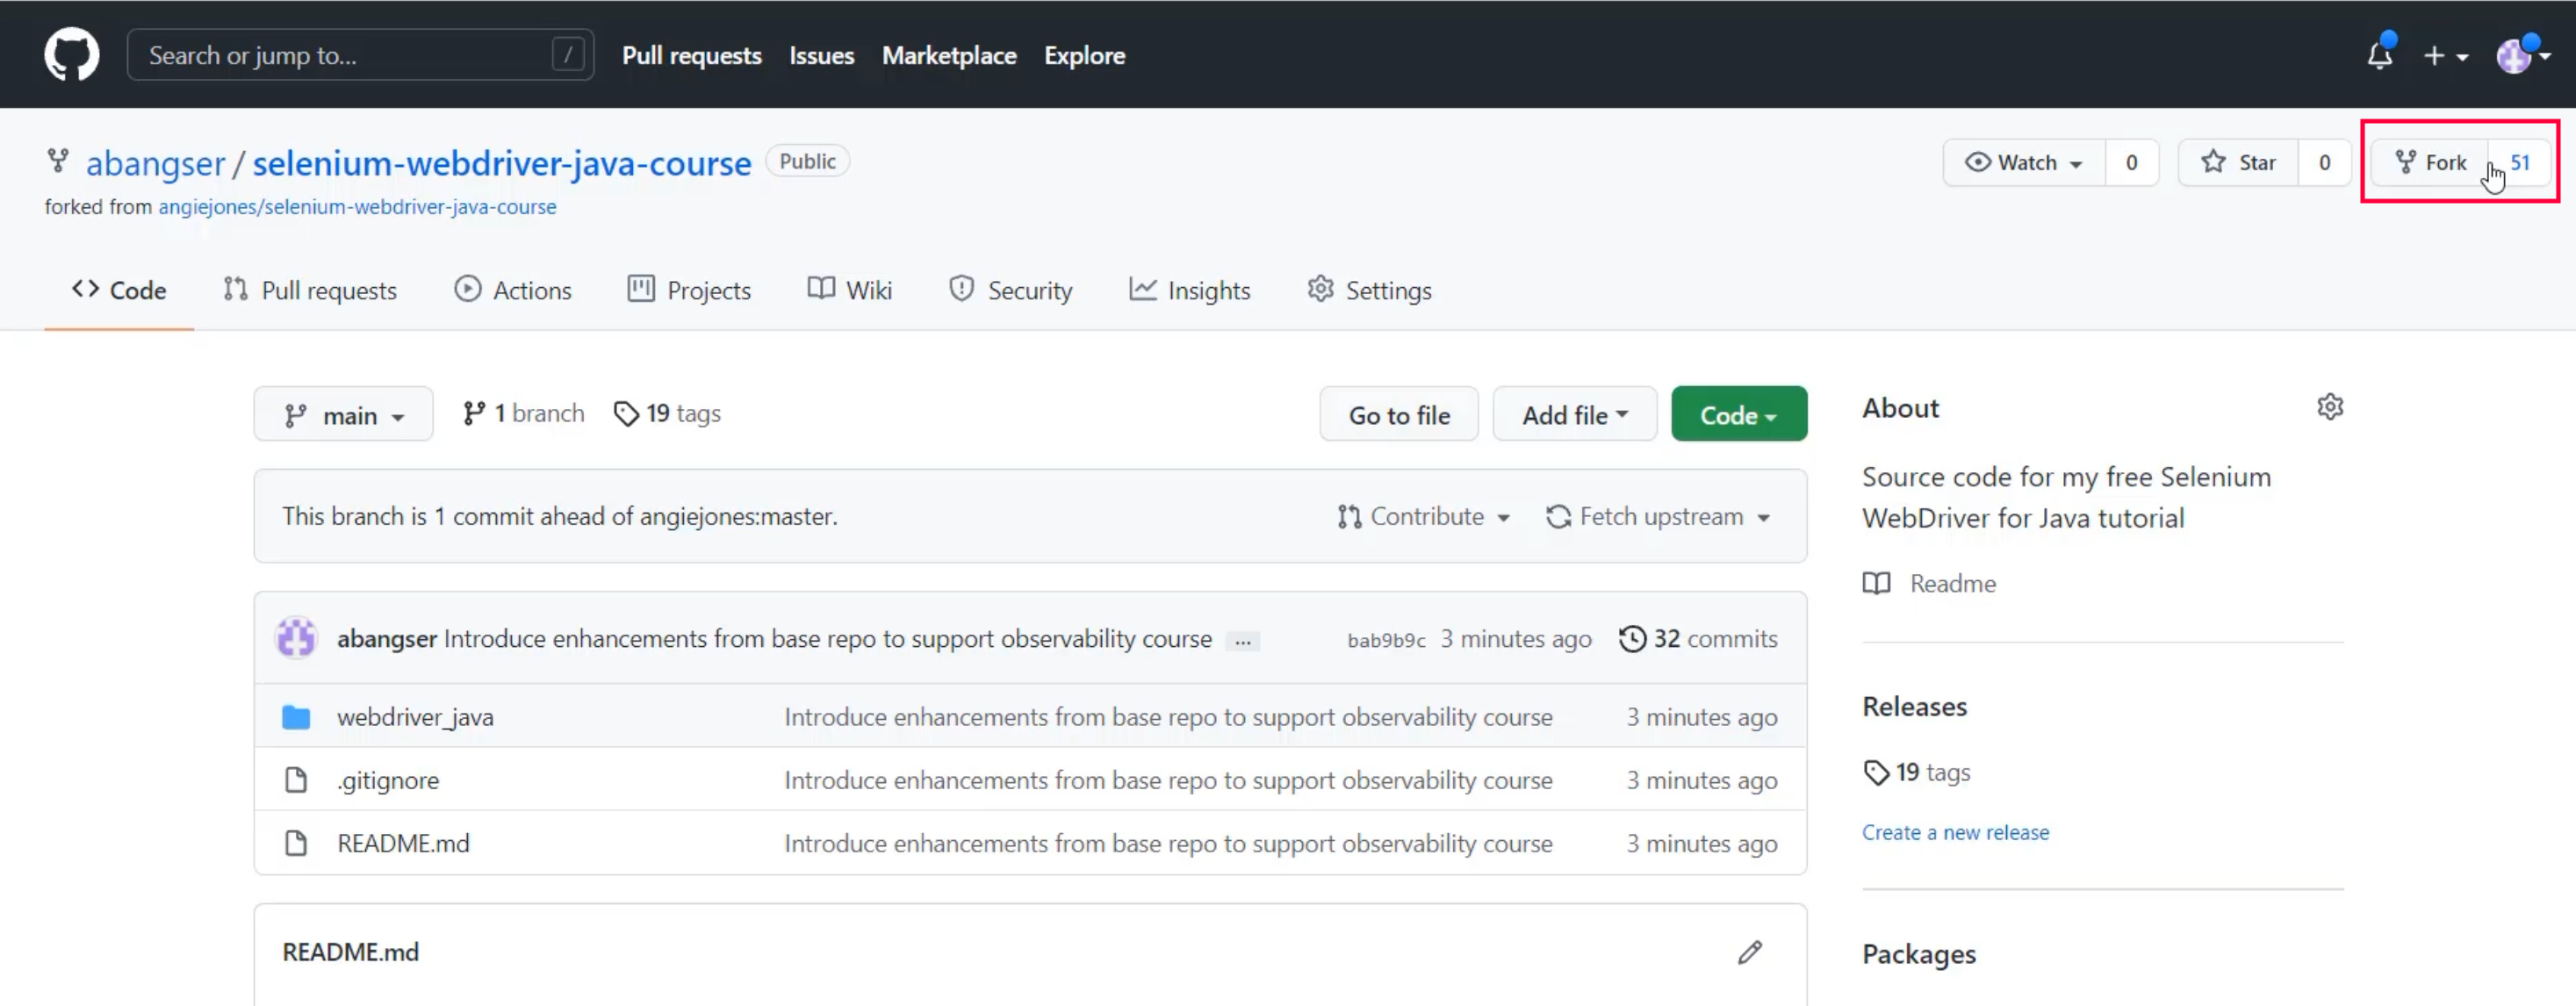
To get started, you will need to fork the course code base from abangser/selenium-webdriver-java-course.
You will see that this is, in itself, a fork from Angie Jones' selenium-webdriver-java-course.
That is because forking allows us to create a totally independent code base, while still maintaining a reference back to the original.
This lets us make changes, push new commits, and even create our own continuous integration pipelines without creating any changes on the main course repository.
To do this, you'll click the button in the top right corner and follow the instructions from GitHub.
Since we are building off of the Angie Jones course, I would suggest that to get the codebase working and the test running, you should follow along with her Setup chapter, which I have linked down below.
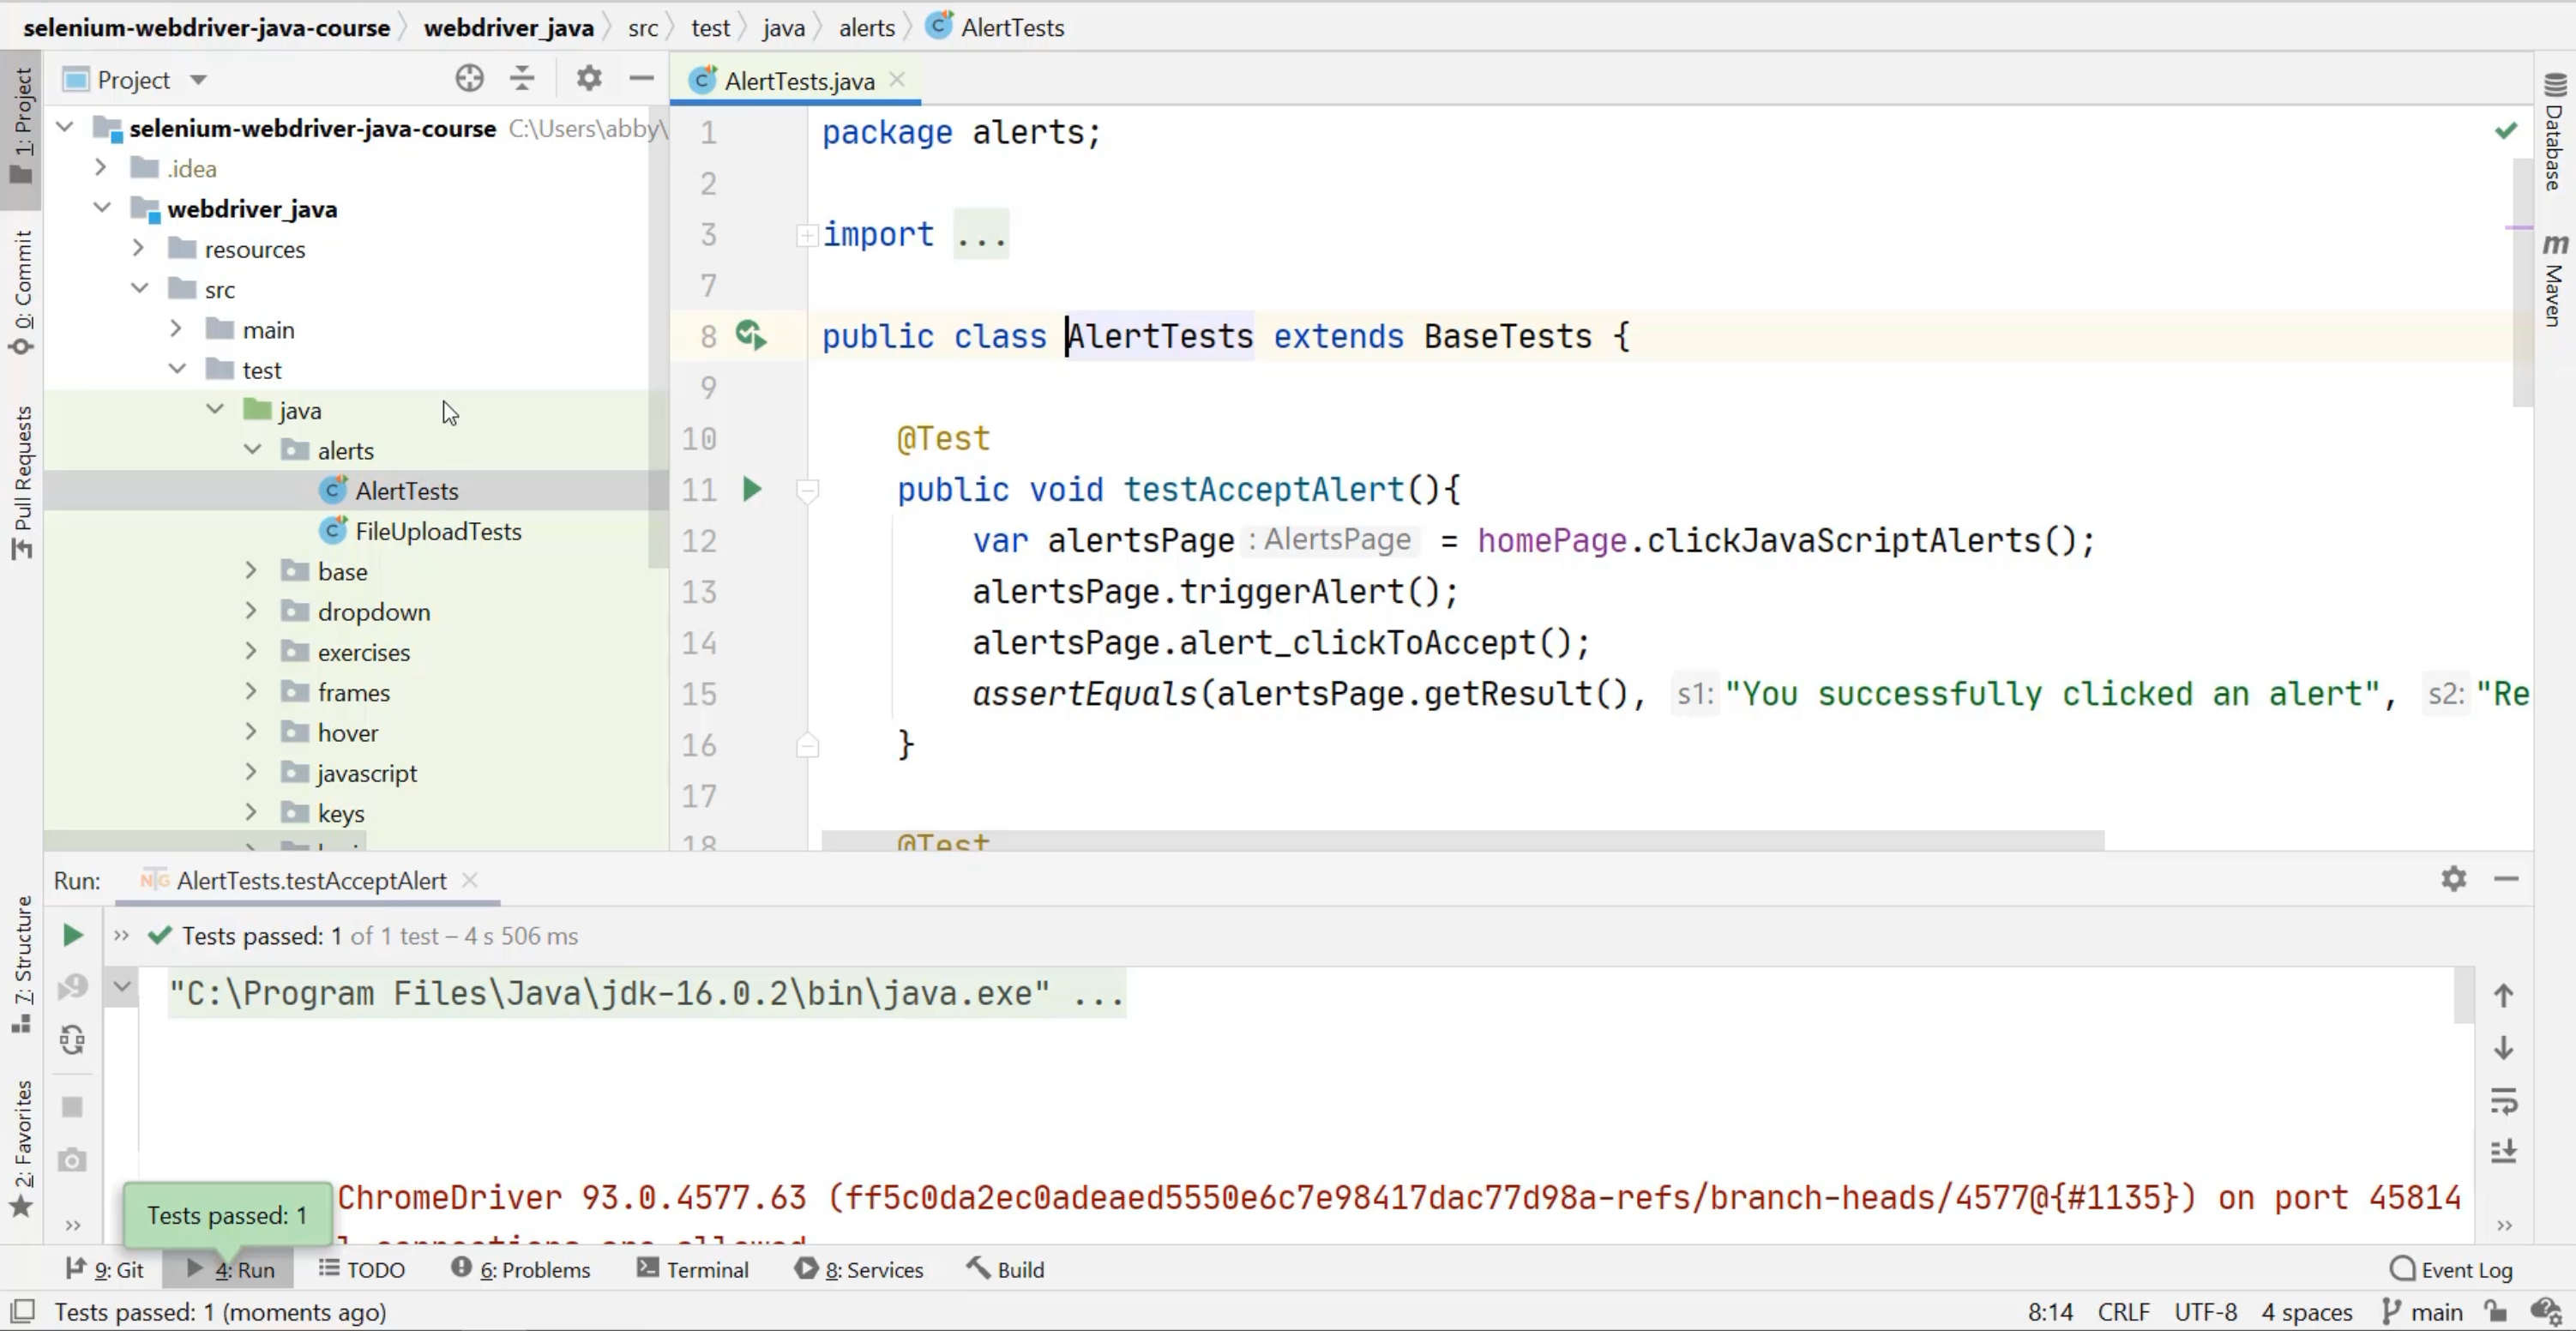
Here I am with my codebase all set up in IntelliJ.
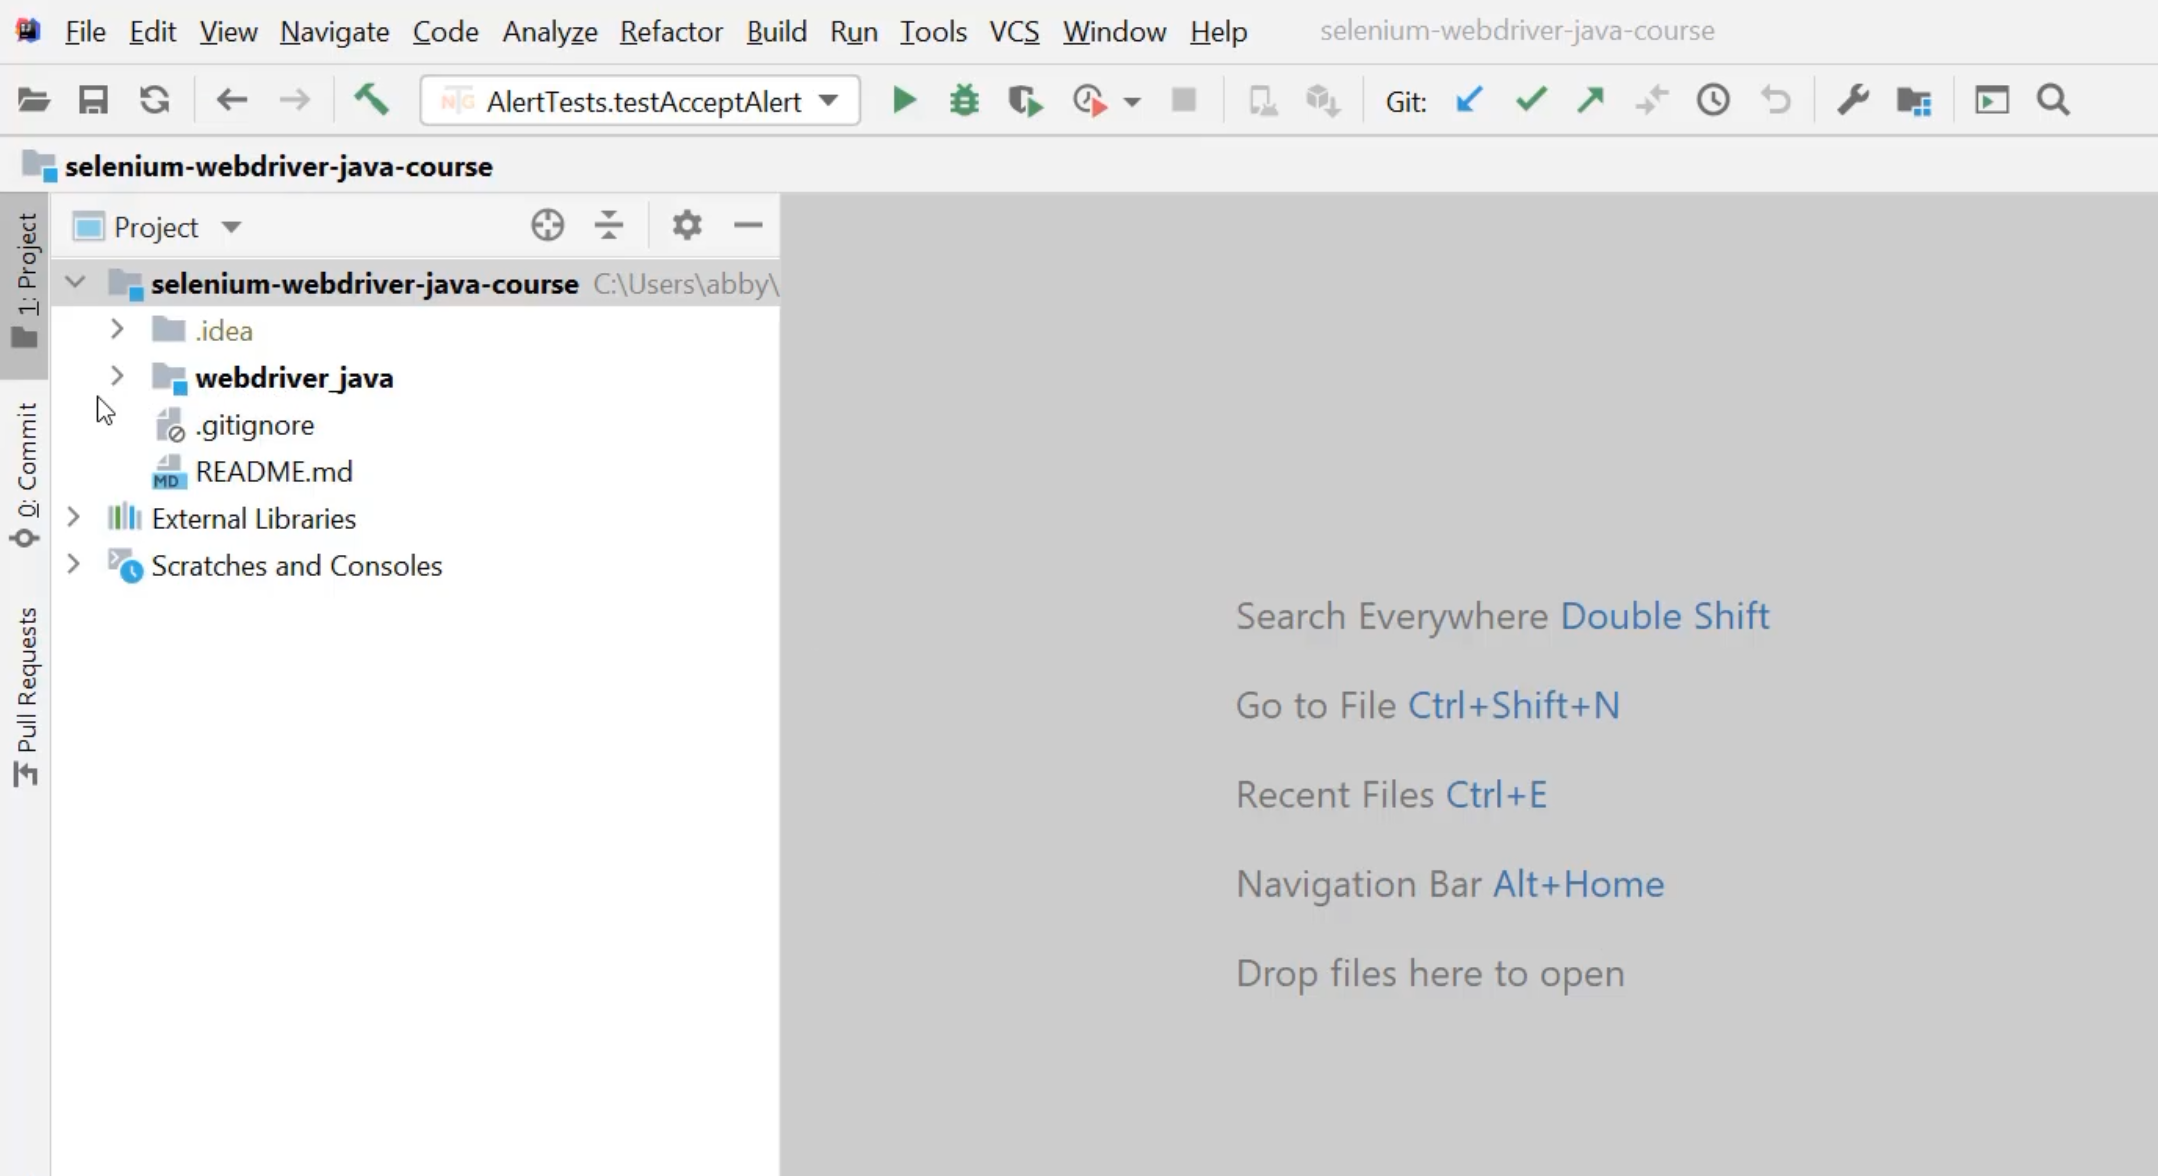
You can see that I have the webdriver_java application and underneath src, I have a set of tests that I can run.
If I open up any of these folders - for example, the alerts folder, I can go into a specific test and IntelliJ provides me the opportunity to run that test by running the green play button.
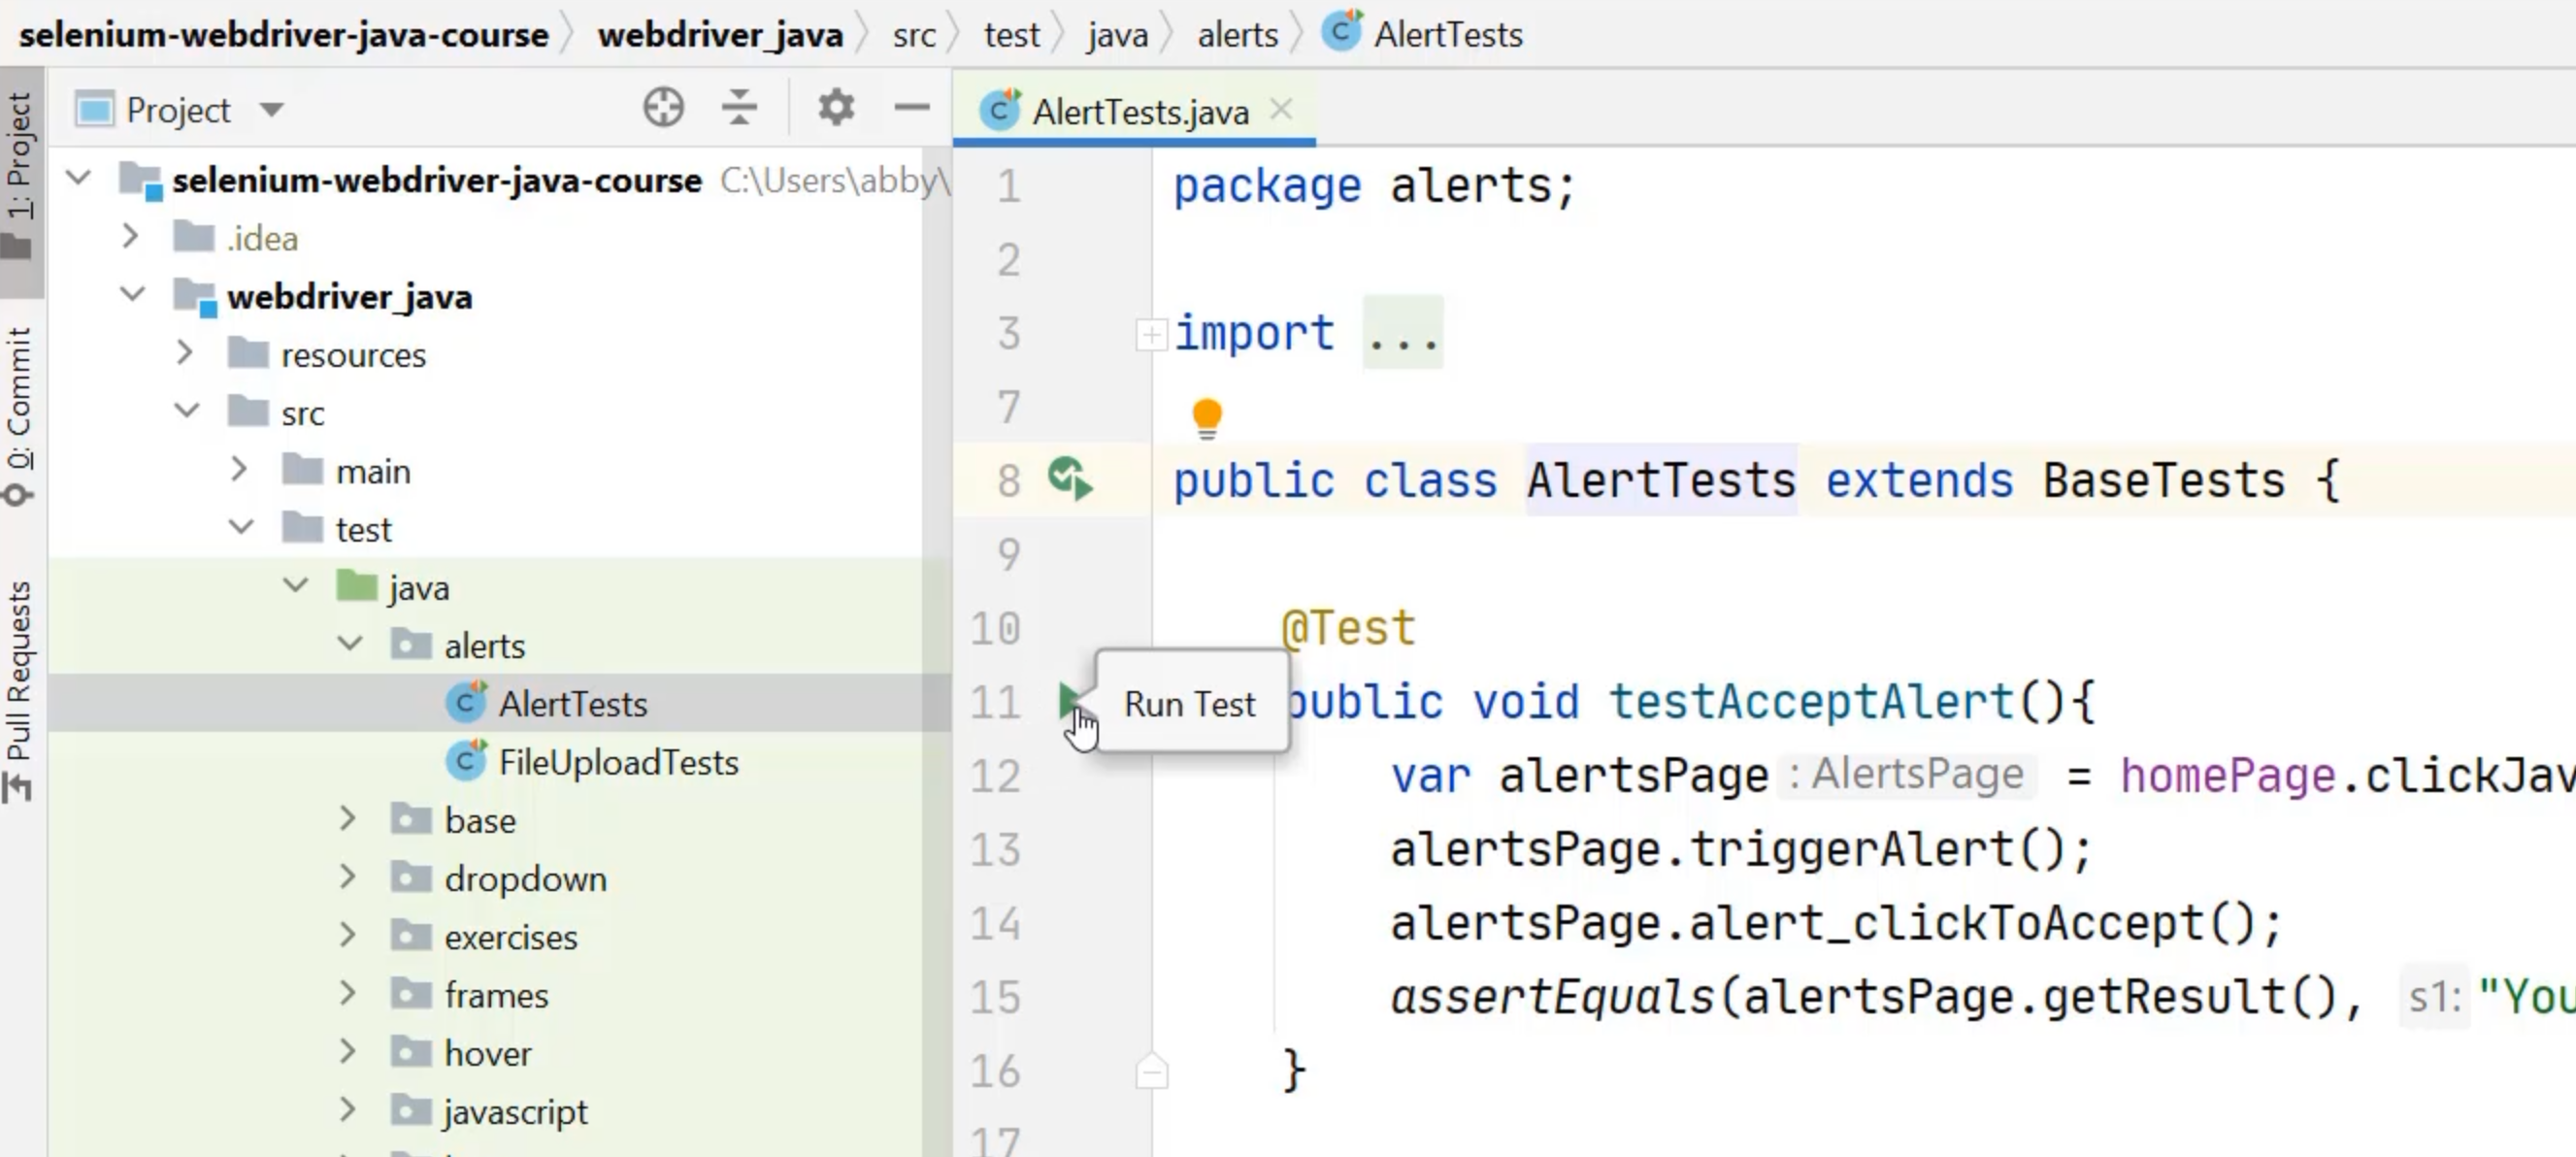
If I do that, I will be able to confirm that my codebase is set up correctly by seeing that the test runs, it opens up a web browser, and then it passes.
We are now ready to start enhancing this codebase by introducing a CI-friendly way to run these tests.
As you can see here in the codebase, we have a pom.xml file - this was discussed in the setup chapter as well.
This is how we will configure our build and test strategy.
Maven actually expects these capabilities.
If you go to the right hand side to the Maven tab and you click on it, you can open up your webdriver_java Maven project, and you can see that there are a number of lifecycle items built into Maven.
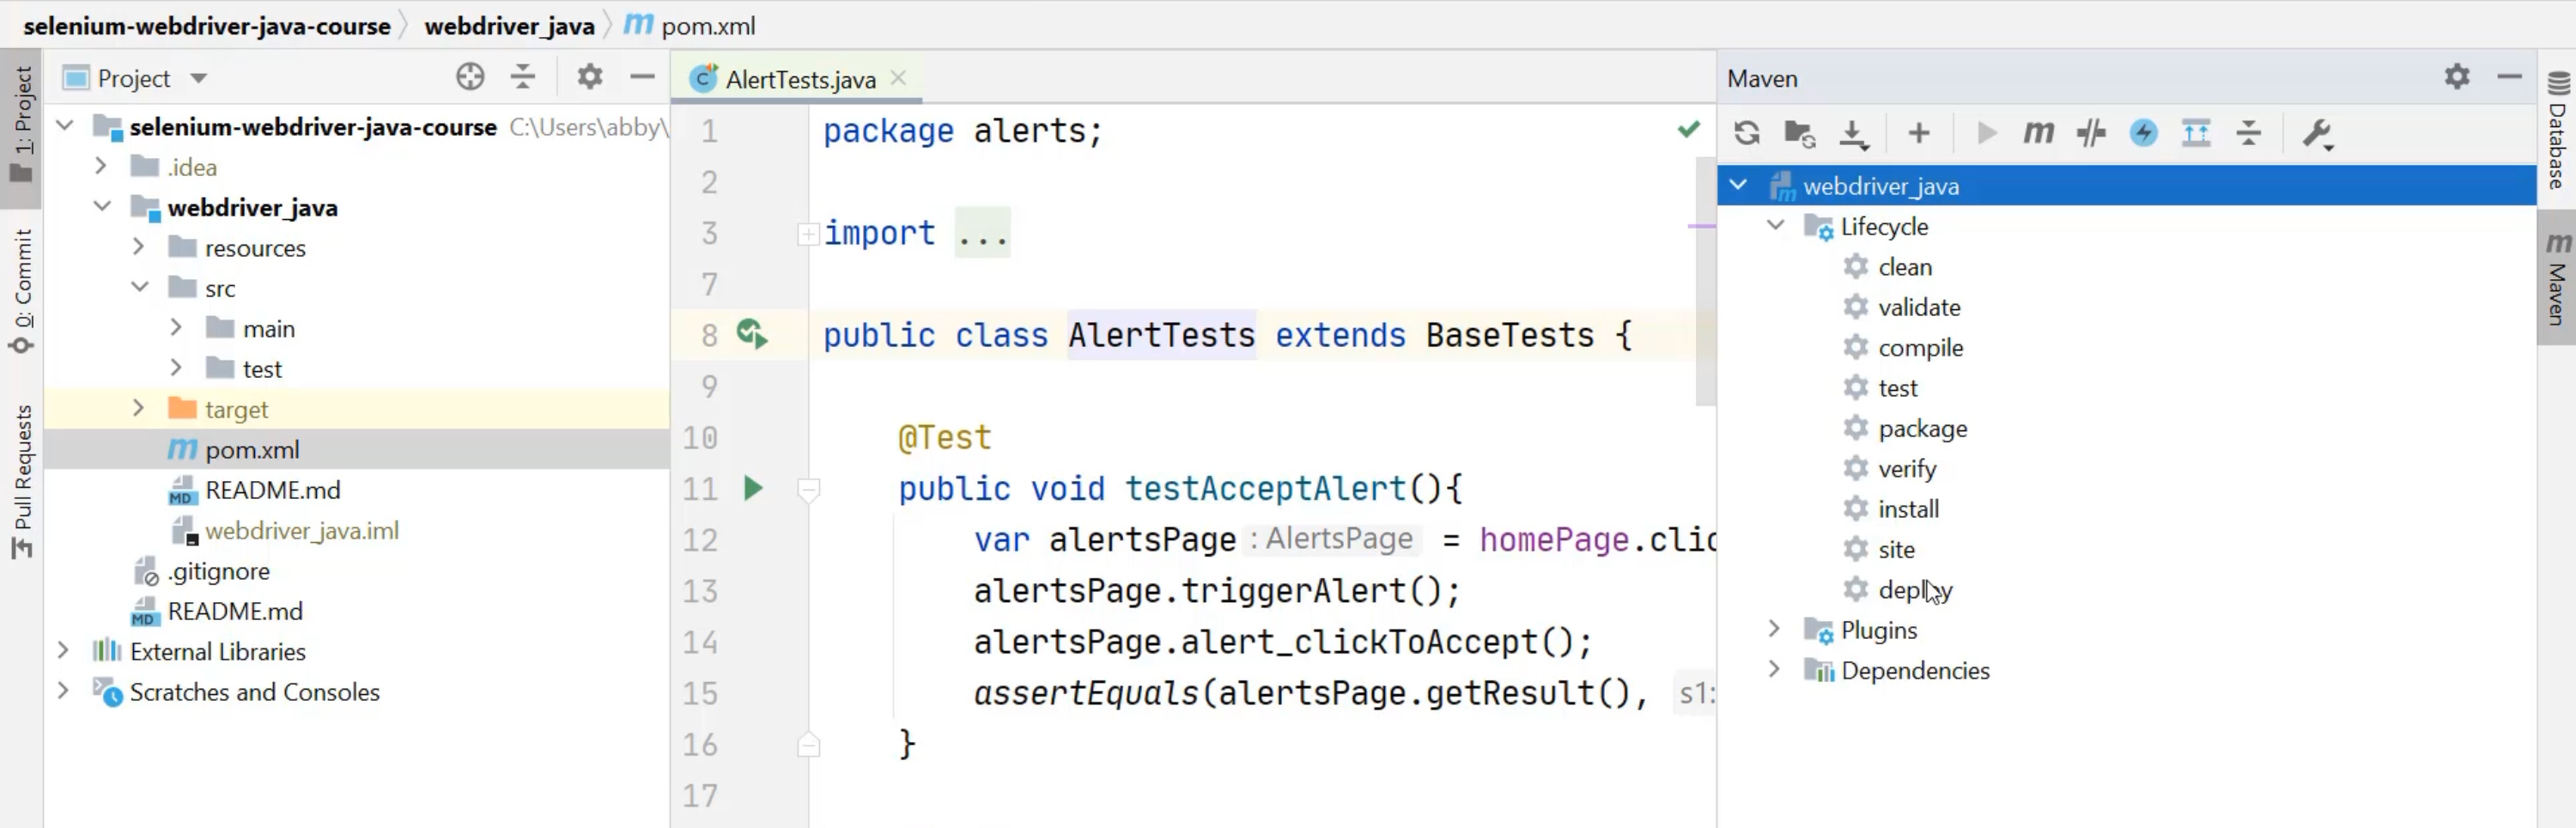
One of them is even called test.
So if we run this test lifecycle via Maven using the green play button, we will see that it starts to try and run the test, but it fails.

If I scroll over to the right, I can see that it specifically says that it fails to compile.
So, I can try and run the compile step first.
This succeeds, and I can move on to run the test.
This now fails slightly differently.
Specifically, it talks about, "Test compile failing."
With "Test compile failing", we now need to introduce a new item to the Maven configuration.
If I open up the pom.xml file, I can see that we speak about things like our dependencies here, but we never define what compilation or testing looks like in our directory.
To do that, we need to introduce a new section under the project.
Under dependencies, I'm going to introduce a section called build.
Under build, I can configure a number of plugins, which configure those different lifecycle tasks.
I'm going to introduce plugins, and one specific plugin at a time, and that plugin is going to be the compilation plugin, which has a groupId of org.apache.maven.plugins.
It automatically adds a few things for me here, but I want to update some of this.
I want to use the maven-compiler-plugin instead of the maven-jar-plugin, and I want to be using version 3.8.0 of that.
I want to make sure it uses the right version of Java, so I'm going to configure a release version here and the release version that I'm using is 16, which you can see above with my target property.
Now, when I go back to Maven and I run test, I've actually been able to successfully build my tests, but I have not been able to actually run those tests.
So the next step is we need to add a configuration for what to do during the testing phase.
This is done by adding another plugin, so we'll add that to the list here as another plugin.
This plugin is going to be from the same groupId, so this is also org.apache.maven.plugins.
Again, we need to replace the default artifactId - this time with the maven-surefire-plugin.
That makes us need to update the version, and the version of Surefire will be 2.22.0.
By introducing this plugin, Maven knows that we would like to run the tests that are in our test folder.
So once again, I come to the Maven tab and press play under tests.
This time, we now know how to compile and Maven also knows how to find the tests that we want to run.
All of a sudden, the browser pops open, and we see all of our tests running through.
This takes a bit of time, so I'm going to fast forward through this for ease of watching.
Great, now the tests have all finished running and we see that we had a failure.

This is a failure indicating that certain tests have failed, not that the whole process has failed.
In order to have a look, it provides you a link to the Surefire reports.
These are located inside the target\surefire-reports directory, and we can open up the TestSuite.txt and have a view.
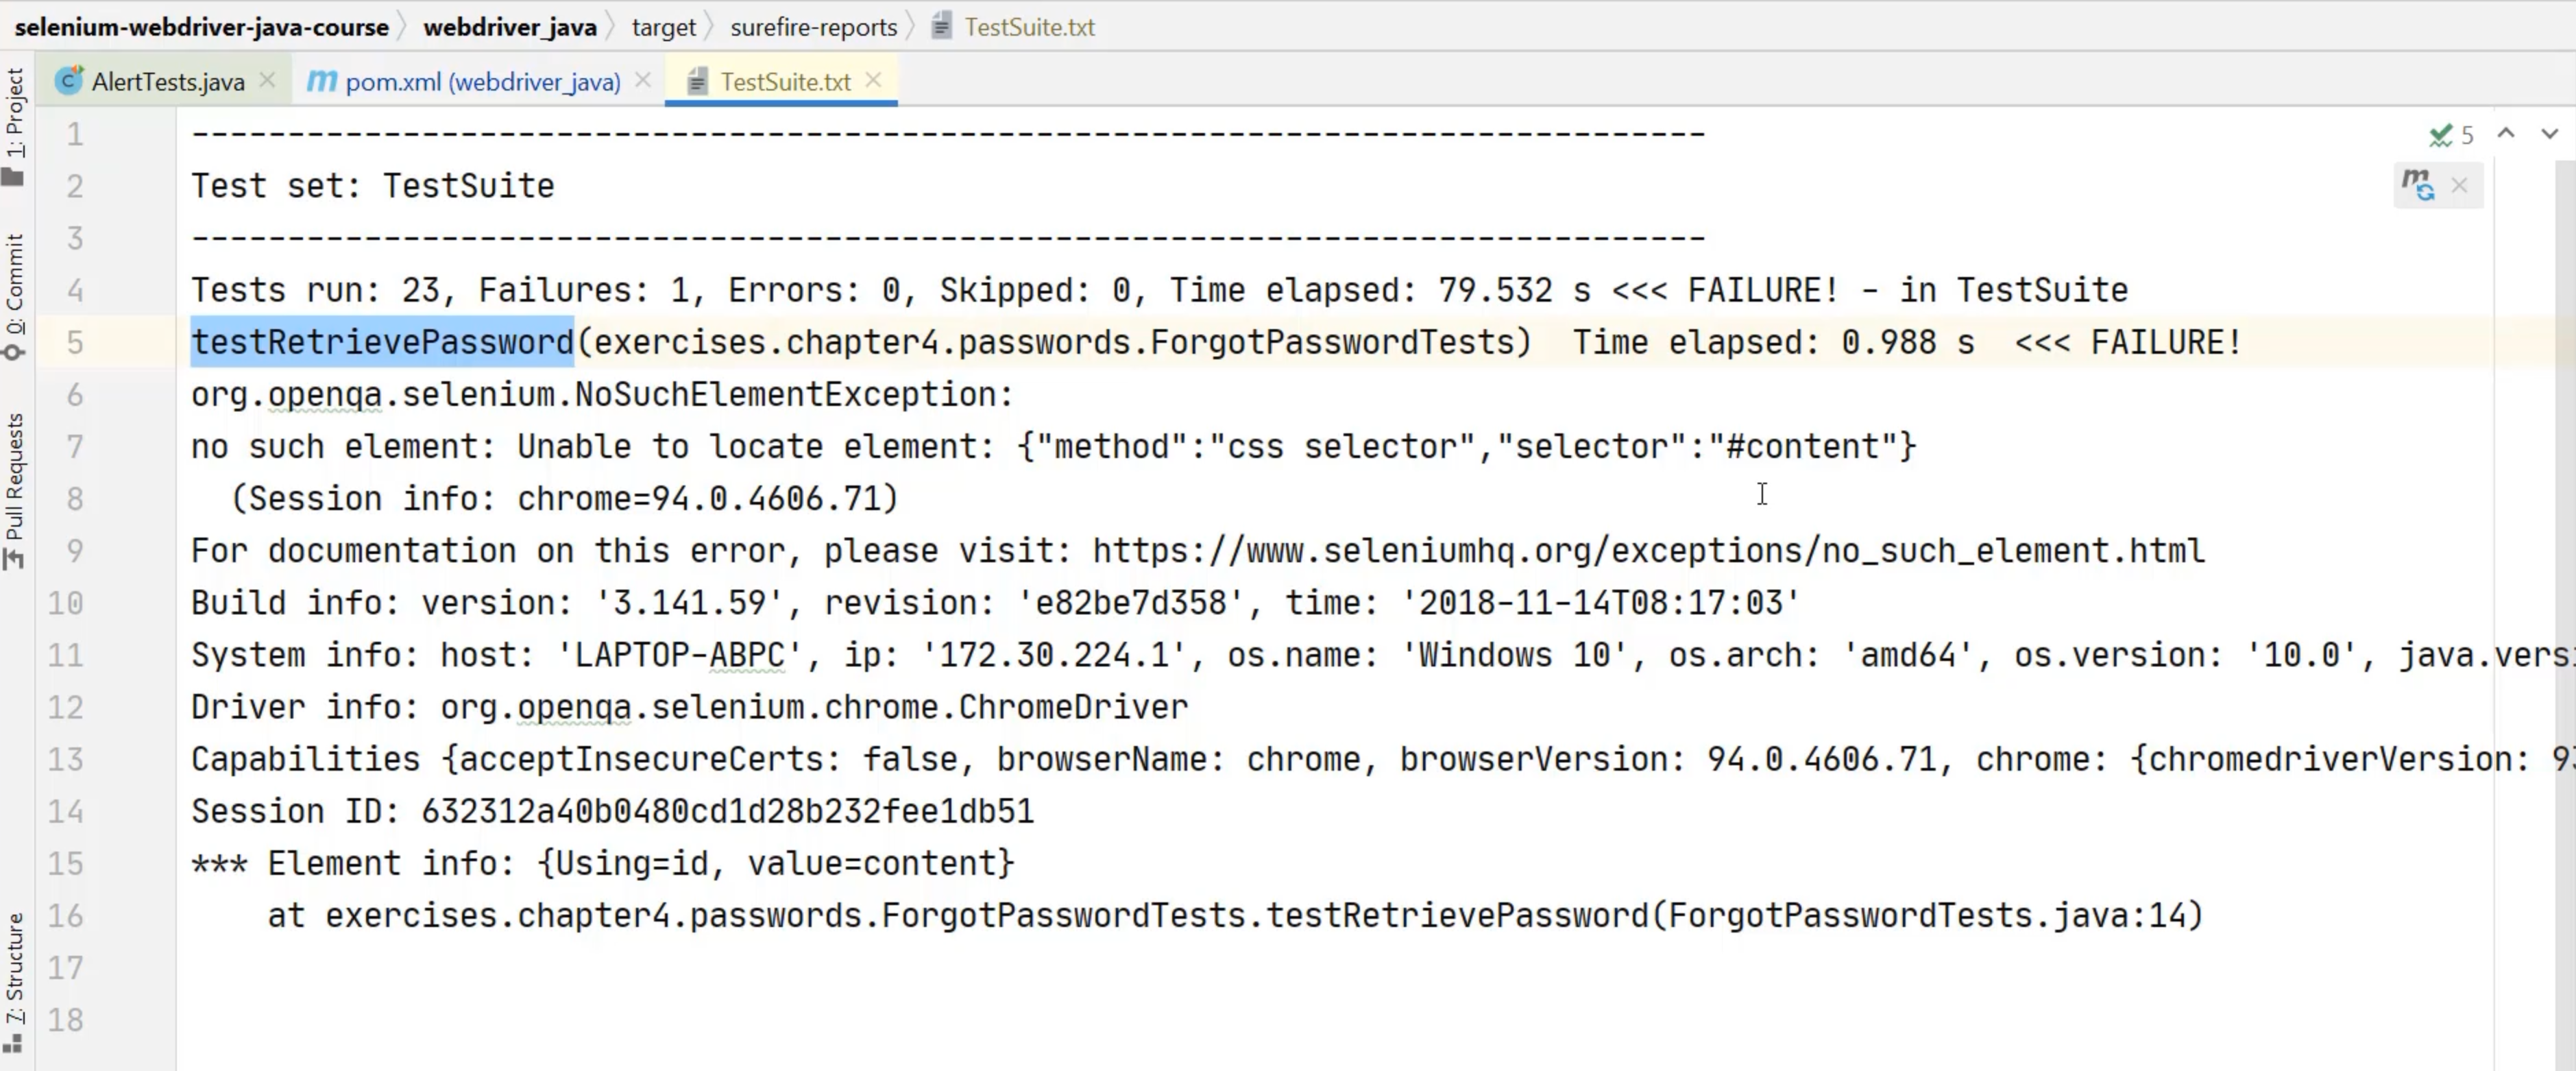
I can see that we had a single failure, and that the testRetrievePassword test failed.
This test is failing due to an issue with the website that we are using for testing, so we're going to allow for this failure, and it will also provide us some interesting data as we continue in our CI pipeline.
At this stage, we have a codebase that we can run tests on locally and via a command line action, which we can run through a remote CI server.
We're going to wrap up here, and we're going to move on to introducing that CI server and having a look at what kind of visibility we want into those tests as its running.
Resources
- Angie Jones course to set up your Java environment
- Course repository to be forked
- Continuous Delivery
