

Transcripted Summary
The first data that we're going to prepare for extraction from the pipeline is the total duration metric.
While nearly every CI server today makes it very clear how long a test suite takes to run, they do not all provide easy ways to explore this data over time or with domain-specific breakdowns, which we can add to our own custom metrics.
There are two common ways to extract this data from a CI pipeline.
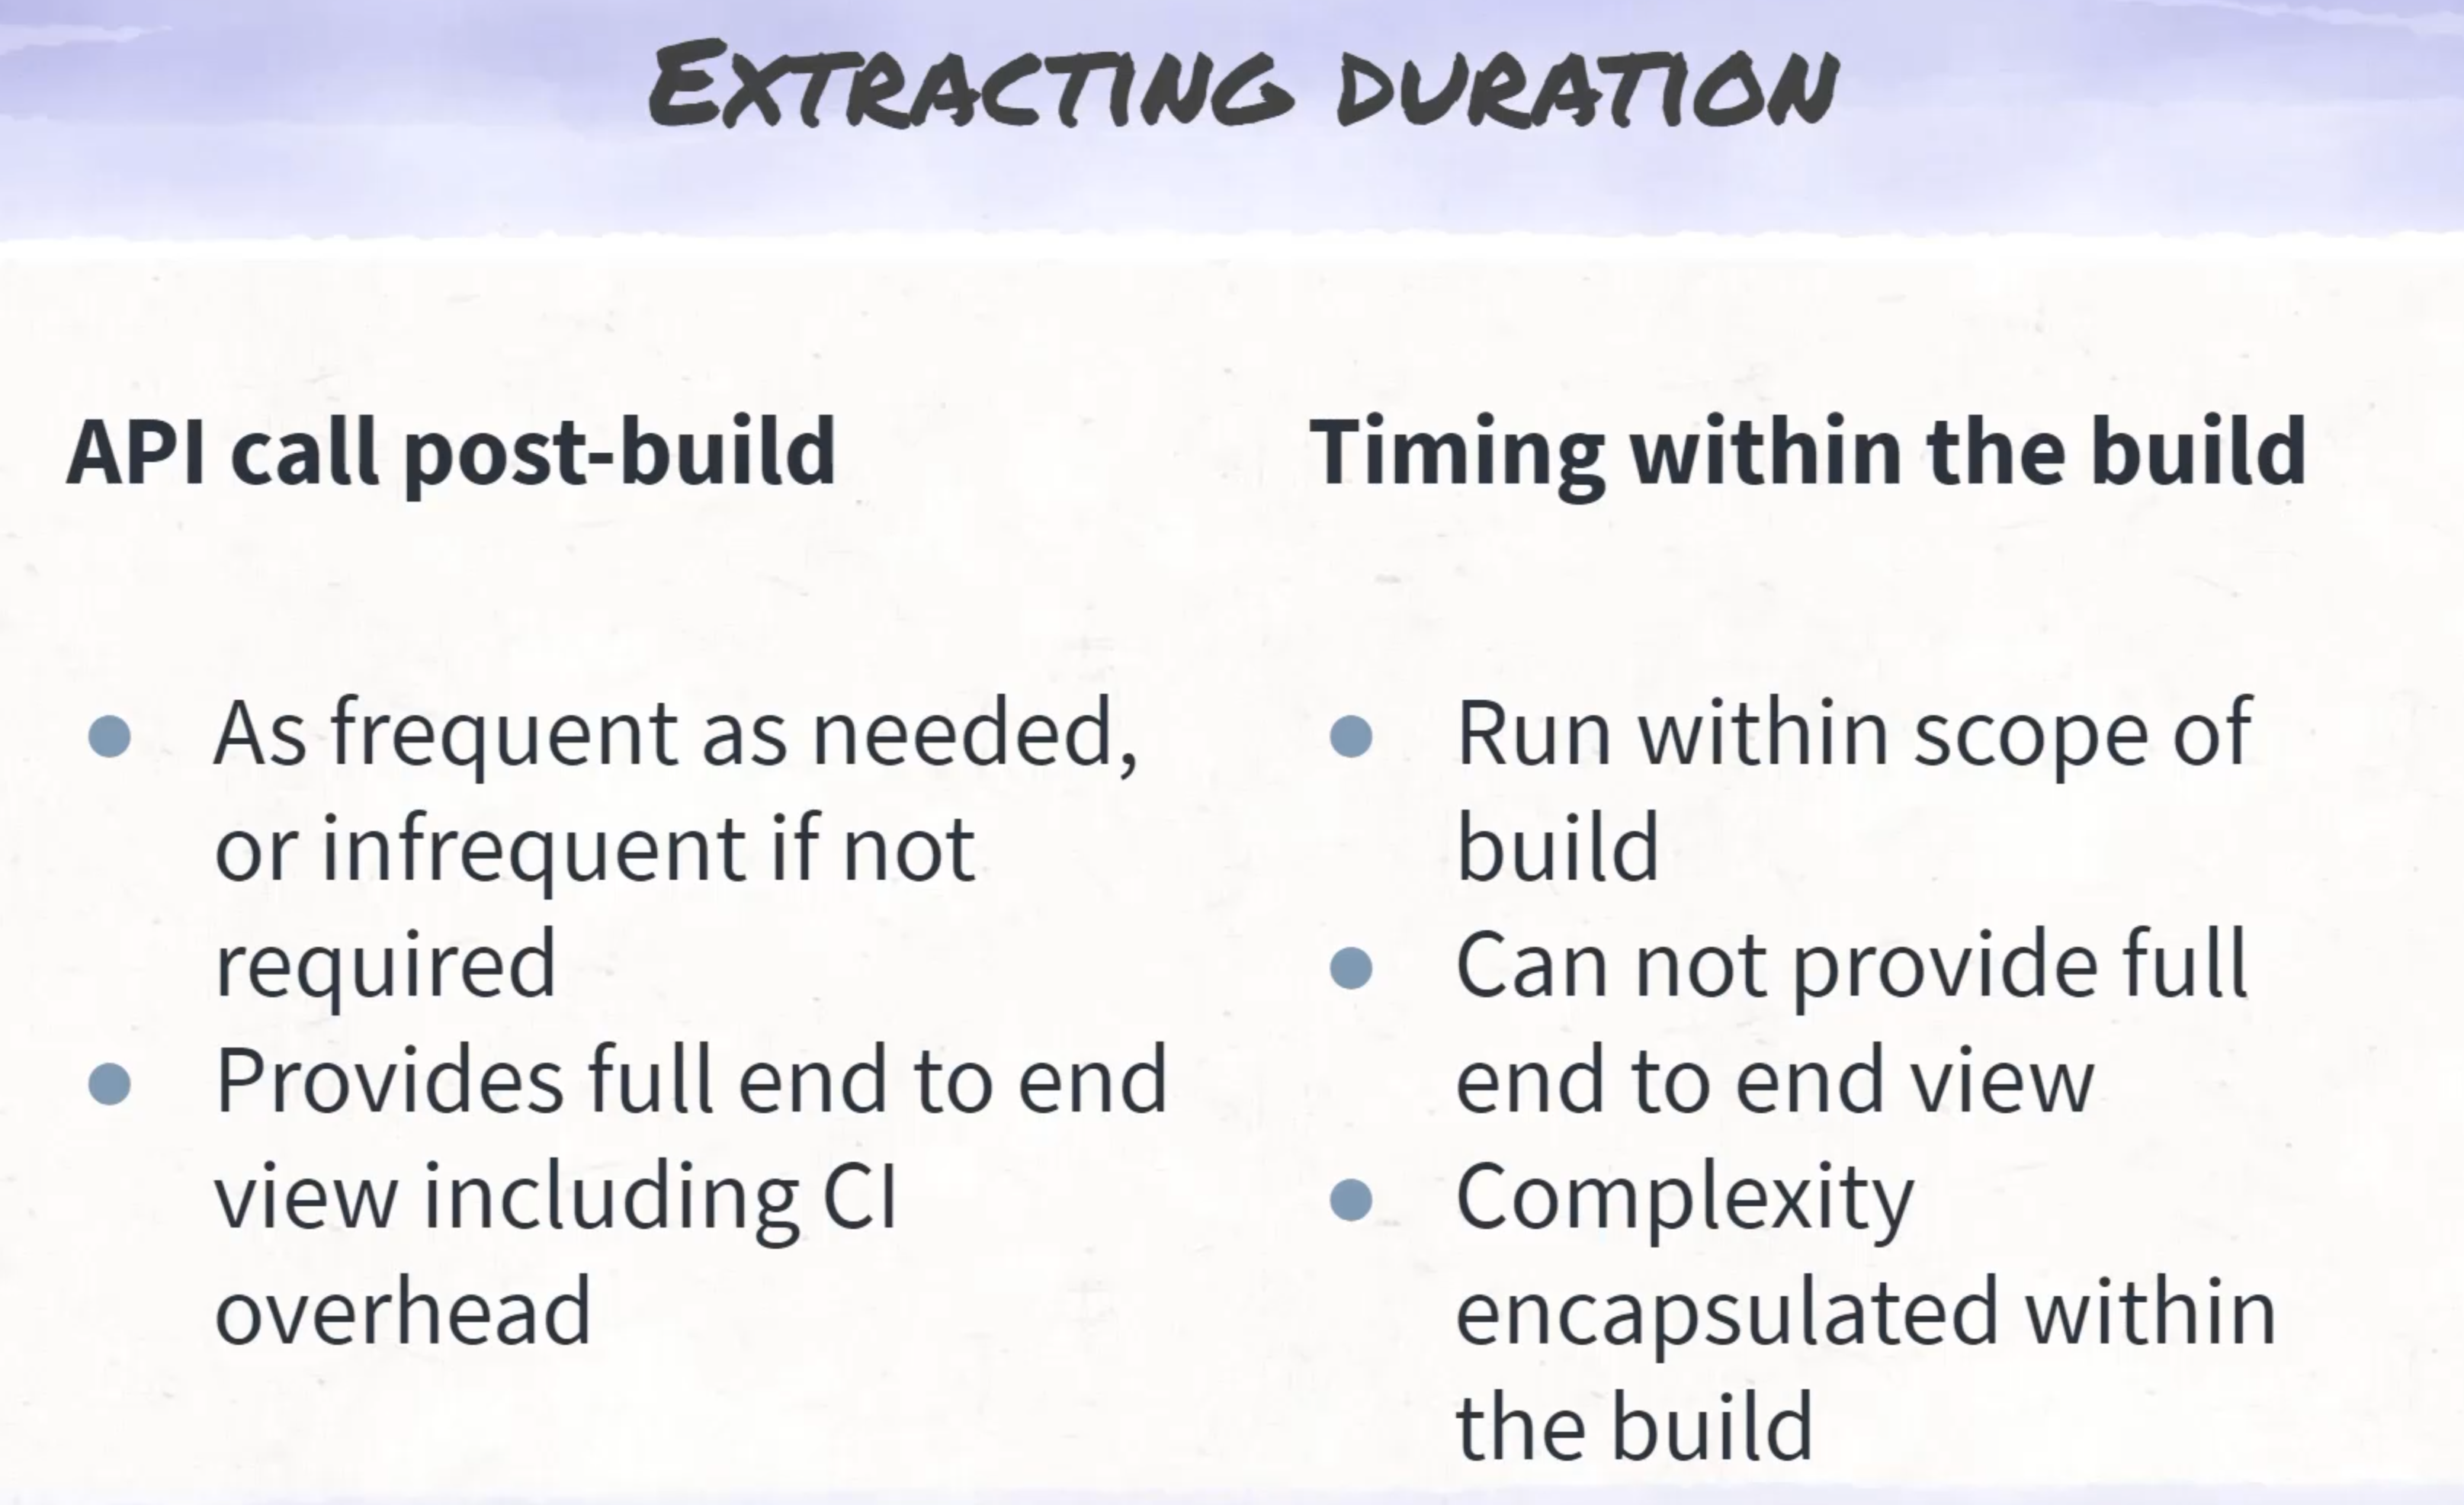
The first is to request the information from the CI's API.
This can be done after the jobs are done running, and it can be done either for every build or on a regular basis, like daily or weekly.
You can do this on the daily and weekly basis because this can be used as more of a review function.
The second option is to do this within the build.
In this case, we calculate on the fly during the test runs so that the logic for how to generate the metrics and store them is all within the build pipeline.
By using option one - via the API - we would need some way of knowing when a job is running or how to know which jobs to collect data from.
We would also need to be able to authenticate to the CI server's API to make these requests.
By using option two - via the calculations - we need to be able to accept that the total time report will be less than the time spent via the CI server.
That's because there will be overhead by the CI server that we won't be able to capture.
Given that each of these processes has its pros and cons, we're going to choose option two today and calculate the total duration as a part of the job.
This reduces the security risk of needing API keys, and one key detail here is that we will need this duration calculation to be stored regardless of if the test passes or fails.
The problem is that most CI tools will exit as soon as any one command fails so if we try and calculate this in the same step that we run the tests, we risk that these will not play nice together and we'll actually lose this duration calculation.
Instead, we will calculate the total duration in a separate step, in a job that is going to act a bit like a teardown step in that it will run at the end regardless of the status of the previous steps.
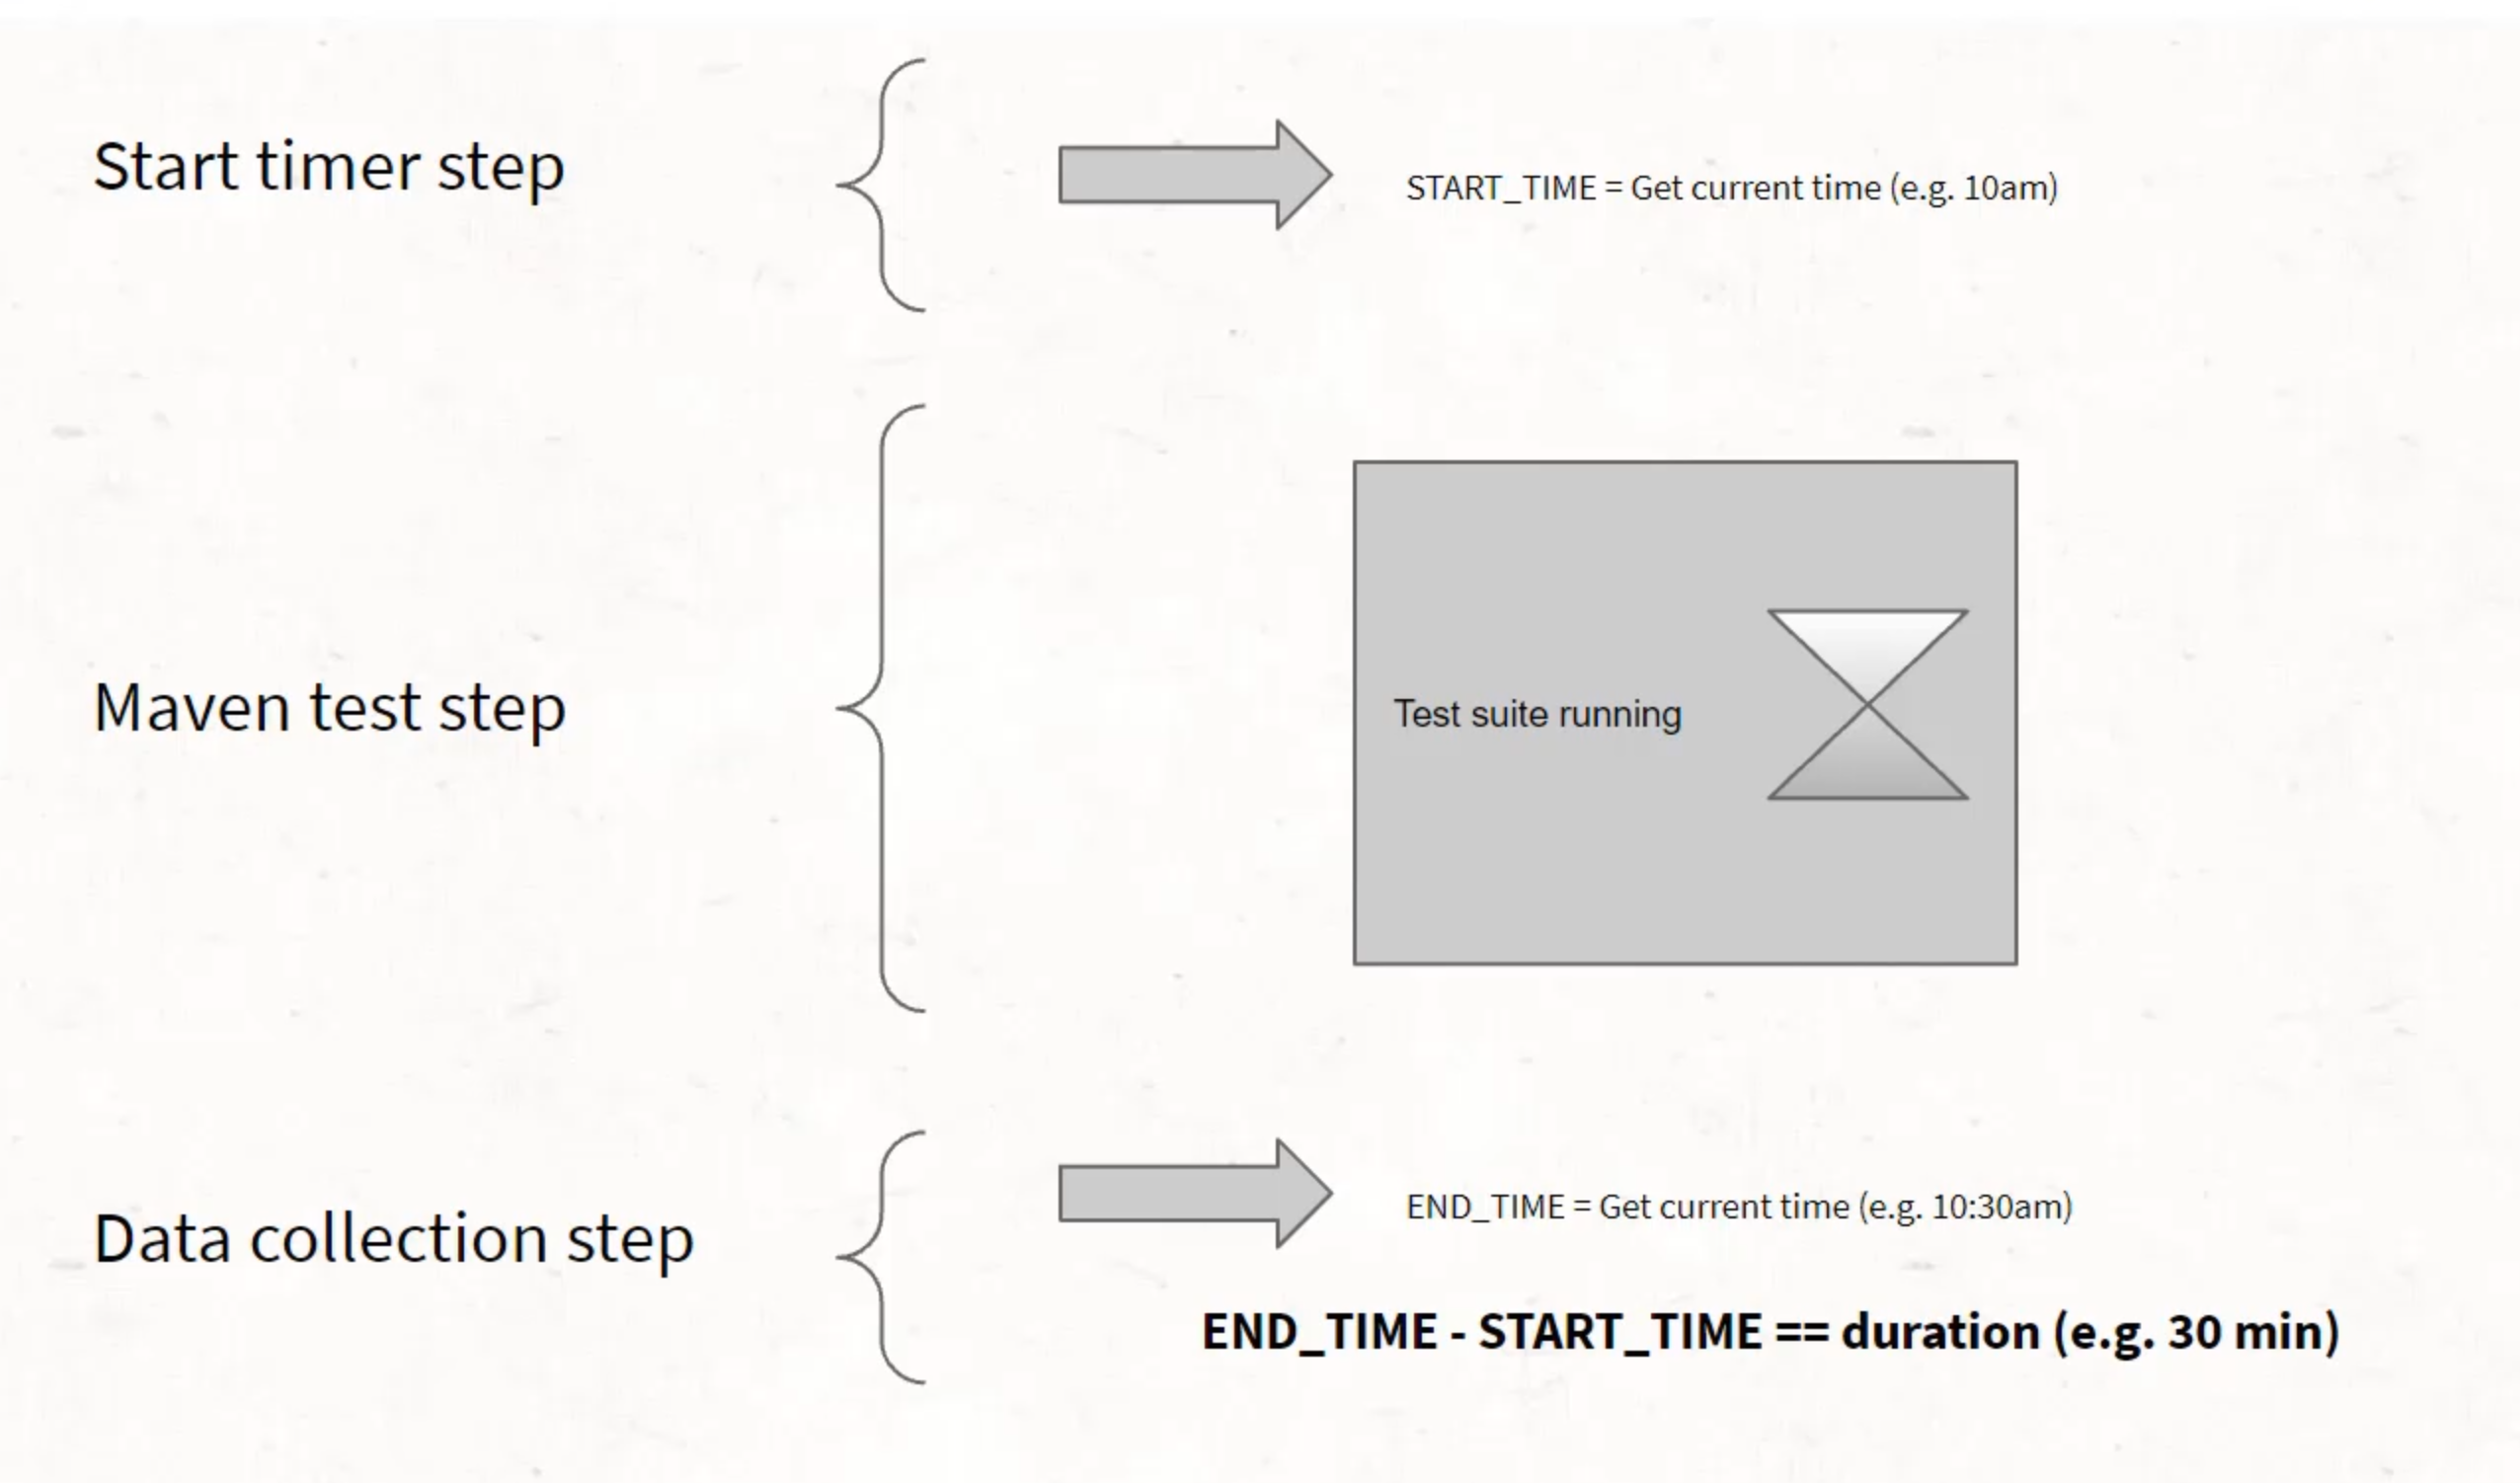
This means we will need to generate the start time and store that in a way that it can be captured and used in later steps.
This can get a bit tricky in different CI tools, since most of them do not guarantee the same machine between steps, but we'll use a little bit of a trick in GitHub Actions on how to store this between steps, and every CI server will have its own trick for this.
# Using Docker
So we're going to get started by exploring how to generate a timestamp on an Ubuntu machine by first running an Ubuntu Docker image locally so that we can understand the command.
In order to make sure that we're using the same type of computer as is being used on the CI, I'm going to try and use a Docker container.
If you've used Docker before, go ahead and get to the command line and ready to use it.
If not, I would suggest that you try out Docker Desktop.
Here, you can follow along for some instructions on how to install.
I already have Docker for Windows installed and so I'm going to open that up.
Here I am in Docker Desktop and I'm going to be looking at two specific aspects of this menu.
The first is "Containers / Apps" and the second is "Images".
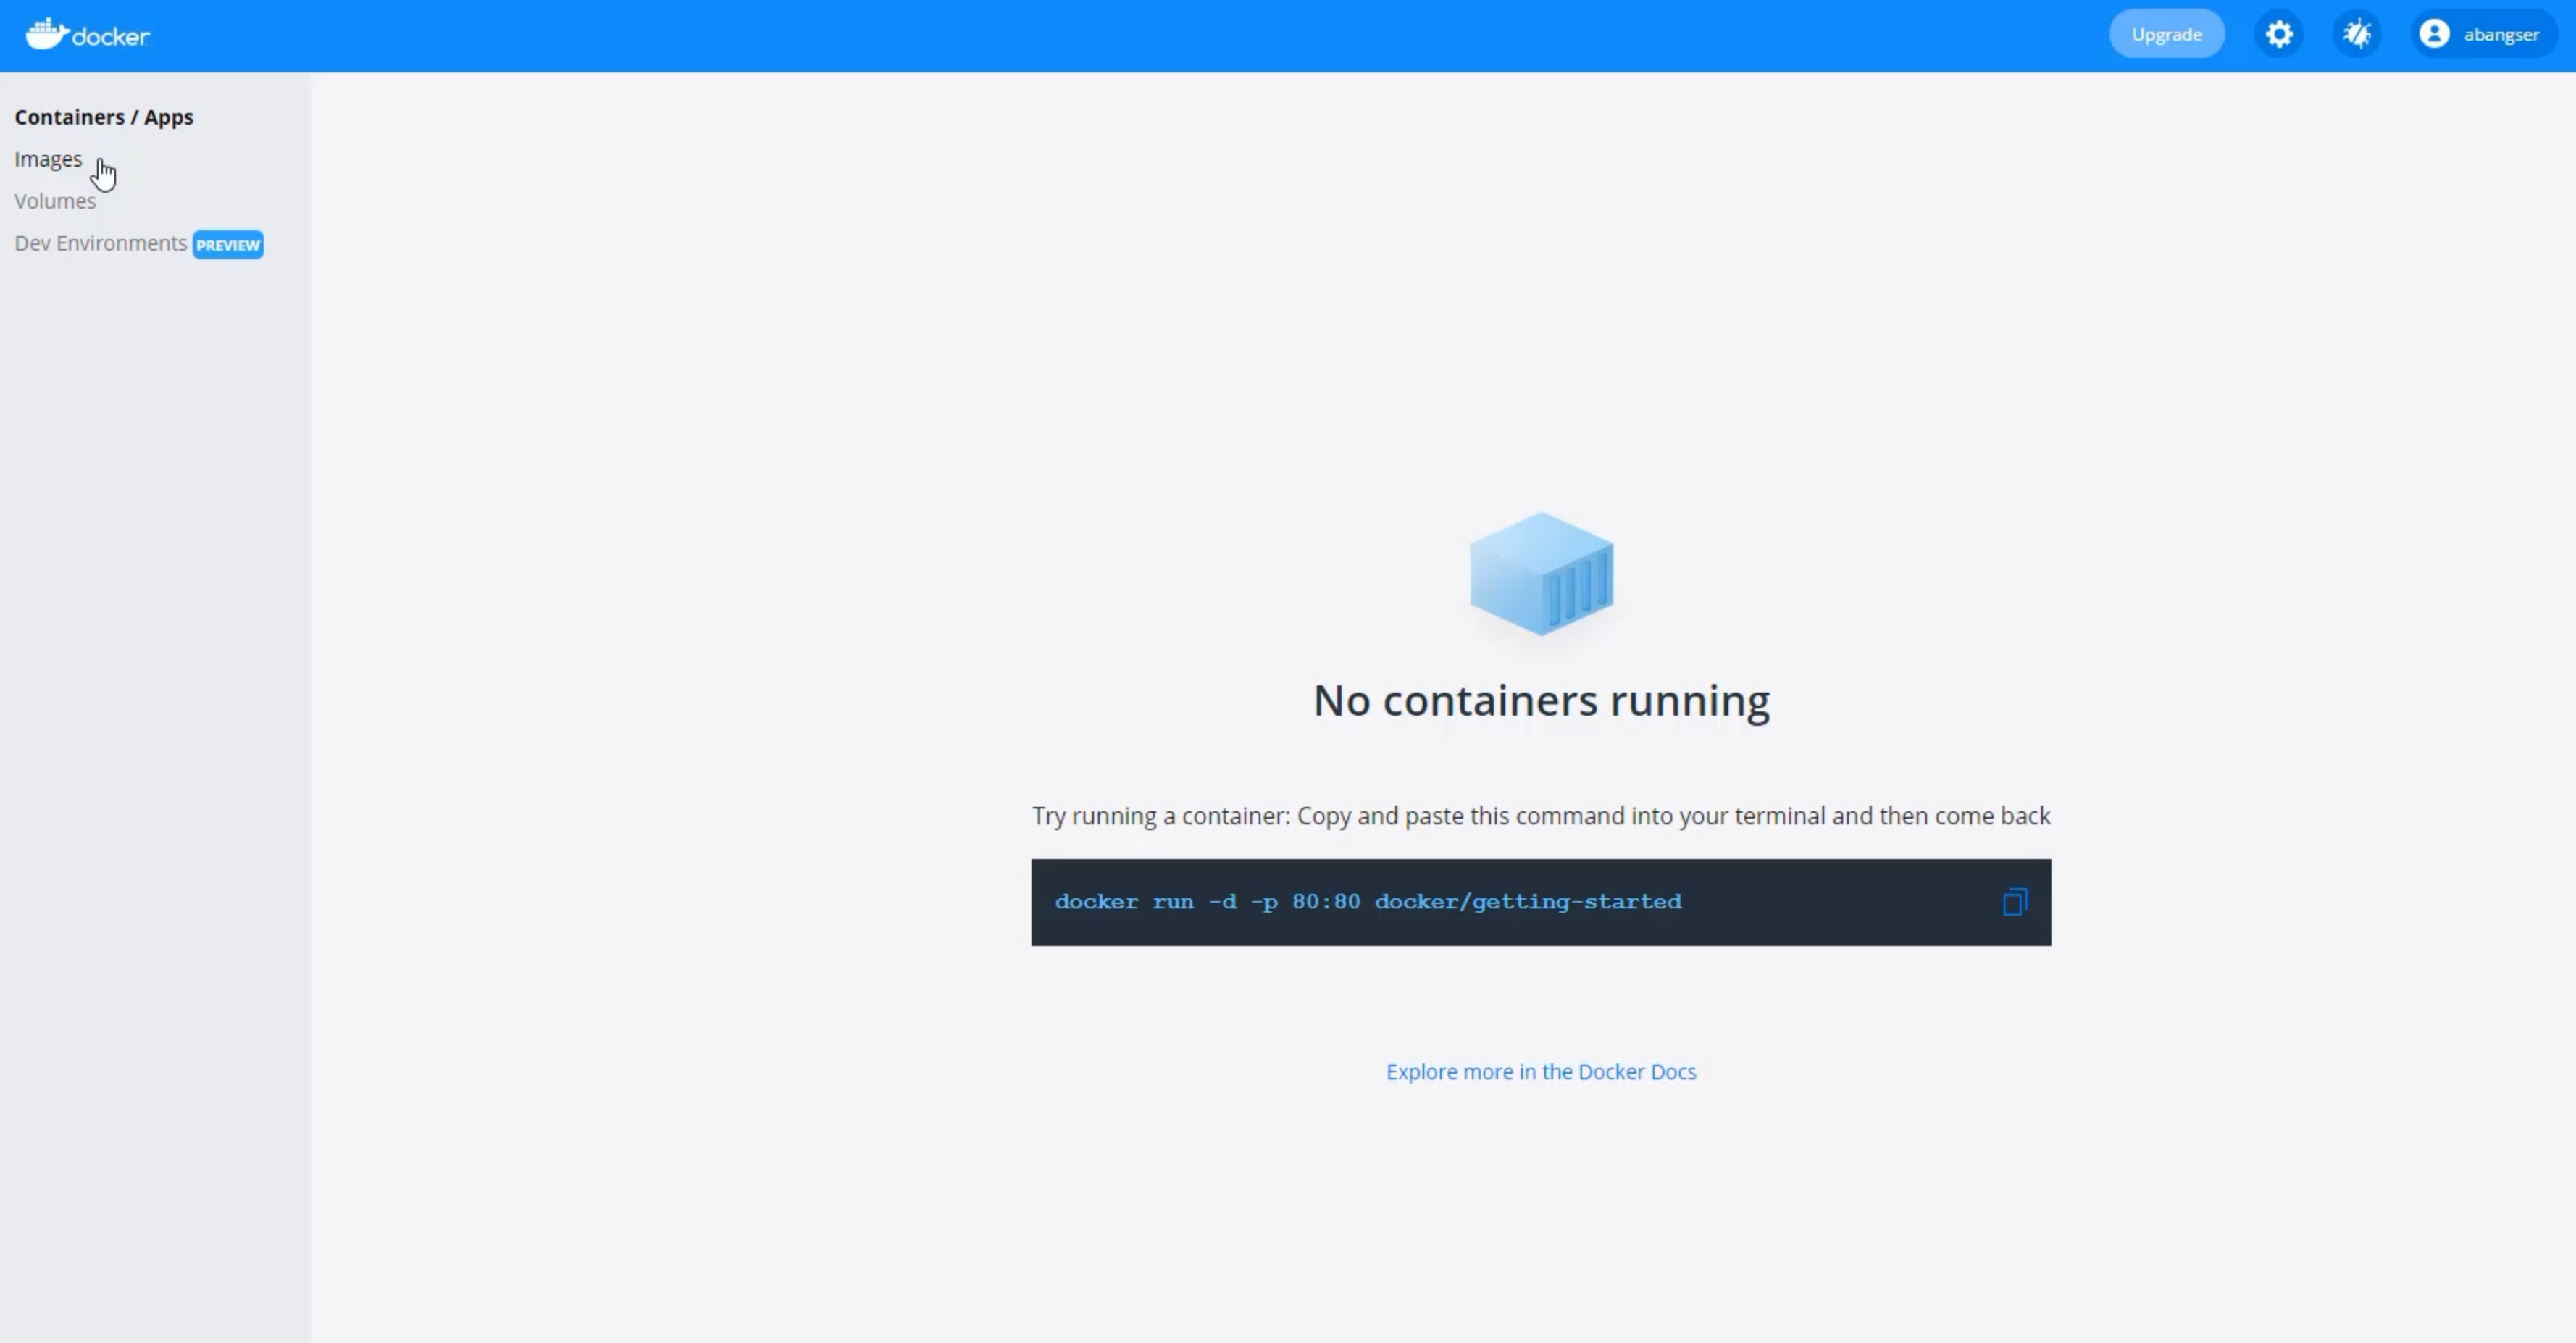
If you've never used Docker before, you can look at this a little bit like cookie cutters and cookies.
The images are the cookie cutters - they provide the template of what a virtual machine or a container will look like on your computer.
The containers are the outputted cookies - they are the computers or the VMs that you can use.
Now, just to be clear, VMs and containers are very different subjects, but at a high level they both allow you to run a different operating system on your computer so I may use those words interchangeably as I know that virtual machines, or VMs, may be more common to some people.
If I go and I look at my images, I don't have any cookie cutters so it's going to be hard to make cookies.
So, the first thing I need to do is I need to go get that Docker image that I'm using in my CI server, that "ubuntu-latest".
I wish there was a way to do that here in the Docker Desktop but unfortunately we need to go to the command line for that.
I'm on Windows and so I can use PowerShell, but you can use lots of different terminals to do this.
The way you'll know if Docker is properly installed for you to use is to just type in the command docker and see if any output comes.
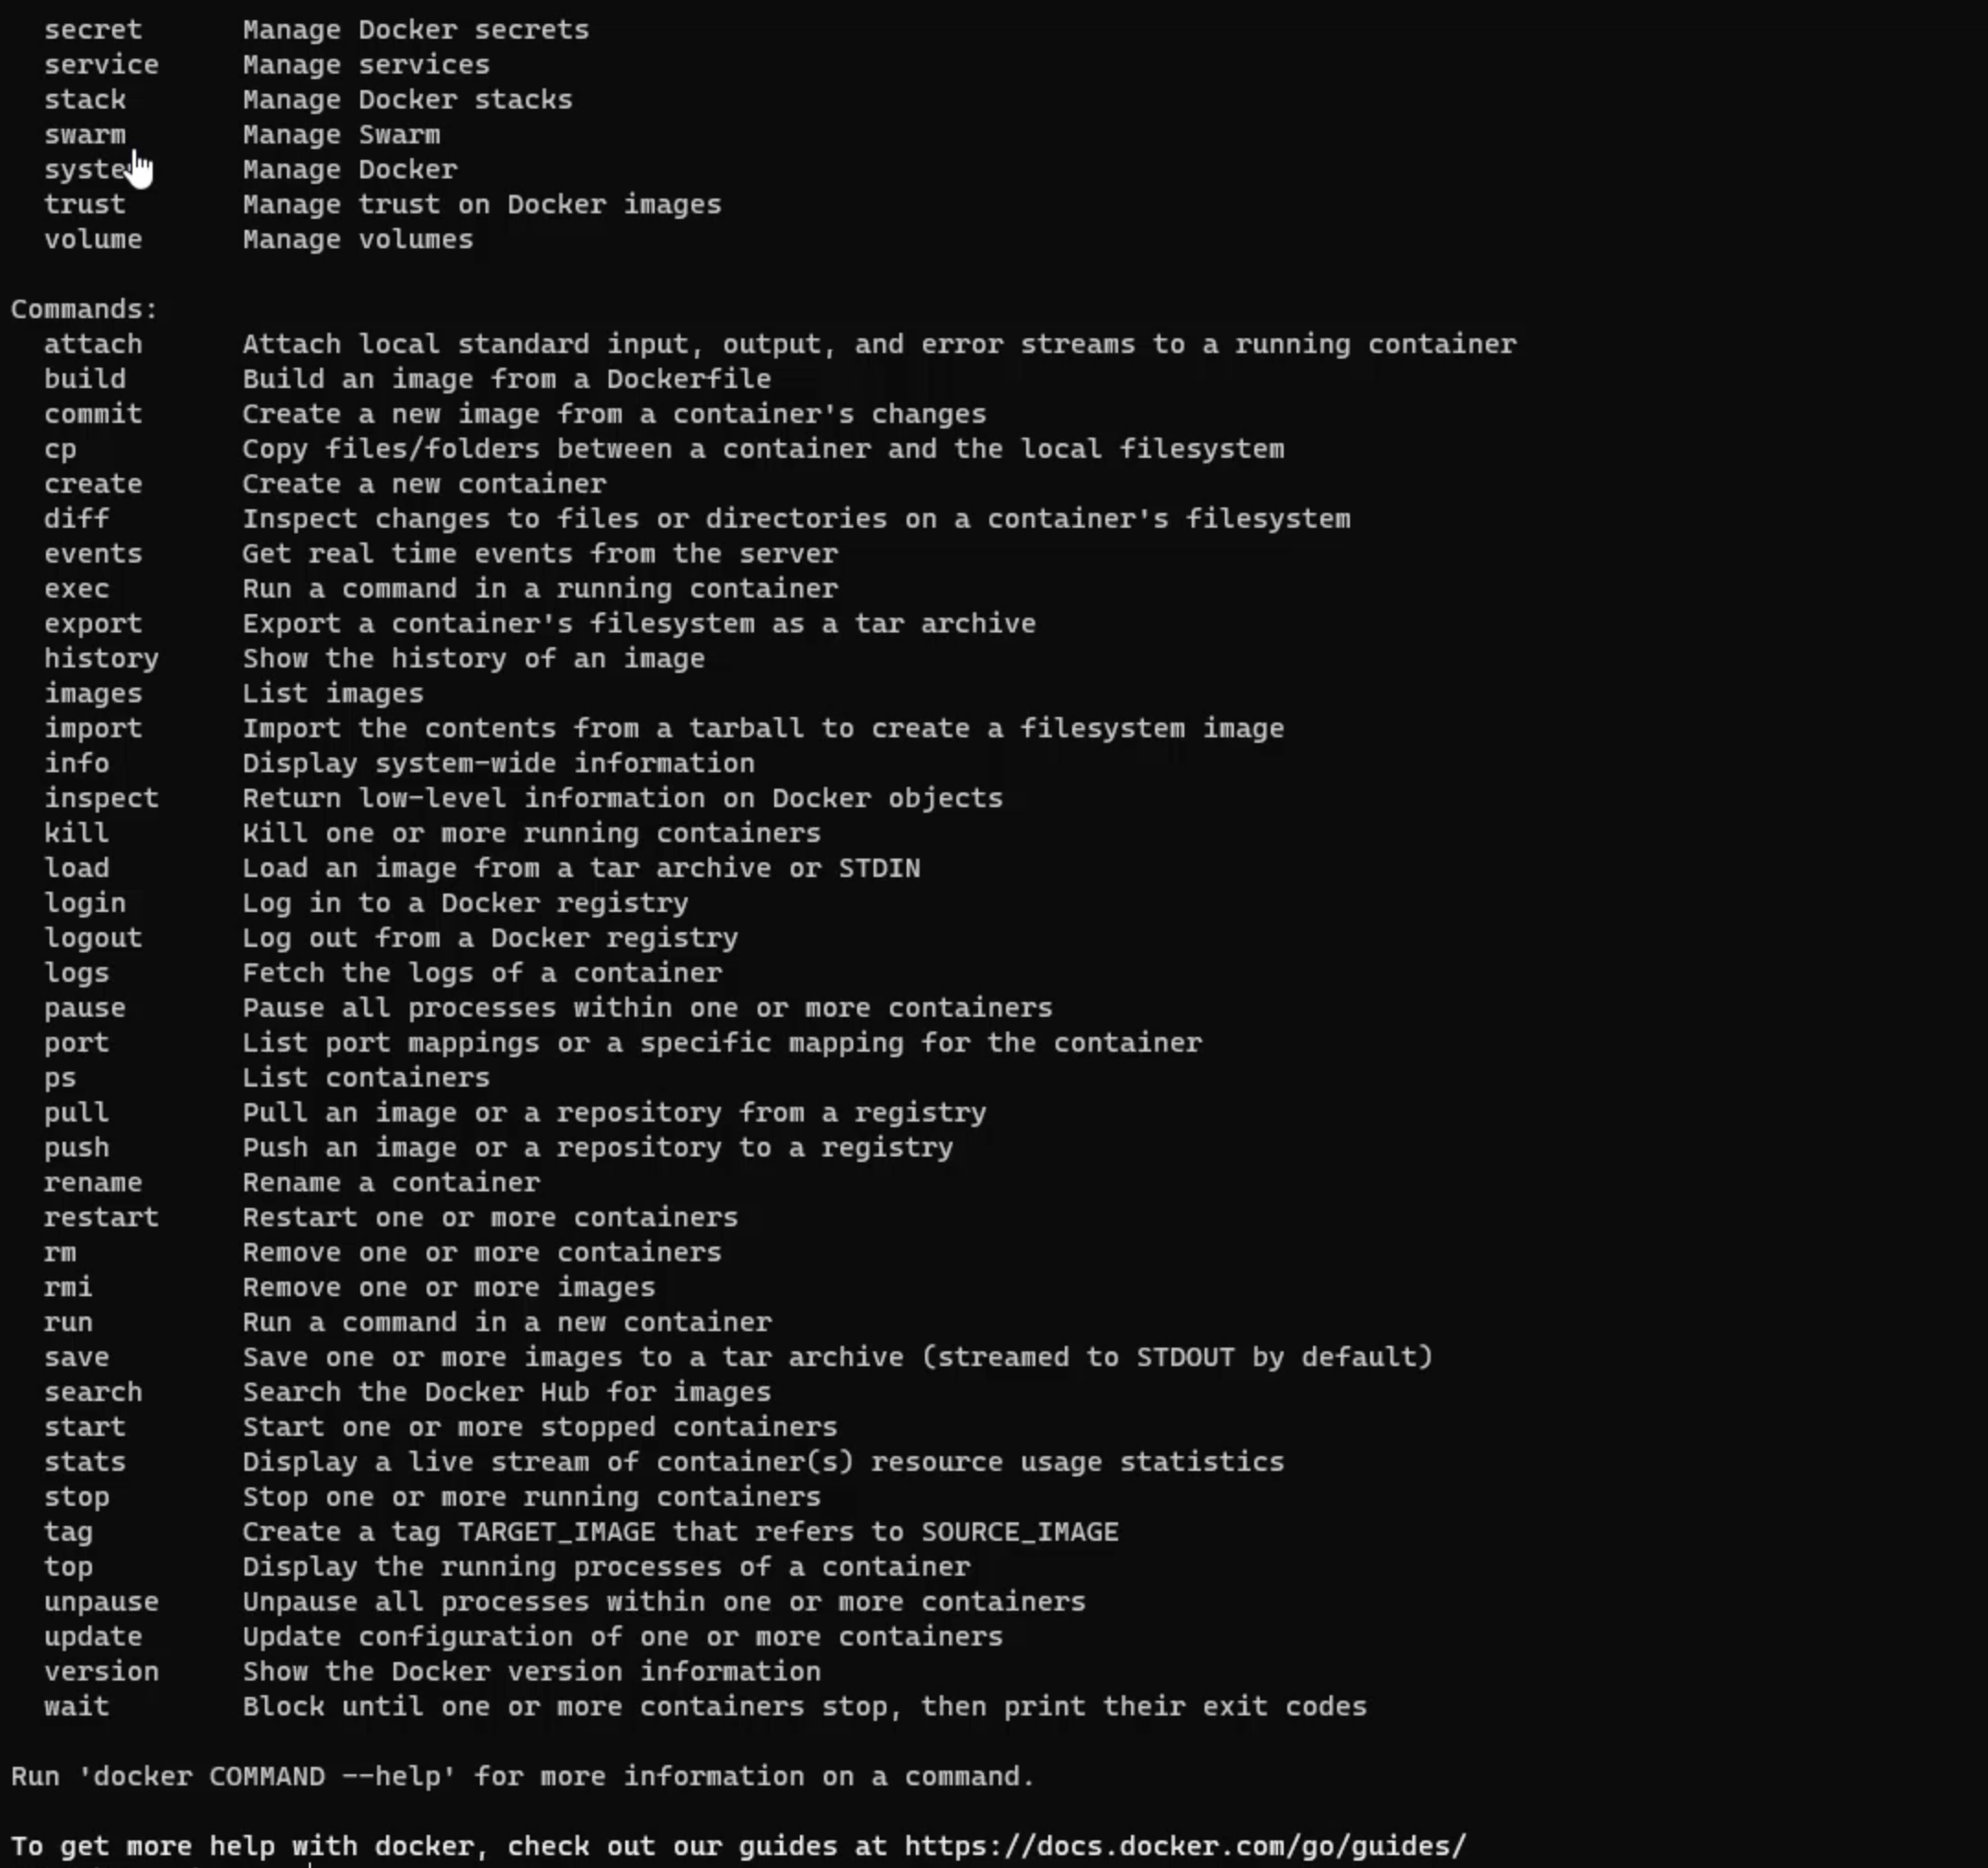
This output is its help text - it tells you what commands you can run, and one of the commands that you can run is a docker pull.
So I'm going to, once again, just enter that command and see what help text comes out.
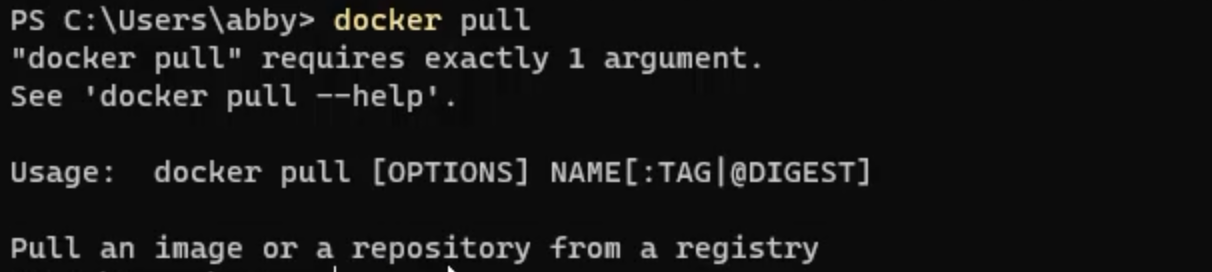
In this case, it tells me that it wasn't able to run successfully because it needs at least one argument, and what the intention is, which is to pull an image or repository from a registry.
So, what I need to do is docker pull, and then the name of the image I want to pull, which is what we used in CI, so ubuntu-latest.
Once I press "Enter", that may take a second to download, but what you will do is you'll end up with an image on your local machine.

I now have this local Ubuntu image.
I can see that by returning to Docker Desktop and there it is.
Now, I want to be able to create a running version of this on my computer so that I can use it.
To do that, I can roll over the row and I can see the button for "Run".

When I click "Run", I have the option to run that machine.
It will give itself a random name and it will start running.
One of the things that I can do is I can actually go into the terminal on that machine by clicking on the CLI button.
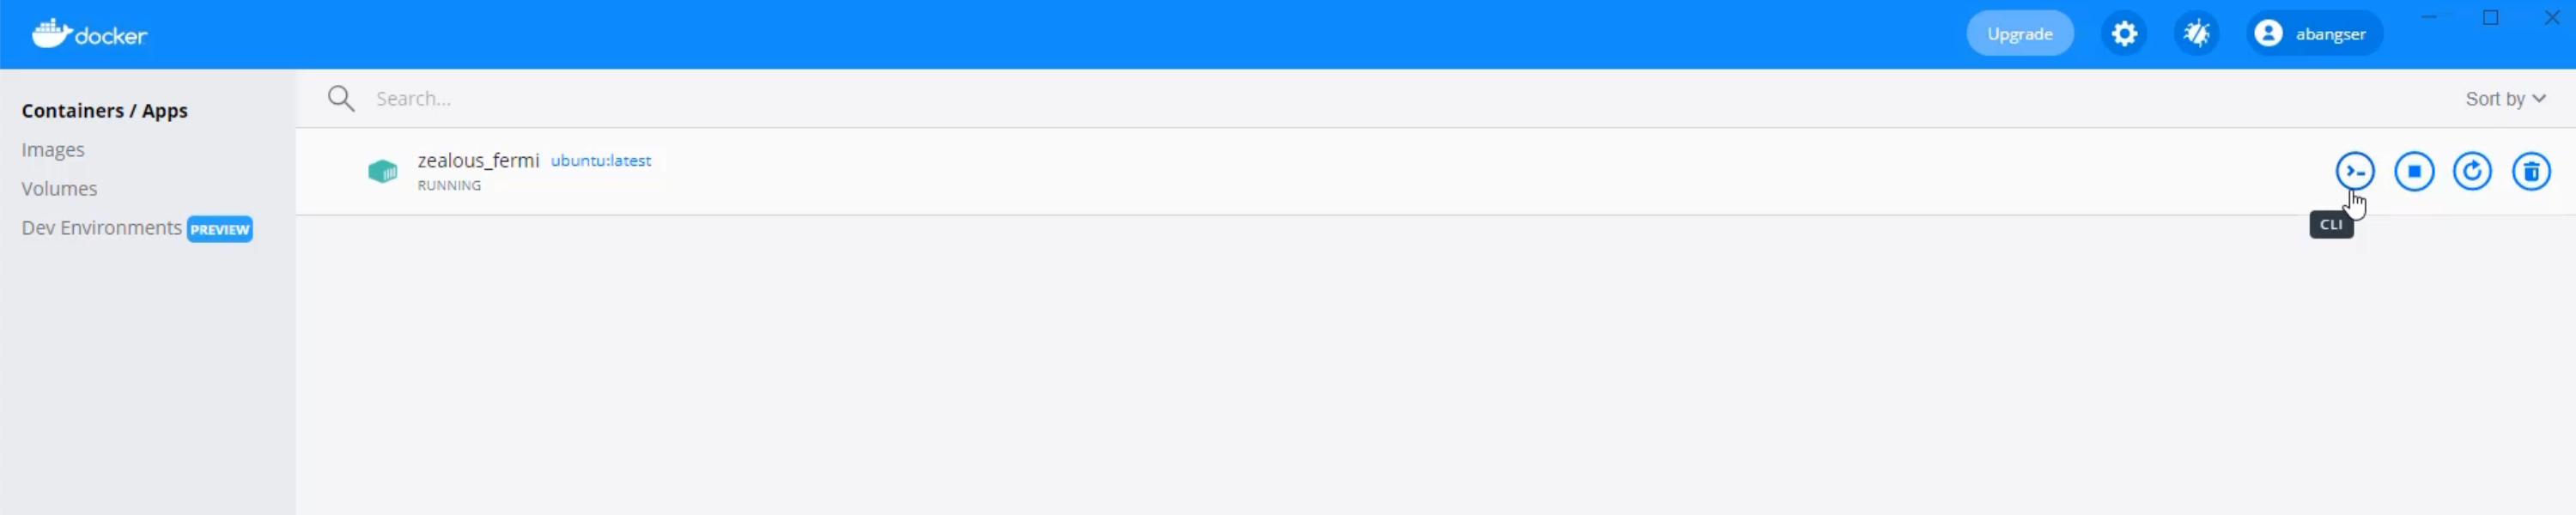
Here I am, inside of the CLI, and I can do things like see what directory I'm in with pwd, or see whoami, which will be root.
This tells me that I'm not on the same computer as my personal laptop.
# Generating Timestamps
What I really want to do now is explore how I'm going to generate timestamps on an Ubuntu machine.
There's a command that we can use that's built-in that's called date.
Date provides us with the current time and day that we're running this command, and that's fantastic - that's exactly what we need.

But that is looking a little bit too human readable to be useful in our scripting.
What we actually need is a way to be able to do math and right now, using date like that, we wouldn't be able to do the math.
I can prove that by storing this into a variable.
if I create a variable and I try to store the output of a command - so I'm going to use $(date) to run the command date and store its output in a variable called START.
If I echo the variable START, I will get that same date and if I try to do math on this - so if I say expression of the output of date, or expr $(date) - $START, this would be saying current date minus the start date.
We get a syntax error with the "unexpected argument of 'Oct'`.
That's quite obviously because we have this text-based date.
What we really need is something we can do math on, so we need to change how we format this date.
Luckily, that's something that date can do.
So if I run this command date, I can use a flag in order to change the formatting, and that flag is using the character plus +, and then passing in the format that we want.
The format we're looking for is %s, which basically says - I want a seconds count from a specific time.
So this is how many seconds since January 1st, 1970, which is an agreed upon standard way of describing time today.
Now all of a sudden, I think I can do math on this.
So, what I can do is I can save the current seconds into my START - and I'll call it START_SEC - and then we save it the same way by running the command $(date +%s) and I can now do math on that by saying expr $(date +%s) - $START_SEC).
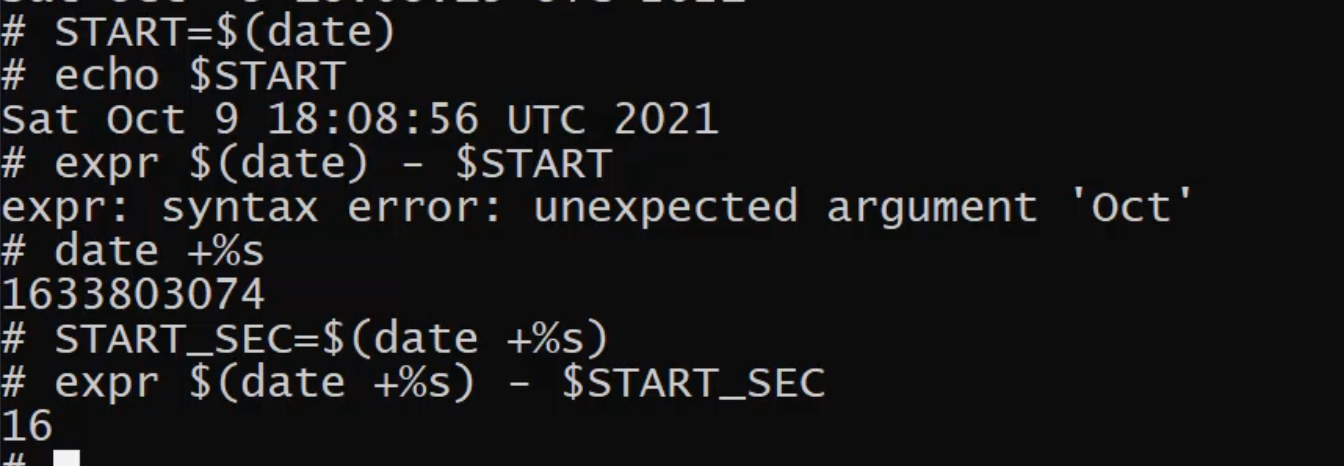
All of a sudden, you can see that it took me 16 seconds to go from the start time to the end time.
This is how we're going to be able to extract current time from the Ubuntu machines that are running our pipelines.
We can now exit this by just clicking the "X" and we can even delete the Docker image by hitting the trash sign.
We can always create another one if we need it.
# Setting Timestamps in our GitHub Action
With all this planning done, it's time to start calculating this in our GitHub Action.
I'm going to scroll down and look at my job.
I'm going to use some code comments, just like I've done before, to describe what it is I want to achieve.
The first thing I'm going to want to achieve is to "Set a start time".
The last thing I'm going to want to achieve is at the end of all of this to "Calculate total duration".
And I want to make sure that under here we "Make sure to run even if a previous step fails".
name: on_push

on:
  push:
    branch:
      - "**" # This will run on all branches and must be quoted to be handled by yaml

jobs:

  build_and_test:
    runs-on: ubuntu-latest
    env:
      RUNNER_OS: true
      HEADLESS_CHROME: true

  steps:
    # Set a start time
    - uses: actions/checkout@v2
    - uses: actions/setup-java@v2
      with:
        distribution: 'zulu'
        java-version: 16
    - name: Run tests with maven
      working-directory: webdriver_java
      run: mvn test
    # Calculate total duration
      # Make sure to run even if a previous step fails
We're going to have to learn how to configure that.
If that's what our goal is, we can start with setting a start time.
To do this, we're going to need to run a custom step again.
That means that we can give it a nice name - so in our case it would be Set start time, and we're going to need to give it a run command.
In this case, we're going to want to use the same date command we were just using in our Ubuntu Docker image.
So we're going to want to say START_TIME=$(date +%s) to run the command date, plus %s to get that in seconds.
But the interesting part here is that we need to somehow make sure this gets stored by GitHub.
To do that, we actually need to echo this entire command out, and write it using these two chevrons >> to the $GITHUB_ENV.
This $GITHUB_ENV is sort of magical in that it will store things for us between steps.
name: on_push

on:
  push:
    branch:
      - "**" # This will run on all branches and must be quoted to be handled by yaml

jobs:

  build_and_test:
    runs-on: ubuntu-latest
    env:
      RUNNER_OS: true
      HEADLESS_CHROME: true

  steps:
    - name: Set start time
      run: echo "START_TIME=$(date +%s)" >> $GITHUB_ENV
    - uses: actions/checkout@v2
    - uses: actions/setup-java@v2
      with:
        distribution: 'zulu'
        java-version: 16
    - name: Run tests with maven
      working-directory: webdriver_java
      run: mvn test
    # Calculate total duration
      # Make sure to run even if a previous step fails
Now that I set the start time, I need to move on to calculating the total duration.
For this, it is, once again, going to be a new custom step and in our case, I'm going to call it Collect build data, and inside of here I'm going to, once again, do a run command.
What I'm going to do is I'm going to run the exact same command I ran in Ubuntu.
I'm going to run an expression that takes the current date in seconds format and subtracts from it the start time, which I can access via the environment variables like this - expr $(date +%s) - ${START_TIME}.
By using the dollar sign $,, I'm saying I'm getting an environment variable and by using curly braces {}, I'm saying that the word inside of that is the variable name START_TIME.
This should print to the screen my total duration.
name: on_push

on:
  push:
    branch:
      - "**" # This will run on all branches and must be quoted to be handled by yaml

jobs:

  build_and_test:
    runs-on: ubuntu-latest
    env:
      RUNNER_OS: true
      HEADLESS_CHROME: true

  steps:
    - name: Set start time
      run: echo "START_TIME=$(date +%s)" >> $GITHUB_ENV
    - uses: actions/checkout@v2
    - uses: actions/setup-java@v2
      with:
        distribution: 'zulu'
        java-version: 16
    - name: Run tests with maven
      working-directory: webdriver_java
      run: mvn test
    - name: Collect build data
      run: expr $(date +%s) - ${START_TIME}
      # Make sure to run even if a previous step fails
We still need to make sure that it runs even if the previous step fails.
To do that, I can introduce another characteristic of the step, and that characteristic is the if characteristic.
I'm going to say that I want to always run this step, regardless of the previous step status.
name: on_push

on:
  push:
    branch:
      - "**" # This will run on all branches and must be quoted to be handled by yaml

jobs:

  build_and_test:
    runs-on: ubuntu-latest
    env:
      RUNNER_OS: true
      HEADLESS_CHROME: true

  steps:
    - name: Set start time
      run: echo "START_TIME=$(date +%s)" >> $GITHUB_ENV
    - uses: actions/checkout@v2
    - uses: actions/setup-java@v2
      with:
        distribution: 'zulu'
        java-version: 16
    - name: Run tests with maven
      working-directory: webdriver_java
      run: mvn test
    - name: Collect build data
      if: always()
      run: expr $(date +%s) - ${START_TIME}
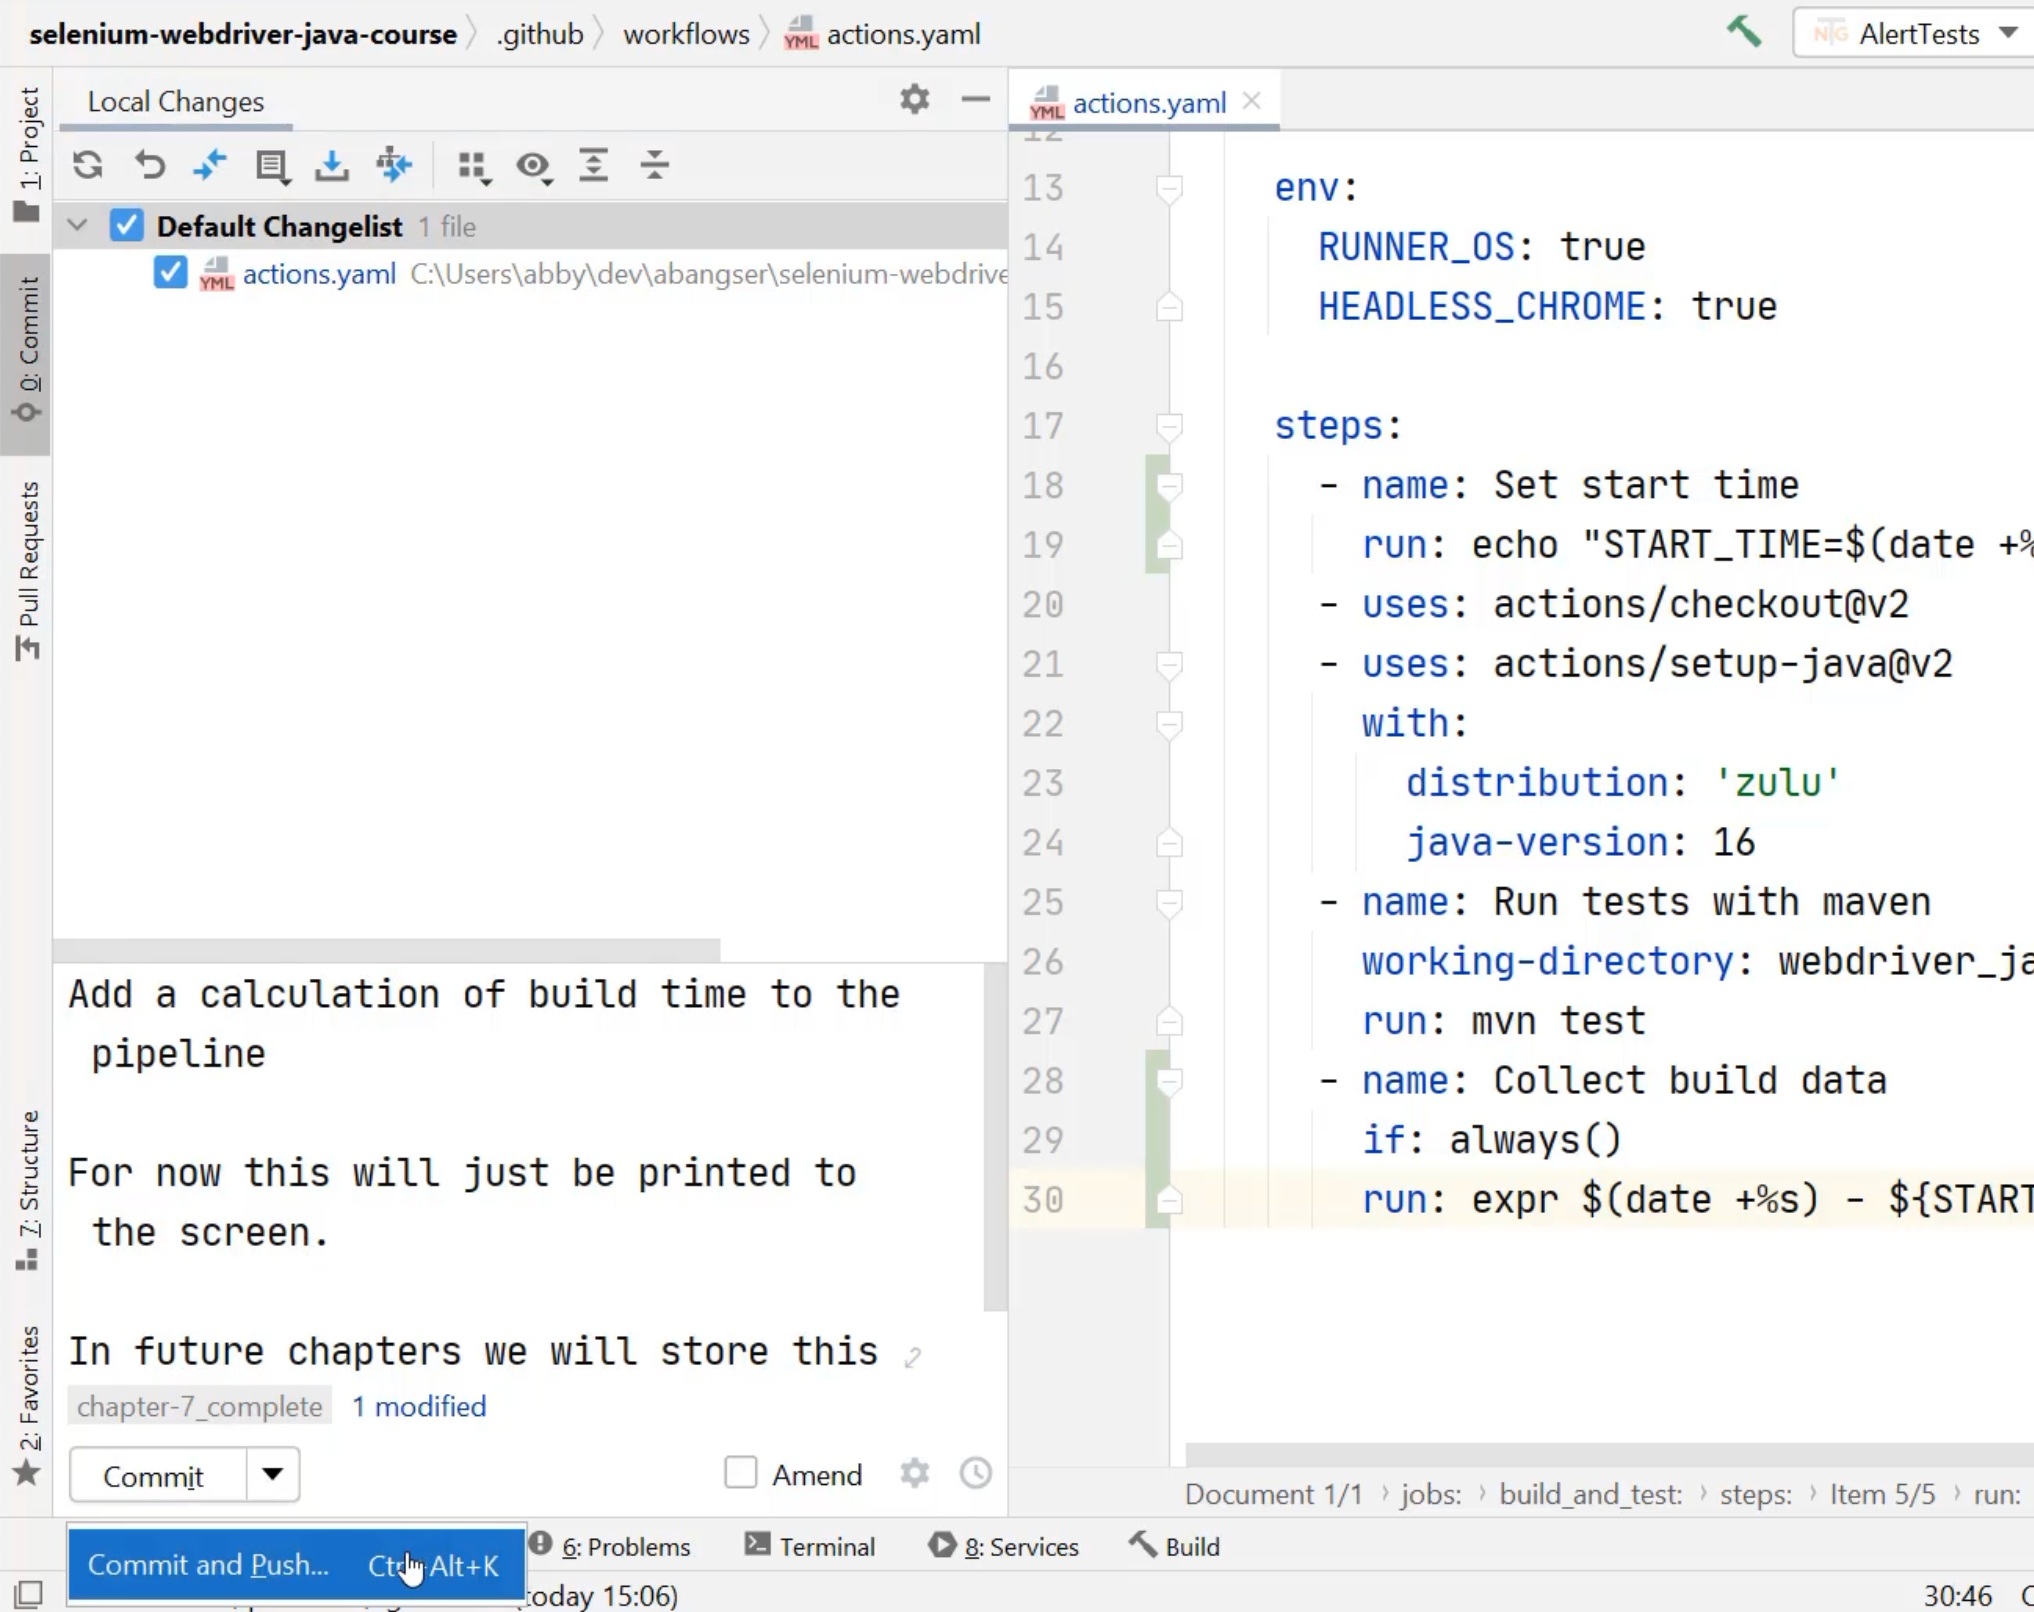
I'm ready to commit this into my repository and see this run on GitHub Actions.
I can do that via IntelliJ.
Under commit, I can see that my actions.yaml has changed and I have written a commit message previously about this, so I can "Commit and Push".
Once that's been pushed, I can return to the browser and see it running.
Here I am in the Actions tab of my repository and I can see that the commit I just ran has started running a new workflow.
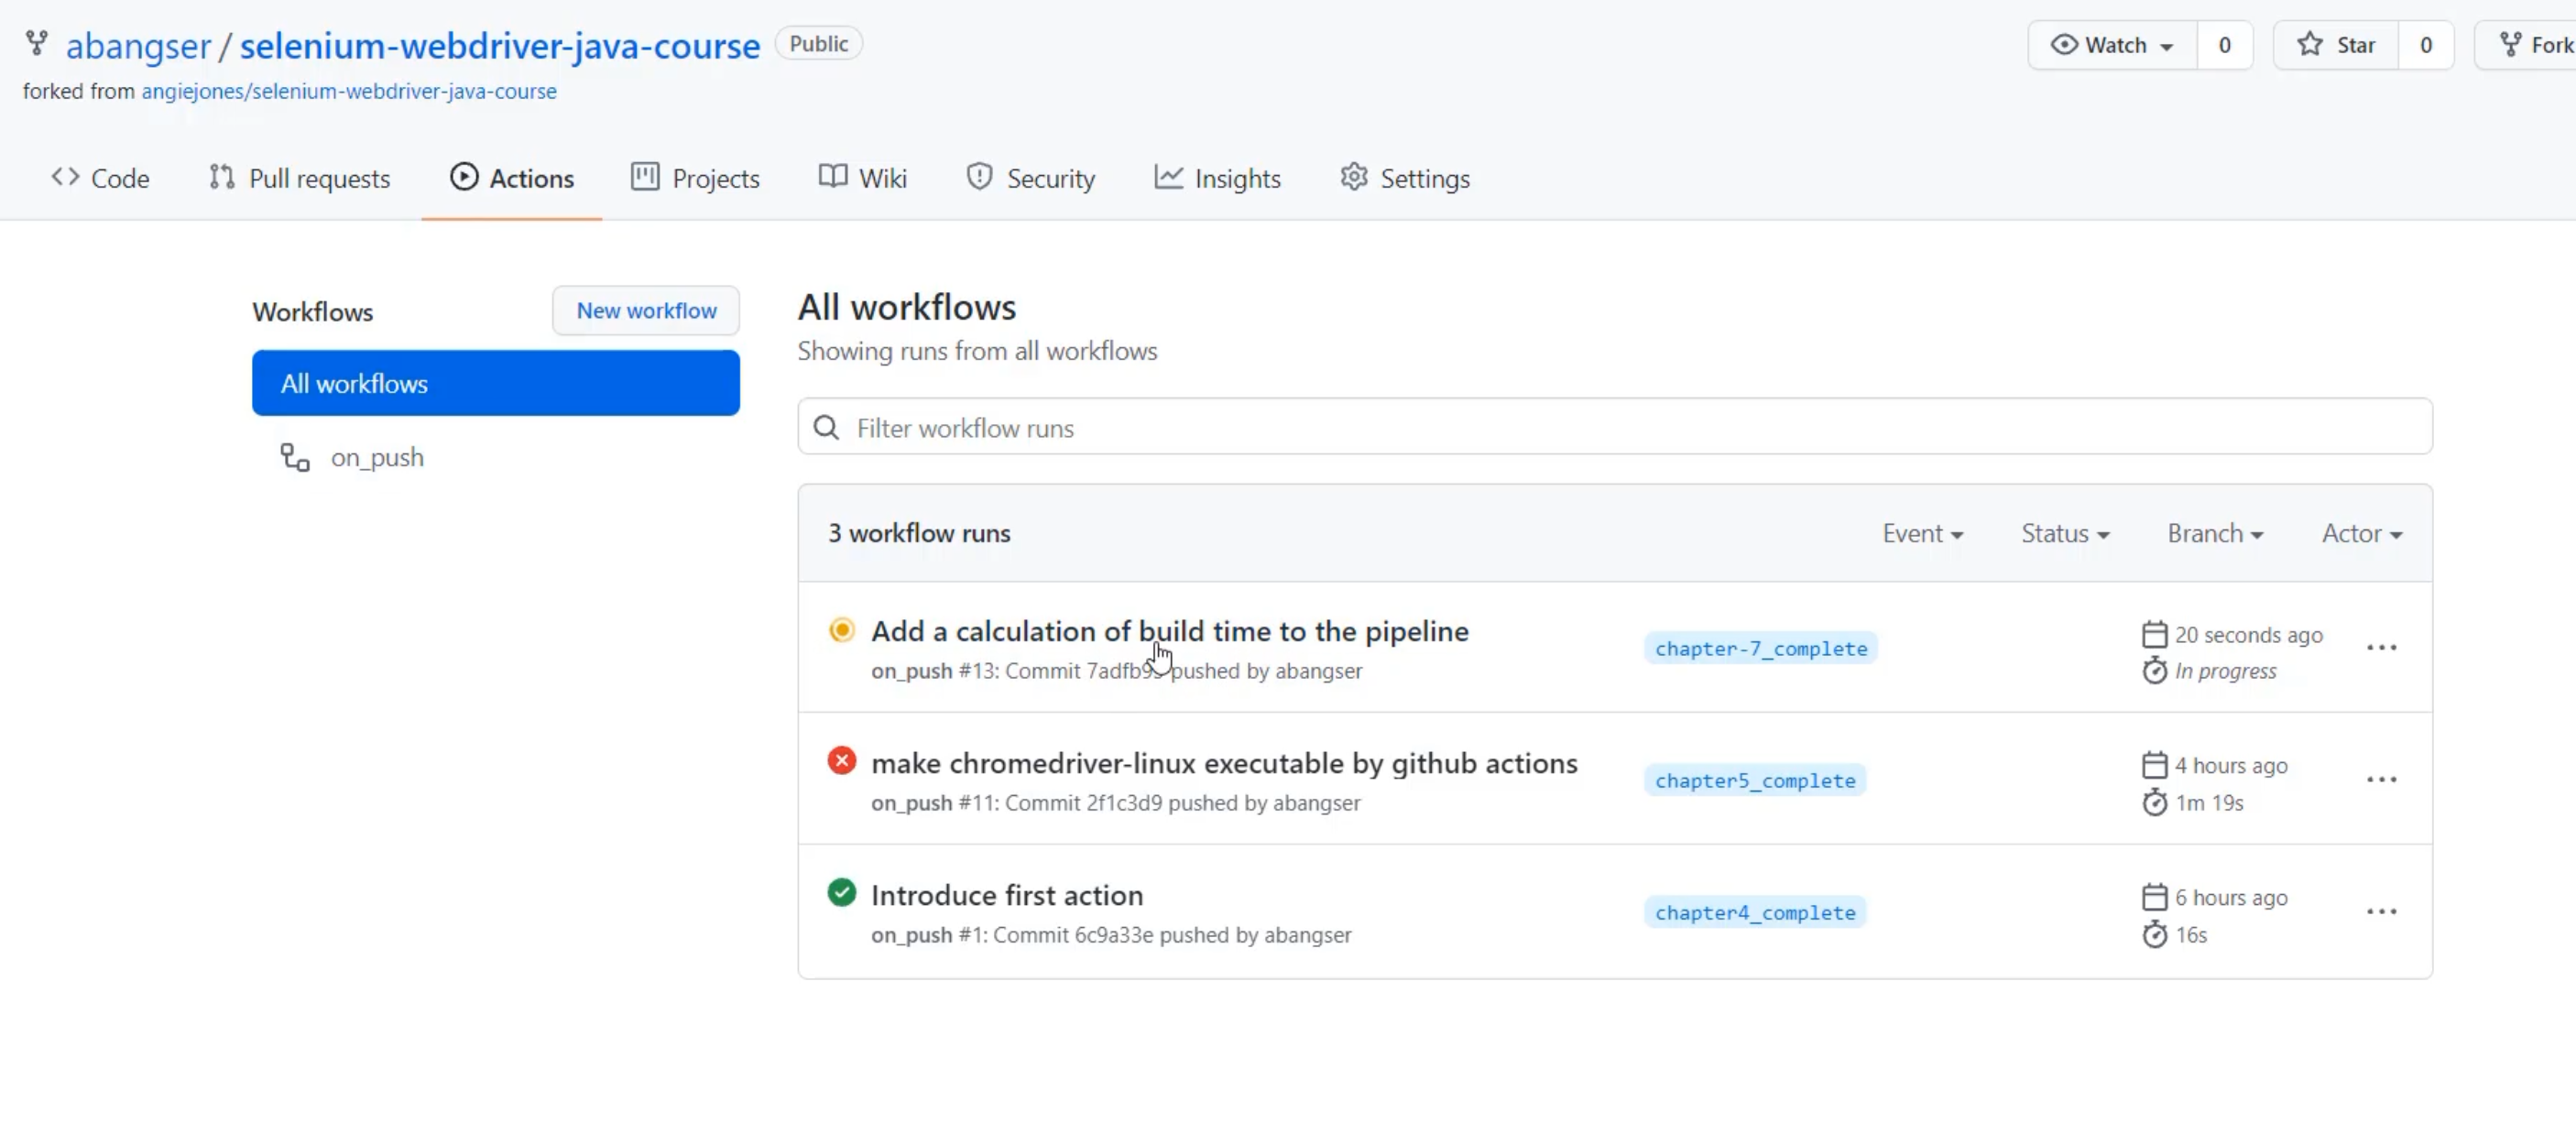
I'm going to click through and watch that run.
I'm going to speed this up for ease of watching.
Here I am with our test having ran.
I see that the tests for Maven have failed so I'm just going to go check out and make sure that nothing is different - we know that there's a failing test there and I just want to see that that's still the case.
So again, we have 23 tests run, we've had two fail, and I can see that the ones that failed were the "WindowsTest" and the "ForgotPassword" tests again, so that's a known failure.
Soon I won't need to click in there because I'll be able to see that elsewhere, which would be great.
But we can also see that I've introduced two new steps, "Set start time", which ran this echo, and "Collect build data" step, which ran the expression and resulted in 64 as the answer - 64 seconds.
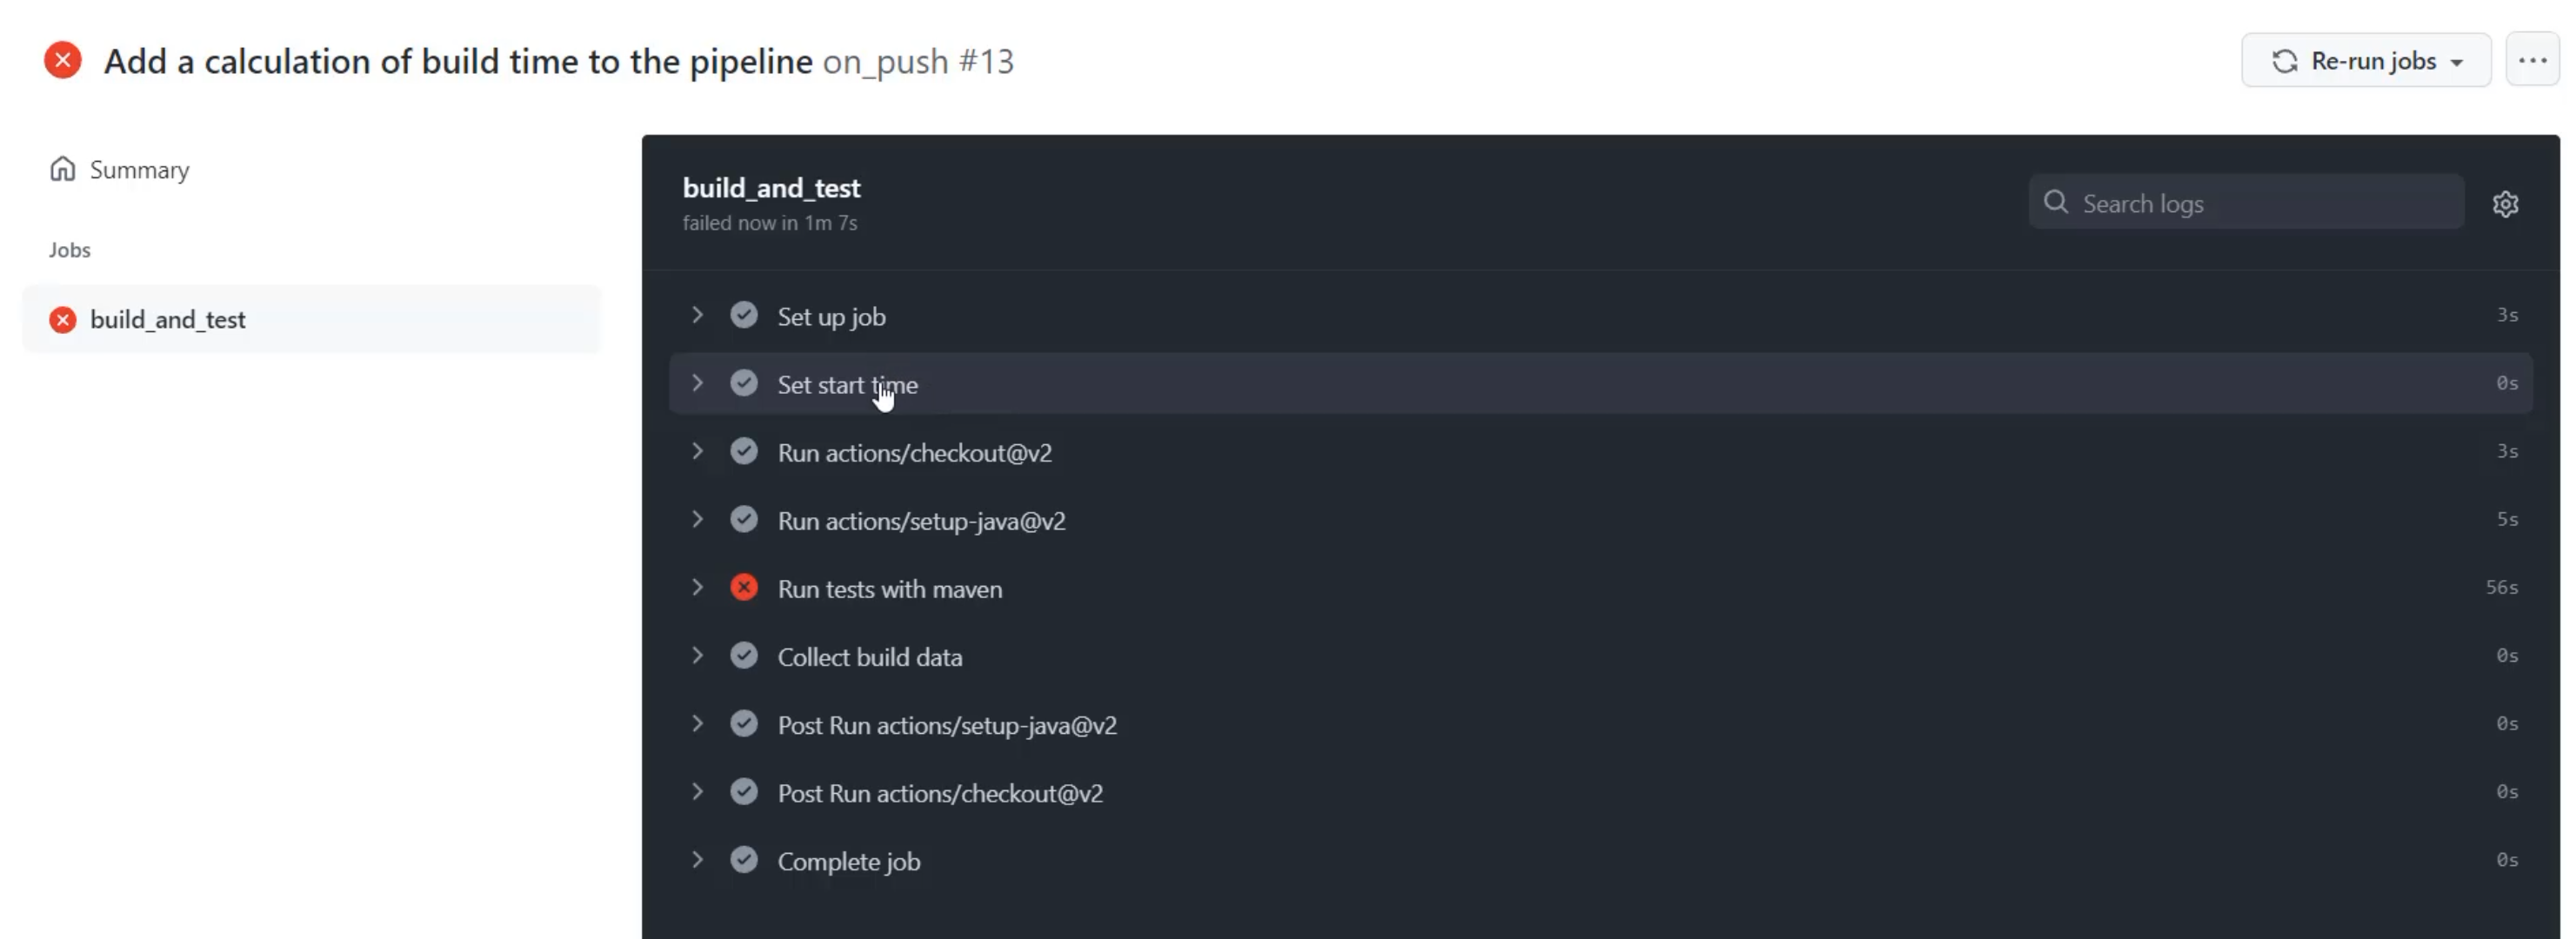
We can see that the "build_and_test" actually took, in total, 67 seconds.
We talked about this as one of the drawbacks of collecting data in this way.
But in my case, this is good enough for now and so I'm going to consider this complete.
Next, we're going to look at collecting even more interesting data and eventually pushing that to Prometheus so that we can explore it through querying.
Resources
- Docker Desktop
- Docker ubuntu image
- date command manual
- expr command manual
- Saving environment variables between steps in GitHub Actions
