

Transcripted Summary
This time, although I want to work with a different project in my IntelliJ instance, I'm not going to go to File and close this project. I want to show you something different.
Instead, I will go to the New entry from the File menu, I will go to Project from Existing Sources.
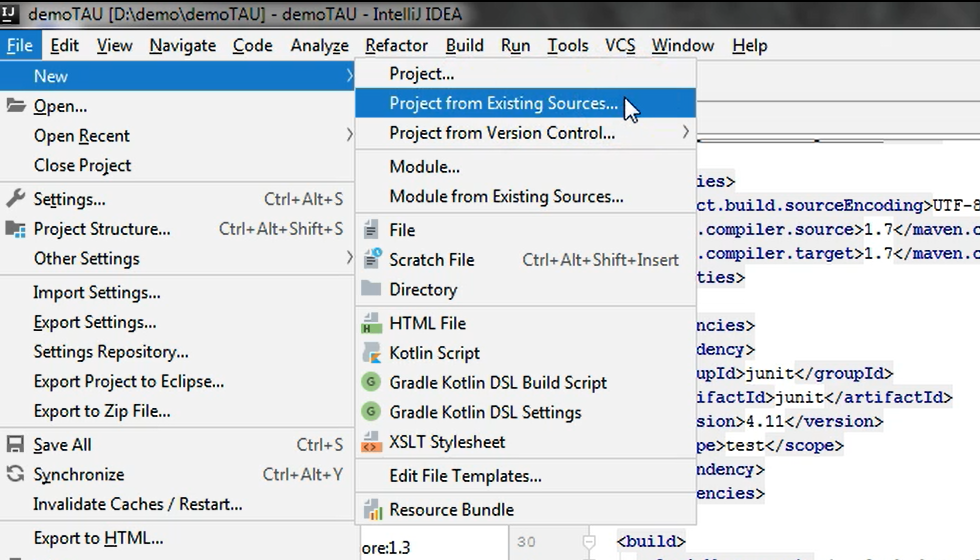
If you remember the screen we had when we opened IntelliJ the first time, where we had Create New Project and Import Project, this particular entry that I've highlighted here [Project from Existing Sources] is the equivalent of the _Import Project _option from that screen.
So, if we want to create a project based on some files that you already have on your machine, you don't need to close the project that you are working on.
You can just go to File > New > Project from Existing Sources.
Once we click that option, we have an import screen where we can specify the location where the existing sources are found on the machine.
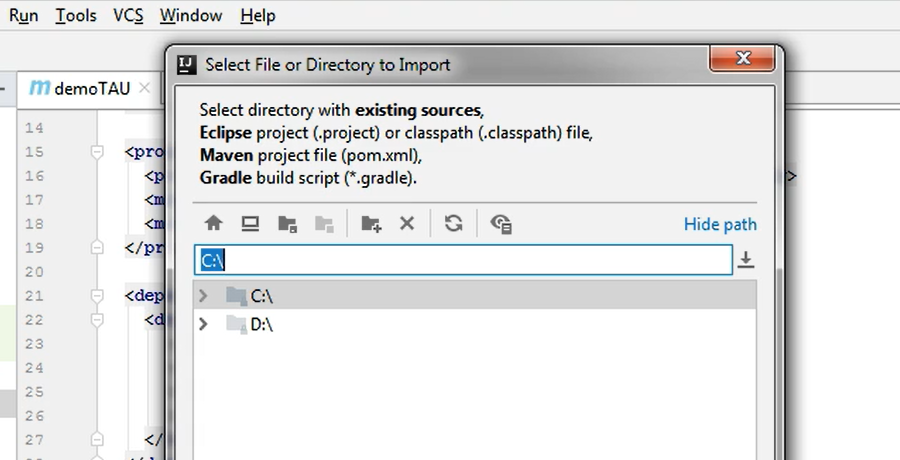
We can select from the locations that we have, or we can just directly type the location of the project we want to import into IntelliJ.
Once we do that, we can just click the OK button.
A new screen appears where we are asked what we want to do — Create project from existing sources or Import the project from an external model.
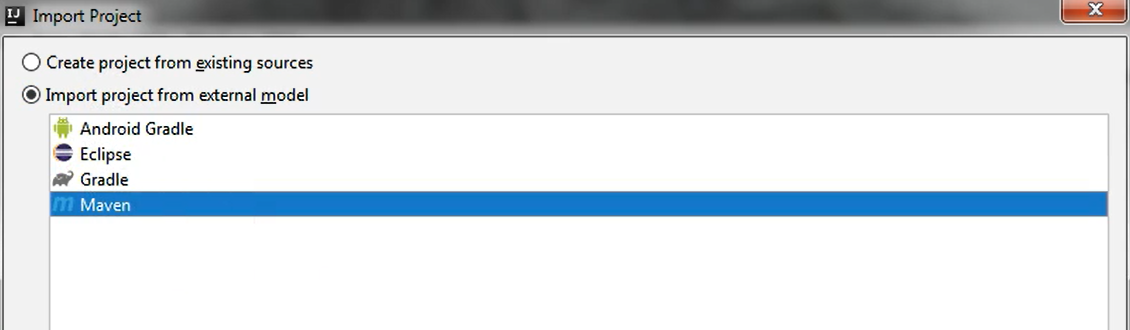
If you have a Maven project as I have in this example, it is good to choose the Import project from external model because that way, the project will be automatically imported as a Maven project with all of its proper setup being done.
So, I will just click the Import project from external model and then Maven, and I will just click the Next button.
Now I have another screen where I'm asked for different things.
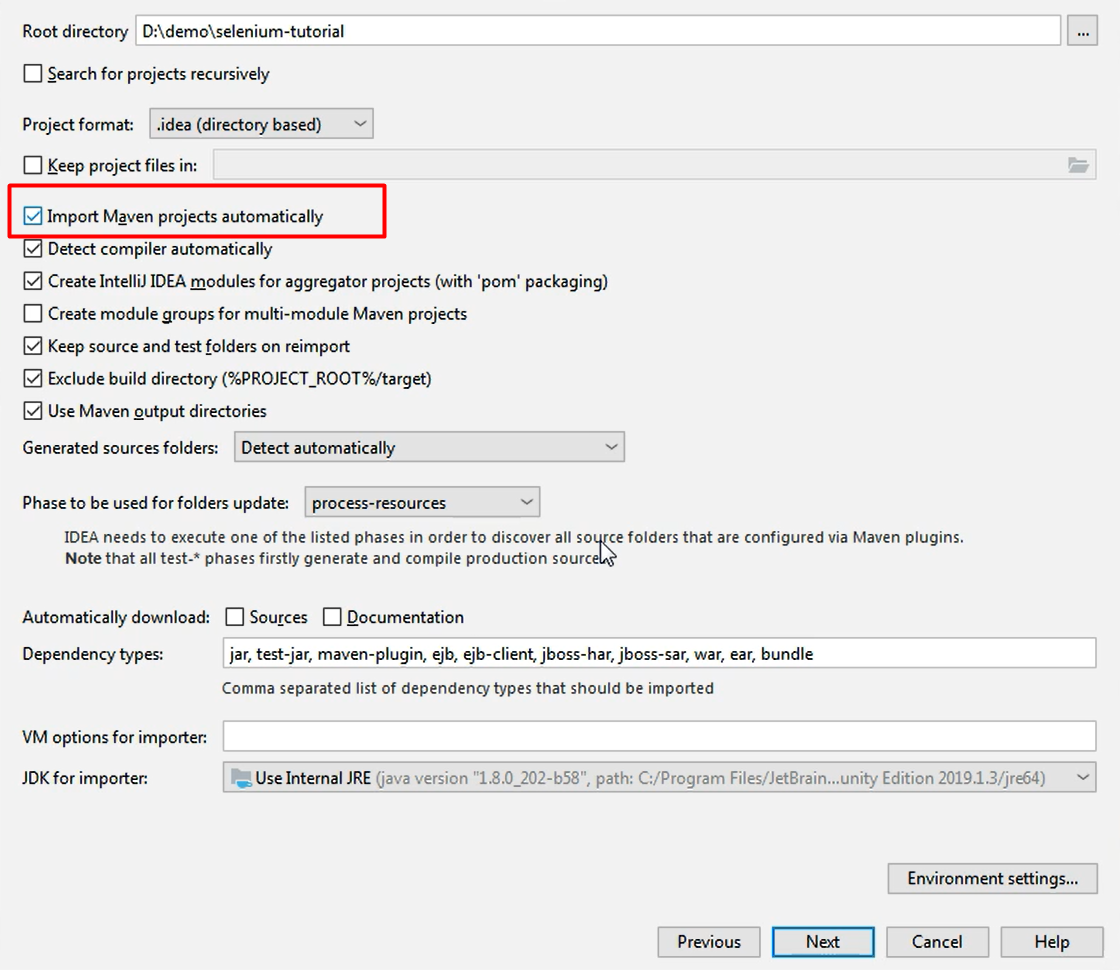
Always make sure that Import Maven projects automatically is checked.
Anything else on the screen is irrelevant at this point, so you can just click Next.
If you have selected to import a Maven project, for sure... So, there is no mistake, you didn't try to import a non-Maven project as a Maven project, then you will see this particular entry here which reflects the pom version.
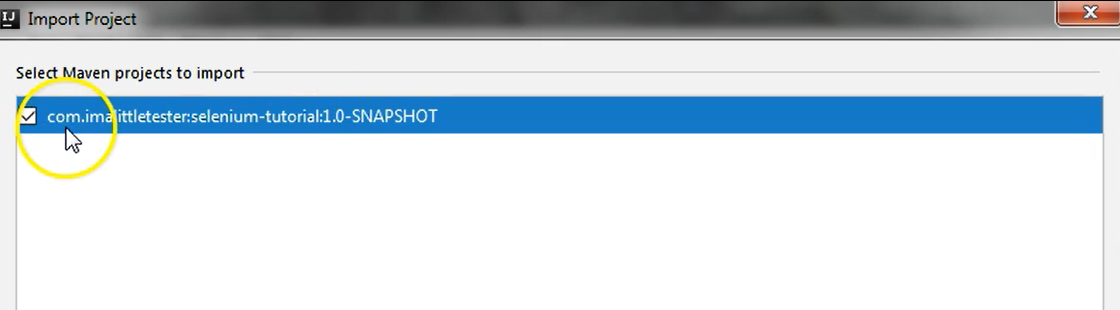
Basically, it says that there is a Maven project in the location that you specified, whose groupId is “imalittletester”, in this example, whose artifactId is “selenium-tutorial`, and then whose version is “1.0-SNAPSHOT”.
So, this is just a confirmation that a pom.xml file was read from the project, and that the project is okay to be imported.
Just click the Next button.
Now you will need to specify what Java SDK you want to use in this project.
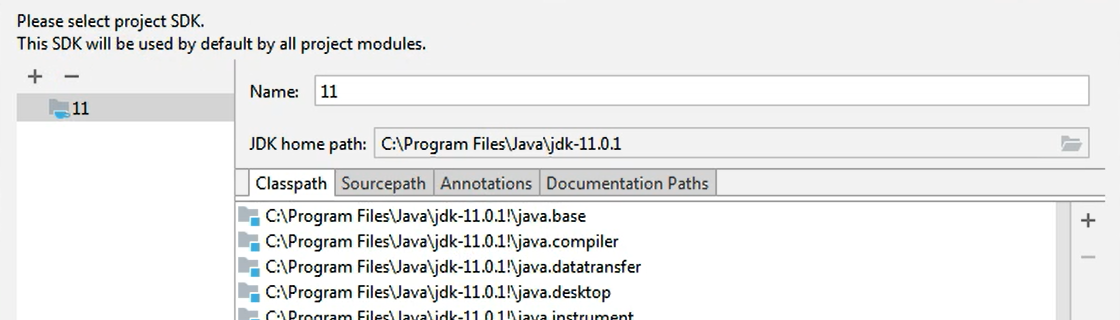
I only have the one installed here, so by default, it is already selected, so, I will just have to click Next here.
Of course, if you have several SDKs and you want to use a particular one, you will just have to choose it from the left-hand side.
If you want to add another one, or you want to remove an existing one, just play with these 2 icons here (the “+” and/or “-” icons) and perform the setup that you are asked to perform by IntelliJ.
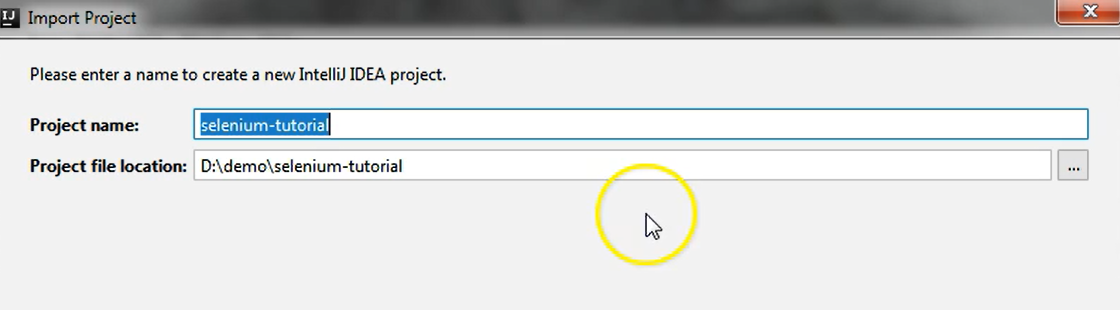
I will just click Next right now and I will just confirm that the project I'm importing has the location that I specified here, and that the Project name, as it is specified in the artifactId, which you can also find in the pom.xml, is “selenium-tutorial”.
I will just click the Finish button now and I will wait for the project to be imported.
Because it was a project that I used with IntelliJ previously, I get a message that there is an .idea folder in that project.
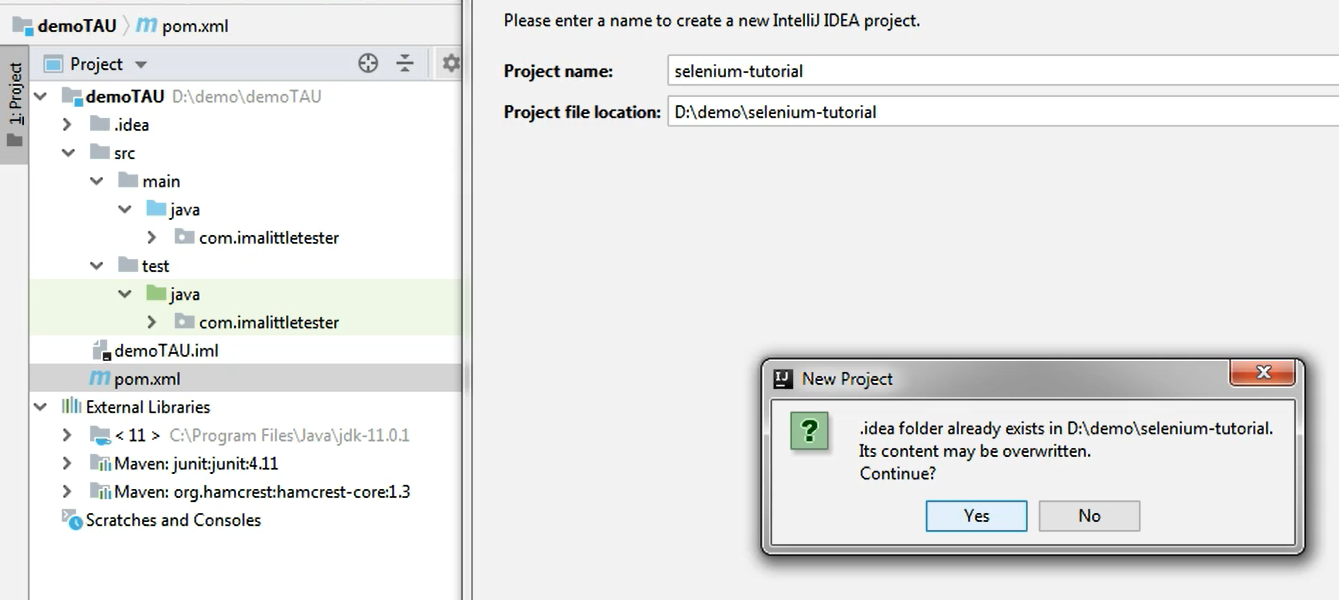
If you remember, I told you that the .idea folder is used by IntelliJ to manage its workspace.
Because we are importing the project again, we just need to override the initial .idea folder that was already there, so I'm just going to click Yes.
If the project was a Maven project that was never imported in any IntelliJ version before, you won't have that .idea folder, so you won't go through this screen again.
So now we just need to wait for the project to be loaded.
How will it be loaded?
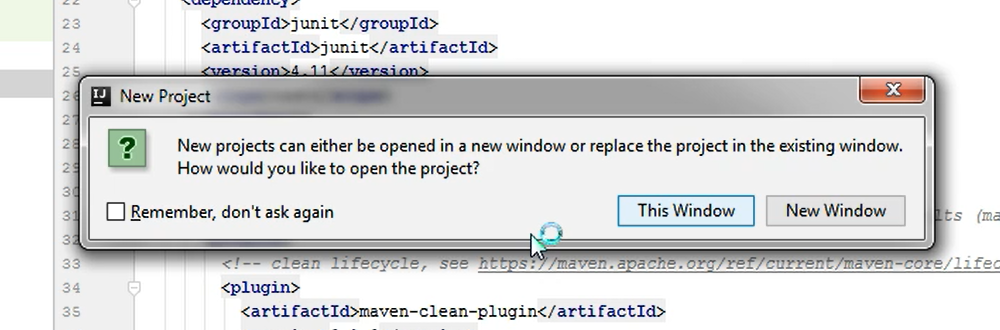
We already have an open project here, so IntelliJ tells us:
You could either open the new project in a new instance of IntelliJ, meaning that you will have 2 open IntelliJ instances at a time — one with the latest project that you're importing, and one with the project that you currently see here.
Or you can just use the same window which means you're not going to use this particular project anymore; you are going to work on the newly imported project. So, it's kind of like closing the project but not really.
So, for the purpose of this demo, I'm just going to say, "I want to work with the same window, don't open a new one."
Of course, you have the option to check this checkbox, which means that if you choose one of the 2 options, every time that this situation is encountered, the option you selected will be applied by default. So, any time you want to open a new project, if you clicked that you want to open the project in the same window, that is what will happen.
It's a good idea not to check this checkbox because you never know what you will be working on.
Maybe you want to compare 2 projects, or you need some information from 2 projects so that's when you will need 2 separate windows.
For now, I will just choose for the new project to open in This Window without checking the checkbox.
And now the processing is done so dependencies are resolved, and the Maven project is being slowly imported into my IntelliJ.
Once that is done, you can see on the left-hand side that we have the Maven project, which has its pom.xml file.
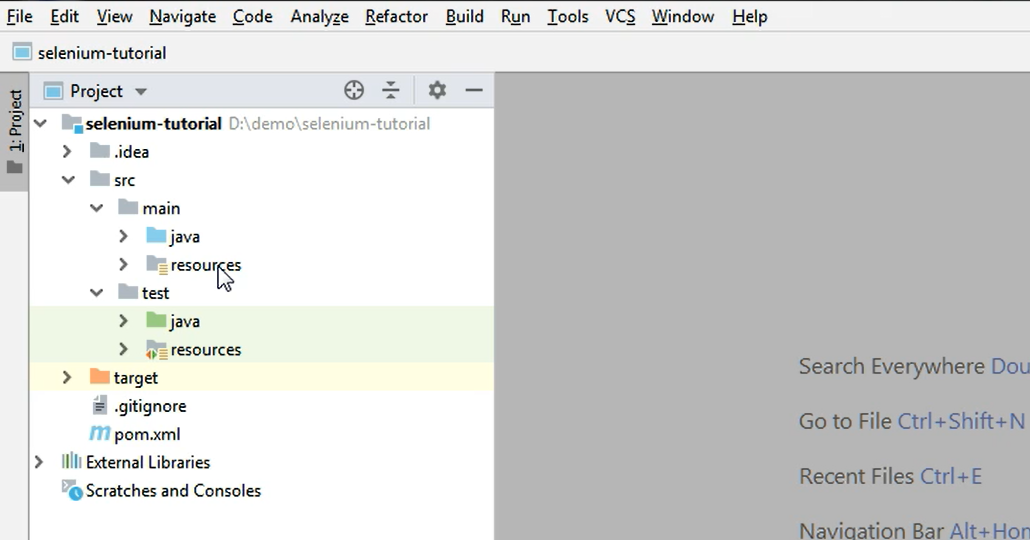
And then its specific Maven structure, which is a src folder with the main and test folders and then each containing a java and resources folders because that is what I had in the initial project.
So, this is how you open a project, or you import a project that you already created at one point and that you had stored on your machine. You can now start working on this, you can start writing your tests and running your tests and so on.
Resources
Quiz
The quiz for this chapter can be found in section 2.4
