

Transcripted Summary
In this chapter, we will see how to run the tests that we created.
- We can run a package
- We can run a class
- We can run a method
# Let's start with running an entire package.
In the taudemo packages that we created in the beginning, there are 3 test classes that I've created: a Selenium test, another Selenium test, and a test which does not have anything Selenium related (just 2 assertions basically representing 2 different tests).
In order to run all of them without having to select each one of them and running them, I can just select the package — I can highlight the package name called “taudemo” — and I will right click.
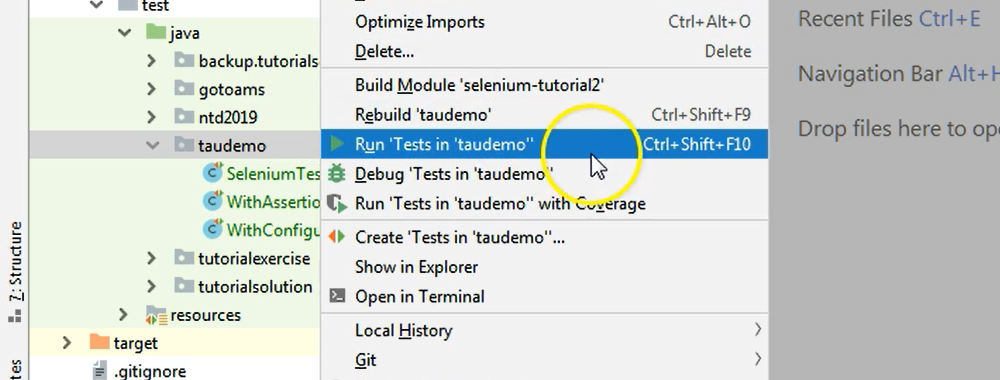
Here among many options that you can see, there is the “run test in the package name” option — so, you have the Run ‘Test in ‘taudemo’’ option.
If I click on this, you will see that something is happening. There is some more parsing and building and so on.
And after that a new tab opens in the lower bar, which is called Run.
Now my tests have started running, so you will see the tests and in this Run tab you will see all of the information regarding the test runs.
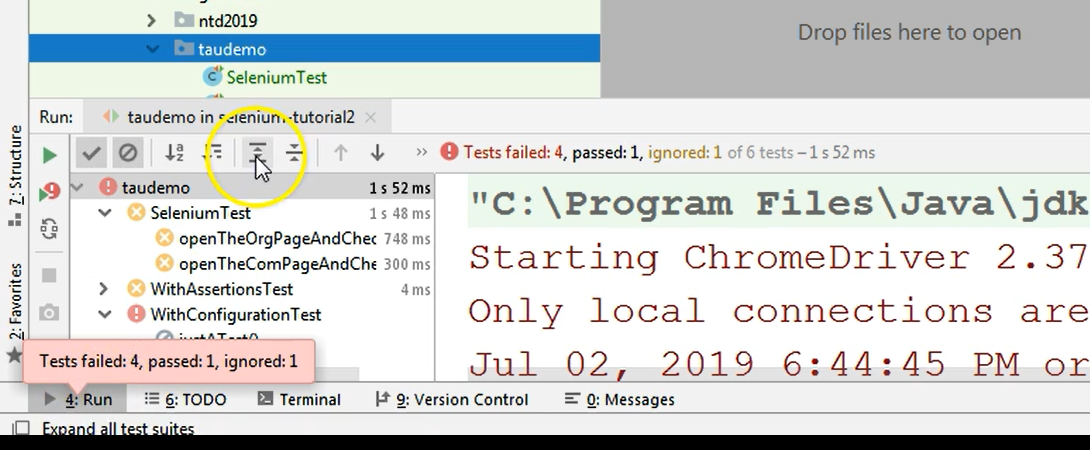
You will see which package was run, which test classes were run.
We had the “SeleniumTest”, “WithAssertionsTest” and “WithConfigurationTest”. And you also see a duration for each of these packages and the name the classes.
You can see by expanding the drop down next to each class name what were the methods, the test methods that were run.
So, we had 2 test methods here in the SeleniumTest class.
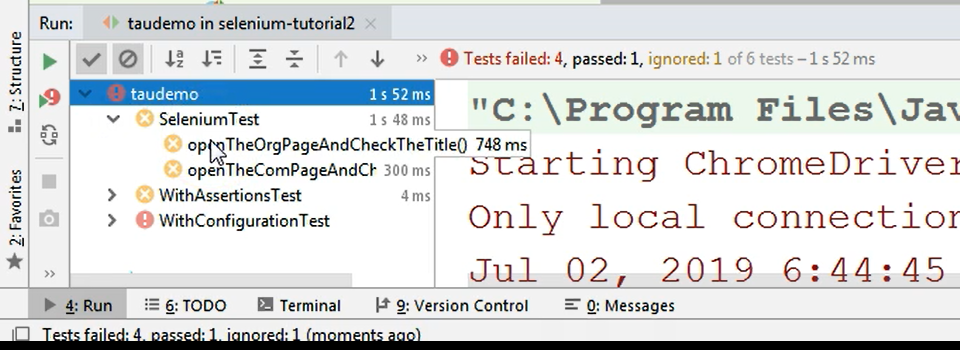
We have two other tests in the Assertions class and we had 1 test in the Configuration test class.
Here on the left side, you can basically see the structure of what was run.
You can see the package, the classes, and the methods.
On the right side, on the upper part of this Run screen, you can see the number of tests that failed, passed, or ignored.
You can also see the total number of tests that were run.
This is basically the number of test methods. So, when you see 6 tests, that means 6 test methods, or 6 methods annotated with the @Test annotation.
Four were failed, as I was saying, 1 was passed, and 1 was ignored — you can see that they are highlighted in different colors.
Right below this information there is a screen where we have the result of the test run.
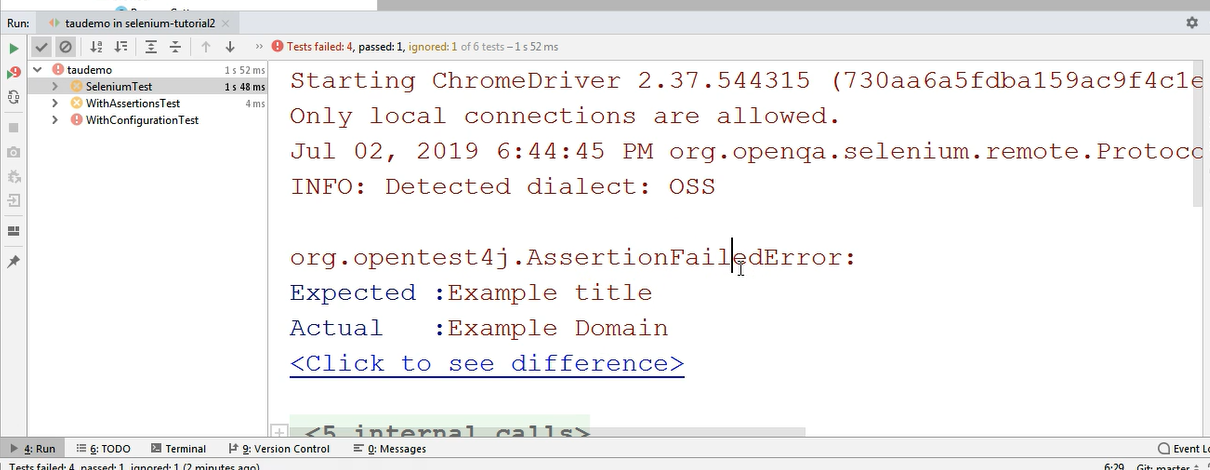
So here, because we are looking currently at the SeleniumTest, we have some information regarding the fact that the browser was open and then we had some information regarding the assertion situation and then below that there is a stack trace.
I will go through all of them in just a second.
Just so you know, if you expand the dropdown next to the test class, you can go to each individual test or test method and you can see the information regarding it.
So, for example, if we go to this second test method from the first class, we can see its failed assertion and we can see its own stack trace.
If instead we are on the class level, we can see the information of all the assertions that were part of that class which failed.
So, here is a, let's say, aggregated view of everything that is happening inside the test class and in the test method we only see information regarding that particular test method.
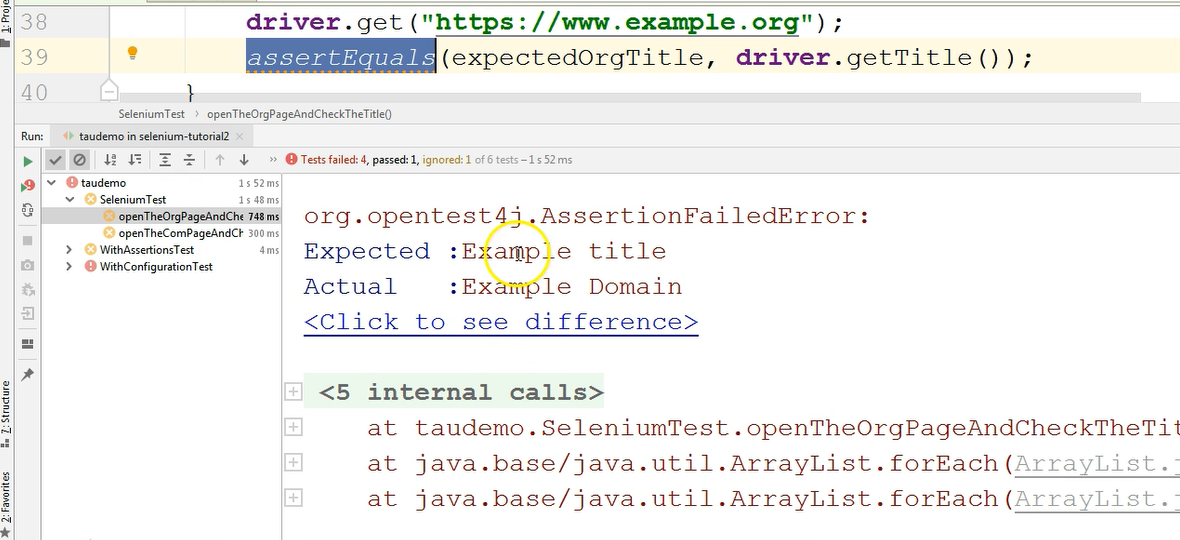
Let's just take a look at this one.
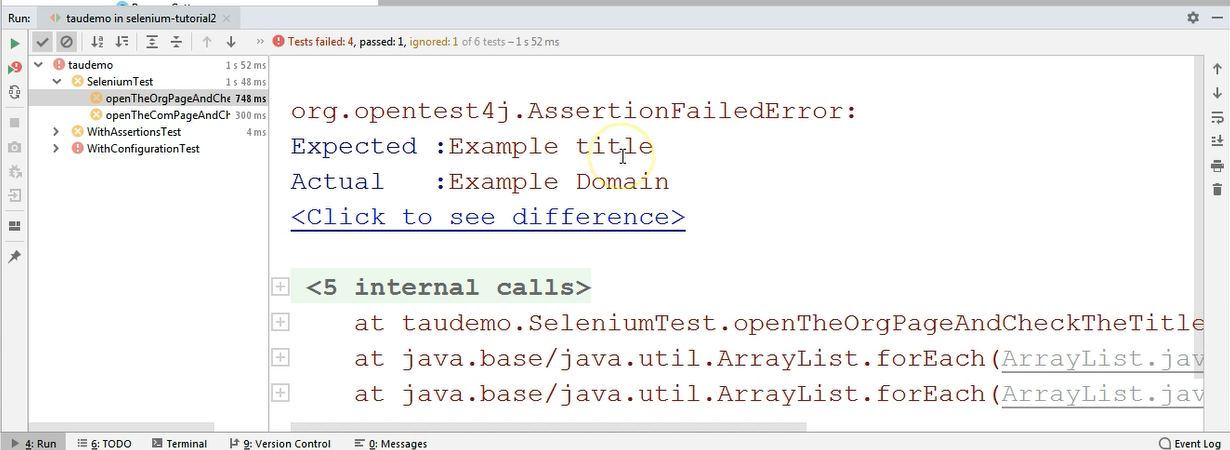
This is a method which failed with an assertion error because the expected value was "example title" and the actual value was "example domain."
So, these are part of the assertion that we made.
In order to see where in the test this assertion is found, we can take a look at the stack trace and we can take a look at that entry in the stack trace, which has a blue underline, which looks like a blue link.
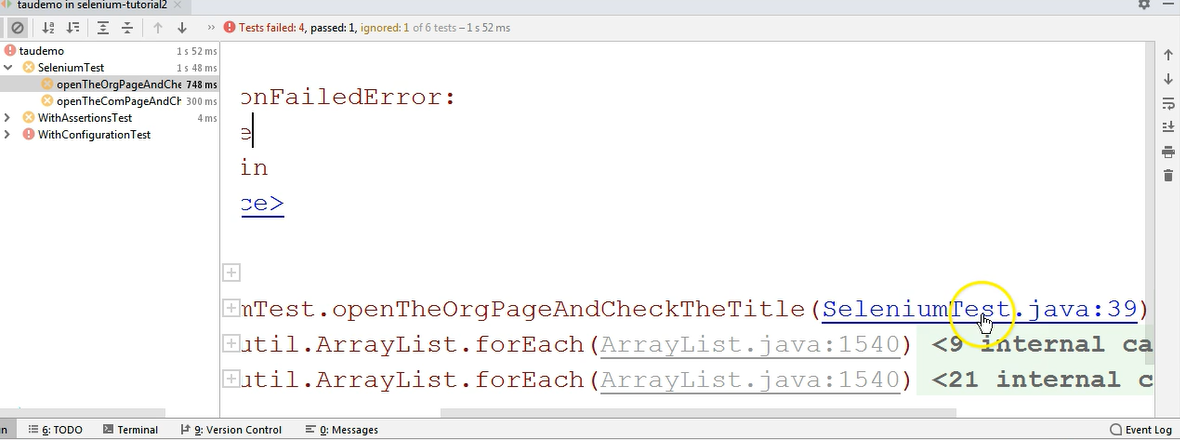
This is the location of the failure inside our test. Let's see where this is.
By clicking on this, we will jump directly to that assertion.
And you can see that the code indicated is this assertion.
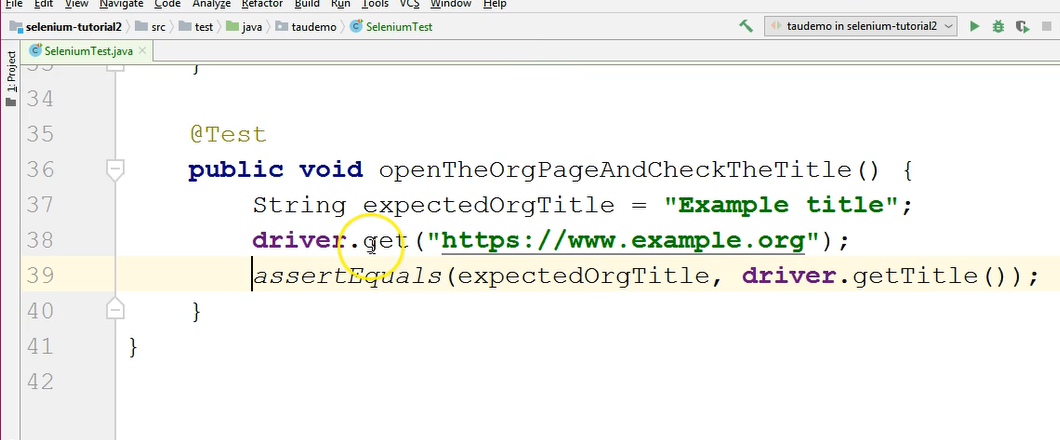
When I clicked on Run and I was in this results screen and I clicked on “SeleniumTest”, it took me to line 39, as you can see here in the stack trace — “SeleniumTest.java:39” — so after these dots (colon) you have line 39.
So, this is the place where there was a failure. This is the assertion that failed, and it failed because it compared the expected value to the actual value. They weren't the same. So, the test failed.
If we look at the other entries from this stack trace, we can actually see basically what's behind the assertion — so, behind the assertEquals method — and where the test actually failed.
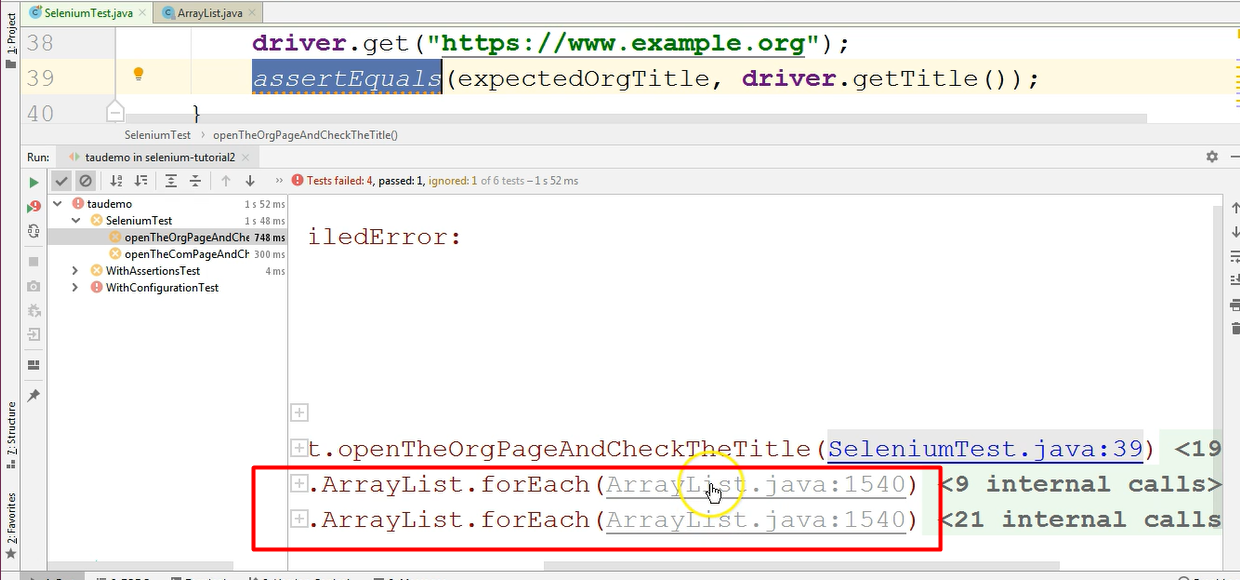
My test is using an external method, a method that comes from a different library.
In order to find out where in that library the code failed, we can take a look at these further in the stack trace, but usually the part where we need to change something or the part that is most relevant for us to see a test failure is inside our own code.
Inside our code is where we called a method, an external method. And that is where the test failed because our own data, the expected and the actual values were different.
So, in case of a failure, this is how you can see the failure of a test method and that is how you can see the root cause or where in the test the tests failed.
In case there are longer values here, so it's not just "Example title," "Example domain," but instead some number streams which are different at one point. So, they're not totally different.
You can see the highlighted difference between them by clicking the _Click to see difference _option.
Here you will see a highlight of what is different between the 2 streams, the expected and the actual one.
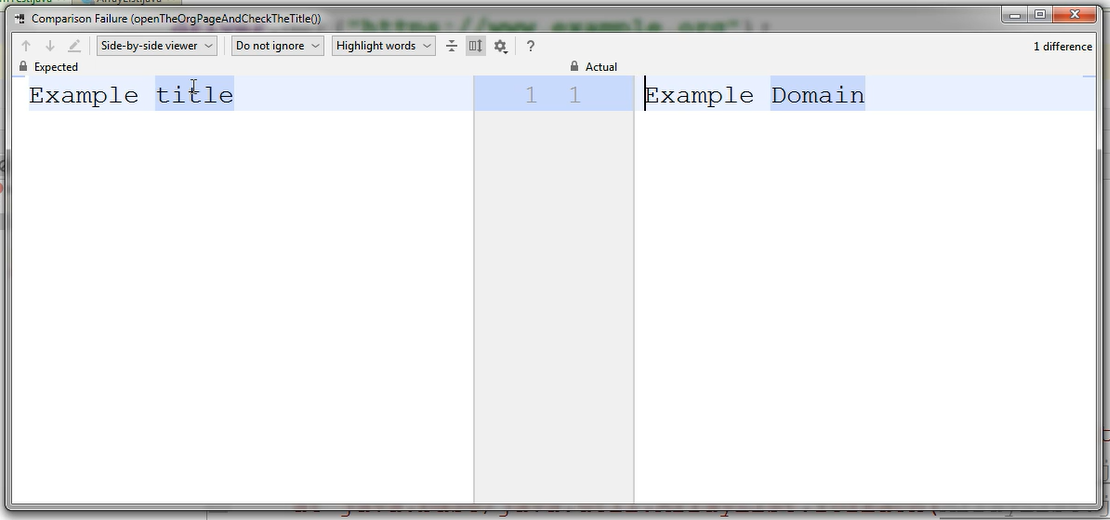
If the 2 are completely different then the entire text will be highlighted on each side.
So, this is how you can easily determine what is different in case there is a larger stream, which is a bit more difficult to see, maybe the 2 texts are almost identical, but there is 1 text that is in uppercase or lowercase or something like that.
So, for those not so obvious comparison results, you can just take a look at the Click to see difference link that is shown right below the failed assertion information and right above the stack trace.
Jumping back to the test class, if we're looking at this results screen, we can see that we have 2 failures.
We have the firstAssertion failure, and then we have the secondAssertion failure.
In order to not have these failures anymore, we need to check the tests and we need to check whether our expected was wrong or whether the actual was wrong.
Of course, if the expected was wrong, we can change it in the test. Otherwise we probably need to talk to the developers or to the product owner because we might have a bug in the system.
Quiz
The quiz for this chapter can be found in section 7.4
