

Transcripted Summary
In this demo, we will learn how to use TestCafe with Allure Report.
We will start by
exploring the Allure Report with TestCafe
install it to using NPM
generate the Allure Report
run Allure server with our test cases from TestCafe
Like the HTML reporter, we are opening the NPM website, and then inside the search bar, we can search about "testcafe-reporter-allure" and here we can find the TestCafe Allure Reporter.
This plugin gives us the ability to generate Allure Reports, or this is the Allure Report plugin for TestCafe to generate Allure visual reports for TestCafe test execution.
To install this one, we just need to install it with:
npm install testcafe-reporter-allure
So we will open our project and we just need to run this on the command line.
Inside the package, we only have the HTML reporter from the previous demo and we need to add one additional reporter with Allure Reporter.
So after NPM finished installing, we can find test-reporter-allure in the dependencies in package.json.
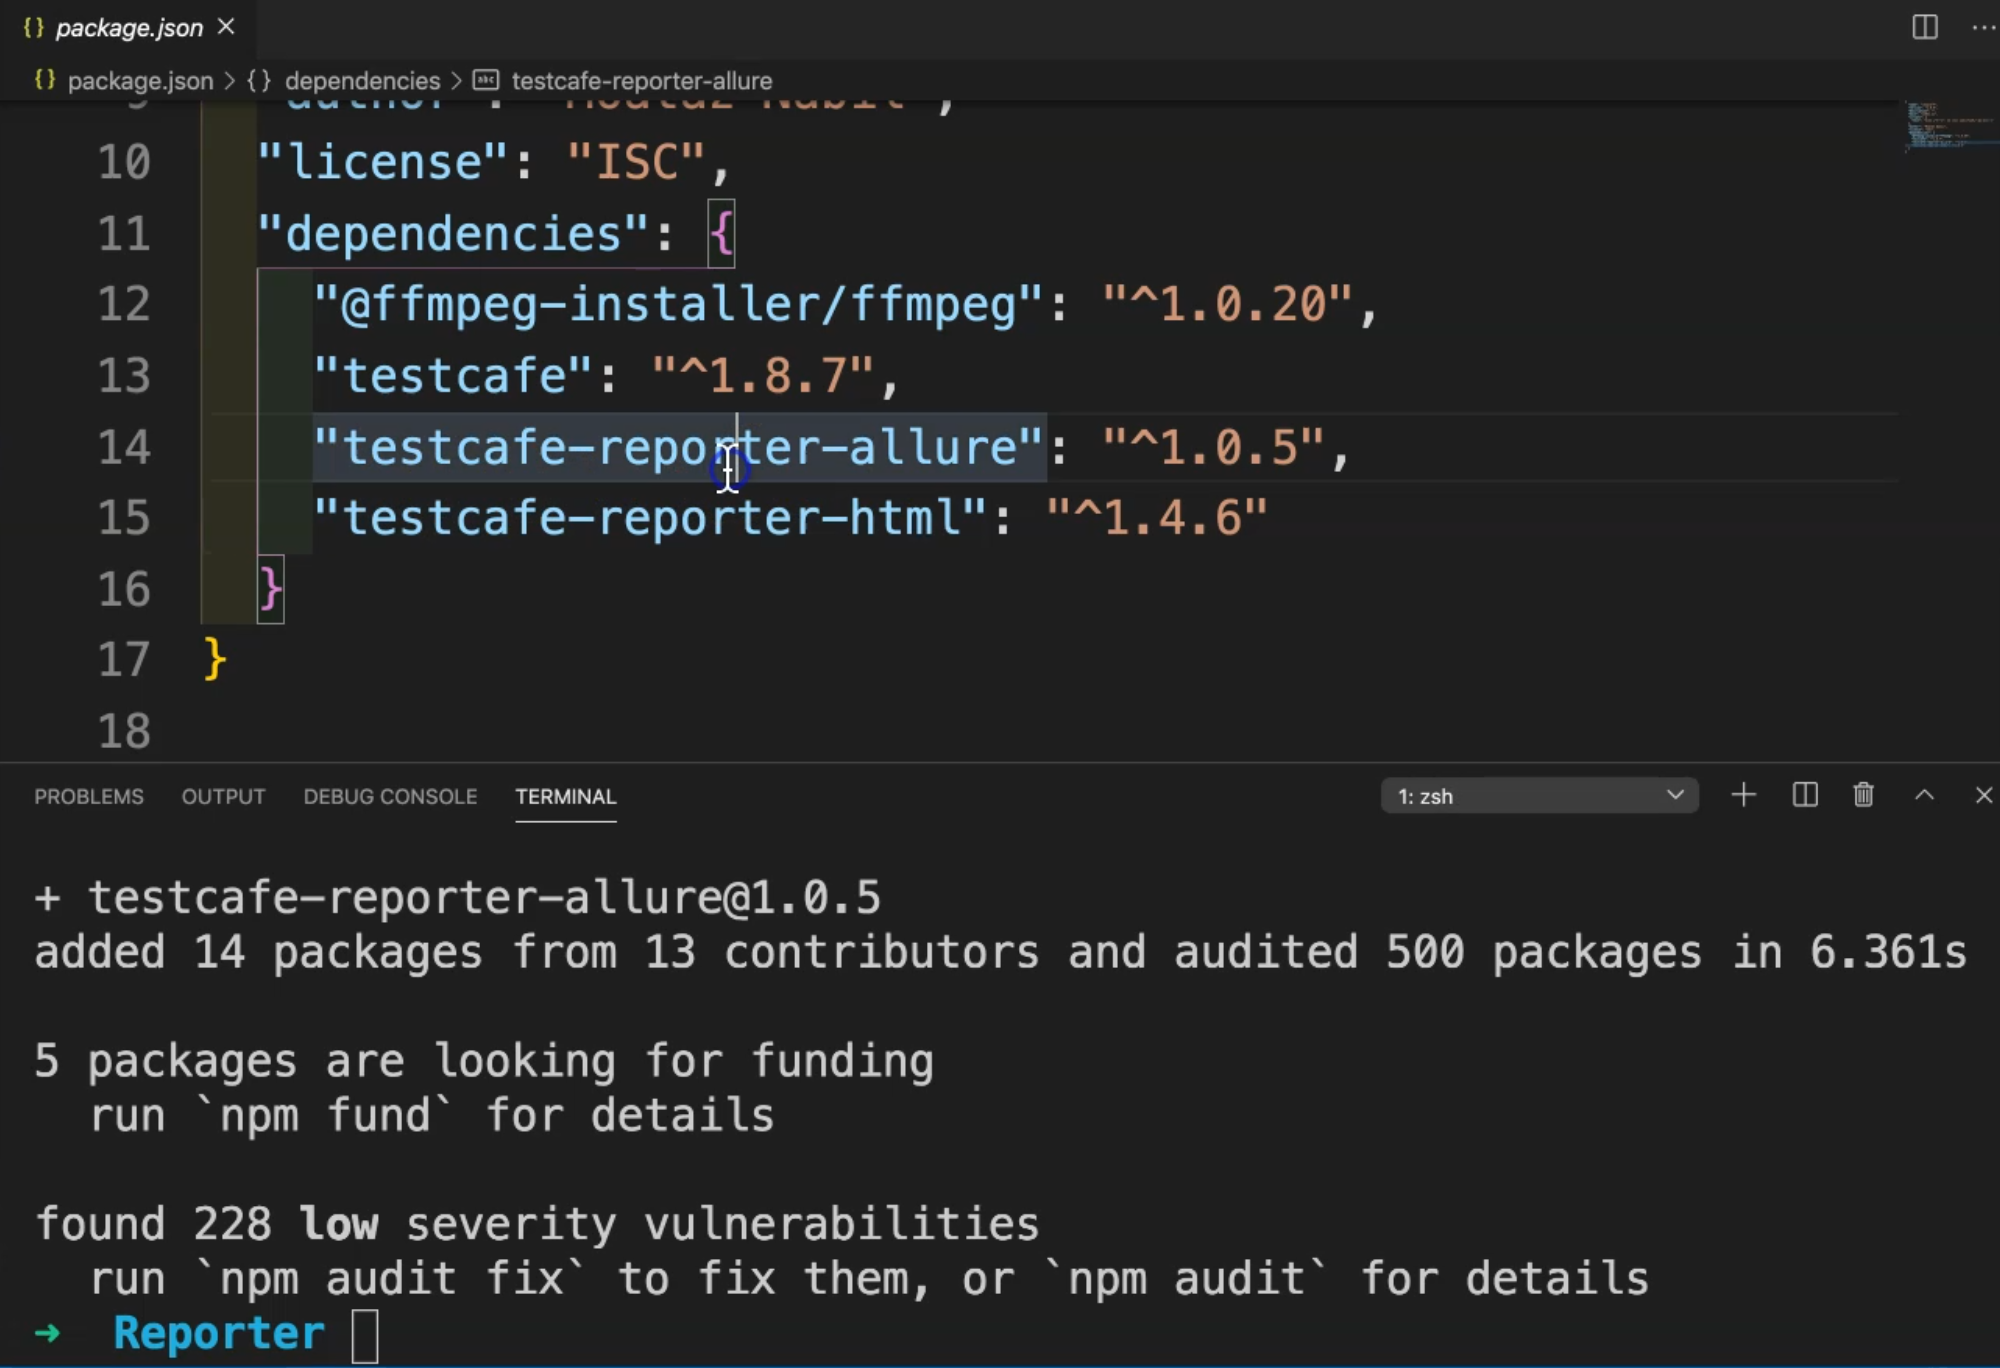
We have testcafe-reporter-allure with the version or the latest version with this plugin.
Then we can also use our registration test in our demo, and we can just change the HTML Reporter to Allure Reporter.
From the command line, we can just run
testcafe chrome test/RegistrationTest.js --reporter allure
Instead of HTML, we can just use --reporter and put allure instead of html.
Let's run our test and check what happened after we finished the test execution.
Our test is now running and we are using the user registration example.
After we finish, we will find the test result.
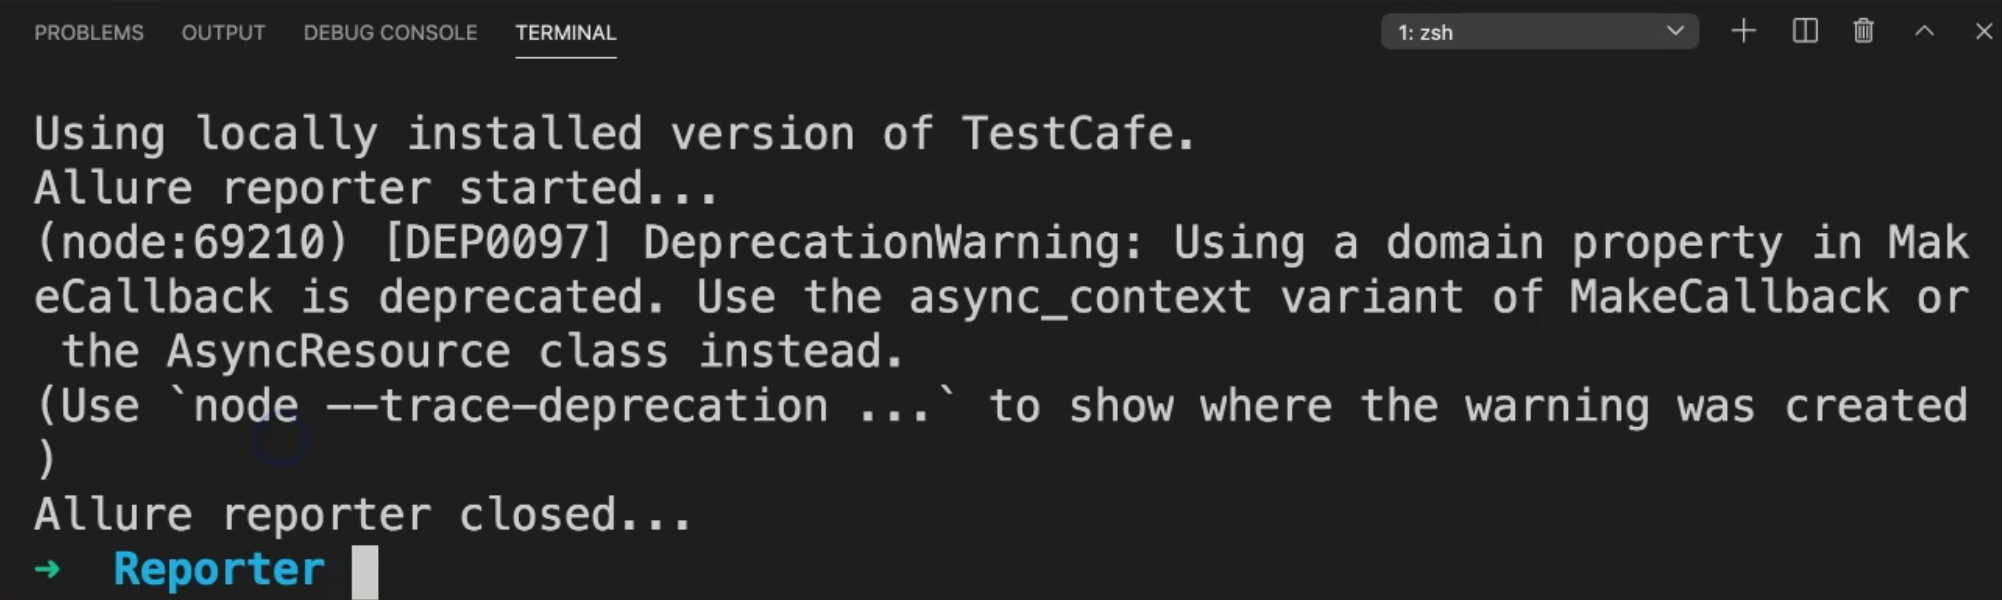
Here we will notice that we have "Allure reporter closed" - that means that Allure started and we started collecting that data or the test result, and then Allure reporter closed.
In our project, we will notice that we have a folder with the name allure and under allure, we have allure-results.
If we open this one in this folder in Finder, we can find allure-results with .xml extension, so these are the test case results from TestCafe.
We are generating the Allure reports, but we still need to install Allure itself, and after that generate the Allure Reporter from our algorithm.
So let's open the page for the plugin or the reporter again.
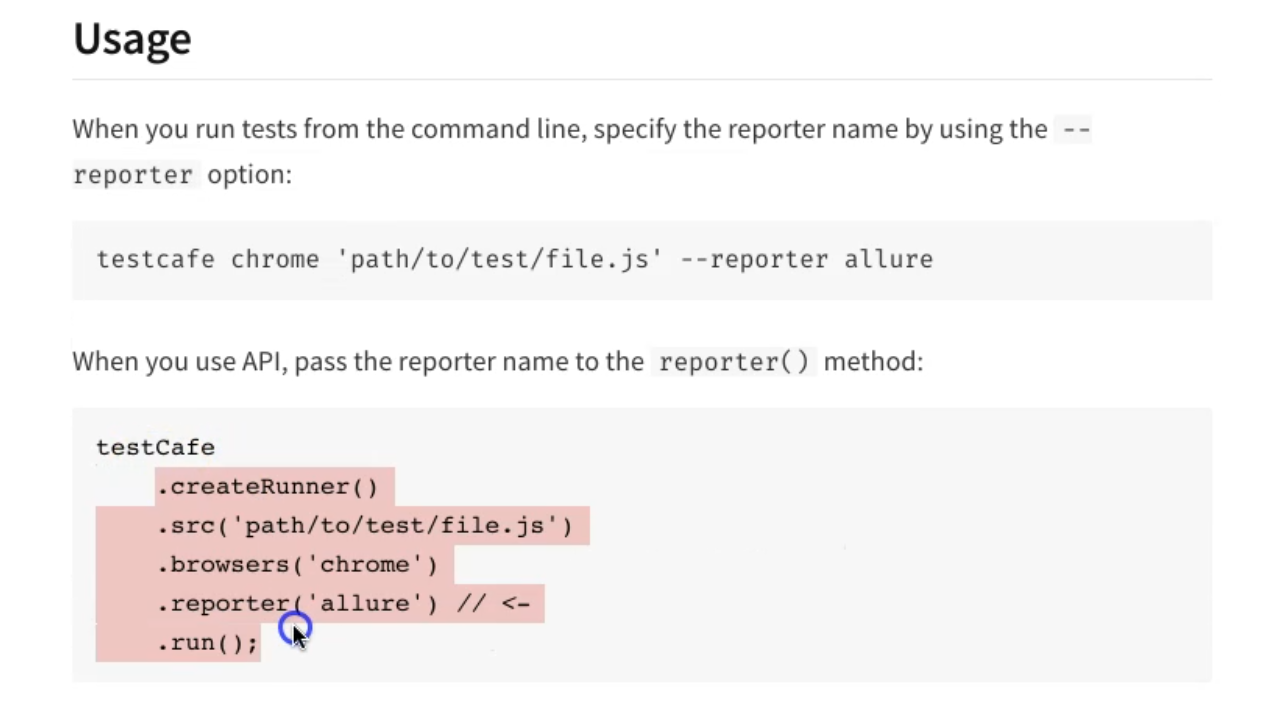
Here is the usage - we are already using it with testcafe chrome passing as a file and --reporter with allure.
If you have the TestCafe runner, we can put a parameter in this file.
In the next step, we can add test metadata, but at the beginning, we just need to generate the Allure reporter to check if Allure is generated successfully or not.
After that, we can append any data that we need with the Test metadata - for example - the test case ID, the severity, the story ID and test run.
Also, you have the Executor, if you have the executor.json in your allure-results.
If you have a configuration, we can create doc-allure-config.js and after that, you can add any configuration that you need to put it with TestCafe and Allure Report, but we need first to view the report.
So after running a TestCafe test, it should generate the folder allure/allure-results and we already have this one.
After that, we need to install the Allure command line in our project using:
npm install -g allure-commandline
The file already exists because I installed it previously, so I already have Allure Report.
Then, we can just run this command to view Allure Reports:
allure generate allure/allure-results --clean -o allure/allure-report && allure open allure/allure-report
So what is the meaning of this?
We will generate the allure report from allure/allure-results.
--clean is for if we have a previous report and -o to put the output in allure/allure-report, and then open the allure-report in the browser.
So let's run our test.
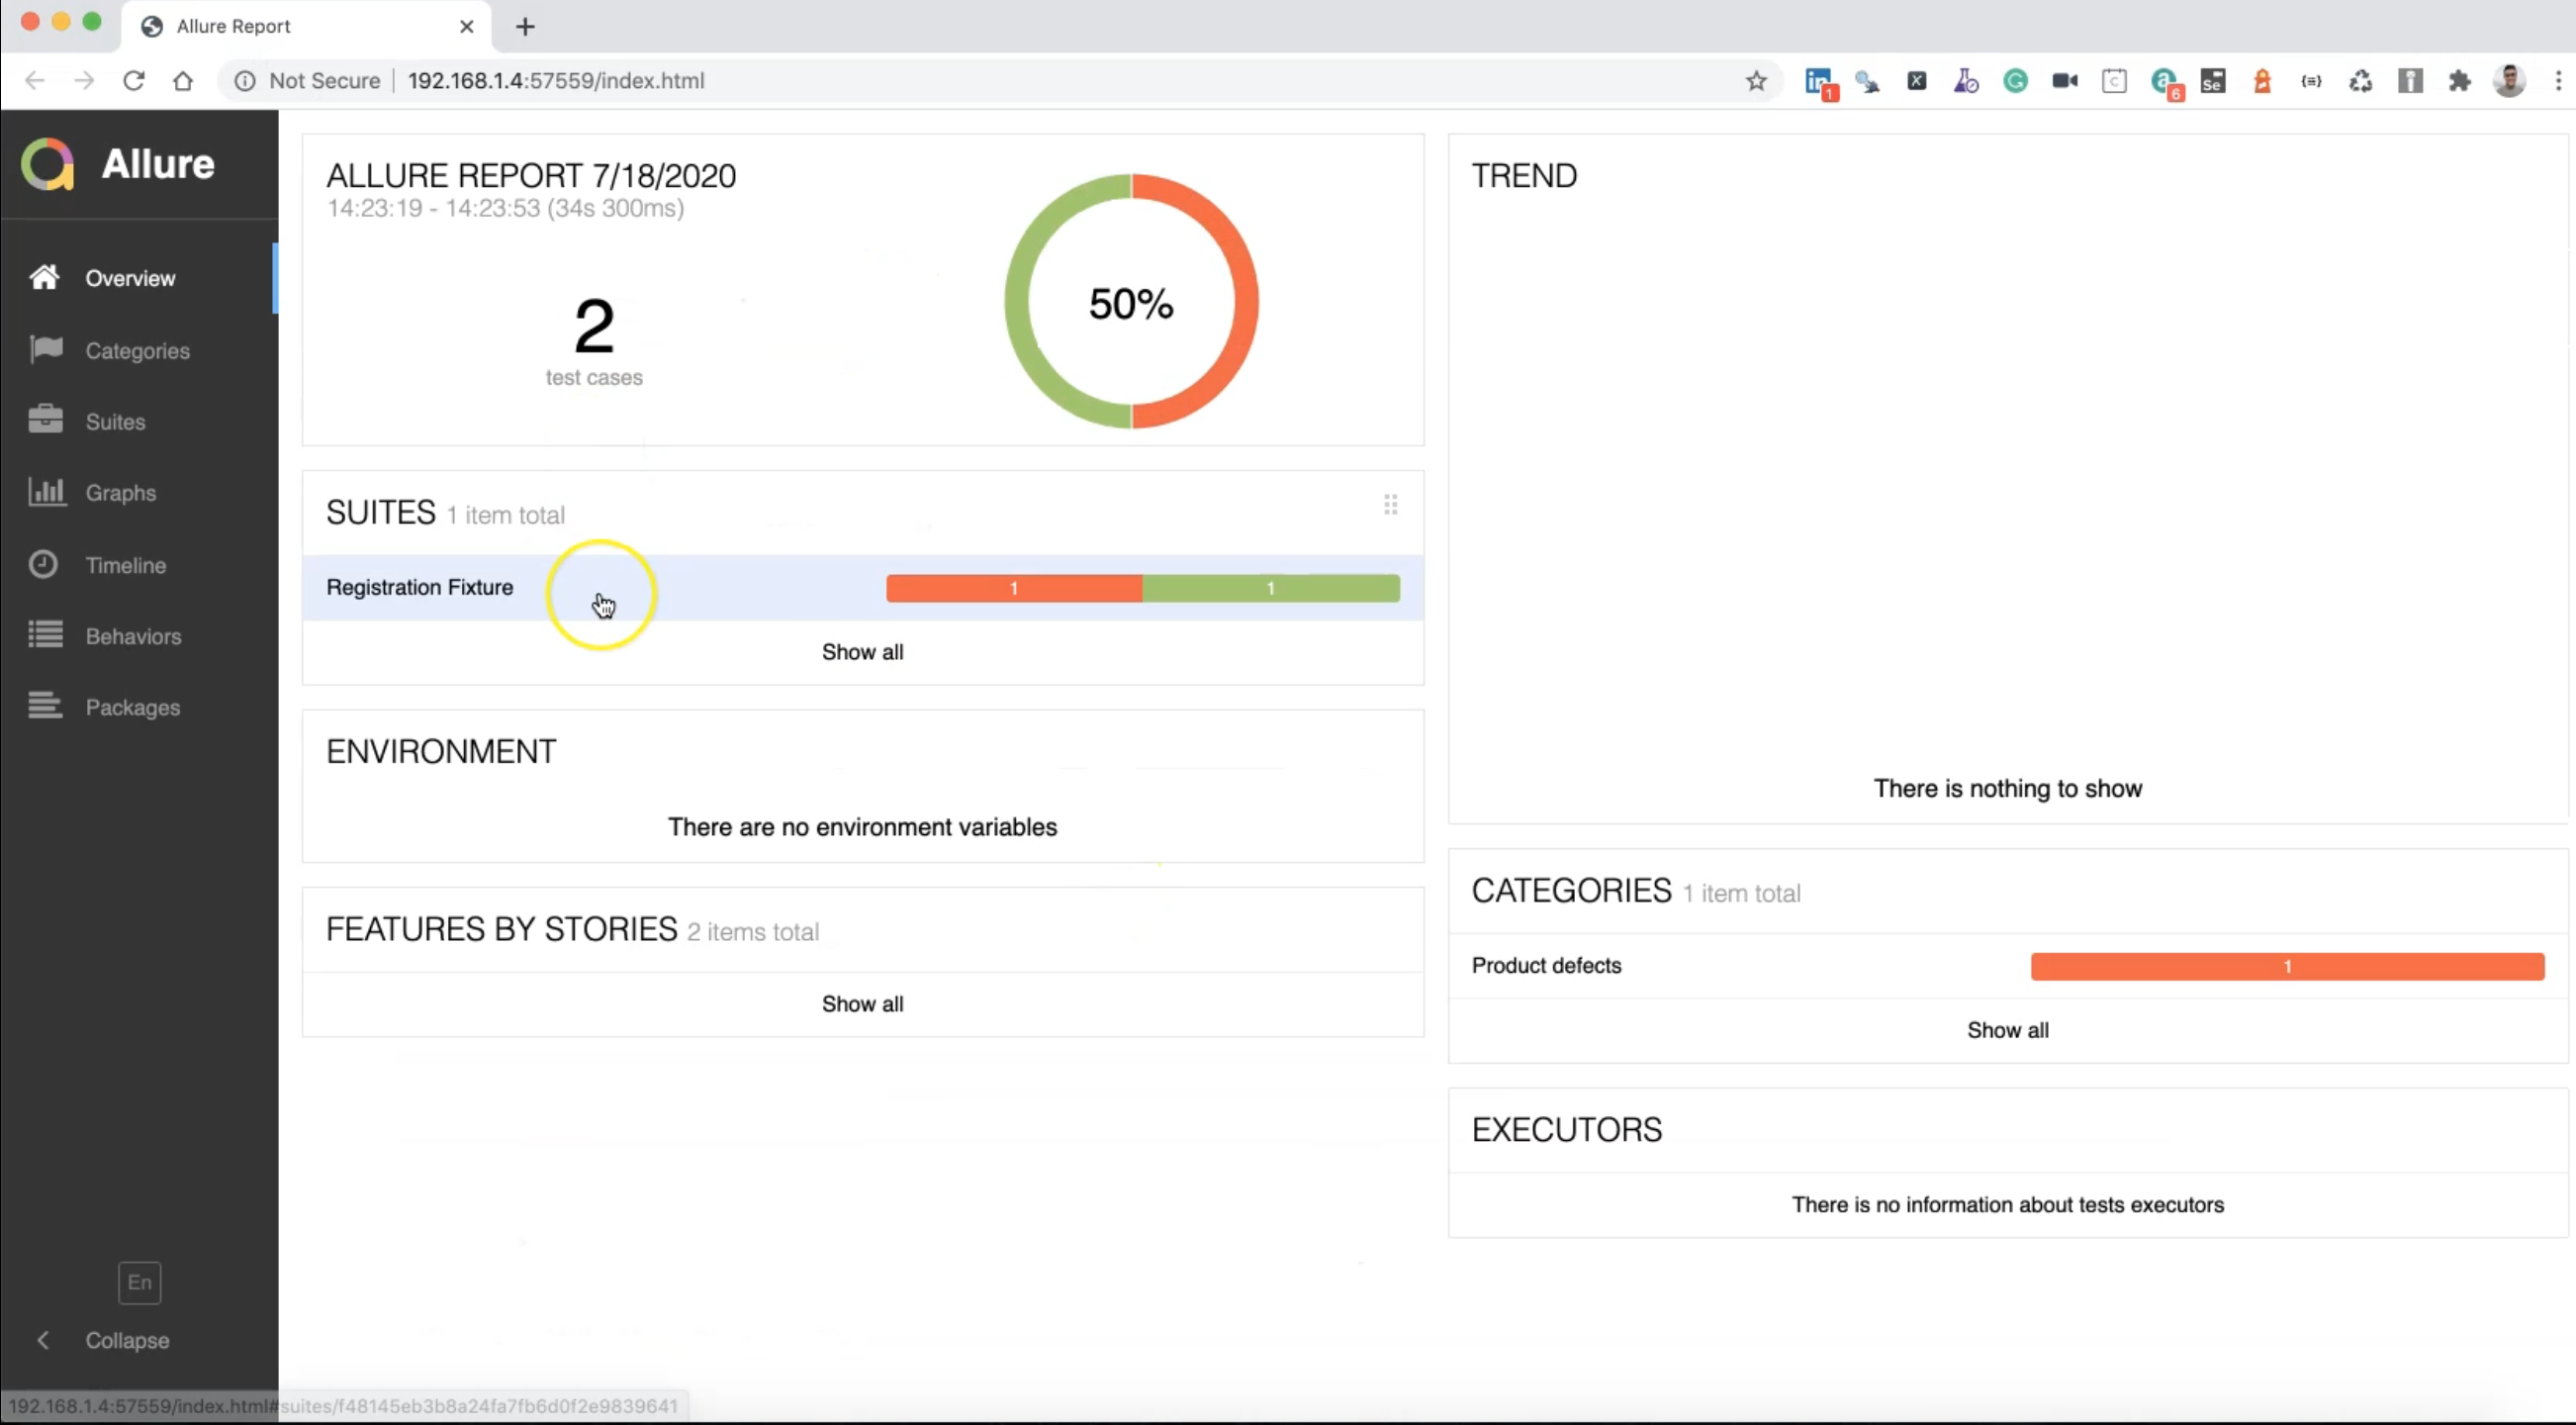
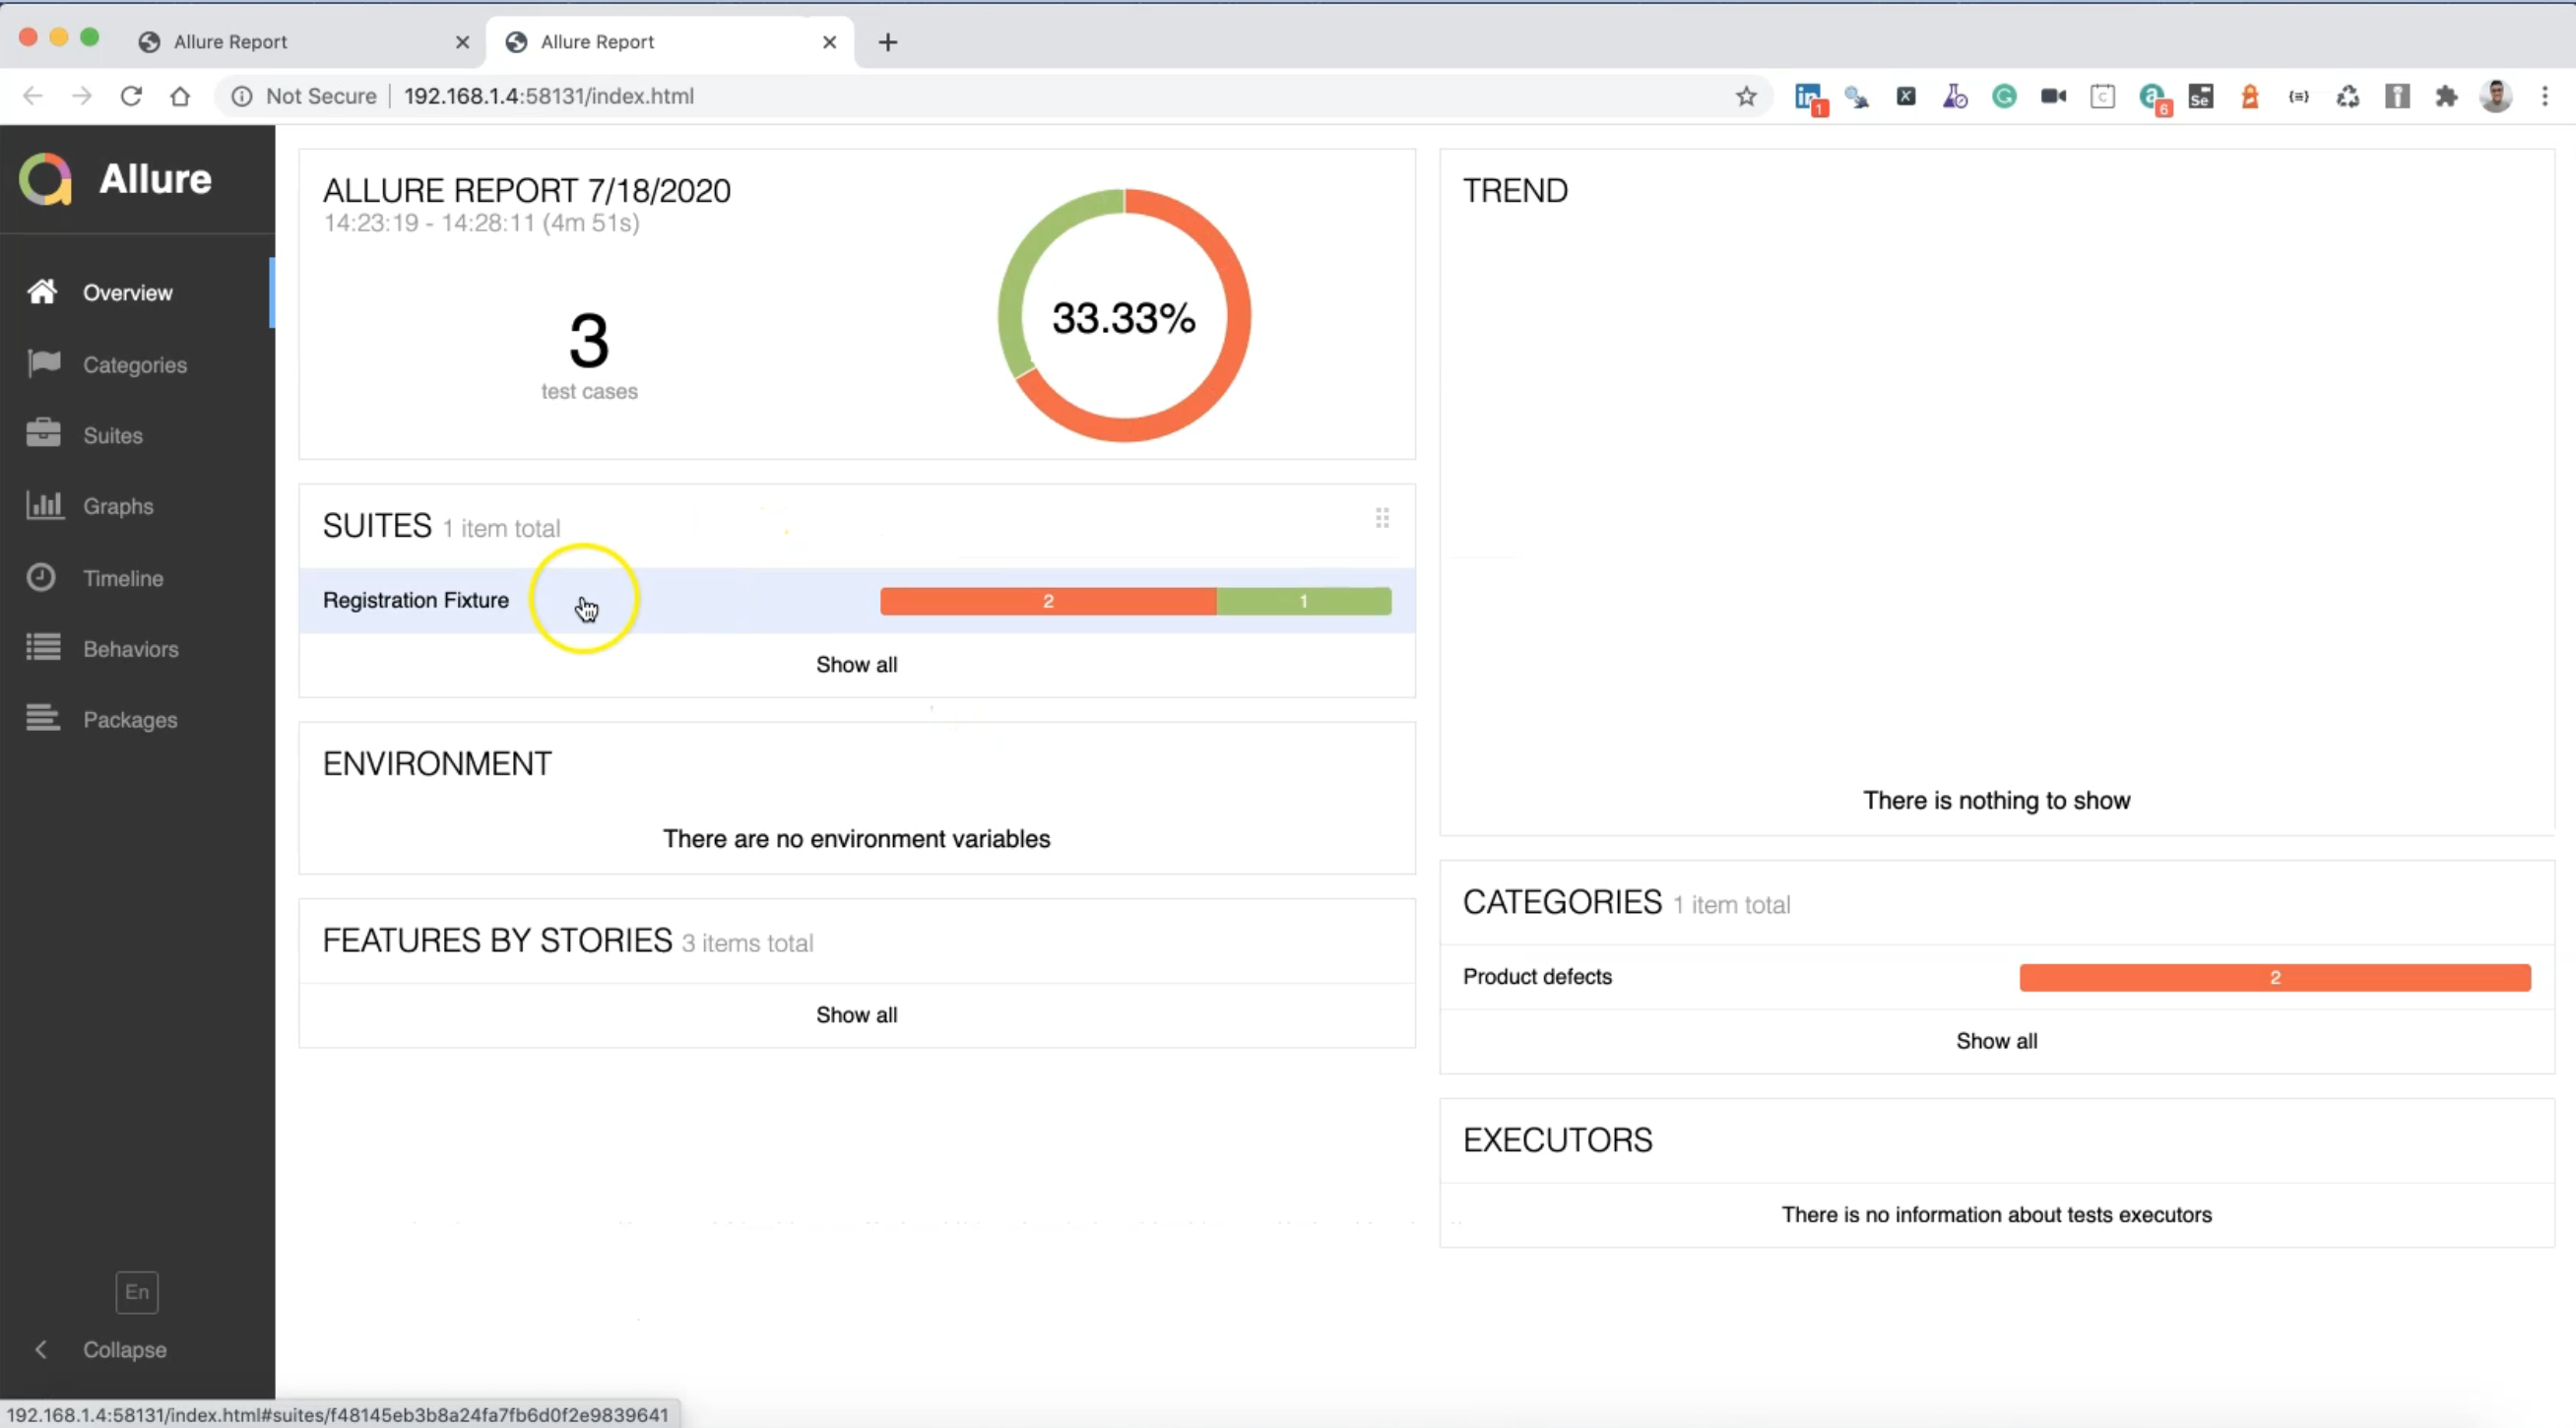
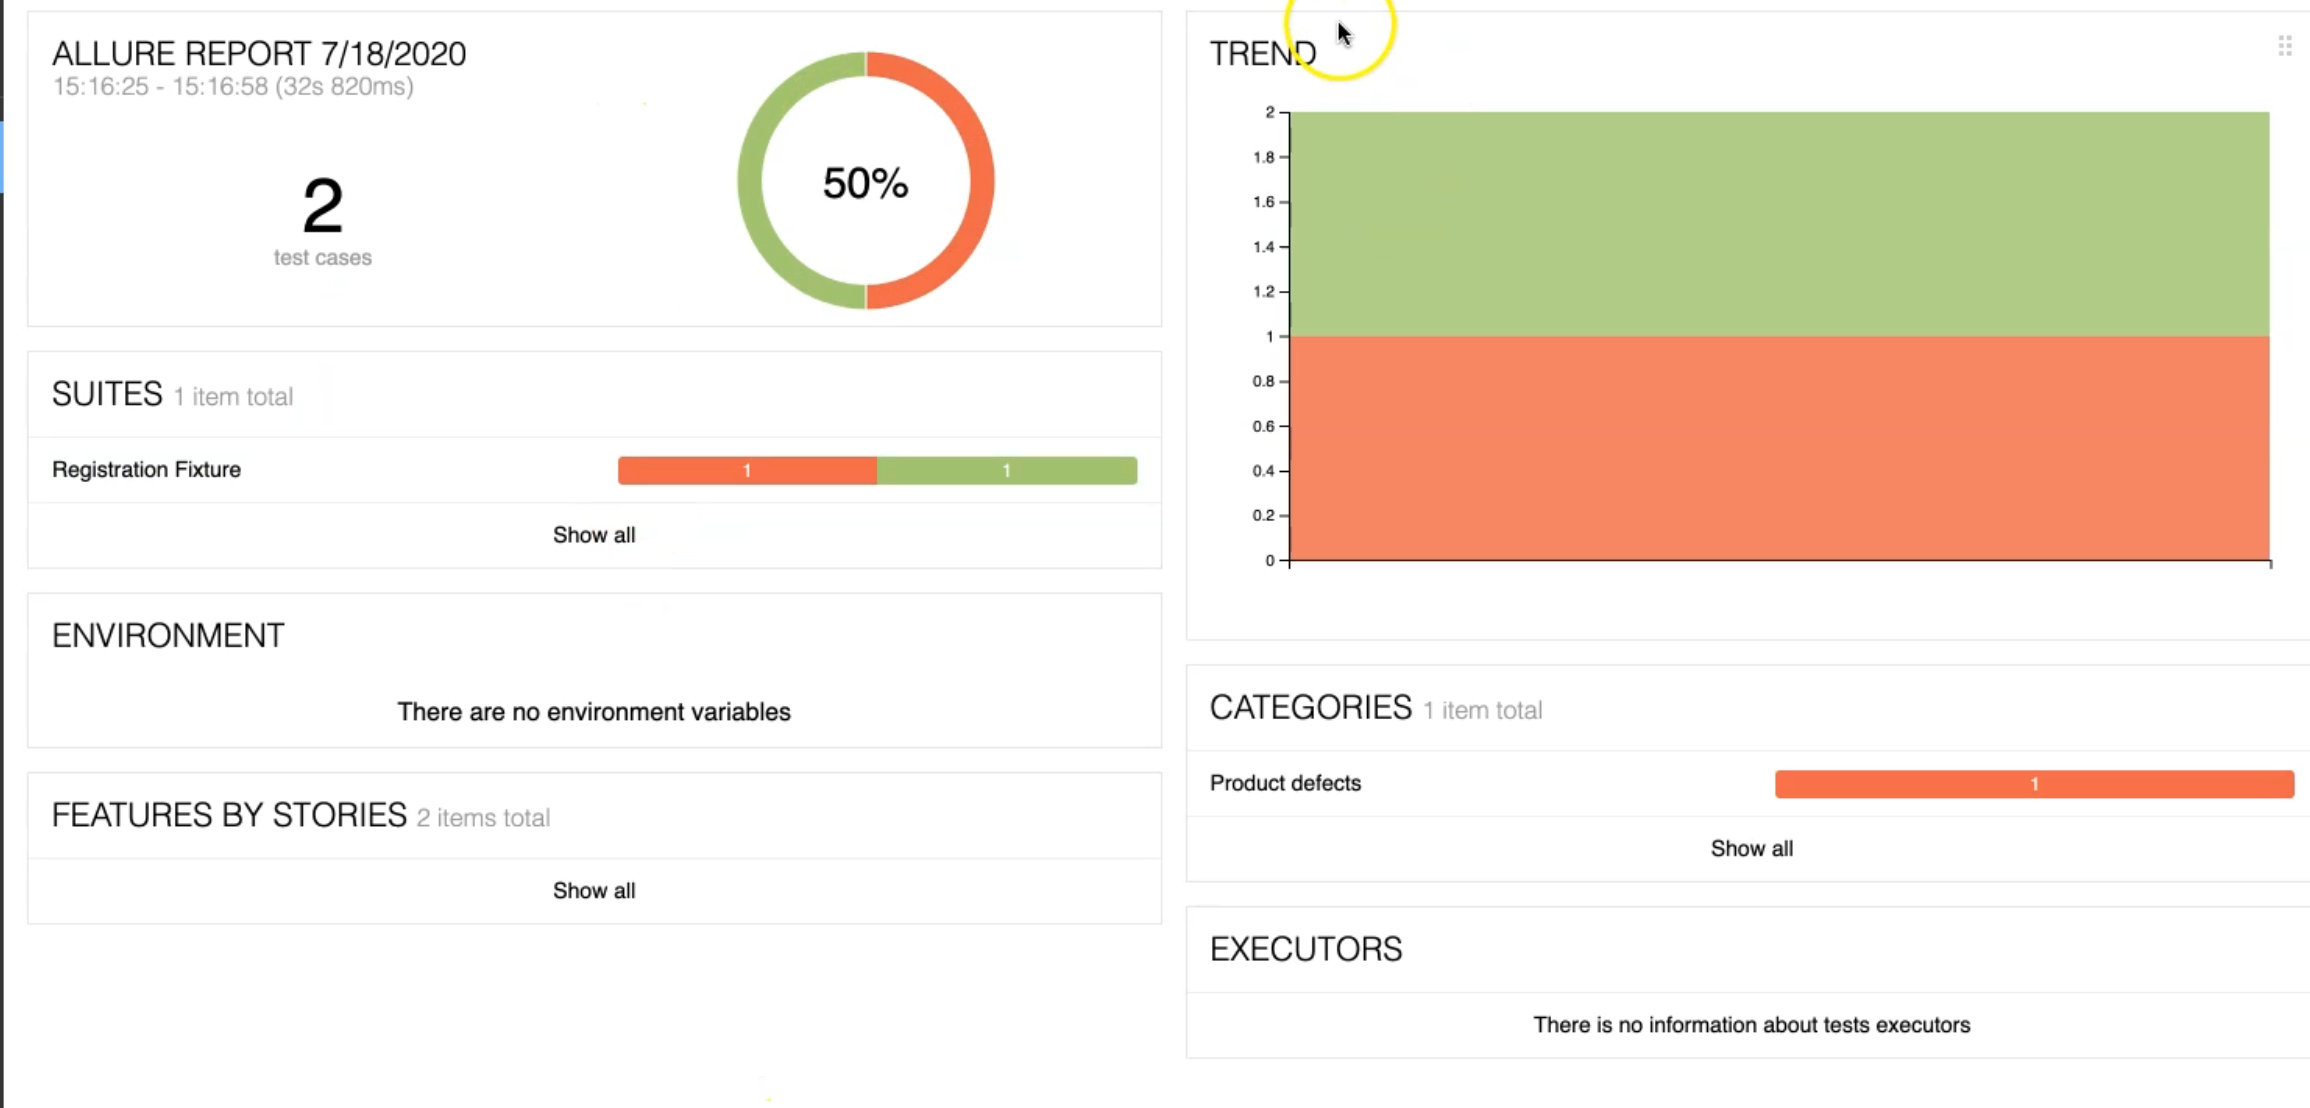
Here we have the Allure report generated successfully, and we have two test cases passed,

We can open the Suites with the Registration Fixture.
Under that, we can find the user agent is Chrome and the operating system.
There is no information because the test case passed and we don't have the history because this is a new run.
This one is for the User Registration - we can open the graph, you can find the result, you can check the timelines, behaviors, packages if you have different test cases, and test suites, categories, and a lot of things.
So this is the Allure report generated from our test result from TestCafe test cases.
So what if we wanted to see one test failure, for example, as the HTML Reporter?
So let's close this one and go to this.
We need to kill the server because this is a Java server and we need to just click control+C to kill the server.
After that, inside the test RegistrationTest.js, we can also create a change as we did in the test case for the html reporter - assert the URL is notOk() instead of ok().
After that, we can just run our test again with --reporter allure and to check what happened during our test.
TestCafe will run the server and we will execute the test.
After that, we can check the result with Allure Result.
So our test is finished and the Allure Report started and closed the reporter and we still have the allure-report folder.
We can just run our command again for generating the Allure Report from our latest test cases or test result.
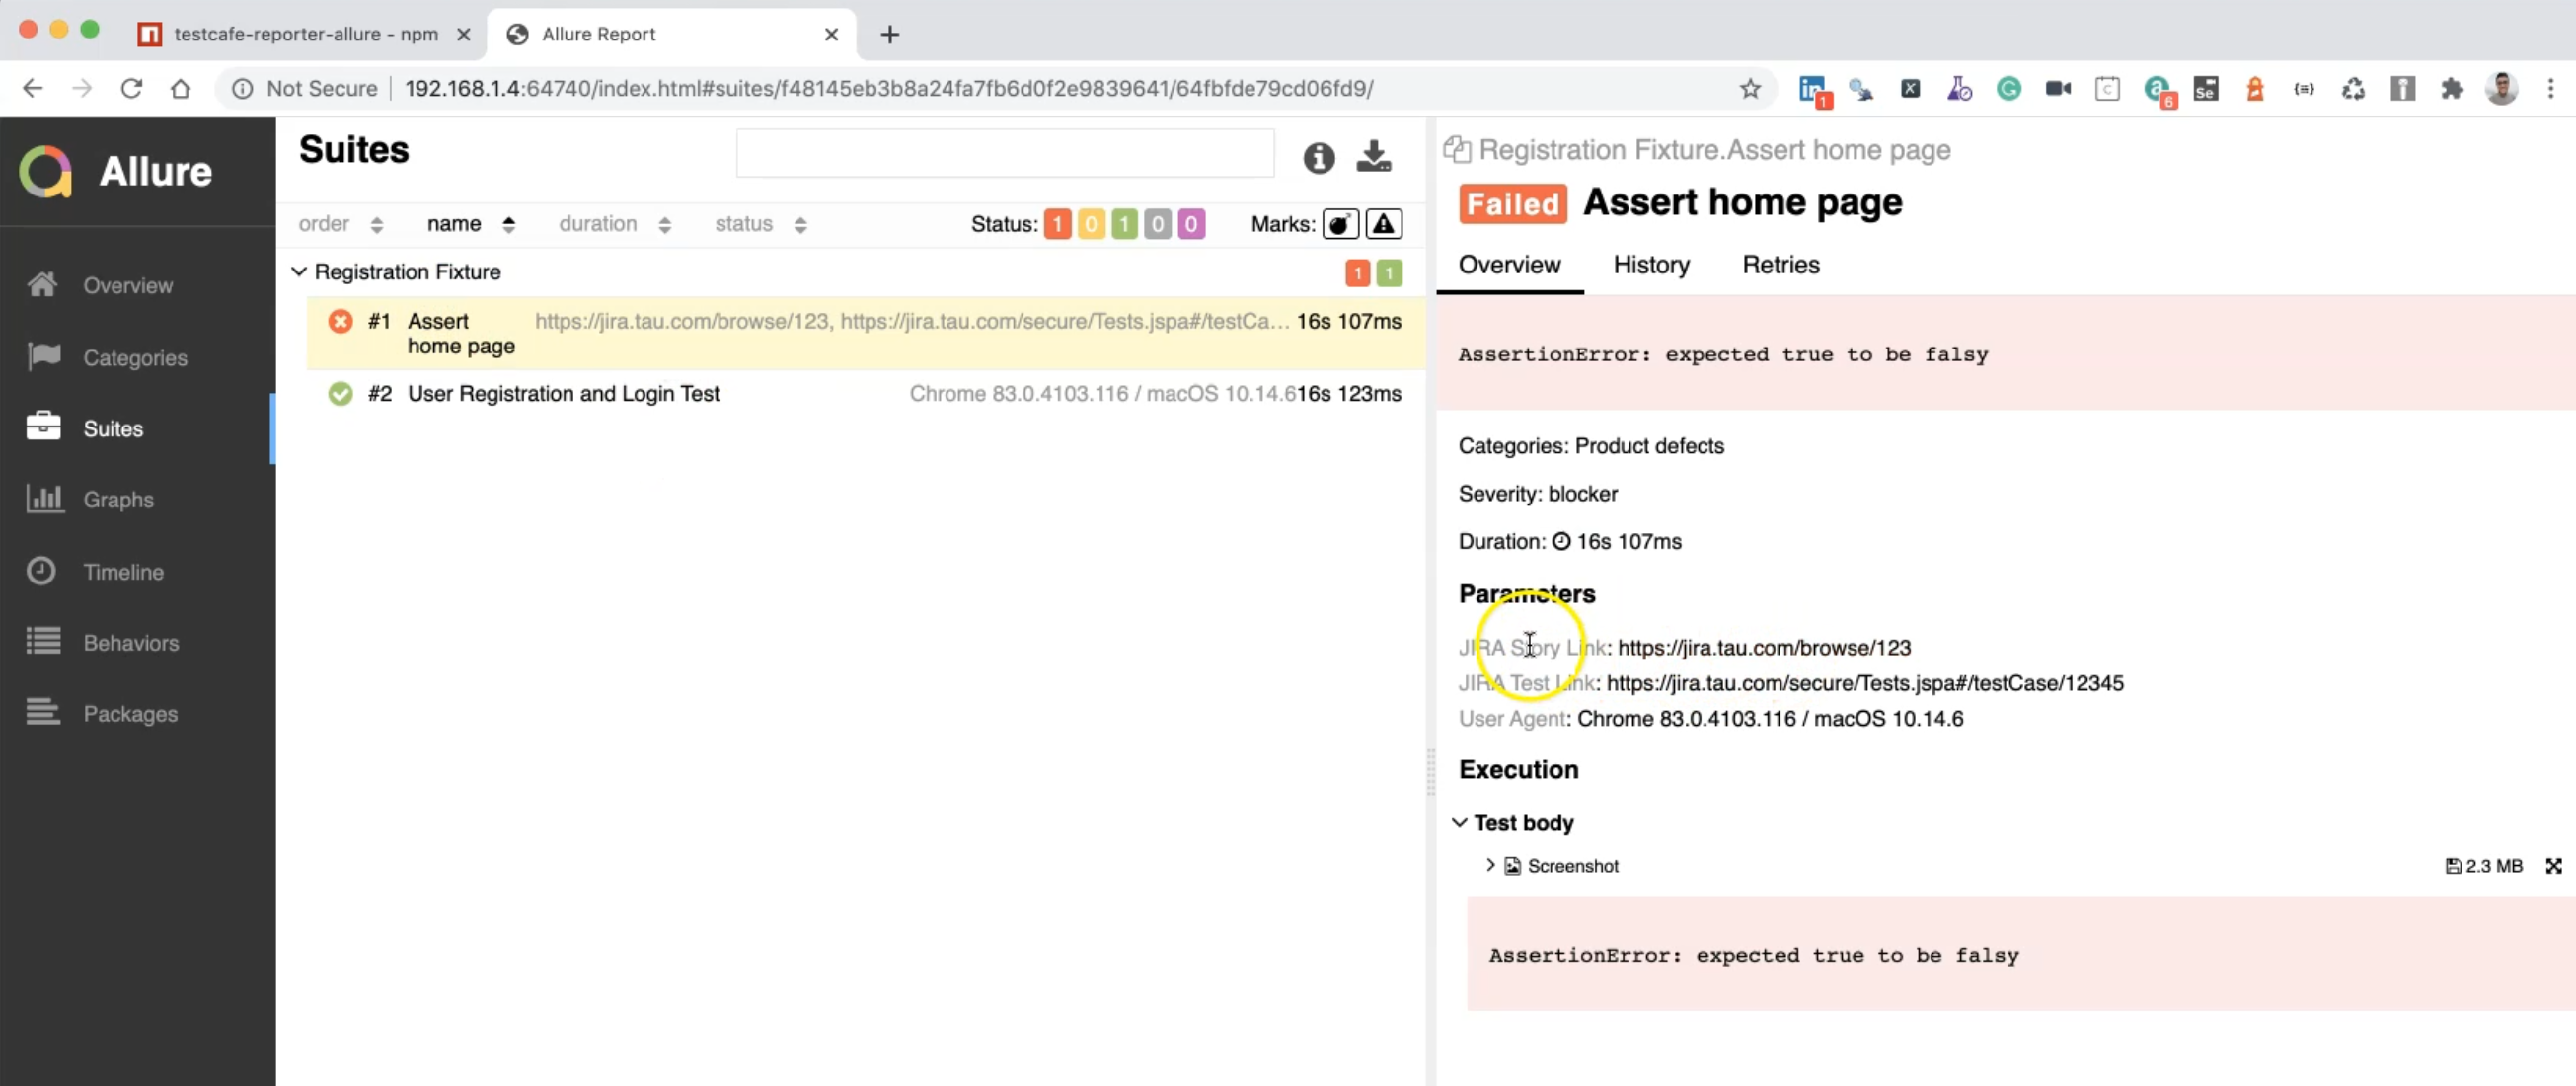
So here we have one failed test case and one passed.
We can just open the "Assert home page" test and here, we can find the assertion error.
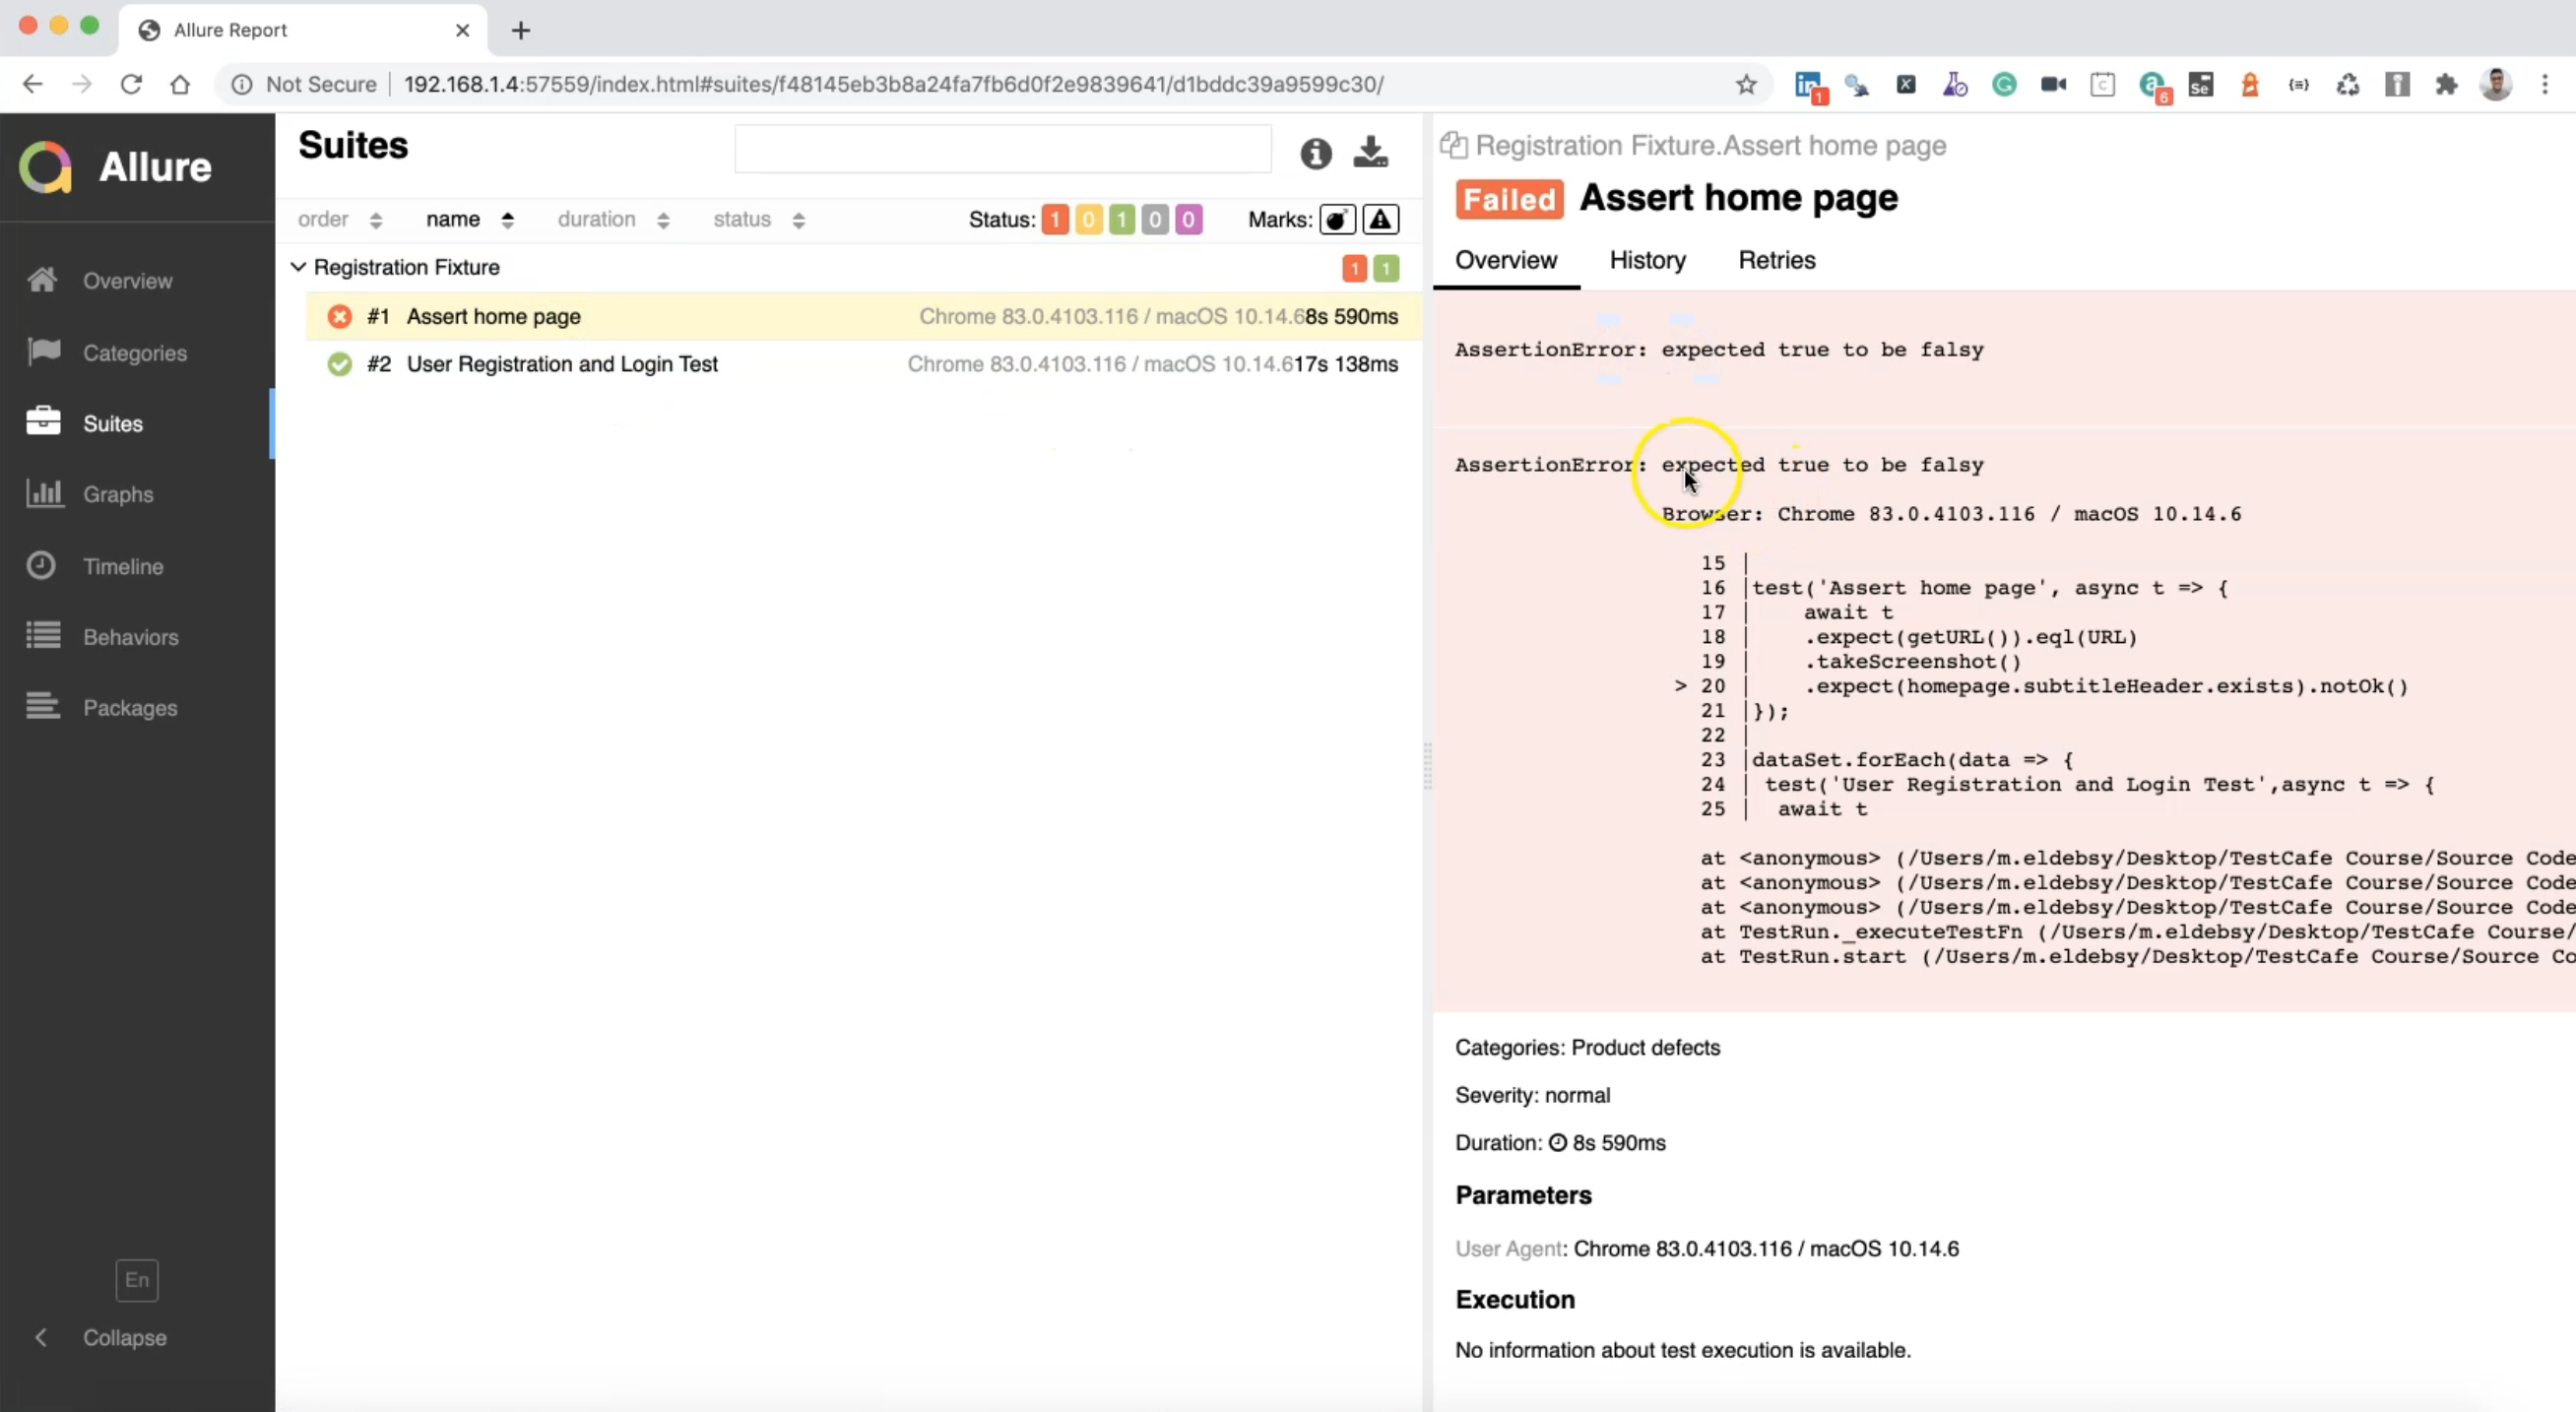
Here we can find the output or the session error with the line number with TestCafe.
We have expected to find exists ok, but it's notOk so this was wrong.
This is the duration, parameters, user agent, and a lot of things.
So what if we need to add any additional data or any extra metadata in our Allure Report?
For example, we can add the story link or the story name, the JIRA URL, severity level, and a lot of things with Allure.
So we can just go to the URL and check what happened.
We can open again the Allure webpage and we can go up for the Test metadata.
Here we can specify the test severity IDs and ID number.
We can just copy this block and then go to our test and inside RegistrationTest.js, we can add it in test.meta().
test
    .meta({
        ID: 'test id',
        SEVERITY: 'blocker',
        STORY: 'story id',
        TEST_RUN: 'test run id or identifier'
    })
    .before(async t => {
        // before test code
    })('Test description', async t => {
        // Test code
    });
We already know about the metadata with TestCafe in the previous chapters.
The 'test id' here, we can just add '12345'.
For 'story id' we can add '123', and maybe we can just add the story, severity, and ID as the test metadata.
After that, Allure will take this data and display it in the report.
Let's close our report and run our tests again after we changed and added the metadata in our test.
After the test is finished, we will check the test result.
Our test finished and we have Allure reporter started and closed.
So we can just check again with the command line and generate the Allure Report.
Then we have here two test cases failed.
We have the previous one and the last one.
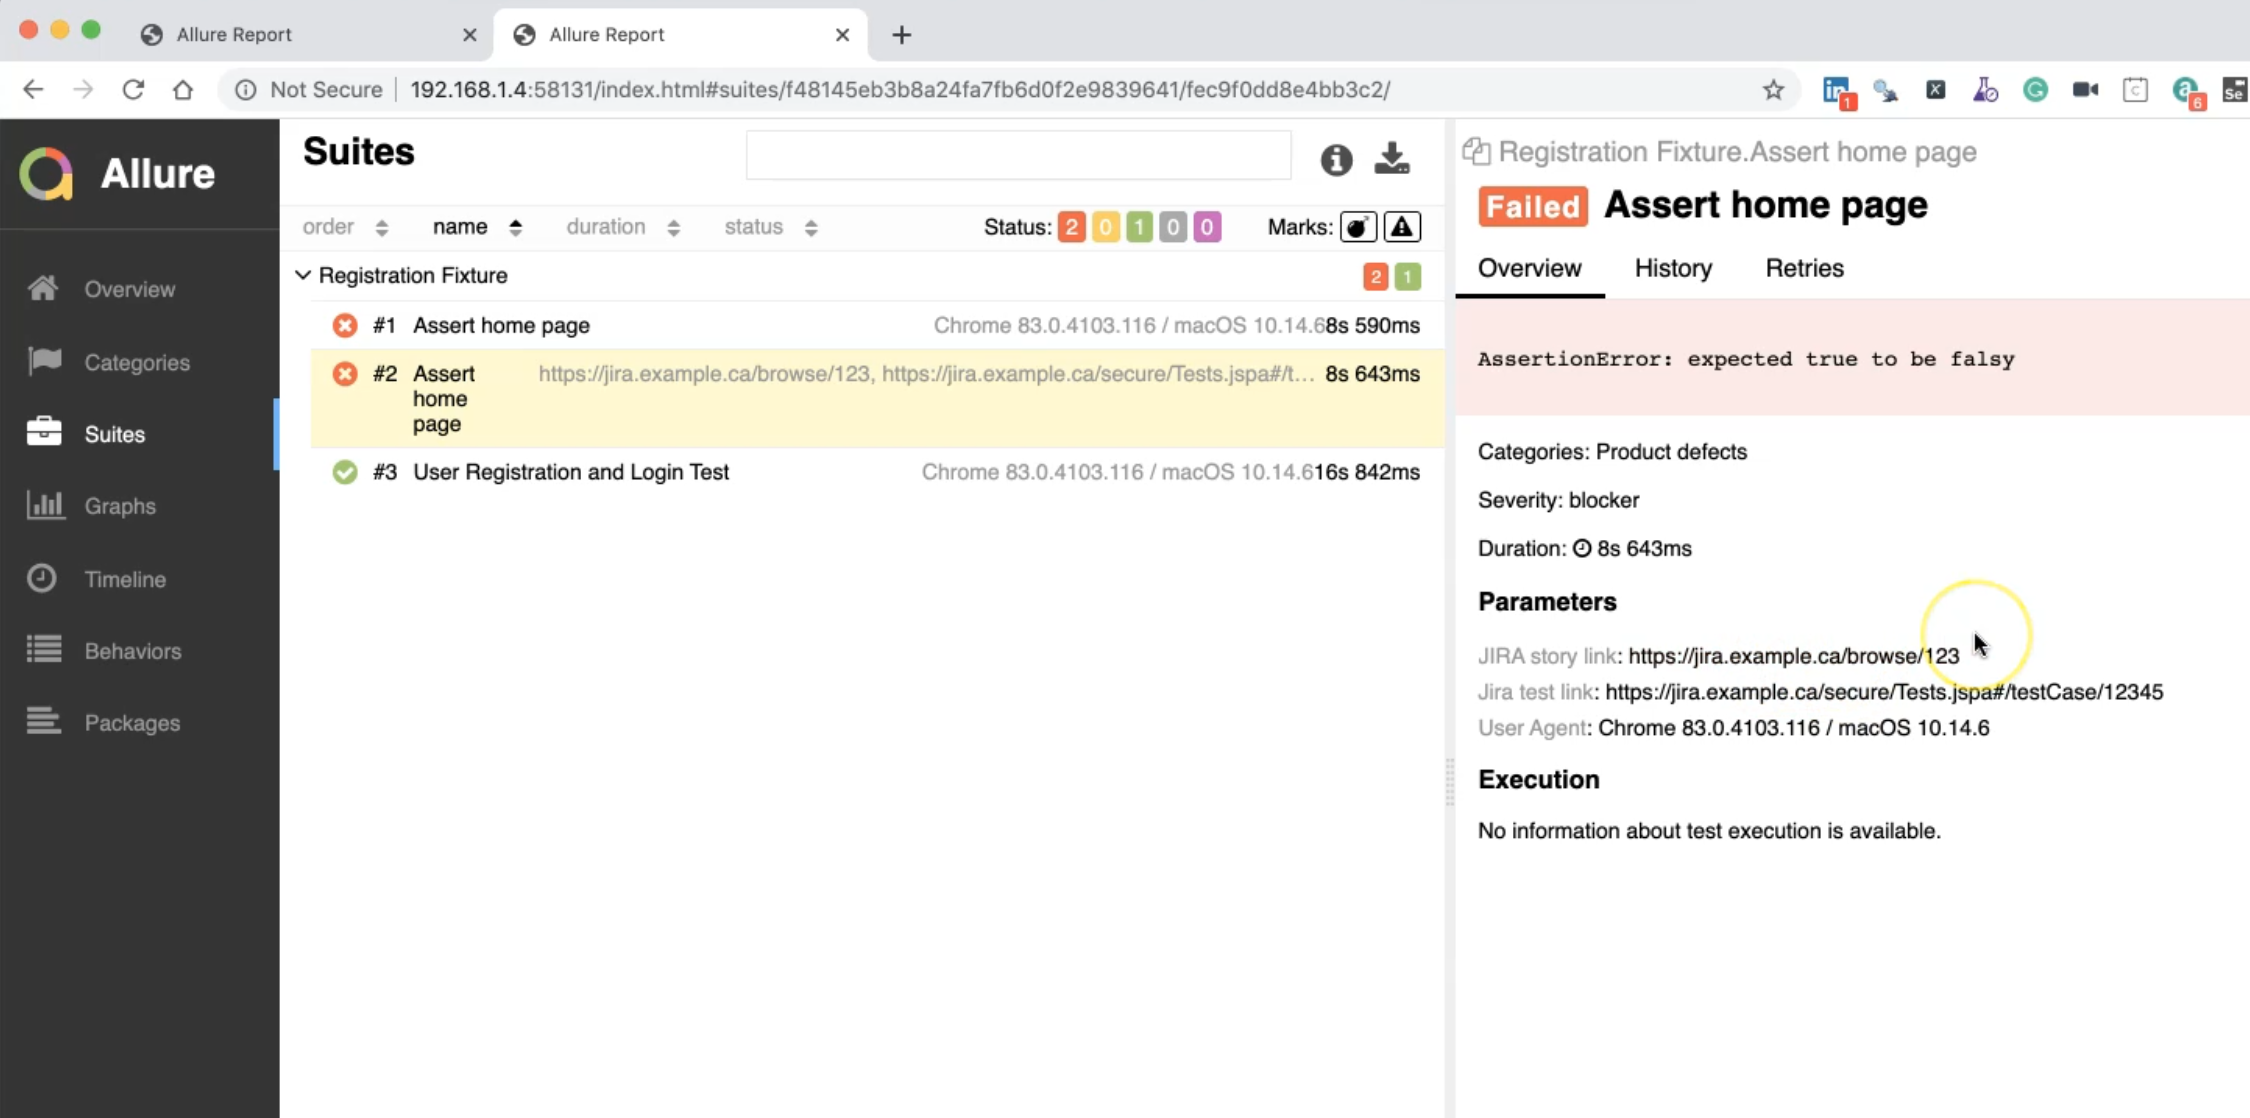
We have the JIRA user story link, and we can change the configuration in the configuration file.
This is a JIRA test link, User-Agent, so this is metadata that can be added.
The previous one does not include any metadata because that is not displayed here, but this last one that we added has the metadata.
We also have History and Retries and any information about this test case.
What if we need to change the default configuration for Allure Report?
Also, what if we need to add a screenshot and attach it to the test cases in the Allure Report?
To do this, we need to add two different files or two different configurations in our project.
The first file is the doc-allure-config.js.
So we will copy this name and go to our project in the route folder and we need to create this one.
After that, we can copy this configuration.
const DOC_ALLURE_CONFIG = {
    CLEAN_REPORT_DIR: false,
    COPY_HISTORY: true,
    RESULT_DIR: '/allure/allure-results',
    REPORT_DIR: '/allure/allure-report',
    META: {
        STORY_ID: 'STORY',
        TEST_ID: 'ID',
        SEVERITY: 'SEVERITY',
        TEST_RUN: 'TEST_RUN'
    },
    STORY_LABEL: 'JIRA Story Link',
    STORY_URL: 'https://jira.example.ca/browse/{{ID}}',
    TEST_LABEL: 'JIRA Test Link',
    TEST_URL: 'https://jira.example.ca/secure/Tests.jspa#/testCase/{{ID}}',
    labels: {
        screenshotLabel: 'Screenshot',
        browserLabel: 'Browser',
        userAgentLabel: 'User Agent',
        allureStartMessage: 'Allure reporter started...',
        allureClosedMessage: 'Allure reporter closed...'
    }
};

module.exports = DOC_ALLURE_CONFIG;
In this configuration, you can add anything - for example - the test URL, you can add the JIRA URL.
So for example, I can change the JIRA URL one to my company, or for example tau.com.
Here also, this is the result directory - it is by default generated in allure-results and this is our allure-report directory.
We don't need to clear the report directory so CLEAN_REPORT_DIR is false to be able to view or to visualize the trends and retries, the number of failures, and a lot of things.
We need to look up the history so COPY_HISTORY is true to be able to view the reports with a lot of previous test cases and results.
We can change anything else here in this file.
So this is the first file.
After that, we need to create one configuration file for TestCafe.
As we know from the page object chapter, we can create in the root the configuration file .testcarerc.json
After that, we can add any configuration that we need to do.
So I just pasted it here.
So the browsers is chrome, the src folder is tests, the reporter is list.
We can name the reporter allure, or we can leave it and we can change it from the command line.
There is screenshots path and takeOnFails is true and fullPage is true.
For the current concurrency: you can run in parallel with three concurrencies or we'll leave it 1.
We also have selectorTimeout, assertionTimeout, and the pageLoadTimeout.
So I can just go to the command line and run my test:
testcafe chrome:headless tests/RegistrationTest.js --reporter allure-expanded
I can run my test headless, registration with a reporter allure and then I will
checked the results.
We will find that we override the "src", the "browsers" and the "reporter" options - those values are overridden because we are running one test - we are not running all the tests.
The screenshots folder is created.
After our test is finished, because we are running in headless mode, there is no browser or GUI open.
So we will check the Allure Report.
So after Allure reporter closed and generated the Allure Report, we can run our Allure command normally, and check that report.
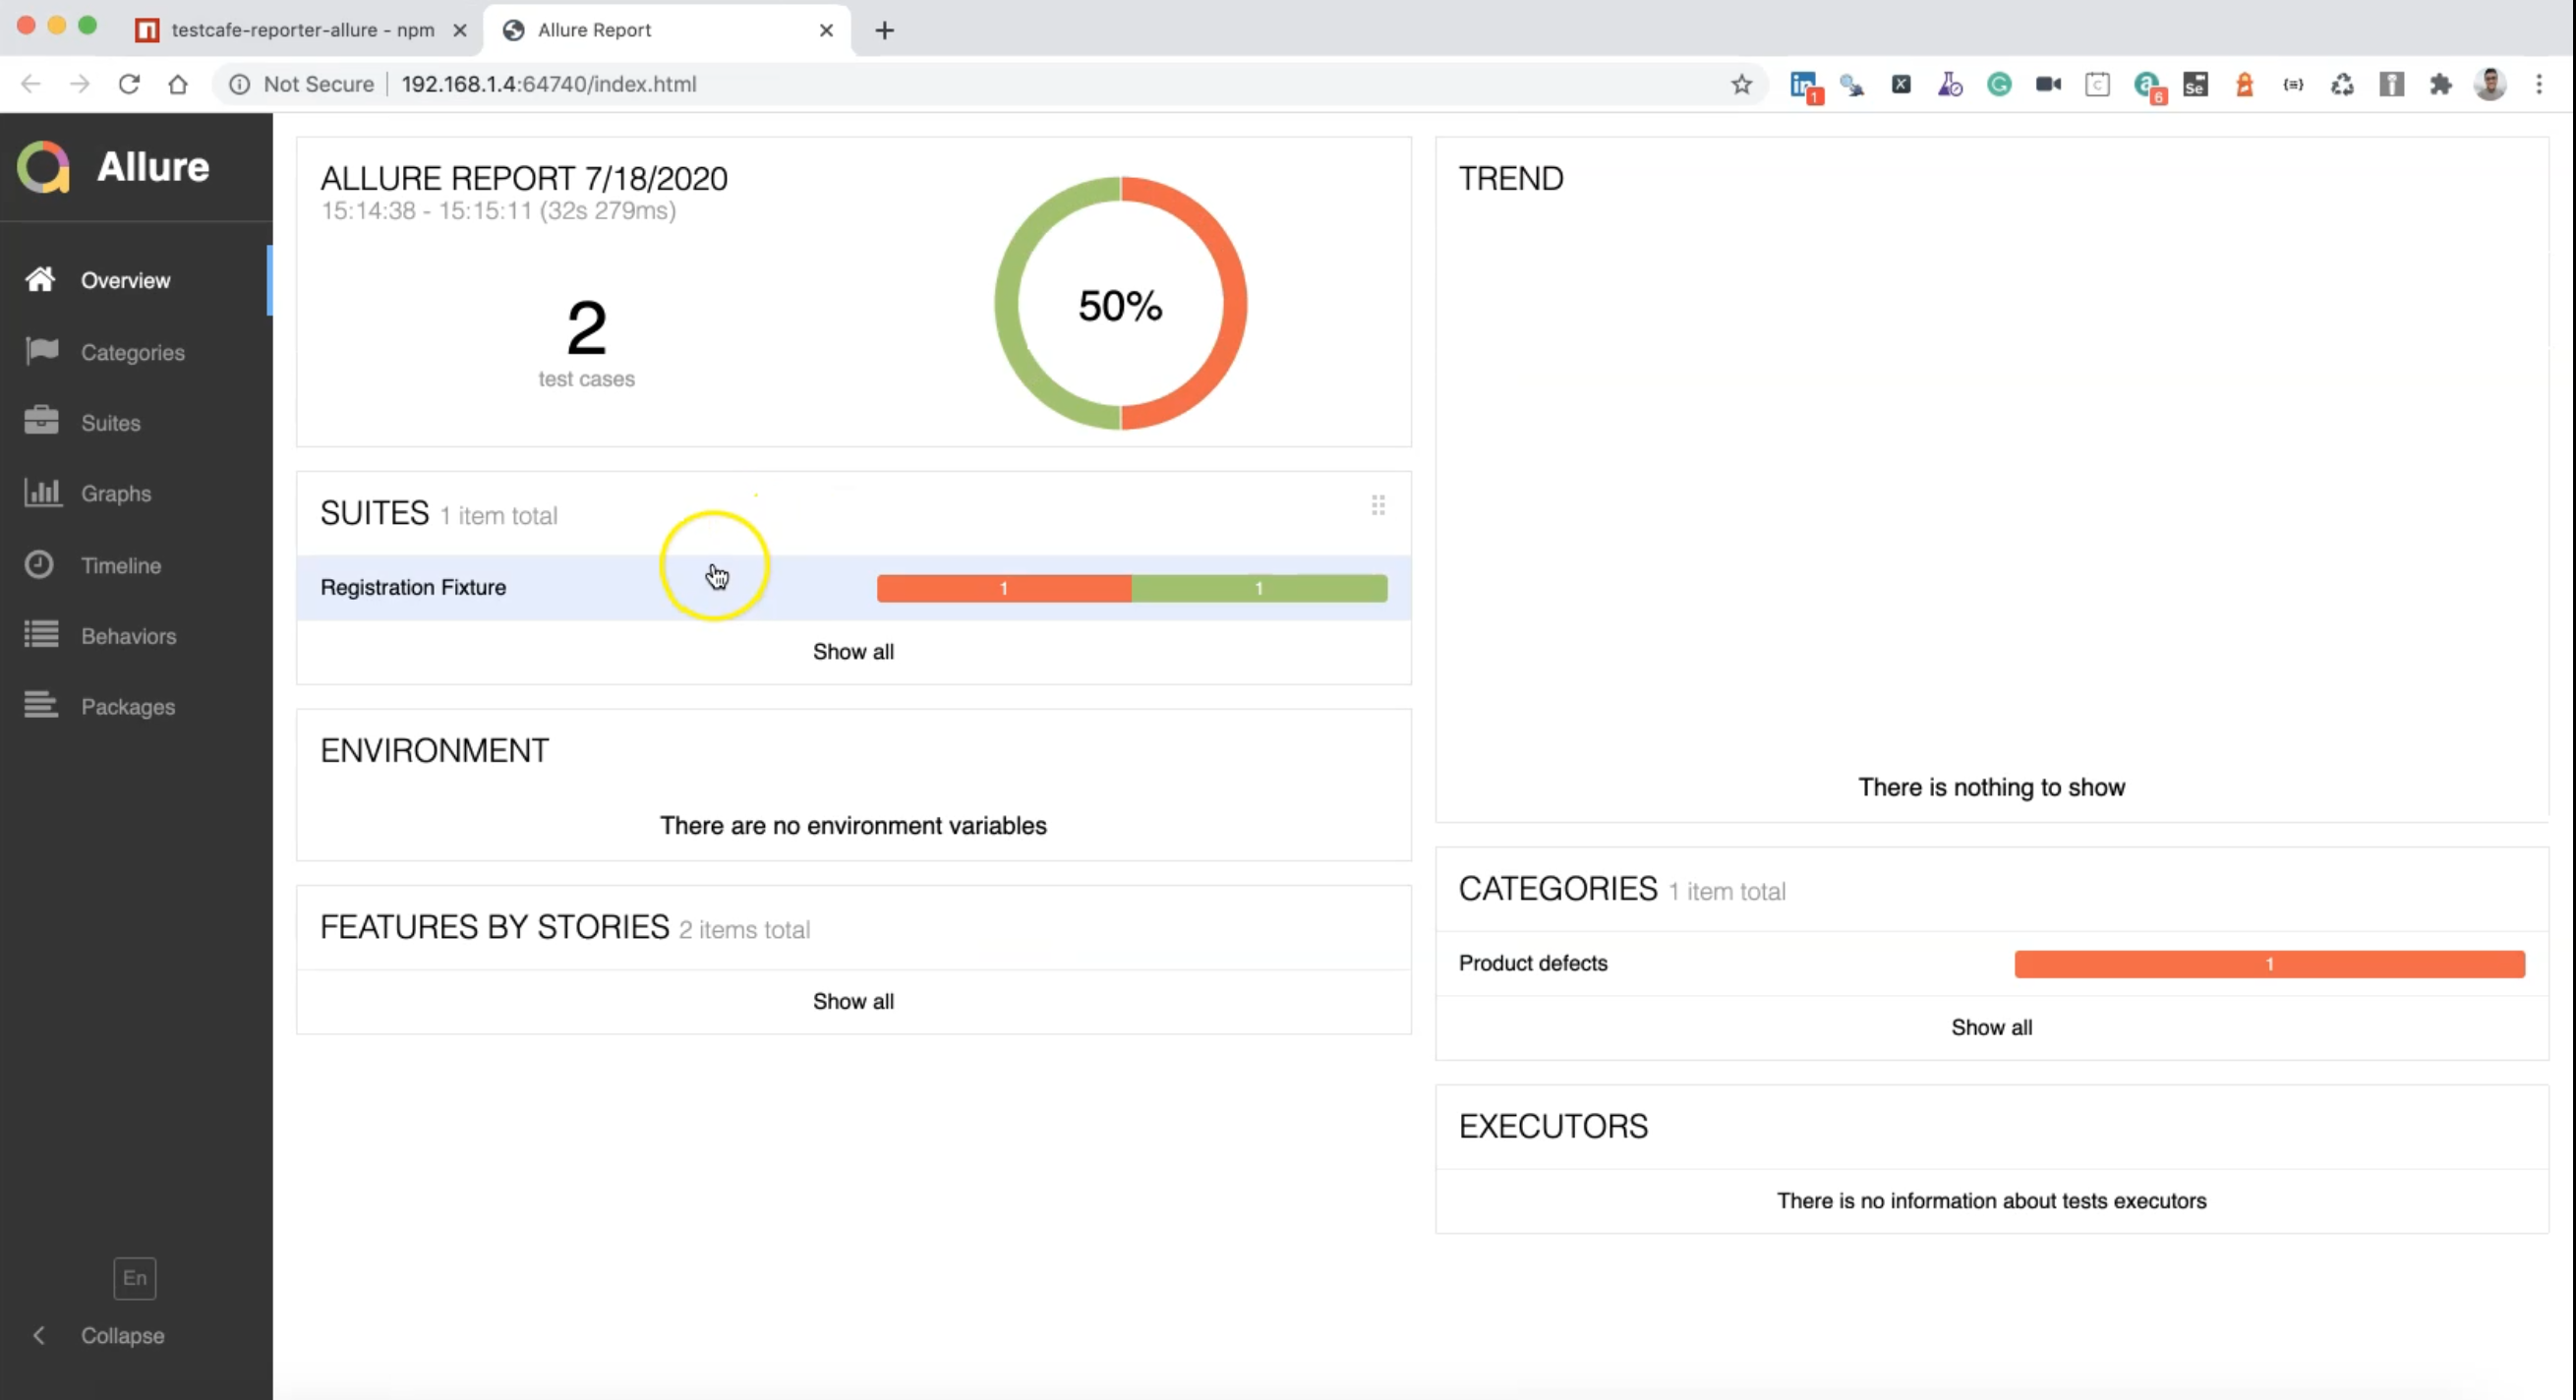
Still, we have one failed and one passed.
If we open this one, so here we can find that 'tau.com' is changed with JIRA Story Link, because we changed it to override the default configuration, and also the JIRA Test link is changed to 'tau.com'.
The User-Agent is still Chrome and here we have the screenshot.
After we added the configuration for TestCafe, we can now find a screenshot attached to our report with the test result.
So here we can find all the data that we need in our test report.
So what if we run the test again just to check that the Trend will be displayed and all the graphs that we need in our test case.
I will run my test again.
After that, I didn't the allure-report folder Allure Report.
In the configuration, we say that we don't need to clean the Allure directory and also we need to copy the history or to leave the history, to be able to check the trends, the retries, and a lot of things.
So we will wait until our test is finished and after that, we will check the Allure Report again.
So Allure reporter closed and I will just run the Allure command line again.
I have trends now because I have history.
Also in the graphs, I can find the durations, categories, retries, and trends.
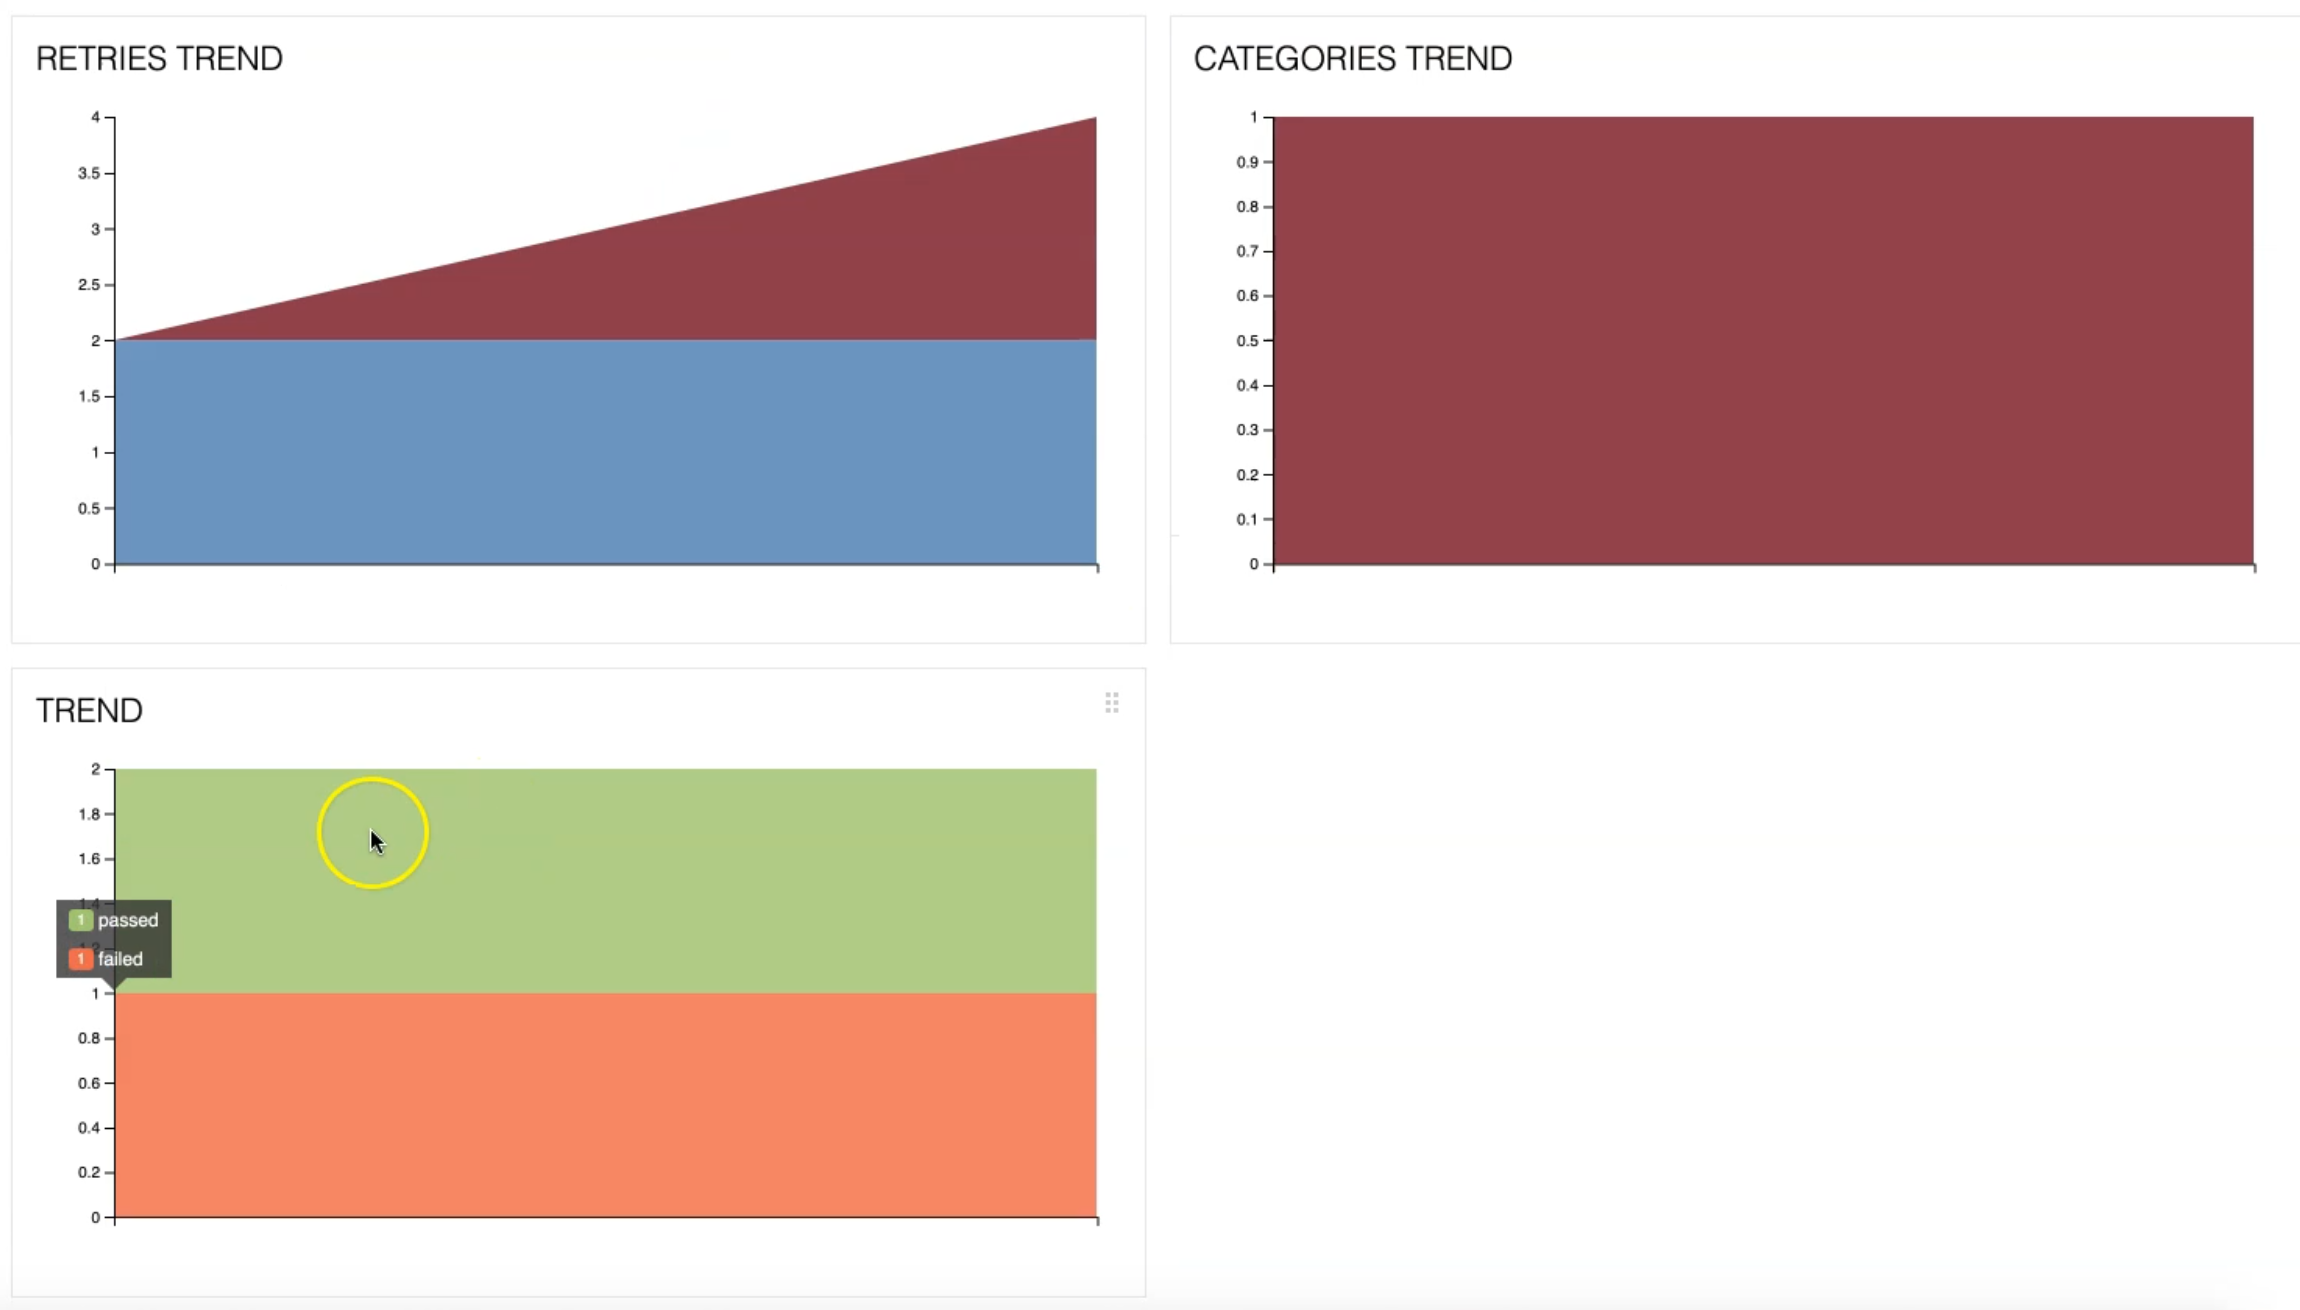
If I open the test case, with the failed test case, this is a screenshot and the history.
There is no success rate because we have two failures and we have one retry.
So we can also find all the details here with a screenshot, with the trends, with the history, and a lot of things that are related to our test result with TestCafe.
