

Transcripted Summary
Finally, in this demo, we will install and generate a Cucumber HTML report with our test cases.
After we finished the implementation of the Cucumber TestCafe step definition and the feature file and ran our test, now it's time to integrate HTML reports with our test result with Cucumber and TestCafe.
To be able to use it, we can open our browser and search for the "cucumber-html-reporter".
Here we can find it on the npm website.
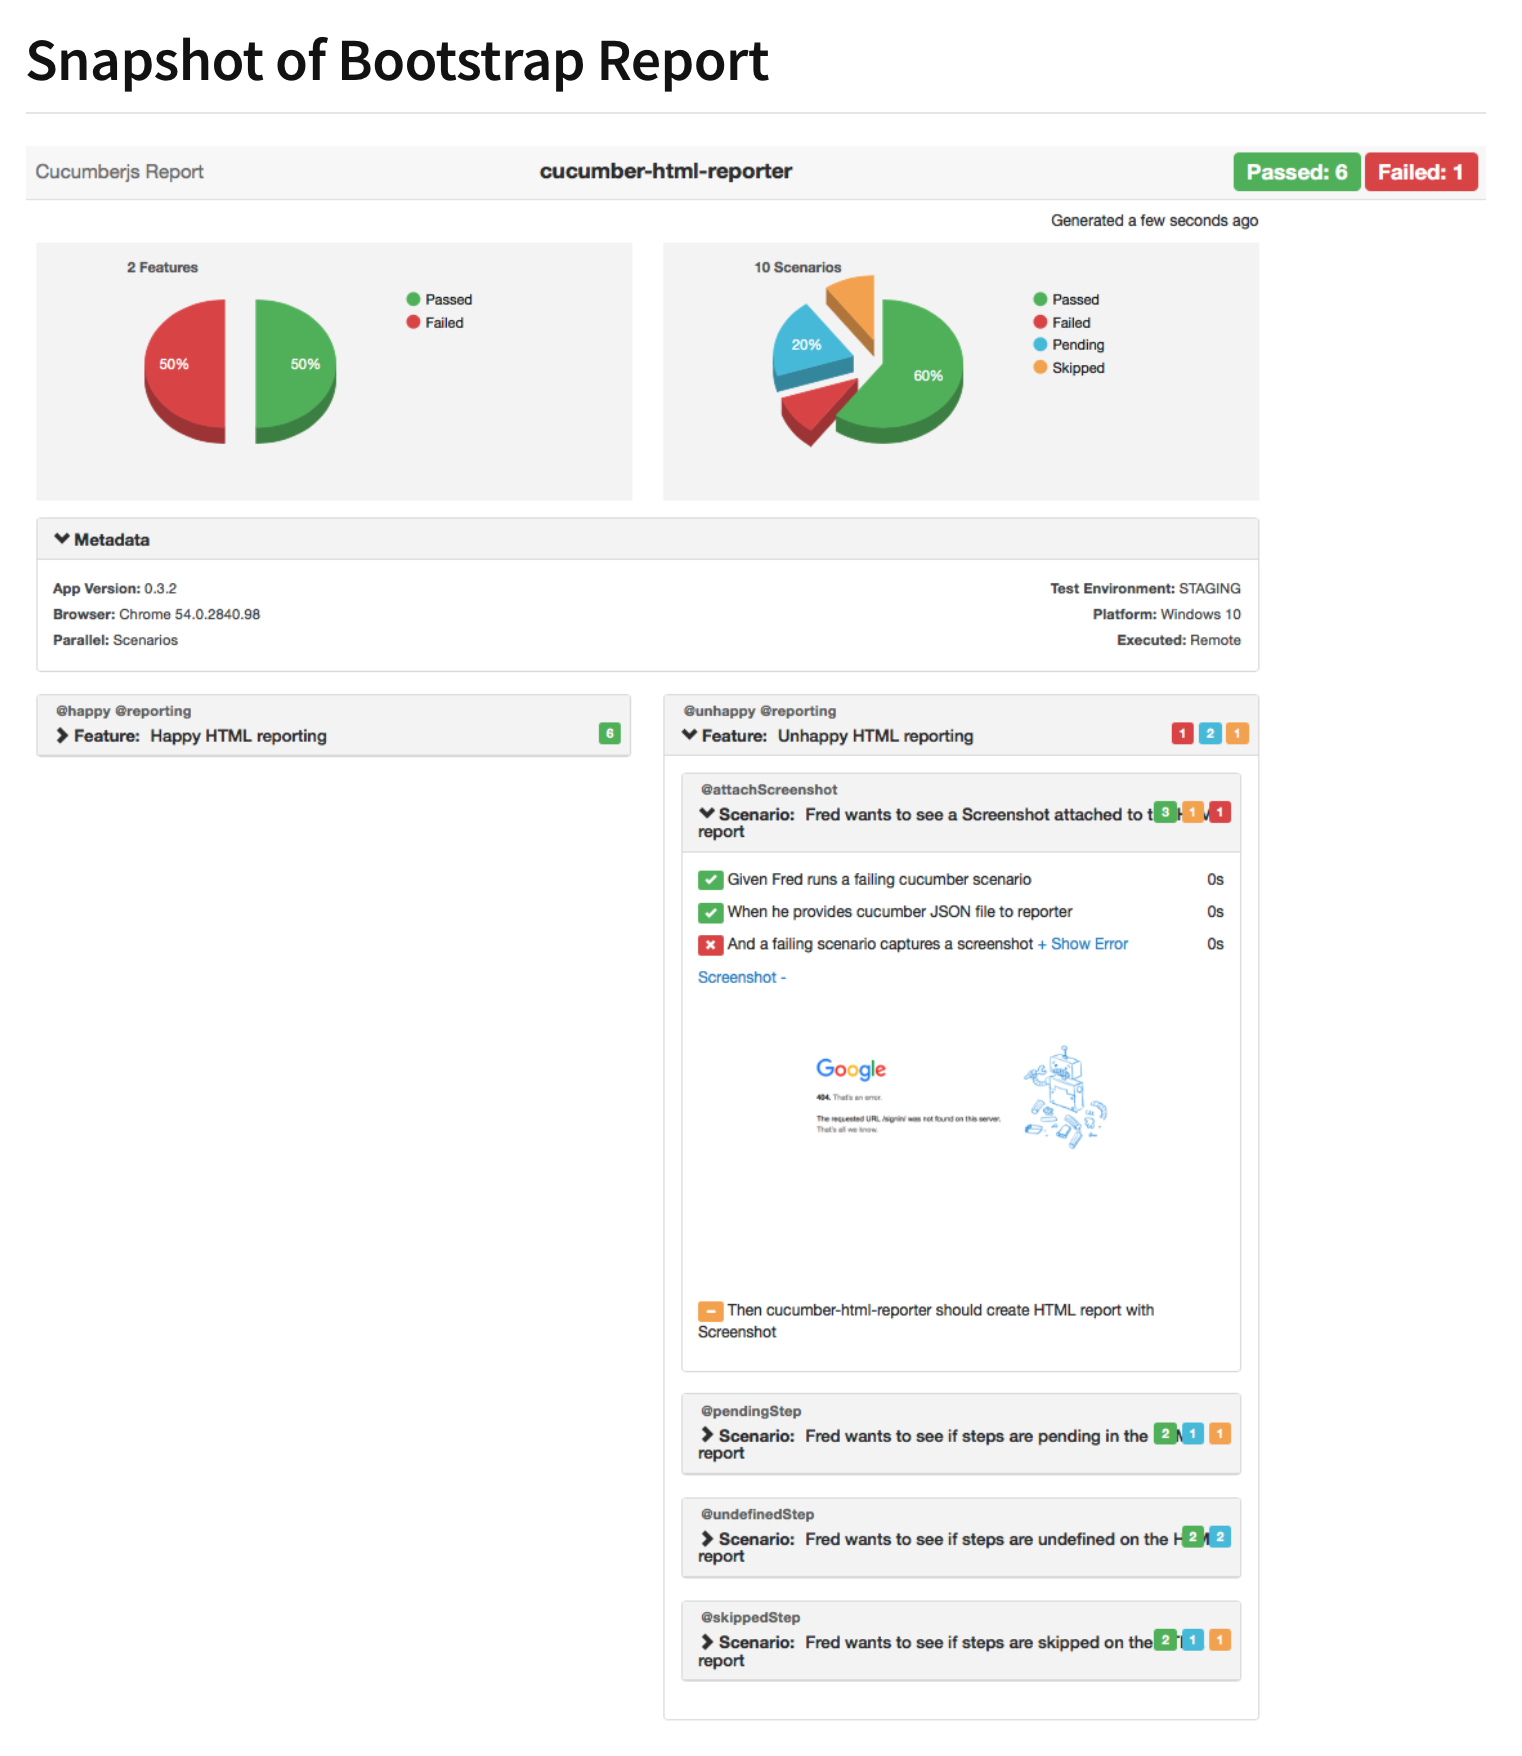
This is a Cucumber HTML reporter, and this is the final result after we generate our report.
To be able to use it, we can just copy
npm i cucumber-html-reporter
Inside our terminal in our project, we can run this on the command line.
Then in package.json, we can find that it will be installed under dependencies.

Here we have cucumber-html-reporter.
After that, we will continue with the steps.
So we installed it already and for usage, now we need to create a report generator file inside our project.
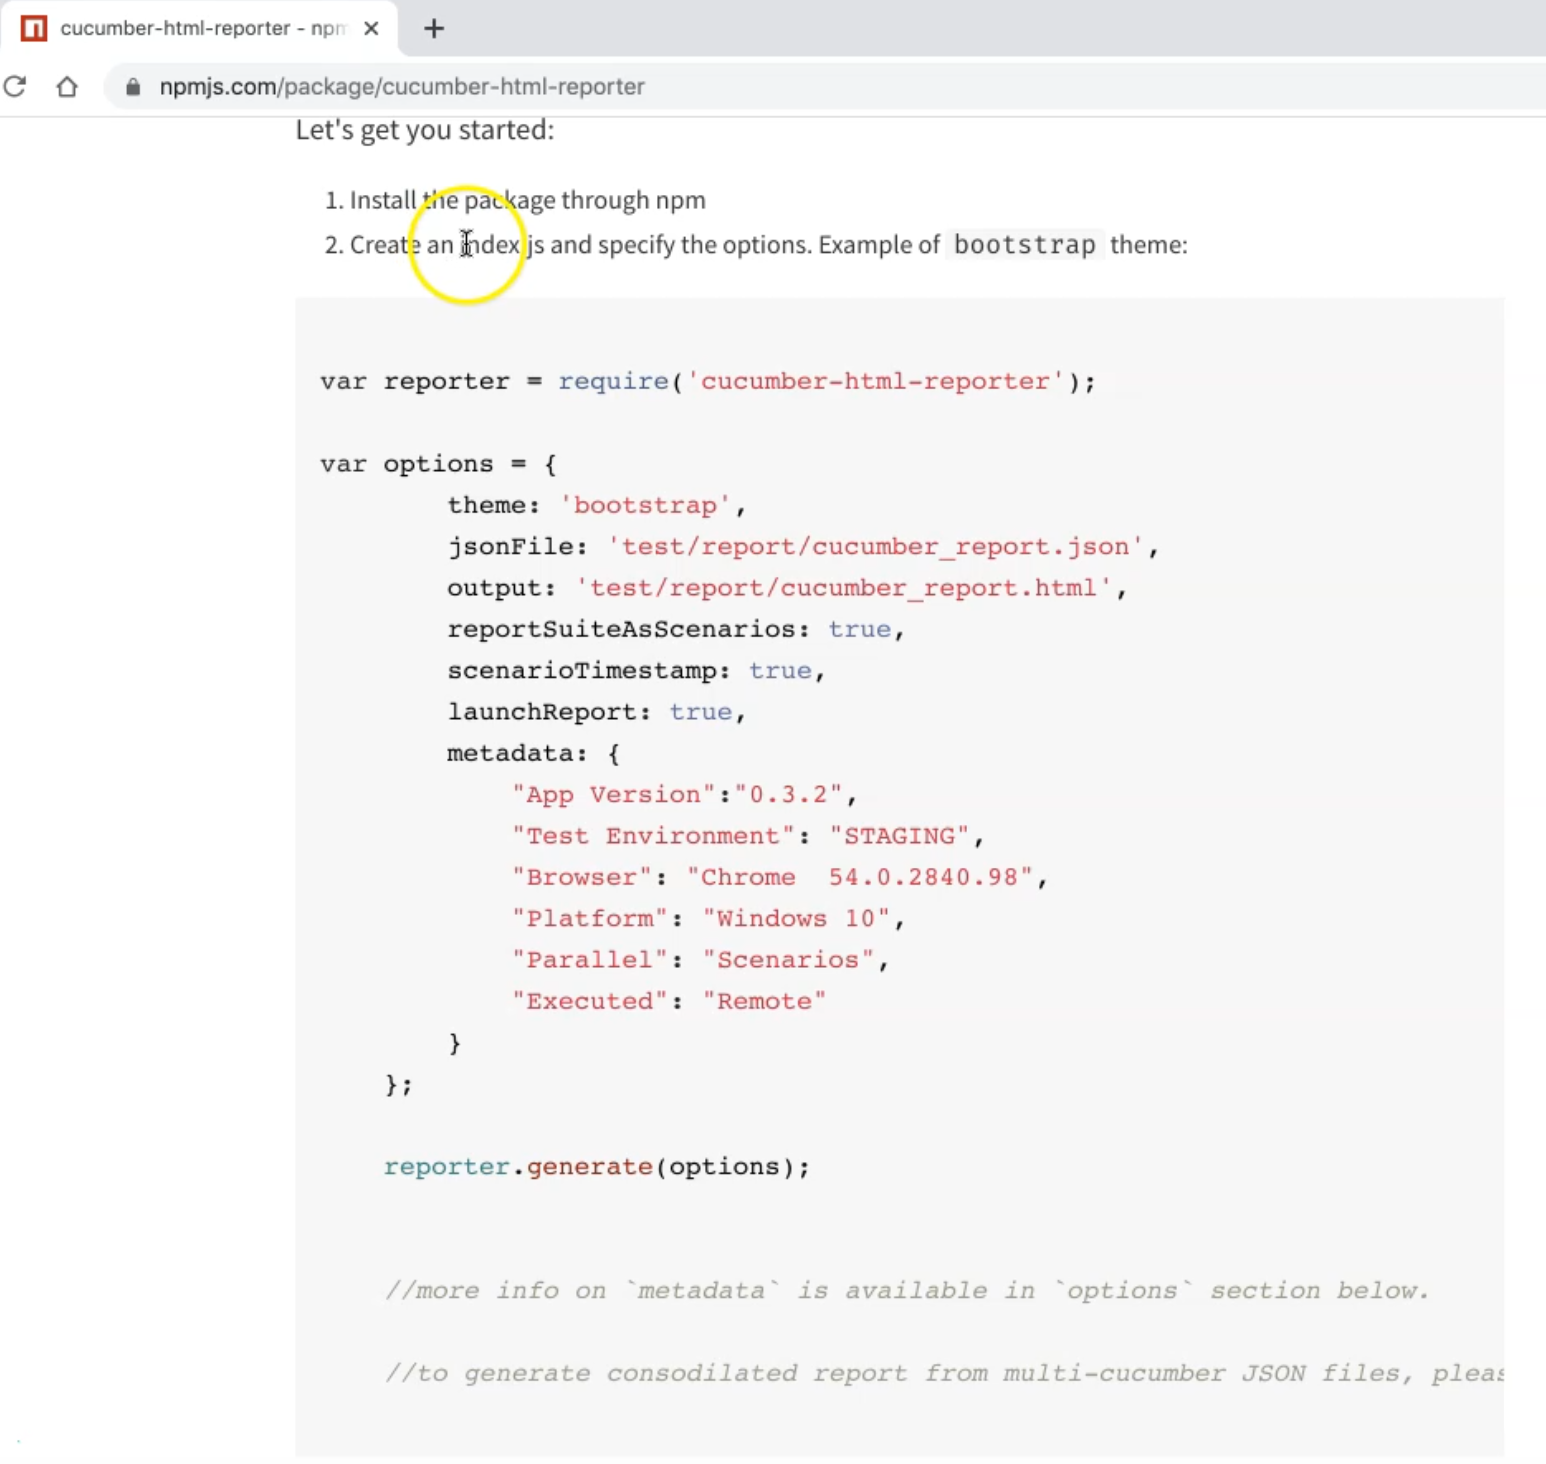
This is for creating an index.js and specifying the options - bootstrap theme - for example.
We need to create or generate this file in our project.
Then let's create index.js - we can copy this one.
At the root of the project, we can just rename it to "index.js", or we can just rename it report-generator.js to have a good name.
We can copy the example into this file.
So it's requiring cucumber-html-reporter, which is installed already.
This is the JSON file path, the output, the reporter suite scenario, and all the configurations that we need.
So we can just copy this.
var reporter = require('cucumber-html-reporter');

var options = {
        theme: 'bootstrap',
        jsonFile: 'test/report/cucumber_report.json',
        output: 'test/report/cucumber_report.html',
        reportSuiteAsScenarios: true,
        scenarioTimestamp: true,
        launchReport: true,
        metadata: {
            "App Version":"0.3.2",
            "Test Environment": "STAGING",
            "Browser": "Chrome  54.0.2840.98",
            "Platform": "Windows 10",
            "Parallel": "Scenarios",
            "Executed": "Remote"
        }
    };

reporter.generate(options);


//more info on `metadata` is available in `options` section below.

//to generate consolidated report from multi-cucumber JSON files, please use `jsonDir` option instead of `jsonFile`. More info is available in `options` section below.
Here we can change the app version, the test environment, the browser, the Windows name or the platform, parallel scenarios, and executed to be remote or on the local machine.
For jsonFile, we can put report.json under reports and the output can also be inside the reports folder, and with cucumber_report.html.
So we have an input jsonFile that we created from our test run, and this is the output that we will generate with our HTML report.
So under reports, we can create one JSON file with our test run, and also we can generate one with an HTML report.
var reporter = require('cucumber-html-reporter');

var options = {
        theme: 'bootstrap',
        jsonFile: 'reports/report.json',
        output: 'reports/cucumber_report.html',
        reportSuiteAsScenarios: true,
        scenarioTimestamp: true,
        launchReport: true,
        metadata: {
            "App Version":"0.3.2",
            "Test Environment": "STAGING",
            "Browser": "Chrome  54.0.2840.98",
            "Platform": "Windows 10",
            "Parallel": "Scenarios",
            "Executed": "Remote"
        }
    };

reporter.generate(options);
After we run our test, we can just run node index.js, but we will need to use report-generator.js because we changed the name in our test.
After that, we can check the file.
So with cucumberjs, we can append json: and add the cucumber report file.json with our test.
In our project, we can go to package.json and for the test command we can add --format json:reports/report.json. We can use -f or --format.
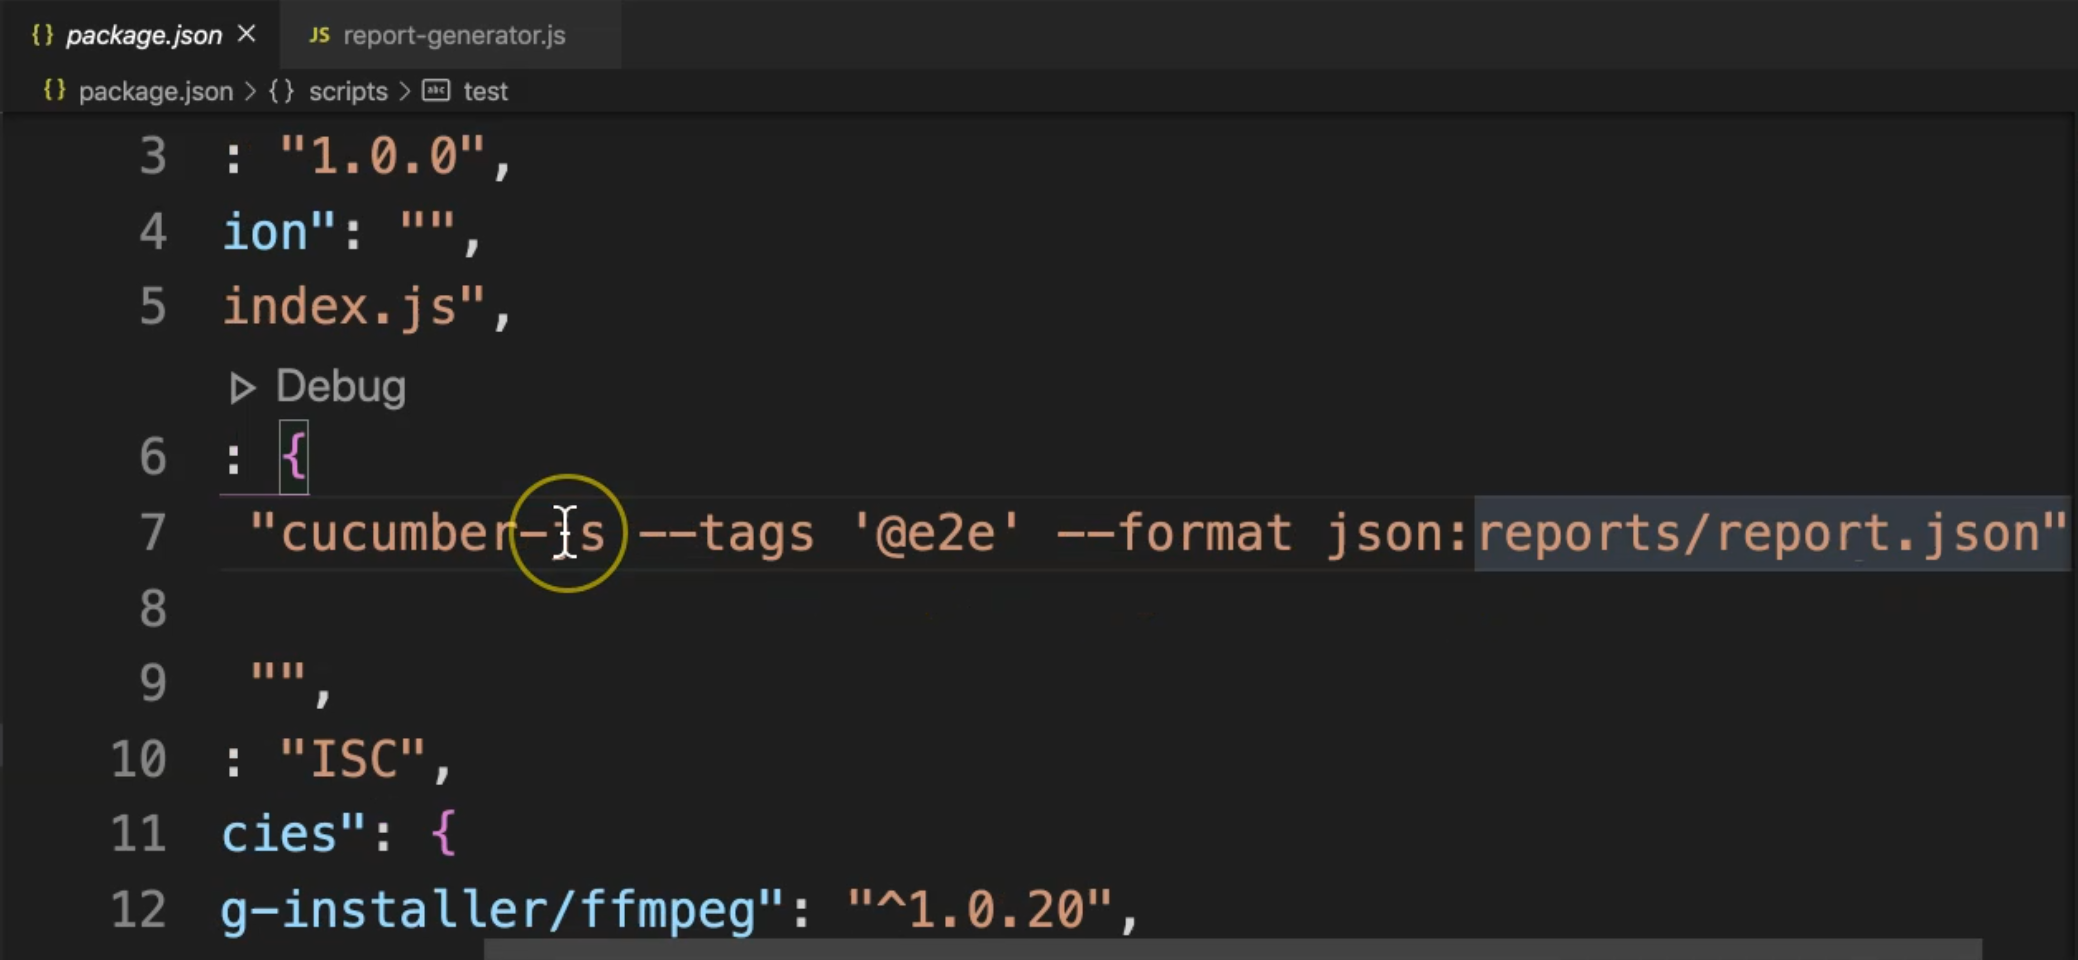
After that, JSON puts the file in reports/report.json, and this will be the output.
Then we can generate our HTML reports from this command line.
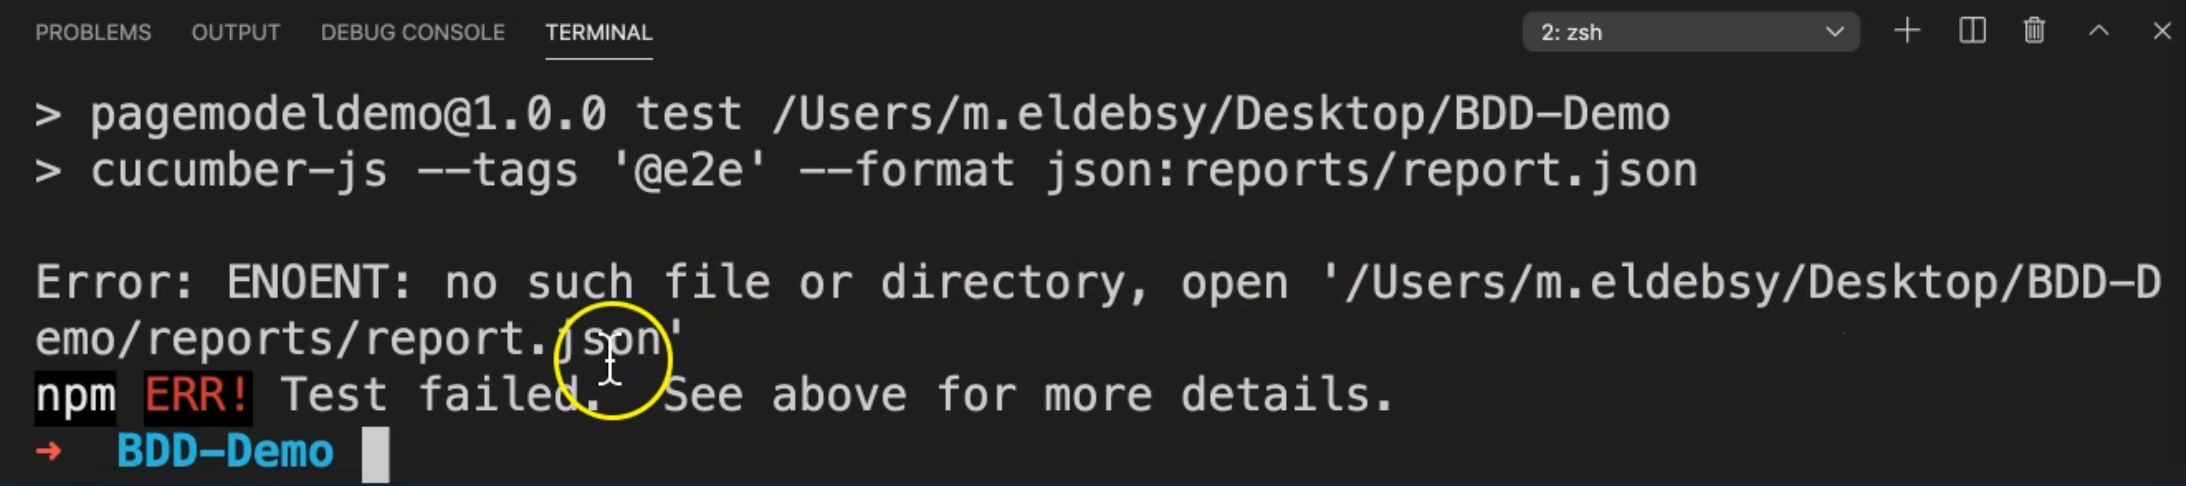
So let's run our test and check what the test result file is.
Let's run our tests with
npm test
because npm test is already including the cucumber-js --tags '@e2e' --format json:reports/report.json, and then it checks the result.
We have one problem - we don't have a directory with reports, and we don't have a file report.json.
We can just create one directory here with an empty file.
We can have the reports folder and inside reports we can create one file report.json because we will write inside this file.
Let's run our test again, and we are now running our test.
After that, we can check the test results, or we can check reports.json with the data included in this file.
Our test is finished now and we have one test case passed.
In the report.json, we have data for our test and we have now created one JSON file with the test result.
We still have one step to generate an HTML report from this JSON file.
After that, from the command line, we can run this command
node report-generator.js
We can run node and we can pass the file for generating the HTML.
Here we have the Cucumberjs report inside our project.
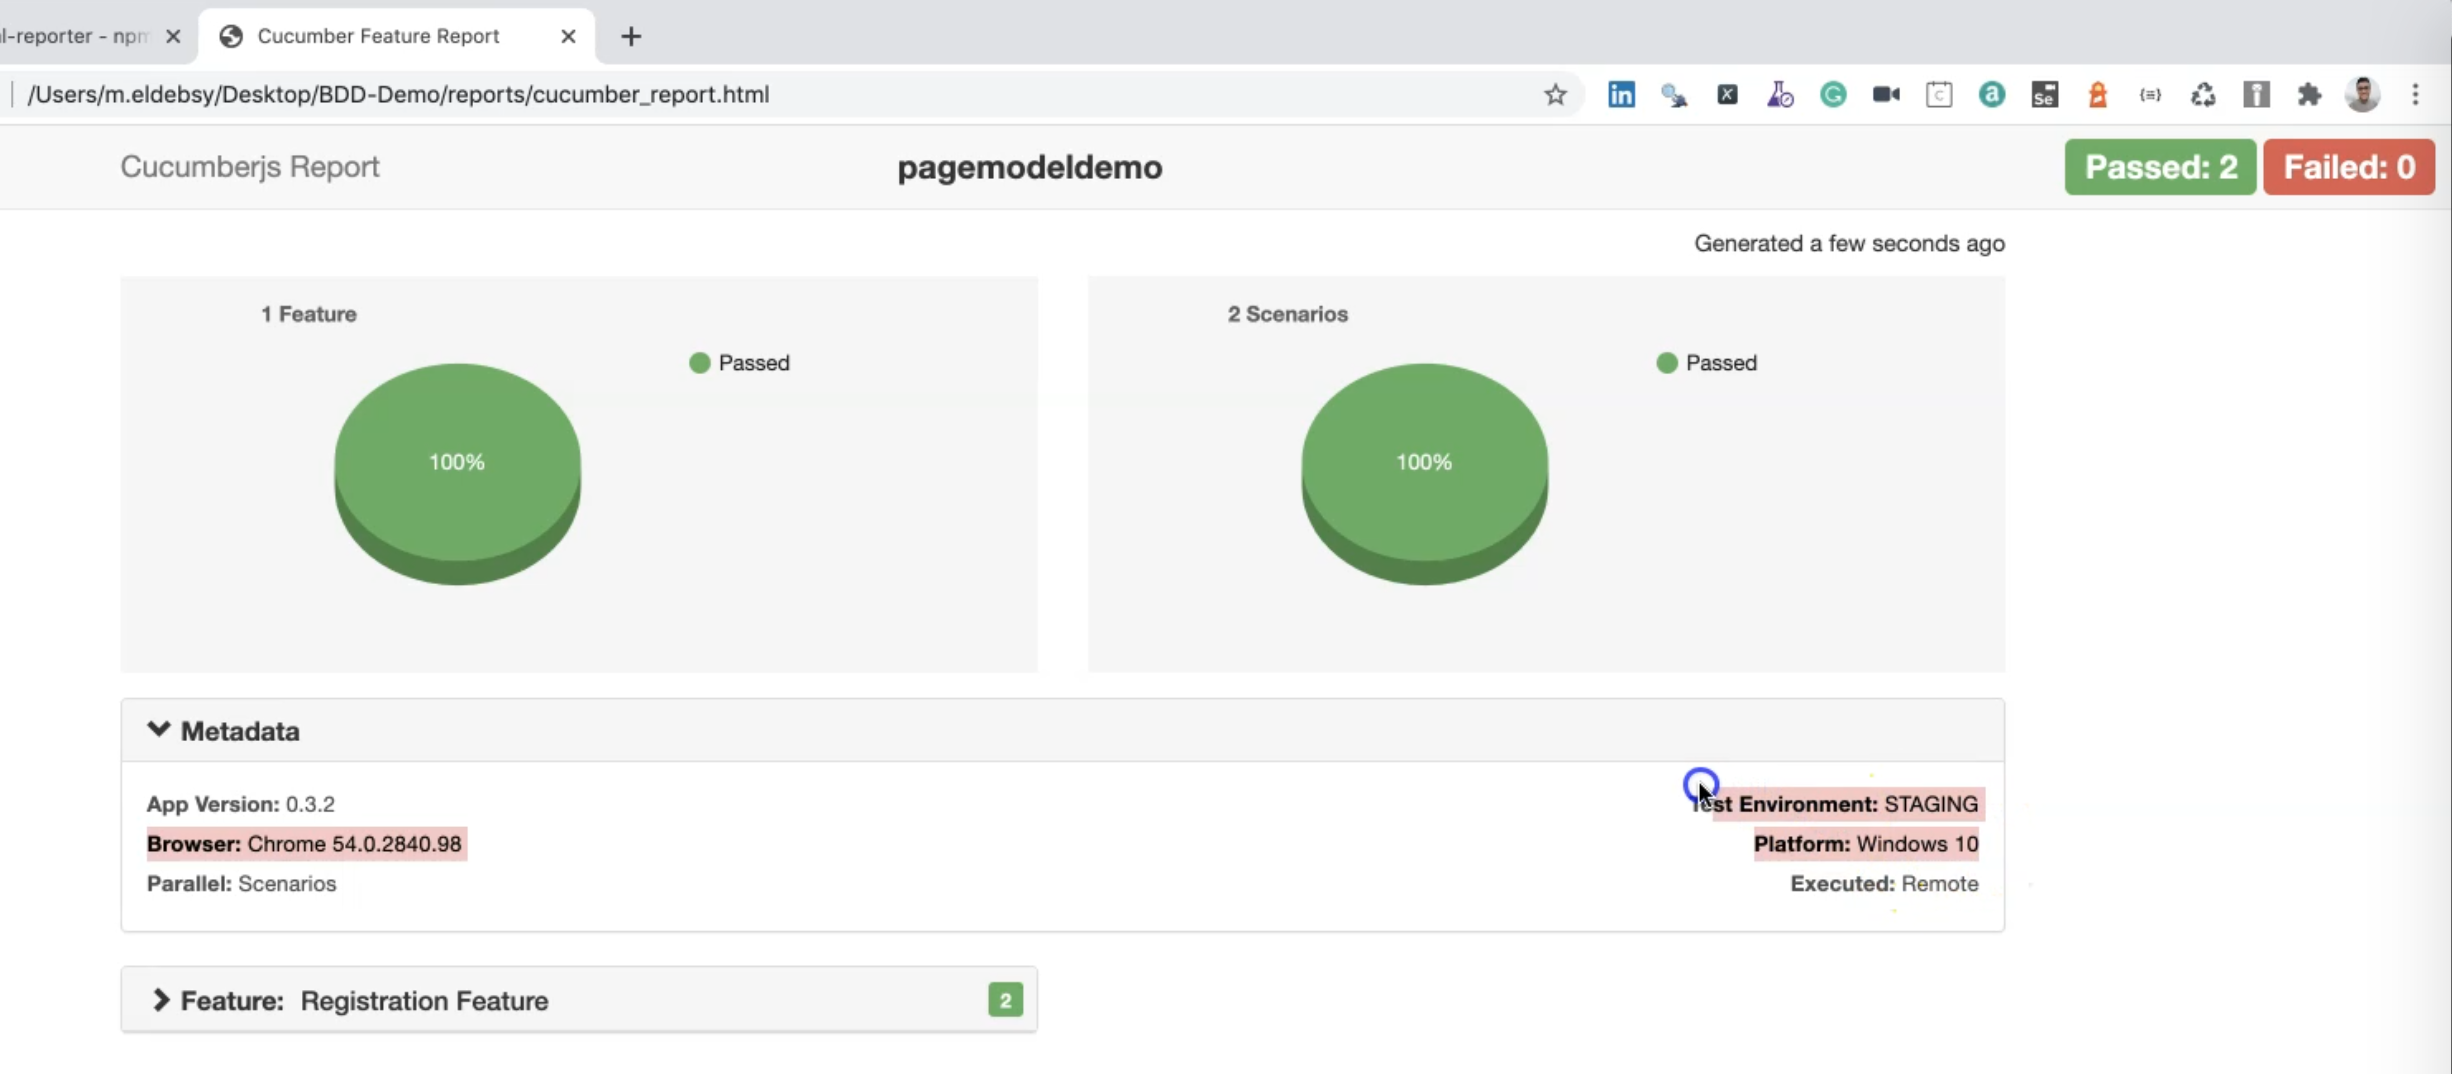
We have two passed test cases.
Here we have metadata - app version, the data that is included in the generator file - we can change it or we can get it from the test metadata from the test cases.
Then, we have the Registration Feature.
We have two scenarios because we are using a data-driven.
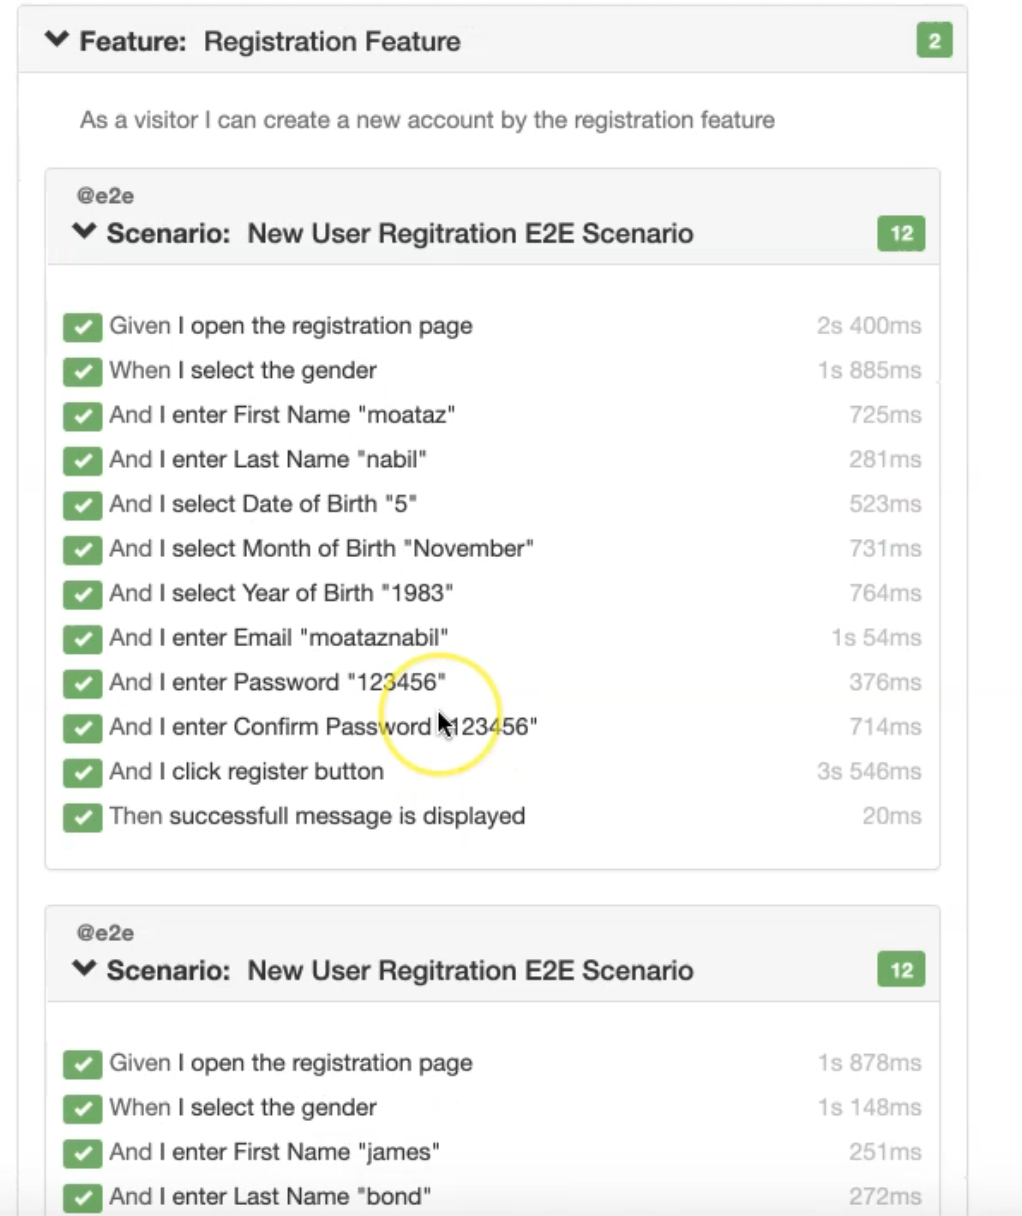
The first data was Moataz Nabil, for first and last name and all the data. And the second one for James Bond and the data also.
Let's make one test fail and after that, we can check, or for sure we can do both failing because we are using the same feature, with step definition.
And we can check the result with the failed test cases.
We can change anything in the step definition.
For example, in the page object RegisterPage.js, we can just change one locator.
We'll change the password from #Password to #Passwordssss to make it fail.
After that, we can run our test again and check the results.
So this one should fail and we'll have it in the feature file or step definition, and we will check the report after that.
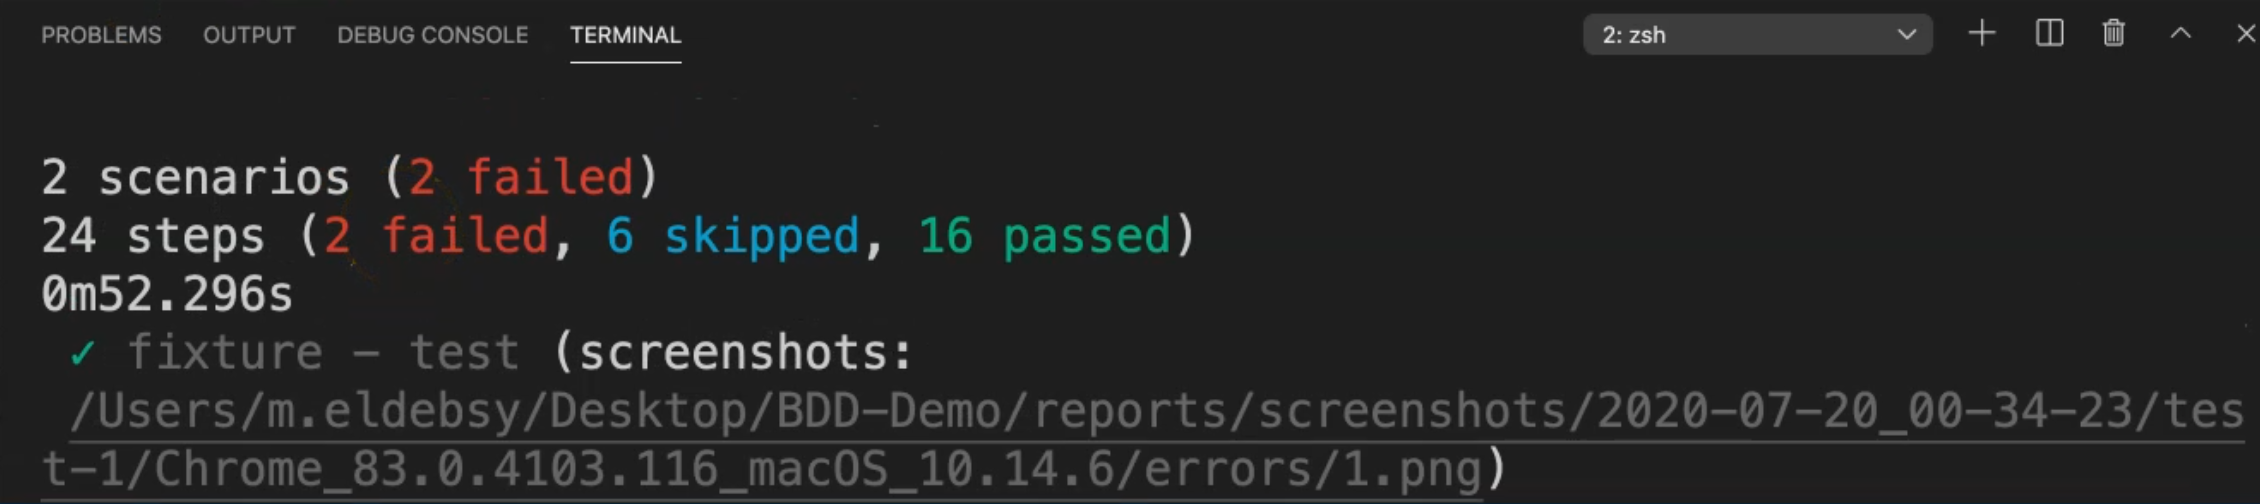
Now we are running our test and we will wait until the test is finished and we will check the test result.
Our test failed and the test didn't find the password.
So we will open again, the second iteration, because we have data-driven - or we have data tables inside our feature.
Also, this one will fail because we changed the locator for the password.
So we entered the email. We are waiting for the element to be displayed in the domain, but we don't have this element and then our test will fail.
Now we have an error, that our test failed.
So we have two failed test cases.
Also, we have a screenshot inside this one and because we have a problem with the screenshot.

Let's run our test and we will check the report.json.
So let's run again, node report-generator.js.
We have two failures because we changed the same scenario.
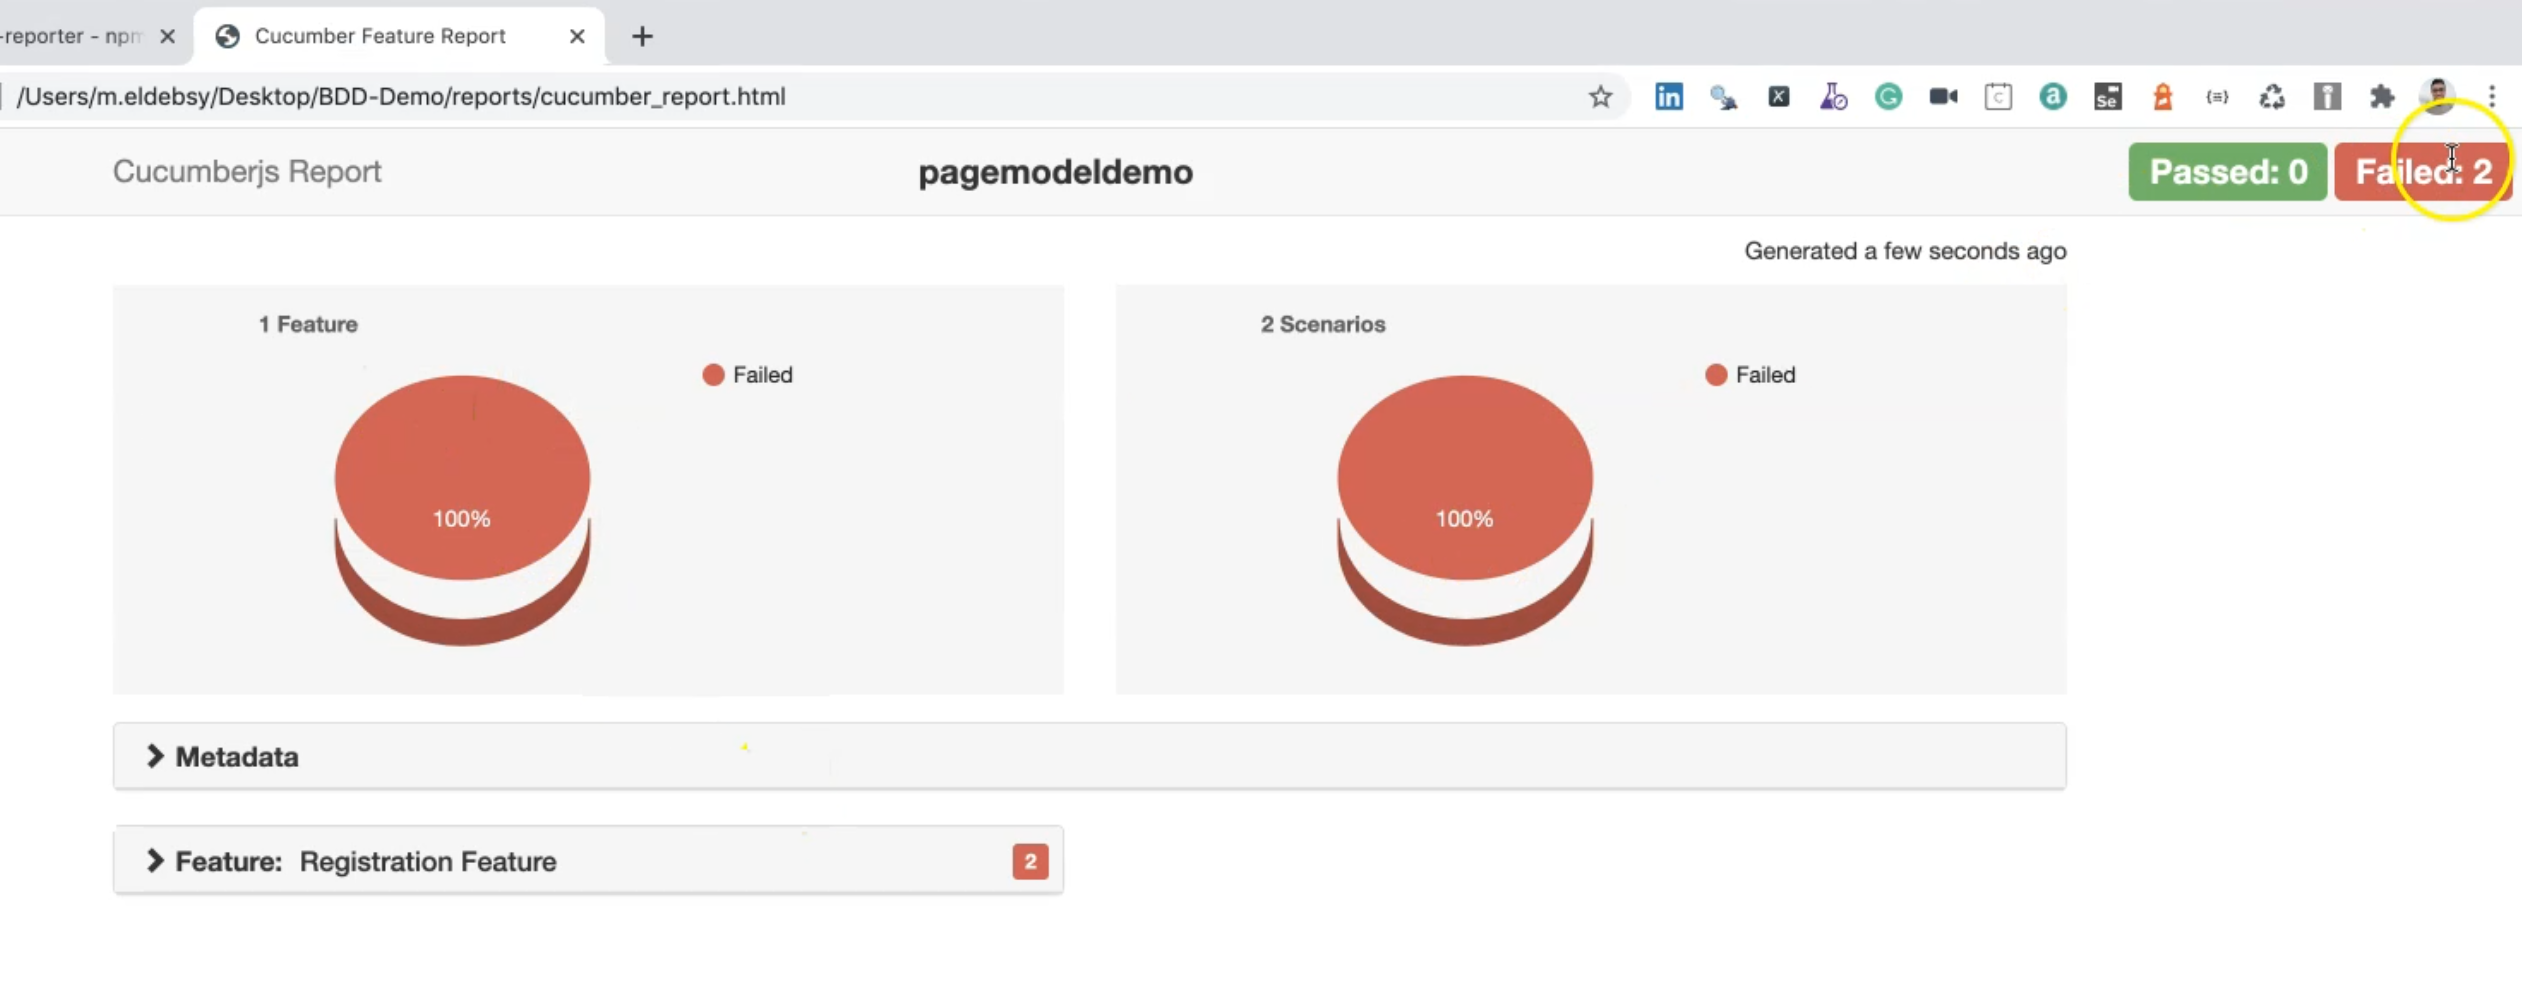
So with the second one, or with the first one, we have eight steps passed, because we are marking every step as passed until we get to the password here.
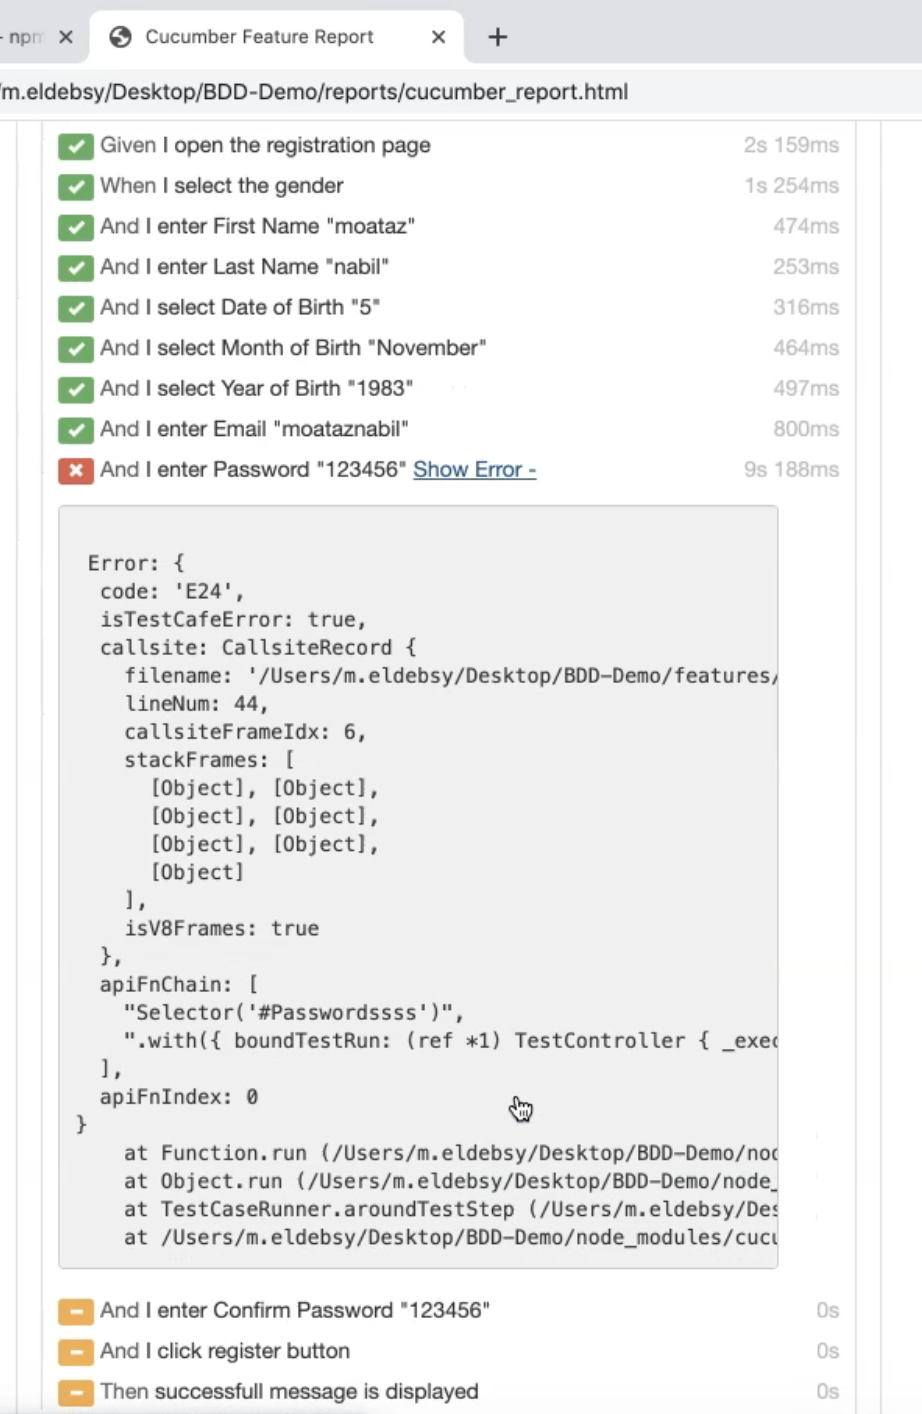
We can open the error and here we can find that there is an error in this element - our password Selector.
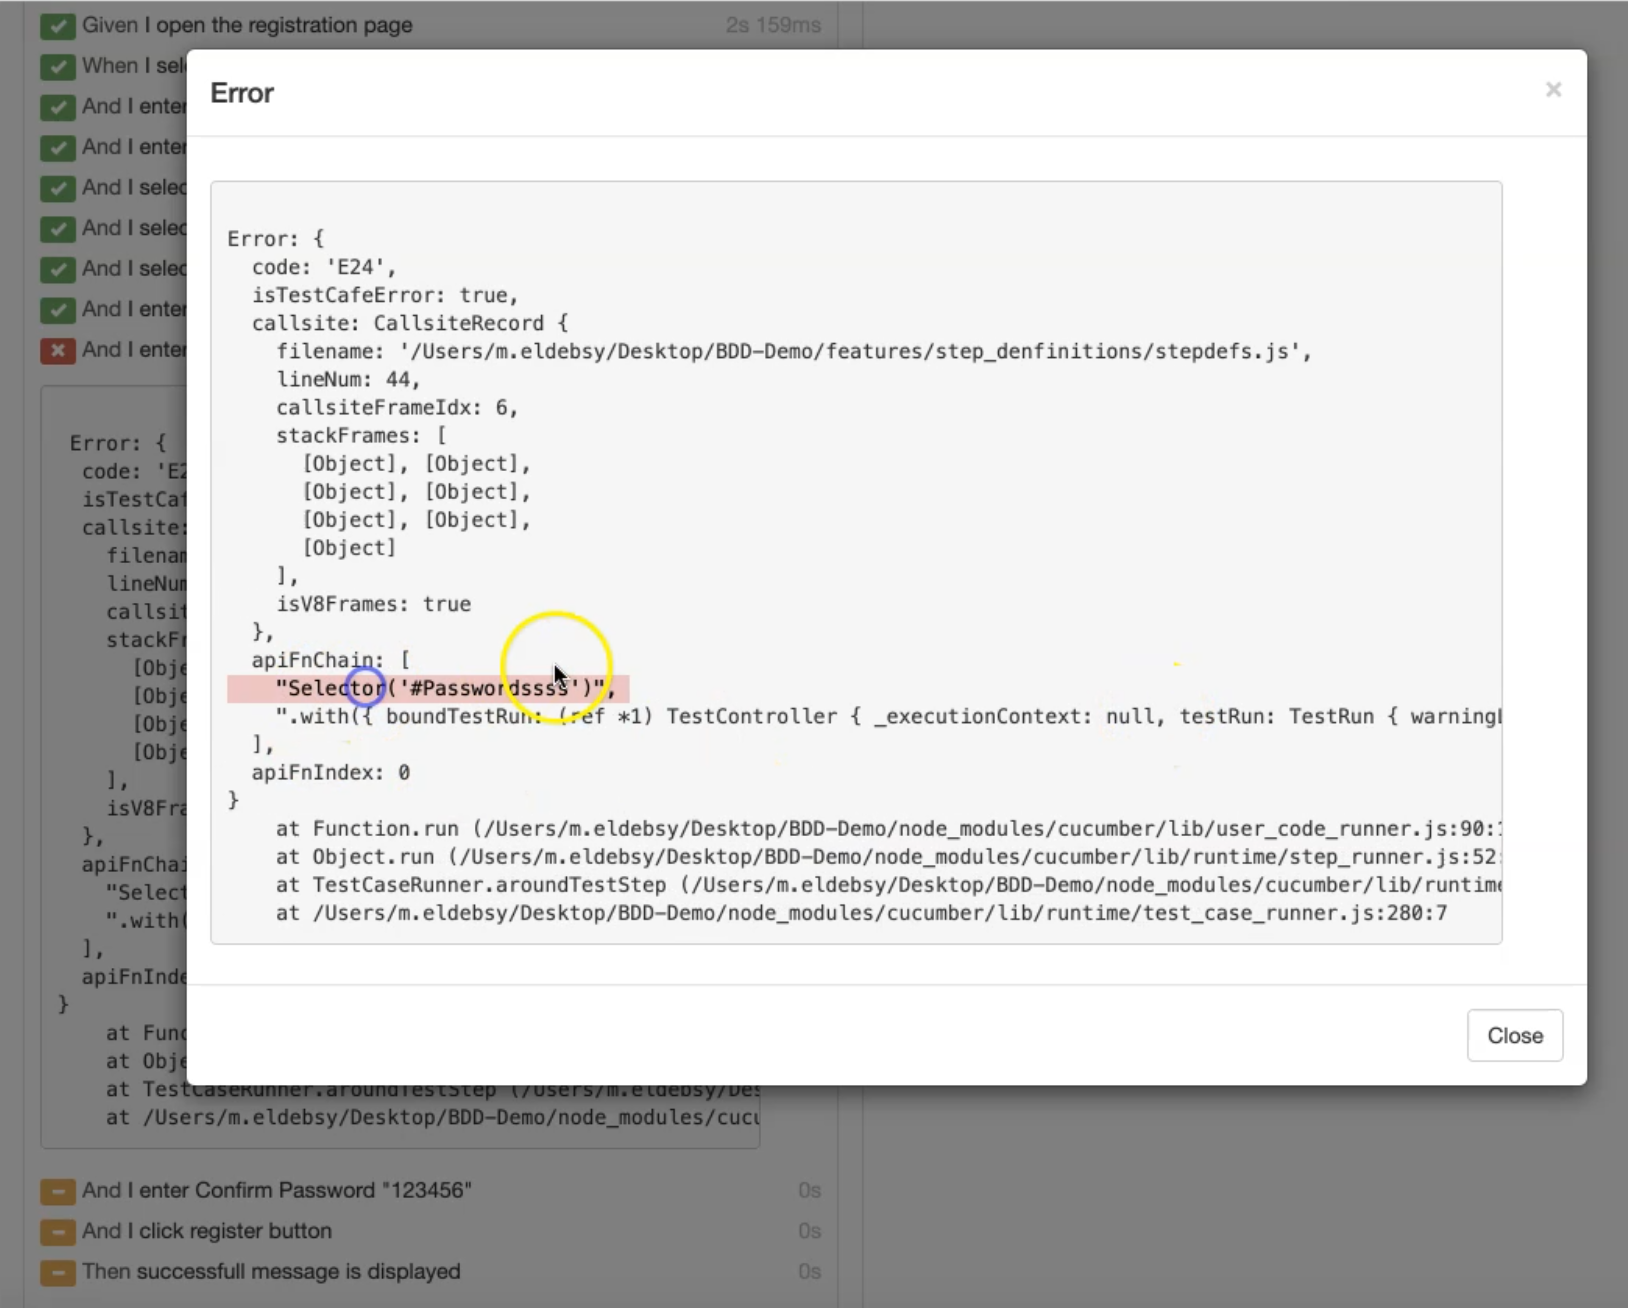
There is nothing with this selector.
The last 3 steps are skipped so that we didn't run it.
With the second scenario, it will be the same because it's the same scenario or the same feature.
