

Transcripted Summary
# Data-Driven Tests with TestCafe
In this chapter, we will be talking about data-driven tests with TestCafe.
What we will cover during this chapter:
Introduction to data-driven tests
How to add the test data in a JSON file
How to parametrize actions and run this test against the data objects
Data-Driven Tests is a procedure when you repeat the same scenario with different input parameters and then verify the result with the given output values.
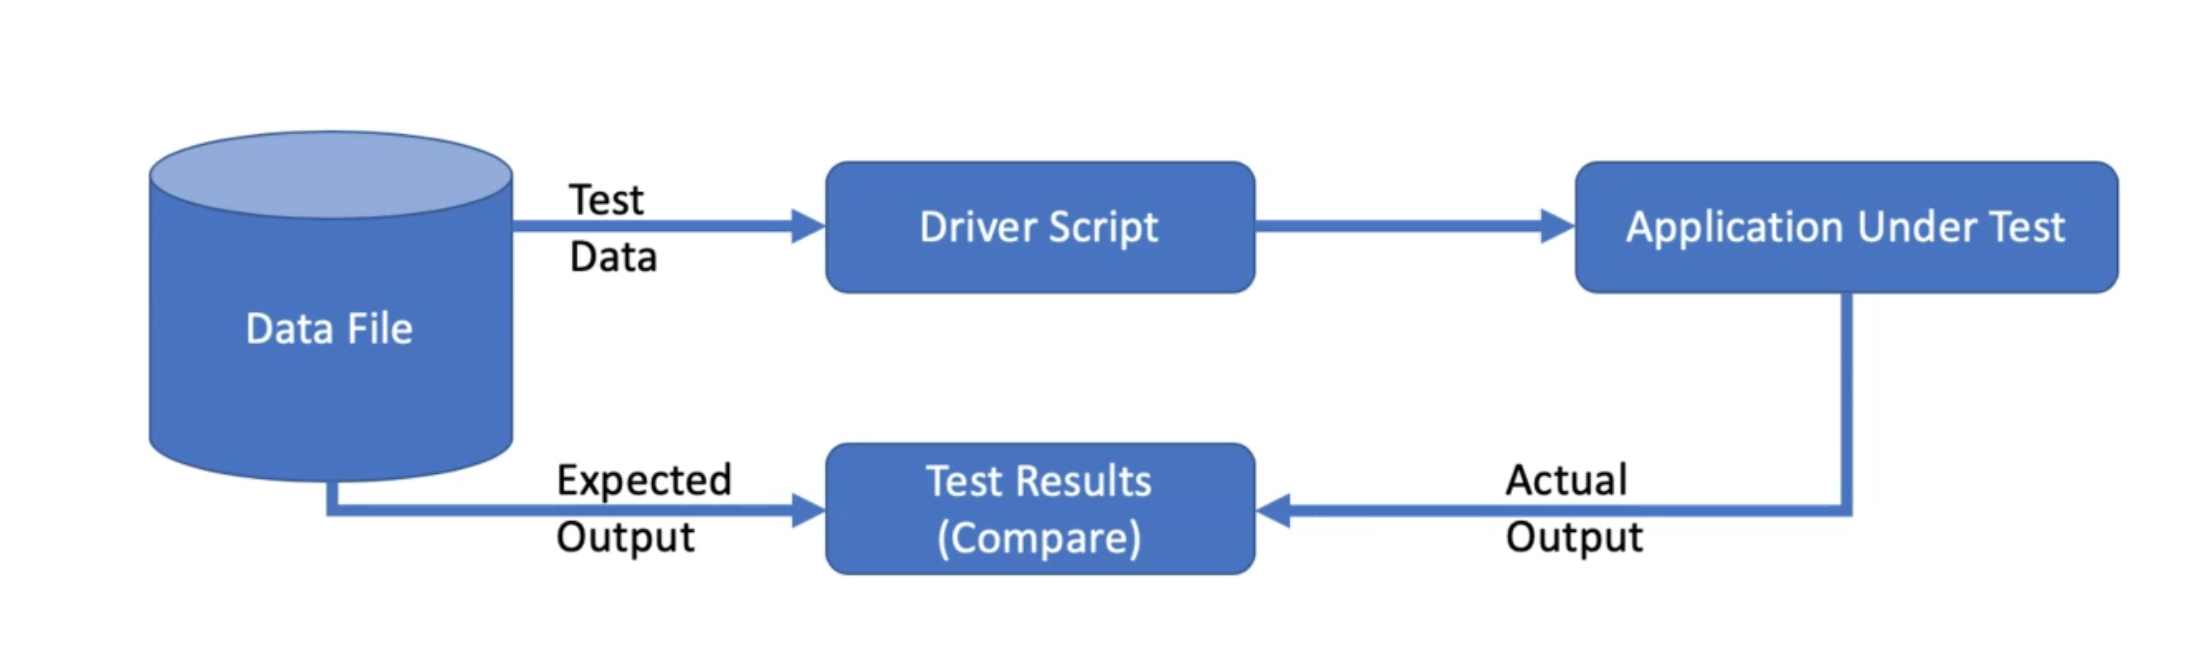
Test data is always an important part of automated tests.
Test data is not just the value or the text in the application, but it's about the whole environment that we are testing.
We usually use hard-coded data in the data that we are editing in our test script, like username password, or URL.
For example, if we have different testing environments with different URLs, we need to add these URLs in one file and read the correct data from the file.
But if we add it and decide in this case, it will be hardcoded, they can't be configurable.
Another example - if we have a registration form and they need to test this form for positive and negative scenarios, we need to prepare different sets of data for this case, to be able to provide the application behavior.
# Prepare the Test Data with JSON Demo
In this demo, we will prepare our test data using a JSON file to be able to use it with our data preferences.
We will continue with the existing project that we did with the page object, and we will select the registration test case for data-driven.
In the beginning, we will create a new folder in our project named data and inside this one, we will create a new file data.json.
After that, we will create a new array and a new object.
Also, we can add another object if you want to use different data.
[
    {
    },
    {
    }
]
Then if we open RegistrationTest.js, we can find that we have the user name, password, first name, last name, email, and so on.
So here we can just go to the data.json and add firstname and I can add my name, for example.
After that, we can fill the last name.
Then we will continue with the rest of that data.
Over here, I continued the data with the birthday, birthmonth, birthyear, email, and the password.
[
    {
        "firstname": "Moataz",
        "lastname": "Nabil",
        "birthday": "5",
        "birthmonth": "November",
        "birthyear": "1983",
        "email": "moataz_nabil",
        "password": "123456"
    },
    {
    }
]
For the second object, we can just copy and paste and change the names with different values just to check that the data is changing during our test.
[
    {
        "firstname": "Moataz",
        "lastname": "Nabil",
        "birthday": "5",
        "birthmonth": "November",
        "birthyear": "1983",
        "email": "moataz_nabil",
        "password": "123456"
    },
    {
        "firstname": "James",
        "lastname": "bond",
        "birthday": "2",
        "birthmonth": "July",
        "birthyear": "1981",
        "email": "james_bond",
        "password": "6789433"
    }
]
We can add more objects in the JSON array and change that data if we need it.
We finished the preparation of the data with the JSON file and after that, we can start using JSON objects in our test tickets.
After we created our data file using the JSON file with the data we need to use, now it's time to parameterize our actions or our test using data objects and JSON files instead of our hardcoded values.
If you open the RegistrationTest.js, we can go down to our test and find that we have the first name, last name, the day, month, year, email and the passwords are hardcoded values.
But we need to read from the JSON file and use data-driven testing.
So we will go to the beginning of the file and write const dataSet = require(), and after that, we need to pass the file.
We have a string value and we can select ../data/data.json.
Then we will go to our test and start using the data object from that JSON file.
So we will call dataSet.forEach() and after that for each data with the arrow function, we need to add our test.
Then, in the end, we need to close the data.
We are creating a data set for each and we put it our test inside this dataset.
That means that this test will go through the data set for each data.
Inside this data set, we will run it with our test, but we need to change also the hard-coded values.
For example, this string or hardcoded value 'Moataz', we can say data.firstname and we'll do for others.
Also data.lastname, data.birthday, data.birthmonth and data.birthyear.
The userEmail will be data.email plus the random number that we created, plus '@test.com'', for example.
Why are we doing that here?
Because for an email in the test data, we just add the first name and the last name.
After that, we need to append a random number and '@test.com'.
So because we are adding an email in the test data with this schema for first name and last name, then with our test, we can just add the random number after the email and after that, we can add the 'test.com'.
For password, we will continue and change it to data.password. For ConfirmPassword it is the same data.password because we are confirming the same password.
Also in the typeText for login, we are replacing the password and the email.
So we changed all the values to read from the JSON file.
After that, we save the changes and we can run our test.
import { ClientFunction } from 'testcafe';
import homepage from '../pages/HomePage';
import registerpage from '../pages/RegisterPage';
import loginpage from '../pages/LoginPage';
import customerpage from '../pages/CustomerPage';

const dataSet = require('../data/data.json');

const URL = 'https://demo.nopcommerce.com/';
const getURL = ClientFunction(() => window.location.href);
var randomNumber = Math.floor(Math.random() * 10000);

fixture`Registration Fixture`
    .page(URL);

test('Assert home page', async t => {
    await t
    .expect(getURL()).eql(URL)
    .takeScreenshot()
    .expect(homepage.subtitleHeader.exists).ok()
});

dataSet.forEach(data => {
 test('User Registration and Login Test',async t => {
  await t
     .click(homepage.RegisterLink)
     .expect(getURL()).contains('register')
     .click(registerpage.GenderOption)
     .typeText(registerpage.FirstName,data.firstname)
     .typeText(registerpage.LastName,data.lastname);
     await registerpage.selectDay(data.birthday);
     await registerpage.selectMonth(data.birthmonth);
     await registerpage.selectYear(data.birthyear);
     await t
     .typeText(registerpage.Email,data.email+randomNumber+'@test.com')
     .typeText(registerpage.Password,data.password)
     .typeText(registerpage.ConfirmPassword,data.password)
     .click(registerpage.RegisterButton)
     .expect(registerpage.SuccessfullMessage.exists).ok()
     .click(homepage.LogoutLink)
     .click(homepage.LoginLink)
     .expect(loginpage.accountHeader.exists).ok()
     .typeText(loginpage.emailInput,data.email+randomNumber+'@test.com')
     .typeText(loginpage.passwordInput,data.password)
     .click(loginpage.submitButton)
     .click(homepage.MyAccountLink)
     .expect(customerpage.ordersLink.exists).ok()
     .click(customerpage.ordersLink)
     .expect(customerpage.noOrdersLabel.exists).ok();
    });
});
From the terminal or the command line, we will run our command.
testcafe chrome tests/RegistrationTest.js`
We will initialize and execute our test now with Google Chrome and check if we have any problems with data-driven or with the JSON file or anything in the documentation, so we can solve it if we have any problems.
So we open the URL, click on the Register link, and here we have a problem because we didn't fill in the email and password.
Here we have our ReferenceError because password is not defined.
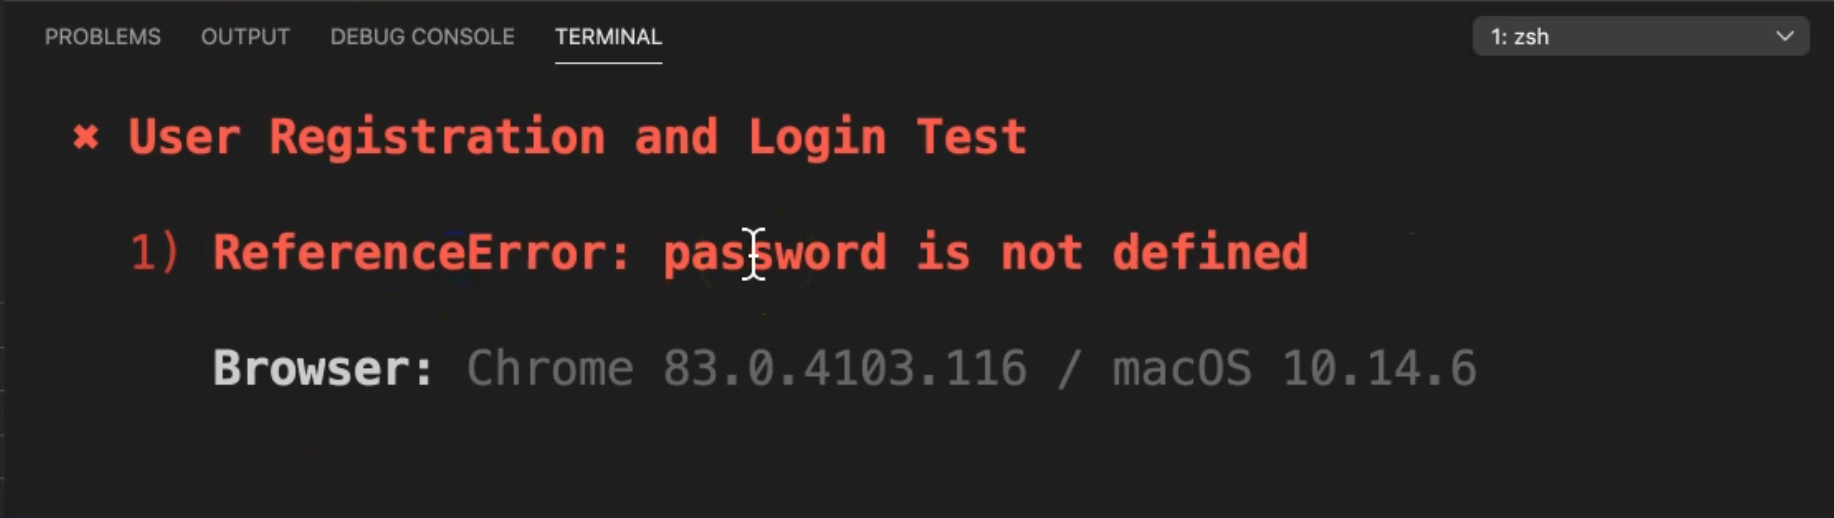
Let's go to our test and check what happened.
Here we have two passwords.
So let's start with this password - here we have data.password with a confirmation data.password also, and after, that was the email for the login app.
Here we have password without data so we need to add data to password to enter the password in the password login.
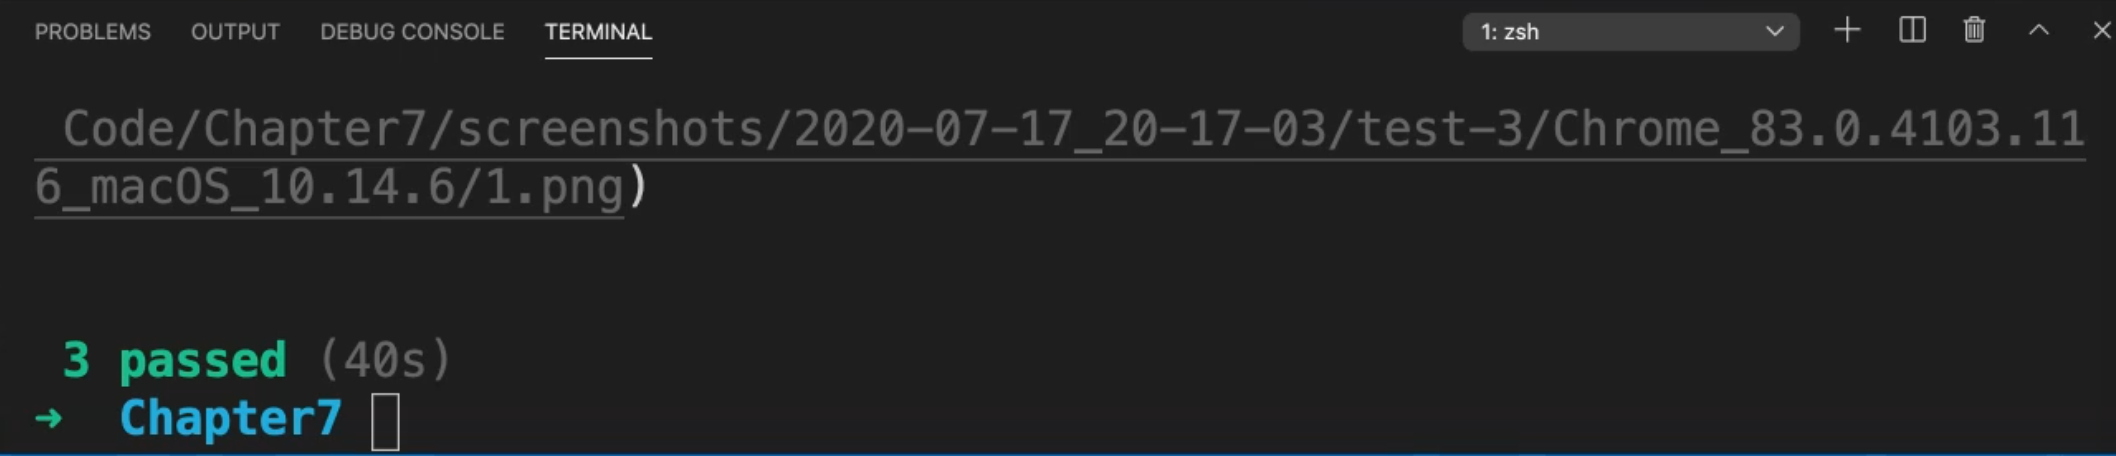
Let's run it again and check and see if that change will make the test pass or not.
Now we are clicking on the Register and here, this is the email with the random number and the domain.
We will log out and try to login with the account that we created.
So we logged in successfully.
We'll open the order and after that, we will run the same test with the second data or second JSON object.
It's running successfully also, and we will log in with it, with "james_bond" and a random number.
Also, we will open the orders and our test is passed now without any problems.
So, with data-driven, we didn't add anything.
We just created a JSON file and in our system, we just added or created a forEach and this data automatically went to the JSON file and tried to get all the data from the JSON file and run our test normally without any problems.
