

Transcripted Summary
With a Custom TestController and Hooks, we have two things.
We have support for the BDD files and we have the custom test controller and custom hooks.
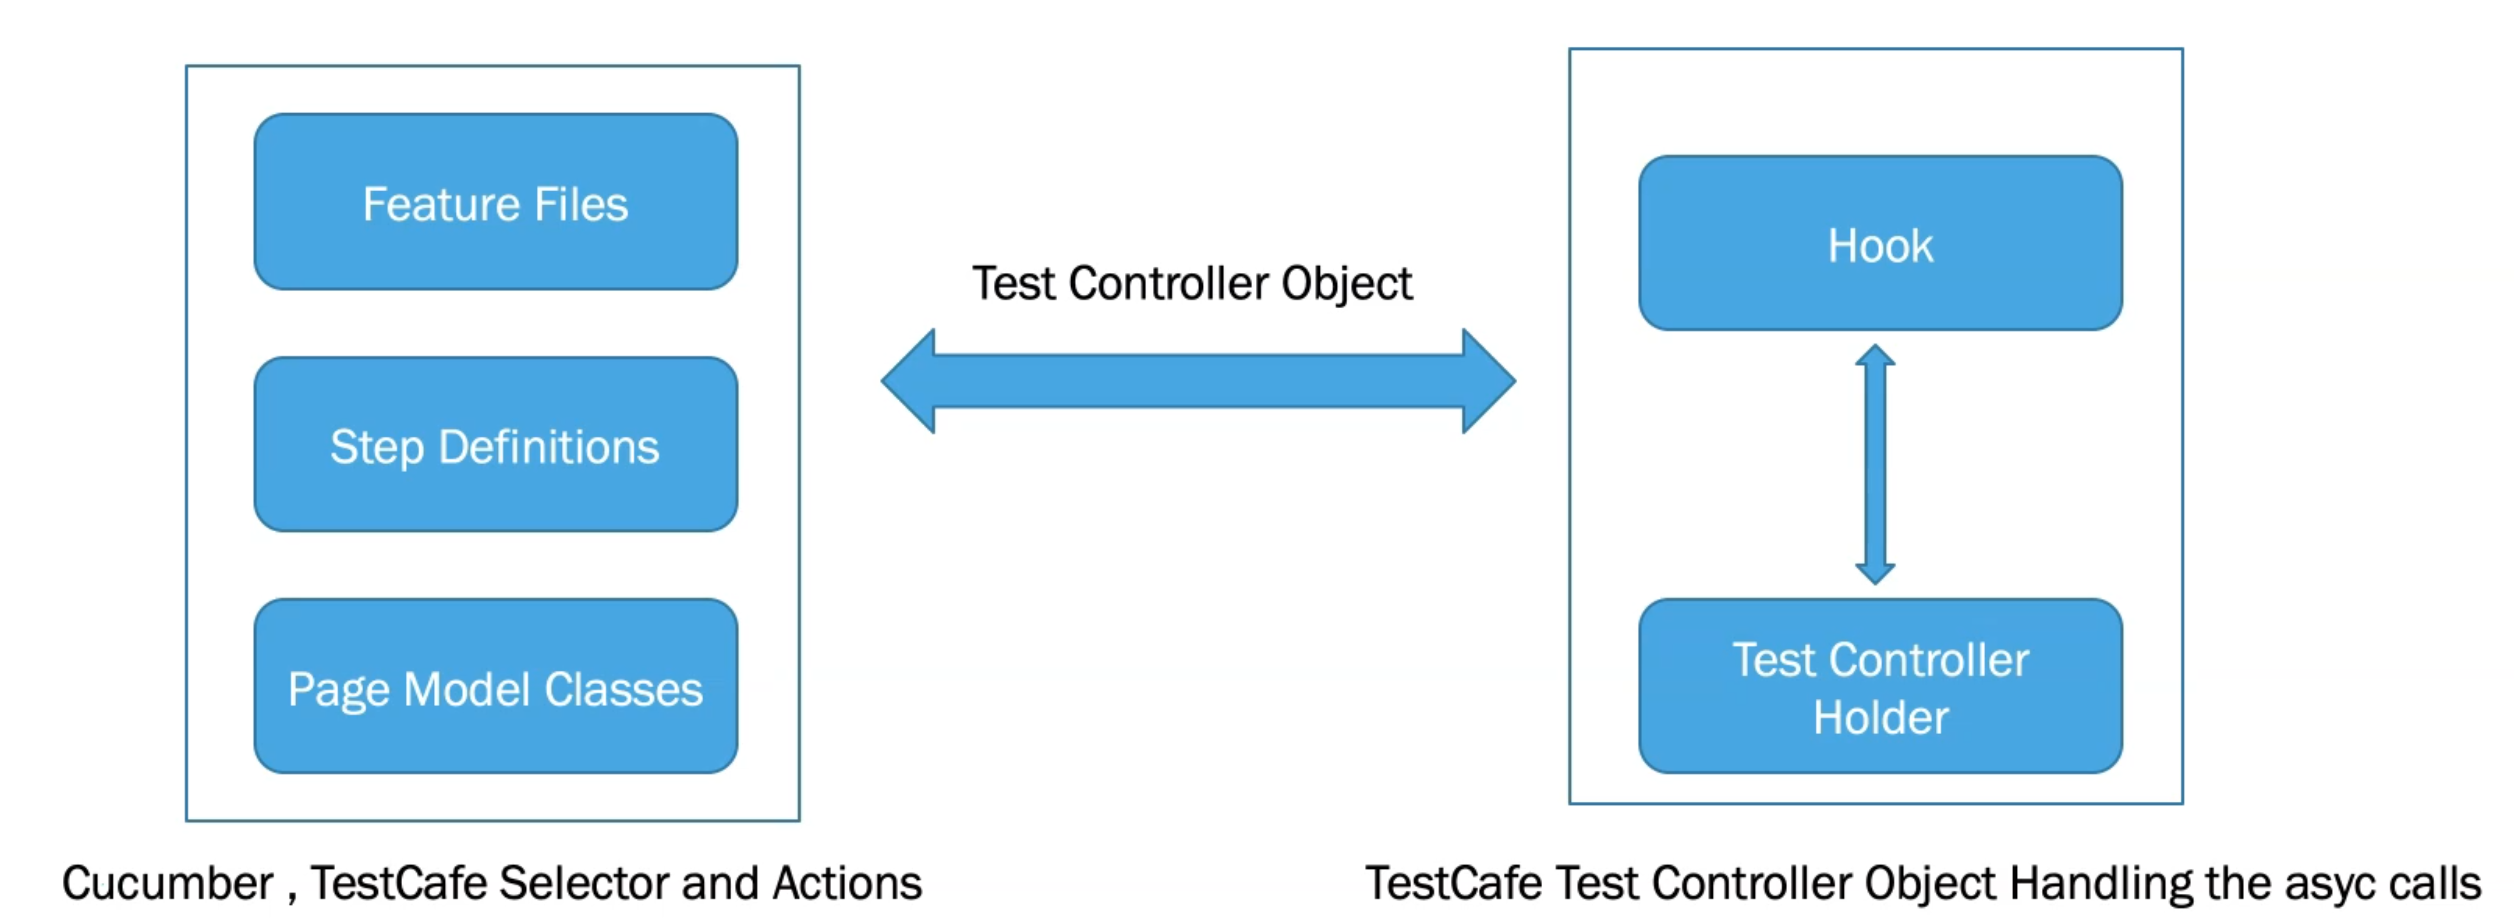
On the left side, we have the Feature Files, where the user can write test scenarios in plain language using Gherkin keywords.
Then, the Step Definitions methods can be generated for each test step in the feature file scenarios and updated with TestCafe actions to automate the application.
With the step definitions, we are using the page objects, which can define the selectors in the page object files.
This, as we know, improves readability and it's one of the most popular design patterns in test automation.
On the right side, we have a TestCafe Test Controller Object, that handles the asynchronous calls.
The main objective for this is to inject the test controller object into the context of each Cucumber step definition method.
So here we have a custom solution for this problem - by using a Test Controller Holder Cucumber file and hooks.
Part of the Cucumber JavaScript custom hooks and controller that is an isolated context for each cucumber scenario is exposed to Hooks and the steps.
Then hooks create a dummy test file.
This test file captures the Test Controller Object and passes it back to the Test Controller Holder.
It waits for setting up the Test Controller Object asynchronously and then adds the object to the cucumber scope with the help of the Test Controller Holder.
Finally, the Test Controller Holder holds the object until the Cucumber script execution finishes and then the object is free.
# TestController and Hook Demo
In this demo, we will check the TestController and the Hooks filed under the support directory that helps us to run scenarios and step definitions using Cucumber and BDD with TestCafe.
After we finished the step definition, implemented our page object with step definitions, refactored our pages to be able to use it with the step definitions, and finished our registration feature, now it's time to get a look at the support files that we have, or the custom hooks and Test Controller Holder.
Here, we have one test class errorHandling.js using JavaScript with error handling.
const testcafe = require('testcafe');
const hooks = require('../support/hooks');

exports.addErrorToController = function() {
    testController.executionChain
        .catch(function(result) {
            const errAdapter = new testcafe.embeddingUtils.TestRunErrorFormattableAdapter(result, {
                testRunPhase: testController.testRun.phase,
                userAgent: testController.testRun.browserConnection.browserInfo.userAgent,
            });
            return testController.testRun.errs.push(errAdapter);
        });
};

exports.ifErrorTakeScreenshot = function(resolvedTestController) {

    if (hooks.getIsTestCafeError() === true && testController.testRun.opts.takeScreenshotsOnFails === true) {
        if (process.argv.includes('--format') || process.argv.includes('-f') || process.argv.includes('--format-options')) {
            resolvedTestController.executionChain._state = "fulfilled"
            return resolvedTestController.takeScreenshot().then(function(path) {
                return hooks.getAttachScreenshotToReport(path);
            });
        } else {
            return resolvedTestController.takeScreenshot();
        }
    }
};
This is using TestCafe and support hooks and this is the testController for test execution or for the execution of the chain.
We have here that if there is an error to take a screenshot and put it in the root folder.
After that, with hook.js, here we haveTestCafe and we are also using Test Controller Holder and here also, this is something like TestCafe running or writing in the file.
const fs = require('fs');
const createTestCafe = require('testcafe');
const testControllerHolder = require('../support/testControllerHolder');
const {AfterAll, setDefaultTimeout, Before, After, Status} = require('cucumber');
const errorHandling = require('../support/errorHandling');
const TIMEOUT = 20000;

let isTestCafeError = false;
let attachScreenshotToReport = null;
let cafeRunner = null;
let n = 0;

function createTestFile() {
    fs.writeFileSync('test.js',
        'import errorHandling from "./features/support/errorHandling.js";\n' +
        'import testControllerHolder from "./features/support/testControllerHolder.js";\n\n' +

        'fixture("fixture")\n' +

        'test\n' +
        '("test", testControllerHolder.capture)')
}

function runTest(iteration, browser) {
    createTestCafe('localhost', 1338 + iteration, 1339 + iteration)
        .then(function(tc) {
            cafeRunner = tc;
            const runner = tc.createRunner();
            return runner
                .src('./test.js')
                .screenshots('reports/screenshots/', true)
                .browsers(browser)
                .run()
                .catch(function(error) {
                    console.error(error);
                });
        })
        .then(function(report) {
        });
}


setDefaultTimeout(TIMEOUT);

Before(function() {
    runTest(n, this.setBrowser());
    createTestFile();
    n += 2;
    return this.waitForTestController.then(function(testController) {
        return testController.maximizeWindow();
    });
});

After(function() {
    fs.unlinkSync('test.js');
    testControllerHolder.free();
});

After(async function(testCase) {
    const world = this;
    if (testCase.result.status === Status.FAILED) {
        isTestCafeError = true;
        attachScreenshotToReport = world.attachScreenshotToReport;
        errorHandling.addErrorToController();
        await errorHandling.ifErrorTakeScreenshot(testController)
    }
});

AfterAll(function() {
    let intervalId = null;

    function waitForTestCafe() {
        intervalId = setInterval(checkLastResponse, 500);
    }

    function checkLastResponse() {
        if (testController.testRun.lastDriverStatusResponse === 'test-done-confirmation') {
            cafeRunner.close();
            process.exit();
            clearInterval(intervalId);
        }
    }

    waitForTestCafe();
});

const getIsTestCafeError = function() {
    return isTestCafeError;
};

const getAttachScreenshotToReport = function(path) {
    return attachScreenshotToReport(path);
};

exports.getIsTestCafeError = getIsTestCafeError;
exports.getAttachScreenshotToReport = getAttachScreenshotToReport;
So we are creating one test.js to collect the fixtures and the test and start using a feature file and the step definitions together and run it together.
Here we have runTest and in it, we have createTestCafe runner with a local host and specific port.
Then with runTest, we can create the runner and pass the source of the test we are creating, save the screenshot, and the browsers and everything.
So here we have the testControllerHolder.js.
const testControllerHolder = {

    testController: null,
    captureResolver: null,
    getResolver: null,

    capture: function(t) {
        testControllerHolder.testController = t;

        if (testControllerHolder.getResolver) {
            testControllerHolder.getResolver(t);
        }

        return new Promise(function(resolve) {
            testControllerHolder.captureResolver = resolve;
        });
    },

    free: function() {
        testControllerHolder.testController = null;

        if (testControllerHolder.captureResolver) {
            testControllerHolder.captureResolver();
        }
    },

    get: function() {
        return new Promise(function(resolve) {
            if (testControllerHolder.testController) {
                resolve(testControllerHolder.testController);
            } else {
               testControllerHolder.getResolver = resolve;
            }
        });
    },
};

module.exports = testControllerHolder;
This starts to link between our page object, our step definition, our feature and starts running our test cases using TestCafe.
This is used as a Test Controller Holder.
Here we have world.js.
const {setWorldConstructor} = require('cucumber');
const testControllerHolder = require('./testControllerHolder');
const base64Img = require('base64-img');

function CustomWorld({attach, parameters}) {

    this.waitForTestController = testControllerHolder.get()
        .then(function(tc) {
            return testController = tc;
        });

    this.attach = attach;

    this.setBrowser = function() {
        if (parameters.browser === undefined) {
            return 'chrome';
        } else {
            return parameters.browser;
        }
    };

    this.addScreenshotToReport = function() {
        if (process.argv.includes('--format') || process.argv.includes('-f') || process.argv.includes('--format-options')) {
            testController.takeScreenshot()
                .then(function(screenshotPath) {
                    const imgInBase64 = base64Img.base64Sync(screenshotPath);
                    const imageConvertForCuc = imgInBase64.substring(imgInBase64.indexOf(',') + 1);
                    return attach(imageConvertForCuc, 'image/png');
                })
                .catch(function(error) {
                    console.warn('The screenshot was not attached to the report');
                });
        } else {
            return new Promise((resolve) => {
                resolve(null);
            });
        }
    };

    this.attachScreenshotToReport = function(pathToScreenshot) {
        const imgInBase64 = base64Img.base64Sync(pathToScreenshot);
        const imageConvertForCuc = imgInBase64.substring(imgInBase64.indexOf(',') + 1);
        return attach(imageConvertForCuc, 'image/png');
    };
}

setWorldConstructor(CustomWorld);
This is also for setting the browser name - for example - returning chrome if we don't have any browser. After that, adding a screenshot to reports, and then attaching a screenshot to the reports and adding different things or different custom functions that are related to our test runner.
So this is our custom support and you can find it in cucumber JS as documentation and also in the references - you can find more details about this folder and how it works.
We discussed, or we mentioned, in our slideshow they work.
Now it's time to run our tests using a step definition and feature file and support files and to check the test result.
So now let's run our test using cucumber JS and check what happened during our test and if we have any problem, we can solve it or we can fix it.
So here we can run it with cucumber JS:
./node_modules/.bin/cucumber-js
Then we will start running our step definition with a feature file.
Here we are using the custom port that we are using in the hooks and we are using the custom controller.
Now we are maximizing the screen, we are redirected to the registration page and we fill in the data and here we have the data, or the data is repeated because we have a problem that here we are using that same data every time.
So what if we need to use different data with our feature file?
# We can use the Examples data table.
In registration.feature, we can just change Scenario to be Scenario Outline.
After our feature, we can add Examples and those examples will give us a header and the value, and we can replace it with our custom data.
Examples:
    | Header 1 | Header 2 | Header 3 |
    | Value 1 | Value 2  | Value 3 |
We have already data and we can remove these values and put in our data.
Examples:
| firstname | lastname | email | password | day | month | year|
| moataz  | nabil  | moataznabil |123456| 5 | November |1983|
| james | bond | jamesbond | 789443 | 6 | July | 1970 |
So here we have a first name, last name, email, password, day, month,h year, and here we have a value for different applications or different users.
Then, we need to change the hardcoded values inside our feature to be parameterized.
So for example, here we can just create the <firstname> taking the header of the examples, and we can pass <lastname>, <email>, <password> to be parameters, and so on.
Feature: Registration Feature

    As a visitor I can create a new account by the registration feature

@e2e
Scenario Outline: New User Registration E2E Scenario
Given I open the registration page
When I select the gender
And I enter First Name "<firstname>"
And I enter Last Name "<lastname>"
And I select Date of Birth "<day>"
And I select Month of Birth "<month>"
And I select Year of Birth "<year>"
And I enter Email "<email>"
And I enter Password "<password>"
And I enter Confirm Password "<password>"
And I click register button
Then successful message is displayed
Examples:
| firstname | lastname | email | password | day | month | year|
| moataz  | nabil  | moatazddd@test.com |123456| 5 | November |1983|
| james | bond | jamessss@test.com | 789443 | 6 | July | 1970 |
So, we replaced the hardcoded values with the example or the data table.
After that, we can start running our test.
For email, we need to change the value or add the random number that we used before in the previous demos, to be able to use different data every time, but it's based on whether the data-driven with a feature file is working fine.
We can run cucumber JS again, and start running our test.
The browser is opening with our custom port and with the TestCafe server, and then we are redirected to the registration page.
Here, we will notice that we have the first data entered.
We click Register and then we will open the browser again and run the test with the second data set.
We are running the server again with the second port, and then we are redirecting to the register page, add the other data in our data table, and then click Register again.
# The last thing we can add with BDD is tags
For example, we can add @e2e - this is an end to end scenario - and with cucumber JS we can pass the value with this tag.
Let's run our command with the tag:
./node_modules/.bin/cucumber-js --tags "@e2e"
If we have different Scenarios in our feature file and only specify this one with the @e2e tag, it will run this scenario only.
So let's run it again and then check that it will run for sure.
We don't have any different Scenarios but we can run a smoke test with the tag and just check that the tag is working fine.
Here we are running the test, but we will face a problem that the data or the user already exists. So our test will fail.
This will run again for the second data.
So we just need to change the data, or we need to copy this Scenario and add another tag, and then we can run it and it will run only the @e2e Scenario.
Resources
Quiz
The quiz for this chapter can be found in 9.7
